I’m usually a crunchy-fried-shrimp kind of guy. You know, a bit of flour, a bit of cornmeal. These batter-fried shrimp are a bit different, yet still crunchy. The batter is much like you would find on, say, fried cod for a fish sandwich or a basket of fish and chips. Because I have an unnatural addiction to fish and chips, it’s not surprising that I’m now addicted to these shrimp. The batter stuck perfectly, the shrimp cooked up beautifully golden brown delicious, and all was right in the world again. And I ate more than I should!
The batter makes the shrimp look a lot bigger than they are. Even though it’s thick, it’s not ‘ewwwy’ thick at all. It’s light and crispy, just like I like. I’d definitely use this same batter on cod. Or chicken legs (who remembers peg legs from Long John Silver’s? They were my favorite!).
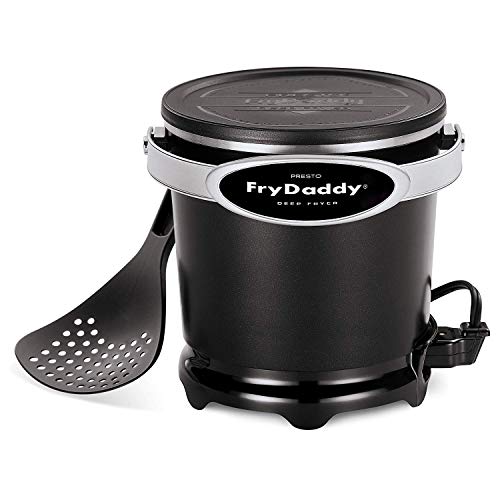
Since there’s just the two of us, I use a Fry Daddy fryer for these shrimp. It’s the perfect size for something like this.
Heat a few inches of oil to 350 F in a Dutch oven or a deep fryer.
Combine 1/2 cup of oil and the egg and beat well. Add remaining ingredients except oil for frying and stir until smooth.
Working in batches, dip shrimp in the batter and coat well.
Add shrimp to the fryer and fry for 1 minute. Turn and fry another 1 minute or until golden brown. Remove to a paper towel-lined plated or wire rack to drain.
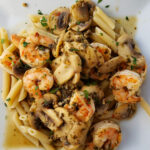
If you love pesto you’re really going to love these pesto shrimp with mushrooms. There’s no skimping on the wonderful basil flavors here. Perfectly cooked shrimp, sautéed mushrooms and a hint of garlic all served over pasta (or rice, your call!) make for a great dish indeed. This was a departure for us from our usually creamy, or fried or grilled shrimp dishes. I am not always keen on pesto, but this helped make a believer out of me.
I wouldn’t hesitate to use a bit more red pepper flake the next time I make this pesto shrimp with mushrooms dish. And I’d probably add more garlic too. But keep in mind, I’m a little shy when it comes to pesto. You might actually want to just add more pesto and ignore my ideas. It’s not always a bad idea to ignore my suggestions! Just ask my wife!
I like to use my good ole trusty Dutch oven to make these shrimp and pretty much darned near anything like it on my stovetop. It’s nice and big and sturdy. That extra weight helps it maintain and distribute heat perfectly. As an added bonus, it’s actually pretty easy to clean up too!
1tablespoonfresh basilchopped, for garnish (optional)
ricecooked, for serving, if desired. Cooked pasta is great too.
Instructions
Heat 1 tablespoon of oil over medium-high heat in a large skillet.
Season the shrimp with 1/4 teaspoon of salt and all of the red pepper flake. Add to skillet and cook 3 minutes, flipping once, until pink and cooked. Remove to a plate.
Add remaining oil to the skillet. Add the mushrooms and season with remaining salt. Cook 2-3 minutes or until the mushrooms just start to soften.
Add the garlic, stir and cook another minute.
Stir in the shrimp, pesto and broth. Stir and heat thoroughly but not for very long as you don't want to overcook the shrimp.
Serve over rice or paste garnished with chopped fresh basil, if desired.
When we want a quick bite for lunch we grab a few Philly style Italian hoagies. They take no time at all to make and are absolutely packed with great flavor. And a bit of a kick. This is the perfect sandwich. Sometimes I stick to the ‘original’, using fine deli meats and fru-fru cheese. And sometimes I just grab whatever is in the meat drawer. The key to this hoagie is the dressing.
I often find myself making Philly style Italian hoagies for my wife’s lunch. It holds up well to bouncing around in a lunch cooler. To keep the bread from getting soggy I insulate the bread by making sure that the dressing and the spicy relish are in between the meat and cheese and not directly touching the bread itself. Boom, problem solved!
When we want a quick bite for lunch we grab a few Philly style Italian hoagies. They take no time at all to make and are absolutely packed with great flavor.
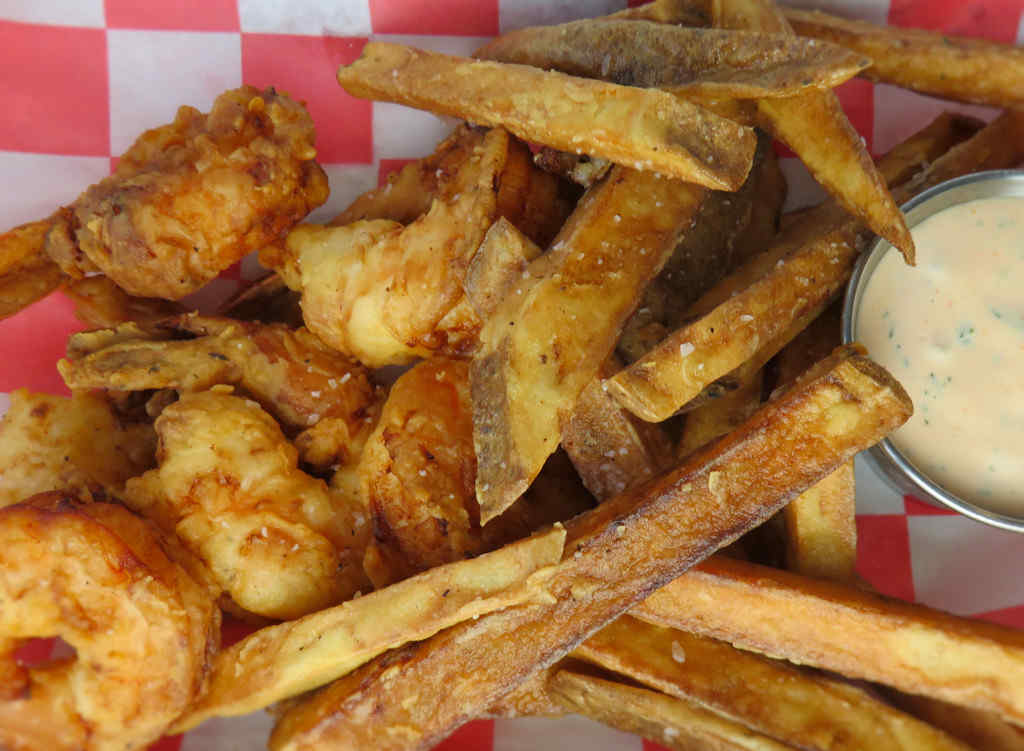
The flavor of the shrimp in this fried shrimp basket is absolutely fantastic. The Gullah seasoning originates from the islands off South Carolina and is inspired by Creole tastes. It’s what makes these shrimp soooo very good. I served them in a basket with some homemade fries. Food is always better when served in a basket. I learned that long ago and this fried shrimp basket is proof.
You’ll have plenty of leftover Gullah seasoning after making a fried shrimp basket. That’s a good thing. Save it for more shrimp or use it in any recipe that calls for Creole seasoning. It’s also great for sprinkling on the fries you’ll want to make with these shrimp. It’ll keep for a long time, just store it in an air-tight container until you are ready to use it.
Since it’s just the two of us, I like to use my Fry Daddy for frying these shrimp and well, anything fried! You can’t cook all of the shrimp for this recipe in one batch in the small fryer, but you can get them done in two.
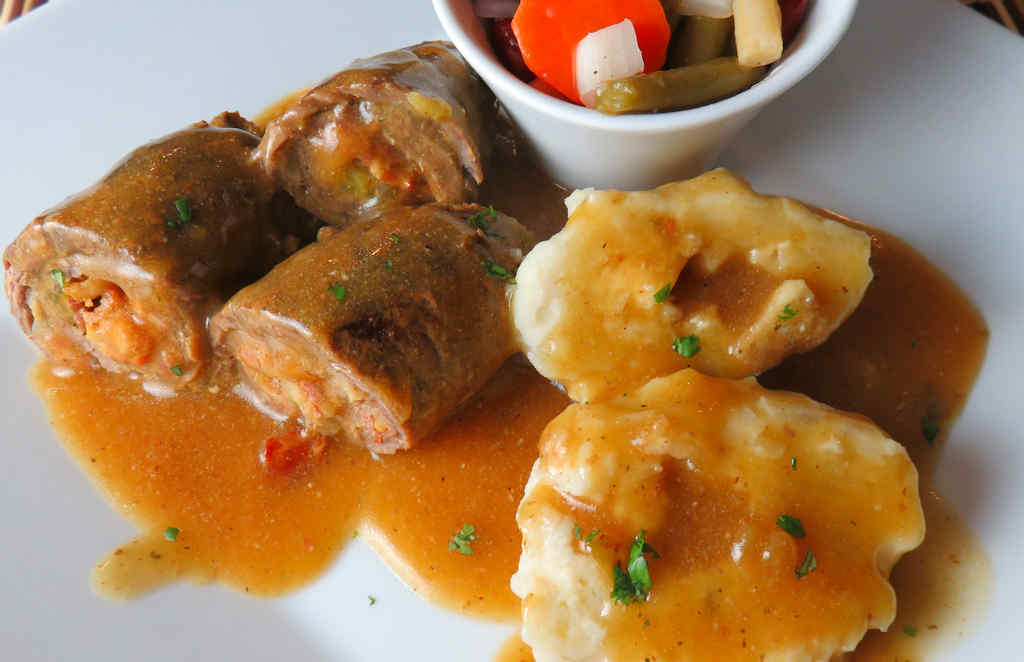
I’m very, very biased when it comes to rouladen and knödel. I’m quite sure that my mom’s are the best. I tried to duplicate hers as best I could, and boy, where they ever fantastic, but they still aren’t mom’s. I’m ok with that. Fantastic tender beef stuffed with a mixture of pickles, mustard, bacon and onion. Cooked and then served with a fantastic pan gravy made from the yum-yums left in the pan. The knödel are spatzle-like. Cold mashed potatoes formed into bowls, stuffed with crunchy croutons, simmered in water. Served with more of the gravy from rouladen. Delicious!
I used a top round that was already sliced. I pounded it thinner using my trusty meat pounder. Next time I’ll probably opt to pick up a whole top round and slice it myself. That’ll give me a bit more control over how the meat comes out. Even still, the rouladen were sooooo tasty good. For only my second time making rouladen and knödel, I was very happy!
This was my first time making knödels from scratch. You can find packets of mix in the grocery store that make the process much easier and still come out fantastic. I decided to give making them myself a shot. They are actually very easy to make. My only advice is to be very, very careful removing them from the pot after they’ve simmered. They really, really want to fall apart. Be gentle and slow and they’ll come out great.
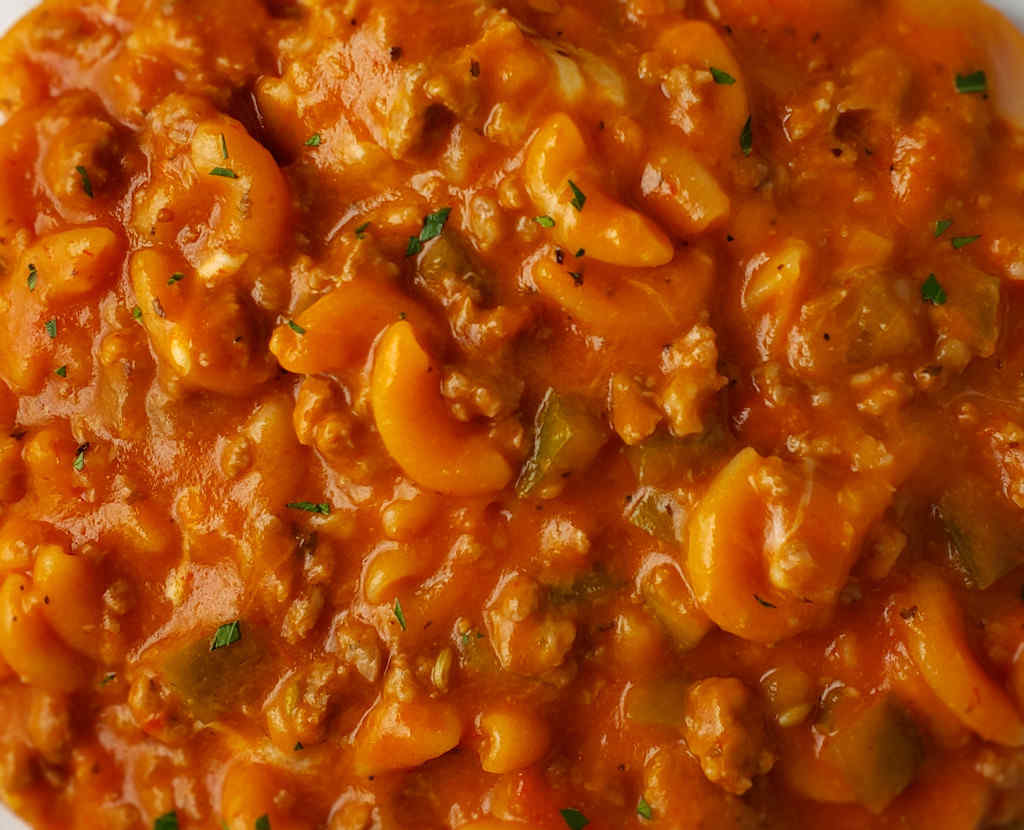
It was a cold windy day. I do mean windy, too. Every time I looked out the window I saw more and more of our neighbor’s Christmas decorations in our yard. That meant it was time for some stick-to-your-ribs comfort food. Nothing fancy, just something to warm me up before I went outside to rescue the inflatable Santa. But not fancy doesn’t mean not flavorful! This cowboy pasta is good tasty stuff. Cheesy shells, super-flavorful beans, tomatoes and chiles, and ground beef all make for a delicious dish. This so hit the spot and made me forget about the weather outside.
This cowboy pasta definitely hit the spot on a cold day. You can choose your heat level (or not) by using spicy (or not) Rotel. I went with the mild. The Ranch beans have such great flavor by themselves, I didn’t want to drown them out by using super-hot Rotel. It’s your call, it’ll be great either way.
While I’m on the subject of Ranch-style beans…. I love them. They are the tastiest beans ever. I keep them on hand and often substitute them in dishes that call for ‘regular’ canned beans.
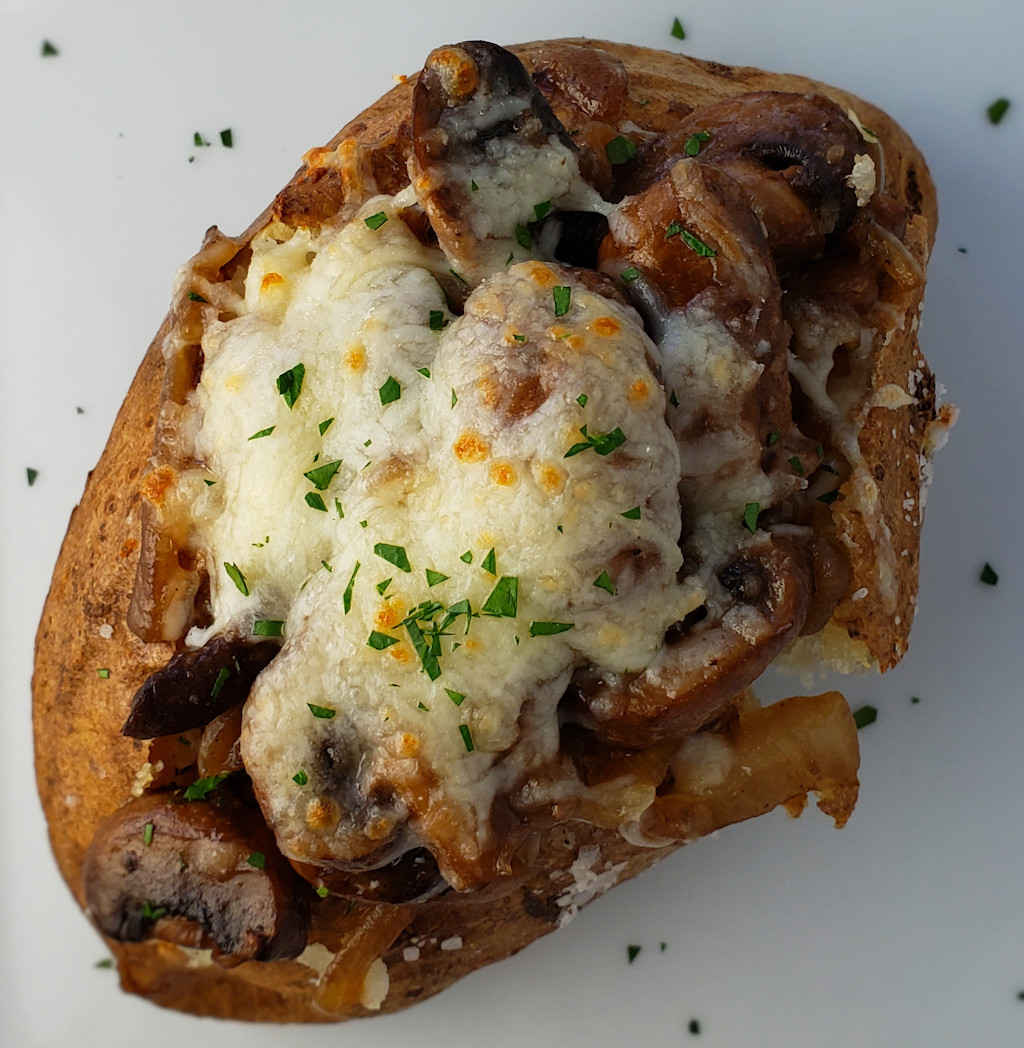
Loaded baked potatoes are something I’ve had a love affair with ever since my college days. They were a great way to get a cheap, and still delicious, dinner. Yep, I love a baked potato as a meal. I don’t need anything else. These mushroom and onion baked potatoes are great as either a main dish or a side. They aren’t shy on the mushrooms. You won’t go searching for them. You’re going to get plenty in each and every bite. Cooked perfectly, this is a favorite potato of mine!
The bigger the potatoes you use for your mushroom and and onion baked potatoes, the more of the yummy mushroom and onion mixture you can pack inside. But, on the off chance you end up with leftover stuffing, you cannot go wrong with using it as a topping for grilled burgers. It’s fantastic on burgers. And it’s great in omelets too! So make extra, you’ll love it!
Sprinkle some salt onto a plate and roll the potatoes in the salt.
Place potatoes directly on the oven center rack. You might want to put a baking sheet lined with foil beneath them to catch any drippings.
Bake until potatoes are done (210 F internal temperature, or tender all the way through when poked with a knife), 40-60 minutes depending on their size. You can also test for doneness by squeezing the potatoes (with potholders on). If they give easily, they are done.
When ready to serve, poke the tops of the potatoes with a fork in cross pattern (i.e. from edge-to-edge and top-to-bottom). Pretend you are tracing the lines you would make if cutting the potatoes with a knife. Then, grab the potatoes from the ends and squeeze. The potatoes will open up perfectly. Fluff with the fork before adding the mushroom mixture.
Top with cheese if desired. Place the potatoes under the broiler for a minute or two if you want to melt and toast the cheese.
For the mushroom mixture
Melt butter in a large skillet over medium-high heat.
Stir in the Worcestershire sauce.
Add the mushrooms and cook until they start to soften, about 5 minutes, stirring gently on occasion.
Add the onions and stir. Cook another 5 minutes, stirring gently on occasion, until the onions are just softened.
Reduce heat to low. Add the garlic and season with salt and pepper, to taste. Stir and cook another 2-3 minutes or until the garlic is cooked.
I’m by no means the first person to deep-fry ravioli. And there’s nothing particularly new or out-of-the-box amazing about this recipe. But, this is the best version of the yummy little fried bites that I’ve made. It’s my go-to, easy dinner recipe. Nothing fancy. Just really yummy. And a bit decadent. That’s probably why it’s yummy!
I do admit, I do sometimes make a slight change to my deep-fried ravioli recipe. I like to add a few pinches of red pepper flake or cayenne to the bread crumb mix. Sometimes I just want a bit of a kick, specially if I am serving these bites as appetizers instead of as the main course.
I use my Fry Daddy fryer when I make anything deep fried for just the two of us. It’s small, uses little oil and does a great job of frying.
2cupsmarinara saucewarmed, for dipping. Pizza sauce is also great!
Instructions
Place a wire rack on a large baking sheet. You need a sheet that will fit in your freezer. If you don't have one, or don't have room, use plates lined with parchment paper instead.
Place flour in a pie plate.
Whisk the eggs with the milk in another pie plate.
In a third pie plate, combine the Italian bread crumbs, cheese, garlic powder, kosher salt and pepper.
Working in batches, coat the ravioli in the flour. Then coat in the egg mixture. Shake off any excess then coat in the breadcrumb mixture. Shake off excess and transfer to the wire rack on a single layer.
Place the baking sheet into the freezer for 30 minutes.
Heat oil to 350 F in a deep fryer or Dutch oven.
Line a few plates with paper towels.
Working in batches, fry the ravioli for 2-3 minutes or until golden brown, turning once. Transfer to the paper towel-lined plates.
Sprinkle with additional cheese and serve with warmed marinara sauce.
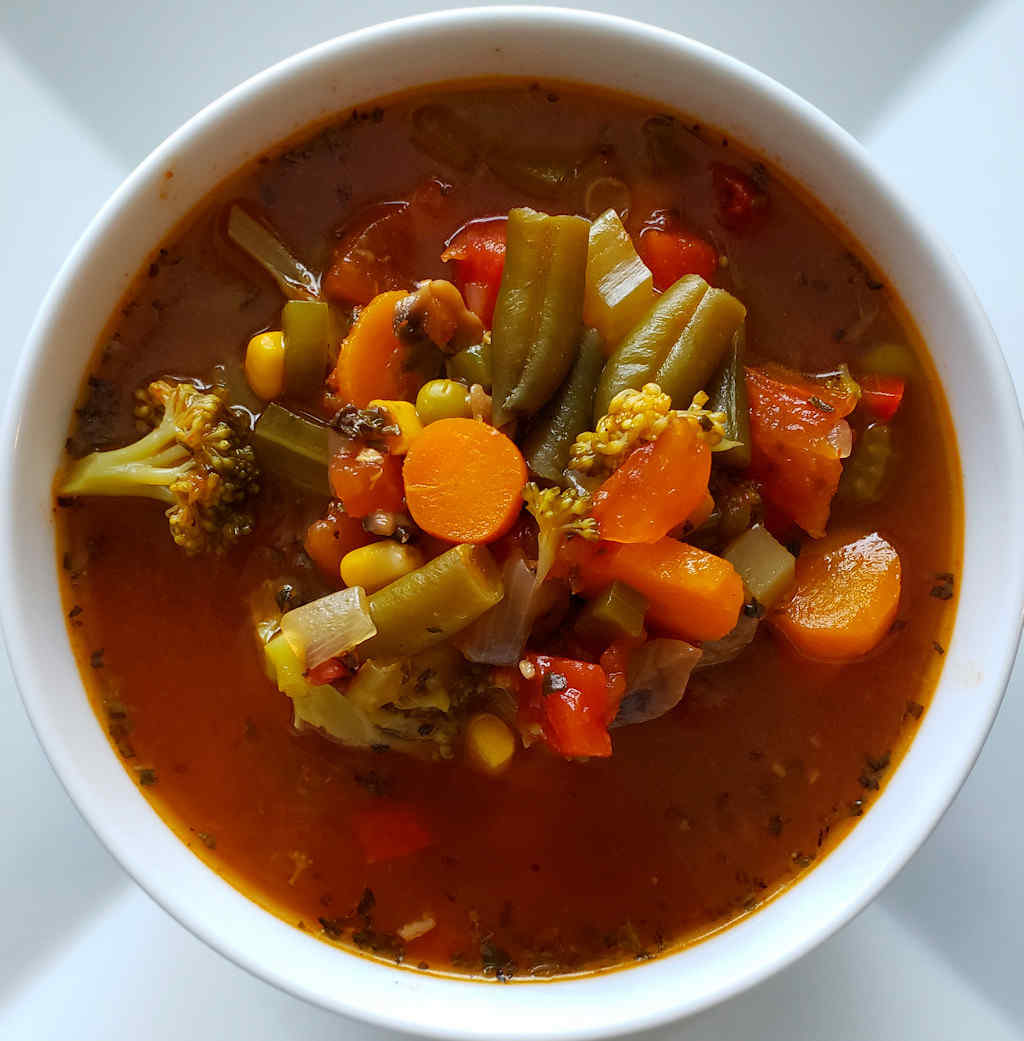
I made some smoked ribs once that I called the ‘best’. Then a week later I found a new technique that was really the ‘best’. So I made a rule that I’d not call anything the ‘best’. Well, in a blatant violation of that rule, this is the best vegetable soup. Why did I commit such a flagrant violation? Because I’m not going to ever look for another vegetable soup recipe. I don’t need to. I can stop after this one. Packed with vegetables, easy to make (ok, there’s some chopping involved, but I consider that cook therapy), and oh so delicious, it’s a real winner. And it makes a really big batch. Plenty for a crowd, and great for freezing for later.
You can omit any vegetables you can’t find or don’t have on hand. This recipe for the best vegetable soup is pretty forgiving. More is better, though, so if you have to leave something out try to find something else that can take it’s place.
Don’t be shocked about the amount of dried basil. It might seem like a lot, but this recipe makes a LOT of soup. I don’t recommend cheating on the basil. Add the full amount.
I like to use my good ole trusty Dutch oven to make this soup and pretty much darned near anything like it on my stovetop. It’s nice and big and sturdy. That extra weight helps it maintain and distribute heat perfectly. As an added bonus, it’s actually pretty easy to clean up too!
Heat the oil in a large pot or Dutch oven over medium heat.
Working one vegetable at a time, add to the pot and saute for a minute, stirring. Then add the next vegetable, continuing until you've added everything up to the water.
Stir in the water, tomato paste, bay leaves, basil, salt, black pepper and red pepper flakes (you can leave them out if you want).
Cover. Reduce the heat to a slow simmer and cook 2 1/2 – 3 hours, stirring occasionally.
It was a very cold few days here in Indianapolis. Not ‘brrrr’ cold but ‘brrr brrr’ cold, and that’s cold. That meant time for a good ole pot of stick-to-your-ribs comfort food. Time for some skillet sausage mac and cheese. Easy to make, a bowl of this will warm you to your cockles. I’m not sure what those are, but they’ll be warm! This makes a good-sized batch, perfect for lunches or dinner. Or both.
When I make this skillet sausage mac and cheese again (and it’ll be soon, because winters here are long) I might use ground Italian sausage instead. Or I might add a good pinch or two of red pepper flake for a bit of kick. I might even use a different pasta. Not matter what I do, though, it’ll still be a great dish.