
Winters here can be rather long. We like to put up some sweet corn for those cold, gray months – it’s like summer in a bag. Just as sweet and juicy as the day it was picked.
The only corn we buy is from My Dad’s Sweet Corn, from nearby Tipton, Indiana. Fortunately for us we don’t have to drive to Tipton since MDSC is at all of our local farmer’s markets.
I wait until the corn is at its peak. This year it was the week after July 4th. Last year, I bought 5 dozen ears (they actually sell them as baker’s dozens). Because of the drought in 2012, the corn, although as sweet as always, was certainly smaller than it is most years. This year, the weather has been great and the corn was absolutely fantastic. So… I bought over 100 ears! Yes, 8 dozen. Two 100 pound potato sacks worth (fortunately they helped me get it to my car)! Well, we now have enough corn for winter, that’s for sure!
There are probably other ways of putting corn up for the winter. This is how I do it. I am always looking for ideas, though, so if you also put corn up and you do it differently, please respond in the comments so we can share ideas.
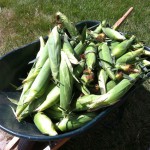
Eight dozen corn ears. Actually, it came to 108 ears total. Quite the load!

Beautiful corn harvest this year. Sweet and yummy!

Boiling a batch in a 30-quart stock pot over a Bayou Classic Outdoor Gas Cooker. You can do this inside on a stove too, of course, but it’s a little less messy outdoors.


- Magic Corn Peeler – Get the fresh corn kernels in…
- Corn Stripper Tool – It cuts the kernels quickly…
Putting up corn for the Winter
Ingredients
- 100 ears fresh sweet corn picked that day
- A large pot I used a 30 quart stock pot with a basket
- 1 tablespoon sugar
- 2 22 pound bags ice
- 1 large cooler I used an old 60 quart Igloo
- 1 large bath towel
- 1 large bowl
- 1 small glass bowl
- 1 small towel
- sharp chef's knife
- Vacuum freezer bags and vacuum sealer
Instructions
- Shuck the corn. Yes, it might take a while. Just pull up a chair and get to it. And the silk? I’ve found it’s just easier to remove them by hand, even though there are tons of gadgets out there that supposedly do it better. Shucking corn is quality time for me. Enjoy it!
- Put the ice into the cooler and add water to nearly fill it to the top. This will be the ice bath used to stop the corn from cooking after you remove it from the boiling water.
- Fill your pot with water and place over high heat and bring to a boil. I use an outdoor propane burner from Bayou Classics. It boils water in a jiffy, and as an added bonus it sounds really cool.
- Add the sugar to the water. I do this because I believe that the first batch of corn loses some sweetness to the water, so I add a bit of sugar. After the first batch, the water gets flavor from the corn so I no longer add any more sugar.
- Add the corn in batches, but do not overcrowd. Let it boil for 5 minutes.
- Remove corn to the ice bath and start your next batch boiling.
- As soon as the corn is cold remove it to the bath towel and dry it just slightly. You don’t have to get it perfect,you just want to sop up and excess water. You can also just shake the excess water off.
- Put the small bowl, upside down, in the center of the large bowl. Cover the small bowl with the small towel. This is where you will cut the kernels from the corn. The towel keeps the ears from sliding around (and you getting cut).
- Take each ear and stand it straight up (shank side down) on the small bowl and towel. Holding it at the very tip, run your knife down the sides, close to the ear, cutting off all of the kernels. The kernels will fall into the big bowl, preventing you from making a big mess! Get as much as the kernel goodness as you can.
- Continue working in batches until all of the corn has been boiled and the kernels removed.
- Now, place the kernels into the vacuum bags. I use quart-sized bags and put about 4 cups in each bag. This is roughly the equivalent of 2 cans of corn.
- Place the bags into the freezer unsealed. You want the corn to nearly freeze first. Otherwise the moisture will make it impossible to seal them.
- After a few hours, remove the bags and seal them per your sealer’s instructions.
- Note: If you have room in your freezer, it is worth saving some of the water you boiled the corn in for soups or chowders.
Nutritional values are approximate.

- Meal Prep MVP – A practical and innovative way to…
- 12 Diverse Blades – With nine interchangeable…

- Set includes: 1/4 cup, 1/3 cup, 1/2 cup and 1 cup
- Magnetic handles keep Cups together for storage…