Chipotle Bacon

This is the first year that I’ve been experimenting with curing my own meats to make bacon and jerky. I’ve found the processes to be much easier than I had expected, and the end results to be far, far better than I could’ve ever dreamed. It all started when I bought a small pork belly and made homemade applewood-smoked maple bacon. After that success, I contacted my local butcher at Moody’s Butcher Shop and ordered two pork sides. As I soon found out, a pork side (seen below) is like a pork belly but oh so much bigger and thicker and perfect. It screams bacon. It screams chipotle bacon.
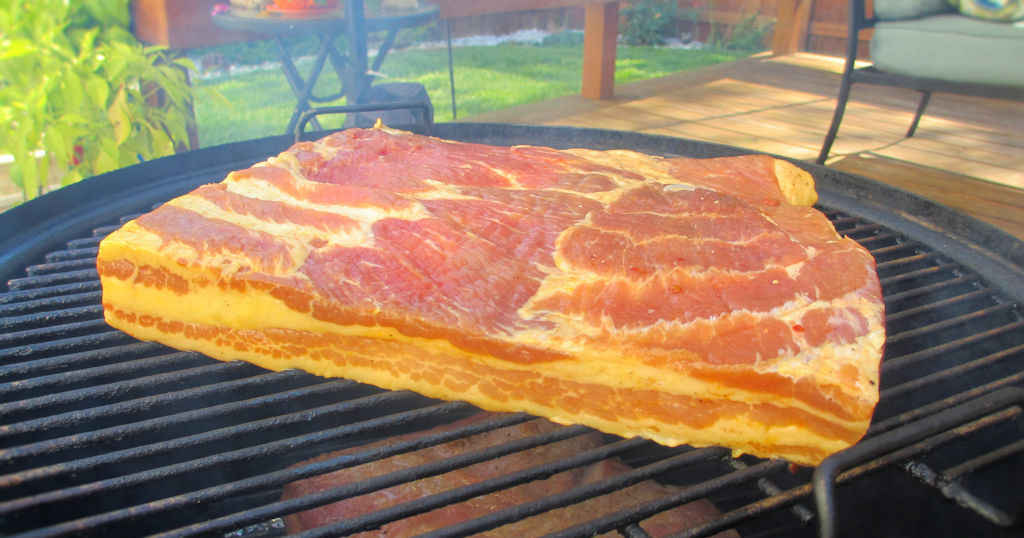
Chipotle Bacon

Subtle, But Fantastic

This chipotle bacon had a mild chipotle flavor. The first time I made it I was way too shy with the chipotle, and although it was fantastic, it didn’t have much of that great smoky chipotle flavor. I recommend you be quite liberal with the chipotle peppers. We aren’t making cheesecake here. Use a lot of chipotle.

Blows Store-Bought Bacon Away

I am so hooked on homemade bacon I know I’ll never go back to store-bought. Not only is homemade tastier, I can make whatever flavor combination I want. I usually do a few big batches all at once, freezing any leftovers for later use.

Also try my Sriracha bacon and my black pepper bacon.

Chipotle Bacon
Print Pin
5 from 1 vote

Chipotle Bacon

This chipotle bacon had a mild chipotle flavor. The first time I made it I was way too shy with the chipotle, and although it was fantastic, it didn’t have much of that great smoky chipotle flavor.
Course Side
Cuisine American
Keyword bacon, homemade, spicy
Prep Time 7 days
Cook Time 2 hours
Total Time 7 days 2 hours
Servings 1 pound
Calories 4780kcal

Ingredients

Instructions

  • Put the belly into a large resealable bag.
  • Whisk together the remaining ingredients in a medium bowl. Add to the baggie.
  • Seal the bag, trying to remove as much air as possible. Place in to a deep flat pan (in case the bag leaks) in the fridge for 7 days, flipping over twice a day.
  • The day you are ready to smoke, fire up your smoker for 225 F cooking over a light wood such as apple.
  • Remove belly from the bag and rinse well with cold water.
  • Place belly onto smoker and smoke for 1 1/2-2 hours or until the meat reaches 150 F.
  • Remove belly from smoker and let cool slightly before placing in the fridge for an hour.
  • Slice bacon as desired. Bake, pan fry, or use however you wish!
  • Store smoked bacon in a plastic bag or container in the fridge for up to 2 weeks.

Notes

Scale the recipe for your pork belly. The recipe below is for a 2 pound belly.

Nutrition

Calories: 4780kcal | Carbohydrates: 20g | Protein: 85g | Fat: 481g | Saturated Fat: 175g | Cholesterol: 653mg | Sodium: 8522mg | Potassium: 1759mg | Fiber: 11g | Sugar: 7g | Vitamin A: 5074IU | Vitamin C: 3mg | Calcium: 76mg | Iron: 8mg

Nutritional values are approximate.

Homemade Tasso Ham

I love all foods Creole and Cajun. I love making jambalaya, étouffée, gumbo, and dirty rice. To really make authentic, unbelievably tasty dishes I like to add homemade tasso ham. Sometimes it’s hard to find tasso ham here in Indianapolis, so I set out to make my own and I couldn’t be happier with the results.

Homemade Tasso Ham

A Huge Success

Not only tender, spicy and tasty, but incredibly easy to make too, the homemade tasso ham was a success. All you need is a pork butt or shoulder, a few spices, and a smoker.

The process…

Homemade tasso ham takes 3-4 days to age before smoking. I started out with an 8 pound bone-in pork shoulder. Ideally you’ll want a smaller, boneless pork butt, but that day in the market a shoulder was all I could find. Cutting the shoulder into “steaks”, each about 1″ thick, I kept the bone section and smoked it at the same time I smoked the homemade tasso ham. The bone-in section will be great in a pot of beans at a later time.

The meat is generously covered in a cure and placed on a rack in the fridge for 3 hours. It lost a LOT of moisture during this process.

Homemade Tasso Ham

Curing…

Next, I rinsed off the cure and patted the meat dry. Onto a rack and back into the fridge for 3-4 days. The meat will firm up during this time.

Homemade Tasso HamOnto the smoker…

The last day, I sprinkled the meat with rub and put it onto a 250 F smoker over hickory for about 3 hours until the internal temperature reached 170 F. I removed it, rested it, and then sliced it thick for later use in jambalaya, beans, etc.

Homemade Tasso Ham

Yummy results

The end result is a spicy, almost-hammy meat that is absolutely fantastic. Although you could eat it by itself, homemade tasso ham is primarily used for flavoring dishes.

This homemade tasso ham is fantastic in my crispy shrimp in tasso sauce and spicy corn and tasso casserole.

Also try my smoked shanks and homemade Canadian bacon.

Homemade Tasso Ham
Print Pin
5 from 1 vote

Homemade Tasso

Not only tender, spicy and tasty, but incredibly easy to make too, the homemade tasso ham was a success. All you need is a pork butt or shoulder, a few spices, and a smoker.
Course Main
Cuisine Creole
Keyword homemade, tasso
Prep Time 3 days 3 hours
Cook Time 2 hours 30 minutes
Total Time 3 days 5 hours 30 minutes
Servings 2 pounds
Calories 1617kcal
Author Mike

Ingredients

  • 1 4 pound boneless pork shoulder or butt

For the cure

For the rub

Instructions

  • Slice the butt into 1″ thick “steaks”, each about a pound or so
  • Combine all cure ingredients and rub generously over the pork.
  • Place onto a wire rack over a baking pan and refrigerate for 3 hours.
  • Rinse cure off the meat and pat dry.
  • Return meat to rack in the fridge and let it age for 3 days.
  • Fire up a smoker for 250 F cooking. Use hickory or a lighter wood for smoking.
  • Combine the rub ingredients and spread gently over the meat.
  • Smoke for 2 1/2 – 3 hours or until the meat reaches 170 F internally.
  • Foil and let rest for 30 minutes before slicing thick.

Nutrition

Calories: 1617kcal | Carbohydrates: 44g | Protein: 257g | Fat: 40g | Saturated Fat: 12g | Trans Fat: 1g | Cholesterol: 680mg | Sodium: 58376mg | Potassium: 4549mg | Fiber: 3g | Sugar: 36g | Vitamin A: 2264IU | Vitamin C: 10mg | Calcium: 189mg | Iron: 12mg

Nutritional values are approximate.

Save

Save

Save

Save

Save

Save

Save

Save

Save

Homemade Canadian Bacon

I was so happy with just how great this homemade Canadian bacon turned out. The flavor is fantastic and the meat is just the right amount of tenderness. Now, I just need to do a better job trimming the pork loin before I start! Despite my lack of butchering skills, I’d make this again and again.

Homemade Canadian Bacon

Wonderful Canadian Bacon

I loved this. I use it on my copycat Tiny Tim’s subs (creamy Italian dressing, pepperoni, Canadian bacon, Swiss, mozzarella, lettuce).

Canadian bacon on pizzas with a little pineapple is another favorite of mine. A slight variation on the traditional Hawaiian pizza. And of course this homemade Canadian bacon would be fantastic in an omelet or frittata.

I prefer to use fruit or nut woods when I smoke unless I want a heavier smoke flavor. Pecan, apple or cherry are my favorites. This time I used apple.

Also try my homemade tasso.

Homemade Canadian Bacon
Print Pin
5 from 1 vote

Homemade Canadian Bacon

I was so happy with just how great this homemade Canadian bacon turned out. The flavor is fantastic and the meat is just the right amount of tenderness. 
Course Main
Cuisine American
Keyword bacon, homemade
Prep Time 3 days 30 minutes
Cook Time 2 hours
Total Time 3 days 2 hours 30 minutes
Servings 2 pounds
Calories 1791kcal

Equipment

Ingredients

Instructions

  • Combine 1 quart of water, the salt, syrup, brown sugar, curing salt, bay leaves, garlic and peppercorns in a large pot.
  • Bring to a boil, whisking to dissolve. Boil for 1 minute then remove from heat. Add 3 quarts of cold water.
  • Transfer the cool brine (if it is not cool, refrigerate for 30 minutes or so until it is) to a large sealable container. Add the pork (It should be fully submerged) and seal. Place in refrigerator for 3-5 days.
  • Fire up your smoker to cook at 225 F. Add some light wood.
  • Meanwhile, remove the pork from the brine and rinse well.
  • Smoke pork over indirect heat for 2-3 hours until the meat reaches 140 F.
  • Let pork rest for 30 minutes before slicing.

Nutrition

Calories: 1791kcal | Carbohydrates: 149g | Protein: 204g | Fat: 37g | Saturated Fat: 11g | Cholesterol: 572mg | Sodium: 57058mg | Potassium: 3901mg | Fiber: 1g | Sugar: 132g | Vitamin A: 40IU | Vitamin C: 2mg | Calcium: 318mg | Iron: 6mg

Nutritional values are approximate.

Homemade Applewood-Smoked Maple Bacon

Making bacon has been on my to-do list for a while now. I was able to find some nice pork belly in the butcher case, so I grabbed a few pounds and set off on making this homemade applewood-smoked maple bacon.

The end result was absolutely great. This is easily the best bacon I’ve ever had. There’s a hint of maple, a hint of smoke, and great texture and flavor. Outstandingly good and so easy that I will always make bacon from here on any time that I have my smoker going.

Homemade Applewood-Smoked Maple Bacon

Cheaper? Maybe. Better? Absolutely.

Price-wise, this homemade applewood-smoked maple bacon is also cheaper than store bought, and you can slice it any way that you like, from super thick to wafer thin. I think I paid about $1.99/pound for the pork. I did have to remove the skin (which I saved for making cracklins at a later time). That took a little effort. If you get your pork belly from a butcher you might want to ask to have the skin removed for you.

I prefer to use fruit or nut woods when I smoke unless I want a heavier smoke flavor. Pecan, apple or cherry are my favorites. I used apple for this bacon.

Also try my Sriracha and chipotle bacon.

Homemade Applewood-Smoked Maple Bacon
Print Pin
5 from 1 vote

Homemade Applewood-Smoked Maple Bacon

Making bacon has been on my to-do list for a while now. I was able to find some nice pork belly in the butcher case, so I grabbed a few pounds and set off on making this homemade applewood-smoked maple bacon.
Course Side
Cuisine American
Keyword bacon, homemade, smoked
Prep Time 7 days
Cook Time 2 hours
Total Time 7 days 2 hours
Servings 1 pound
Calories 5129kcal

Ingredients

  • 2 pound pork belly skin removed (save for making cracklins). Choose a belly that is consistent in thickness so that it cooks evenly.
  • 3 teaspoons kosher salt
  • ½ teaspoon Pink Curing Salt
  • 3 teaspoons ground black pepper
  • 2 tablespoons brown sugar
  • 6 tablespoons maple syrup Grade B if you can find it, otherwise Grade A will work do
  • ½ cup cold water

Instructions

  • Put the belly into a large resealable bag.
  • Whisk together the remaining ingredients in a medium bowl. Add to the baggie.
  • Seal the bag, trying to remove as much air as possible. Place in to a deep flat pan (in case the bag leaks) in the fridge for 7 days, flipping over twice a day.
  • The day you are ready to smoke, fire up your smoker for 225 F cooking over a light wood such as apple.
  • Remove belly from the bag and rinse well with cold water.
  • Place belly onto smoker and smoke for 1 1/2-2 hours or until the meat reaches 150 F.
  • Remove belly from smoker and let cool slightly before placing in the fridge for an hour.
  • Slice bacon as desired. Bake, pan fry, or use however you wish!
  • Store smoked bacon in a plastic bag or container in the fridge for up to 2 weeks.

Nutrition

Calories: 5129kcal | Carbohydrates: 108g | Protein: 85g | Fat: 481g | Saturated Fat: 175g | Cholesterol: 653mg | Sodium: 7285mg | Potassium: 2061mg | Fiber: 2g | Sugar: 95g | Vitamin A: 124IU | Vitamin C: 3mg | Calcium: 227mg | Iron: 6mg

Nutritional values are approximate.

Homemade Catalina Salad Dressing

We loved this simple and delicious homemade Catalina salad dressing. Why would you buy dressing at the store when you can make an even better version at home? Just toss some simple ingredients that you probably already have on-hand into a blender. Pulse a few times, then transfer to a Mason jar. You end up with a fantastic tasting dressing. And you have a healthier dressing for a fraction of the cost of store-bought.

For a little different flavor, substitute honey for the white sugar.

Homemade Catalina and Italian Salad Dressings

Homemade Dressings Are Always Better

On the right is my homemade Italian dressing. It’s not only great tasting too, it is also just as easy to make as this Catalina dressing.

Check out my new site, Dress My Salad, for more great salad dressing ideas!

This dressing is great on my Mason jar salad.

Homemade Catalina and Italian Salad Dressings
Print Pin
5 from 1 vote

Homemade Catalina Salad Dressing

We loved this simple and delicious homemade Catalina salad dressing. Why would you buy dressing at the store when you can make an even better version at home? Just toss some simple ingredients that you probably already have on-hand into a blender.
Course Salad Dressing
Cuisine American
Keyword homemade salad dressing
Prep Time 5 minutes
Cook Time 5 minutes
Total Time 10 minutes
Servings 2 cups
Calories 1434kcal
Author Mike

Ingredients

Instructions

  • Place all but the onion in a blender. Pulse a few times. Add white onion to taste and blend until smooth. Store in the fridge.

Nutrition

Calories: 1434kcal | Carbohydrates: 122g | Protein: 1g | Fat: 110g | Saturated Fat: 89g | Sodium: 3062mg | Potassium: 277mg | Fiber: 1g | Sugar: 117g | Vitamin A: 578IU | Vitamin C: 4mg | Calcium: 31mg | Iron: 1mg

Nutritional values are approximate.

Homemade Italian Vinaigrette

This homemade Italian vinaigrette (on the right in the photo) is my favorite salad dressing. It looks great and tastes great and it is so easy to make. I sometimes find that store-bought dressings can be a bit too vinegary. The beauty of making my own versions at home is that I can easily adjust the amount of vinegar. This has the right balance of vinegar and spices. I love it.

Homemade Catalina and Italian Salad Dressings

Better With Time

This homemade Italian vinaigrette gets better with time as the flavors ‘get happy’. I like to give the dried spices time to flavor the dressing. Make sure you give it a good, long shake before serving.

Shown on the left is my homemade Catalina dressing.

Check out my new site, Dress My Salad, for more great salad dressing ideas!

Homemade Catalina and Italian Salad Dressings
Print Pin
5 from 1 vote

Homemade Italian Vinaigrette

This homemade Italian vinaigrette (on the right in the photo) is my favorite salad dressing. It looks great and tastes great and it is so easy to make. I sometimes find that store-bought dressings can be a bit too vinegary.
Course Salad Dressing
Cuisine American
Keyword homemade salad dressing, Italian, vinaigrette
Prep Time 5 minutes
Cook Time 5 minutes
Total Time 10 minutes
Servings 2 cups
Calories 1499kcal

Ingredients

Instructions

  • Place all ingredients into a pint Mason jar and shake well.

Nutrition

Calories: 1499kcal | Carbohydrates: 8g | Protein: 3g | Fat: 164g | Saturated Fat: 23g | Cholesterol: 3mg | Sodium: 109mg | Potassium: 182mg | Fiber: 2g | Sugar: 2g | Vitamin A: 666IU | Vitamin C: 22mg | Calcium: 120mg | Iron: 2mg

Nutritional values are approximate.