Dried Basil on the Nesco Snackmaster Pro

I plant a (small) garden of herbs every year. This year it didn’t do so well, but I was able to get just enough to make dried basil on the Nesco Snackmaster Pro. I will be rewarded for my efforts (which granted, weren’t much) this fall and winter with fantastically aromatic and flavorful crumbled basil.
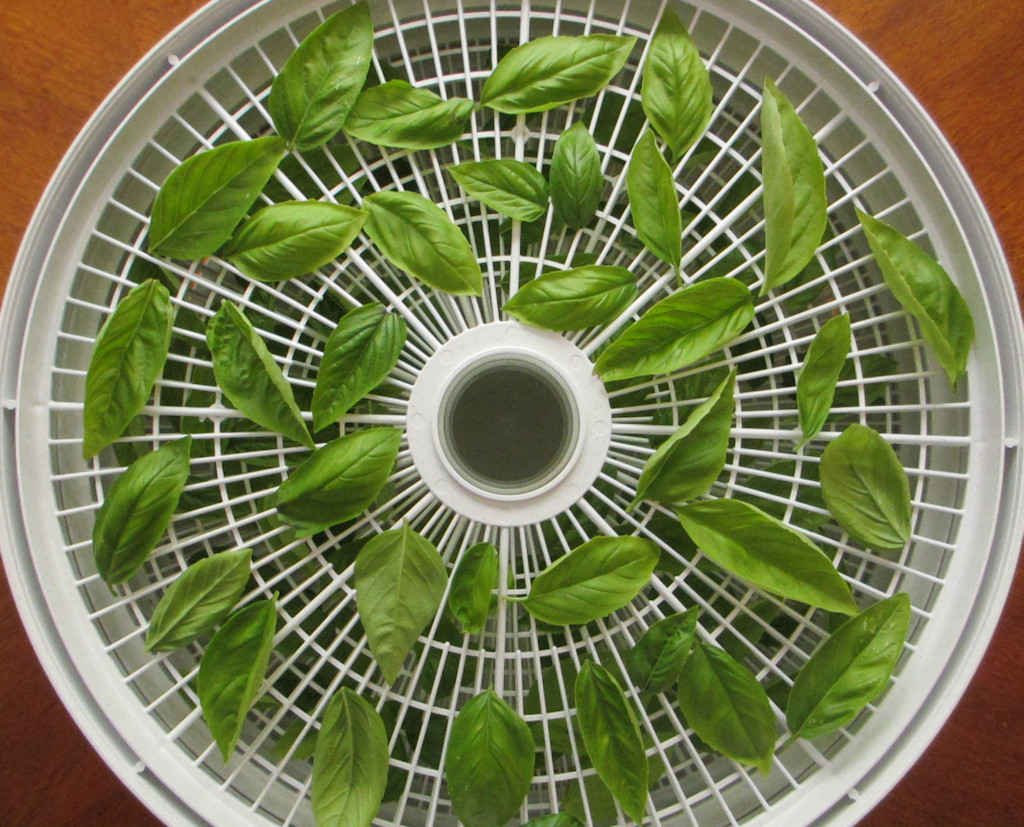
Dried Basil on the Nesco Snackmaster Pro

Storing The Basil

Basil turns almost black in color when you dry it, but don’t despair. It’s normal for it to do that. I keep the herbs that I’ve dried using my Nesco Snackmaster Pro in mason jars. I seal the jars with the optional jar sealer on my vacuum sealer. Whew, I said ‘seal’ three times in one sentence! Dried Basil on the Nesco Snackmaster Pro is a great way to use up those herbs that all seem ready to pick at once.

I like to load up my dehydrator. To do that I picked up a handful of extra trays. They really add a whole lot more drying space! Since I have to rotate my trays, I write a number on each one on a piece of blue painter’s tape so I can keep track of them.

You can dry any fresh herbs in the Nesco Snackmaster Pro. Like cilantro and rosemary.

Dried Basil on the Nesco Snackmaster Pro
Print Pin
5 from 1 vote

Dried Basil on the Nesco Snackmaster Pro

I plant a (small) garden of herbs every year. This year it didn’t do so well, but I was able to get just enough to make dried basil
Course Seasoning
Cuisine American
Keyword basil, dehydrator, nesco snackmaster pro
Cook Time 12 hours
Total Time 12 hours
Servings 1 cup
Calories 104kcal
Author Mike

Ingredients

  • 1 pound fresh basil rinsed and patted dry. Remove leaves from stems.

Instructions

  • Place leaves onto the dehydrator trays.
  • Set the dehydrator to 95 F and let dry for 12-24 hours or until the leaves are dry and crispy, rotating the trays every 2 hours.
  • Let leaves cool slightly then crumble (by hand) into a resealable air-tight container.

Nutrition

Calories: 104kcal | Carbohydrates: 12g | Protein: 14g | Fat: 3g | Saturated Fat: 1g | Sodium: 18mg | Potassium: 1338mg | Fiber: 7g | Sugar: 1g | Vitamin A: 23927IU | Vitamin C: 82mg | Calcium: 803mg | Iron: 14mg

Nutritional values are approximate.

Dried Cilantro on the Nesco Snackmaster Pro

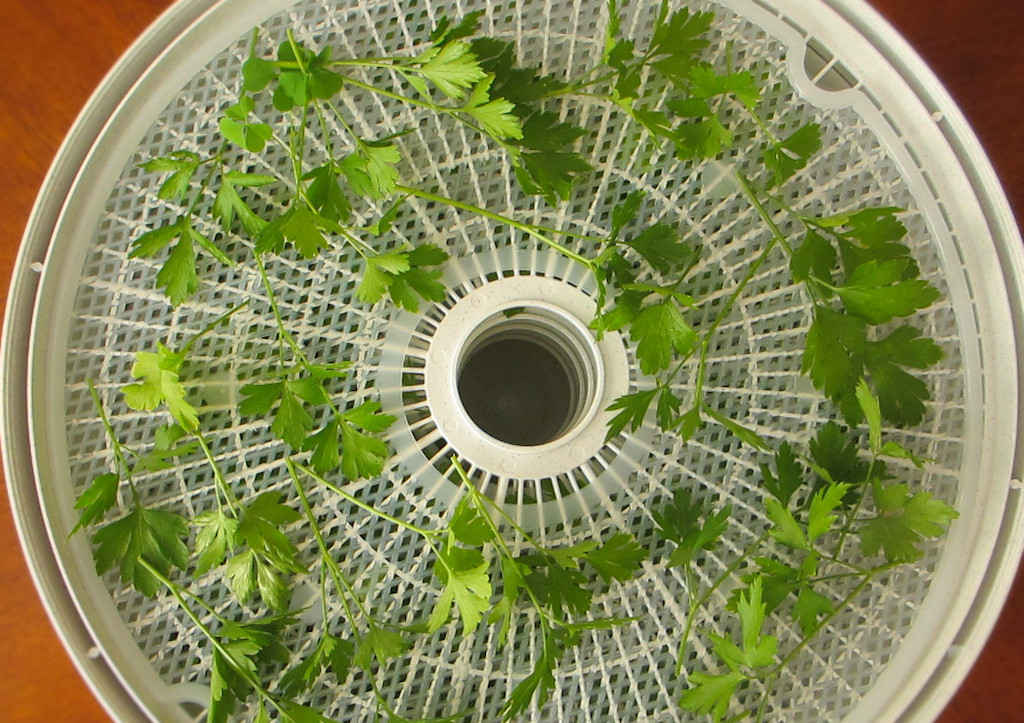
Making jerky with my Nesco Snackmaster Pro is something I really enjoy. But the other reason I bought a dehydrator is to dry fresh herbs from my garden. Fresh herbs don’t last long, so I dry as many as I can and keep them in air-right containers in the pantry like this dried cilantro on the Nesco Snackmaster Pro.

Dried Cilantro on the Nesco Snackmaster Pro

Great In Recipes

Easy as anything to dry, dried cilantro crumbles up and stores easily for use in the winter. It’s not a substitute for fresh cilantro in recipes like salsa, but it’s great for flavoring stews and soups.

Removing The Stems

I did not remove the cilantro from the stems until after I dried it. It’s a lot easier to remove the leaves once they are dried. I then lightly crumbled them just a bit and put them in containers for use later.

I like to load up my dehydrator. To do that I picked up a handful of extra trays. They really add a whole lot more drying space! Since I have to rotate my trays, I write a number on each one on a piece of blue painter’s tape so I can keep track of them.

I love drying fresh herbs with my Nesco Snackmaster Pro, such as basil. I also freeze them for later use.

Dried Cilantro on the Nesco Snackmaster Pro
Print Pin
5 from 1 vote

Dried Cilantro on the Nesco Snackmaster Pro

Easy as anything to dry, dried cilantro crumbles up and stores easily for use in the winter. It’s great for flavoring stews and soups.
Course Side
Cuisine American
Keyword dehydrator, herbs, nesco snackmaster pro
Cook Time 12 hours
Total Time 12 hours
Servings 2 cups
Calories 104kcal
Author Mike

Ingredients

  • 2 pounds fresh cilantro rinsed, patted dry. Do not remove leaves from stems.

Instructions

  • Place cilantro onto the dehydrator trays.
  • Set the dehydrator to 95 F and let dry for 12-24 hours or until the leaves are dry and crispy, rotating the trays every 2 hours.
  • Let cilantro cool slightly then remove leaves from stems and crumble (by hand) into a resealable air-tight container.

Nutrition

Calories: 104kcal | Carbohydrates: 17g | Protein: 10g | Fat: 2g | Saturated Fat: 1g | Sodium: 209mg | Potassium: 2363mg | Fiber: 13g | Sugar: 4g | Vitamin A: 30608IU | Vitamin C: 122mg | Calcium: 304mg | Iron: 8mg

Nutritional values are approximate.

Bell Pepper Powder on the Nesco Snackmaster Pro

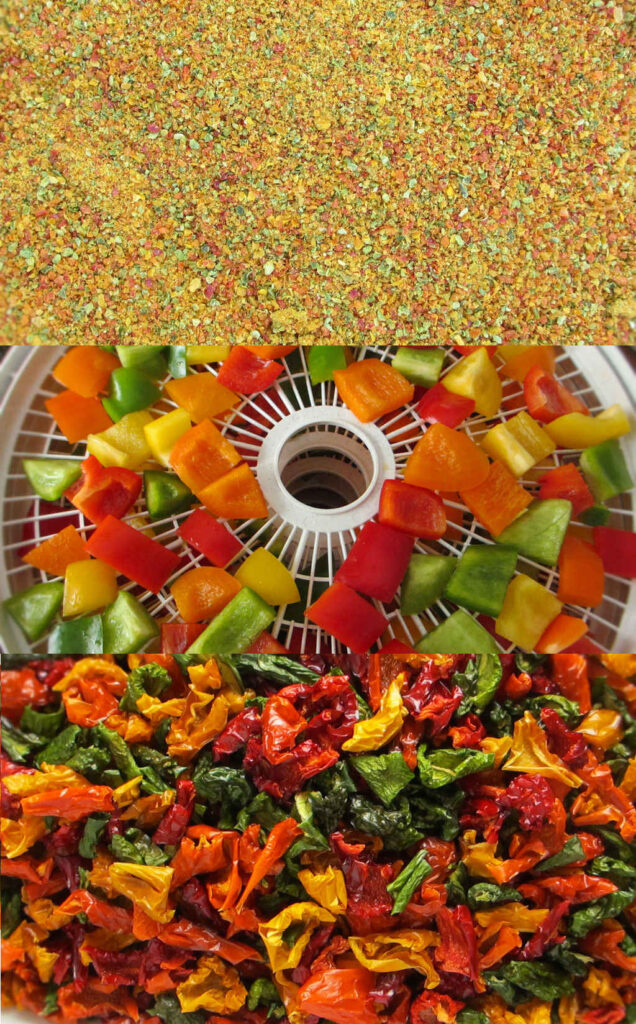
Although I truly do love making jerky on my dehydrator. it’s actually not the main reason I bought it. I got it to dry herbs and vegetables to make my own spice mixes. This bell pepper powder made on my Nesco Snackmaster Pro dehydrator was my first attempt, and boy, is it ever amazing.

Bell Pepper Powder on the Nesco Snackmaster Pro

Great Pepper Flavor

I cannot wait to use this bell pepper powder on the Nesco Snackmaster Pro in everything from omelets to chili. It has a great peppery sweetness to it. You could easily substitute it for black pepper in a lot of cases.

Grind Until Perfect

After drying the chopped peppers for 24 hours I ground them using a blade coffee grinder (not the burr grinder). Not all of the peppers would go thru the grinder (they were still a bit moist) so I returned them to the dehydrator for just a bit.

Storing Your Pepper Powder

The final product went into Mason jars with lids and then vacuum-sealed using a jar attachment for a vacuum sealer. You just have to remember that after you open the jar to remove some of the powder you’ll need to re-seal it. No big deal and well worth the effort.

Also try making poblano pepper powder and onion powder on your Nesco Snackmaster Pro. They’re as easy as easy gets!

Bell Pepper Powder on the Nesco Snackmaster Pro
Print Pin
5 from 1 vote

Bell Pepper Powder on the Nesco Snackmaster Pro

This bell pepper powder was my first attempt, and boy, is it ever amazing.
Course Seasoning
Cuisine American
Keyword bell pepper, dehydrator, nesco snackmaster pro
Prep Time 15 minutes
Cook Time 1 day
Total Time 1 day 15 minutes
Servings 1 cup
Calories 148kcal

Ingredients

  • 4 bell peppers I was able to fit approximately 2 peppers per Nesco Snackmaster Pro tray

Instructions

  • Set your dehydrator to 135 F.
  • Rinse the peppers. Remove the stems and seeds and cut into chunks. If you are not using screen trays you’ll want to cut fairly large pieces so they do not fall between the trays.
  • Dehydrate for 18-24 hours. Rotate the trays every 2 hours if possible.
  • Once all the peppers are dry and a bit crisp remove and let cool.
  • Process the peppers in the grinder until they form a fine powder. If some pieces of pepper do not grind return them to the dehydrator for another hour or so until crisp.
  • Keep the powder in an air-tight container. I place mine in a Mason jar, cover it, then use a vacuum-sealer attachment specifically for jars to remove all of the air.

Notes

You’ll need the following. A dehydrator with screen trays (I use a Nesco Snackmaster Pro), a blade coffee grinder (not a burr grinder) air-right containers or vacuum-sealed jars (I use a canning jar attachment on my vacuum sealer) additional trays, if required (my Nesco Snackmaster Pro came with 5, I purchased more so I can have 8 or more trays going at once).

Nutrition

Calories: 148kcal | Carbohydrates: 29g | Protein: 5g | Fat: 1g | Saturated Fat: 1g | Sodium: 19mg | Potassium: 1004mg | Fiber: 10g | Sugar: 20g | Vitamin A: 14904IU | Vitamin C: 608mg | Calcium: 33mg | Iron: 2mg

Nutritional values are approximate.

Teriyaki Jerky

After making homemade bacon on my Weber Smokey Mountain smoker, I figured the next logical thing to try would be making homemade Teriyaki jerky. The curing process for jerky is similar in ways to curing bacon, but it doesn’t take as long. The smoking process is different, since the jerky needs to dry out on the smoker.

Teriyaki Jerky

The Perfect Flavor-Packed Jerky

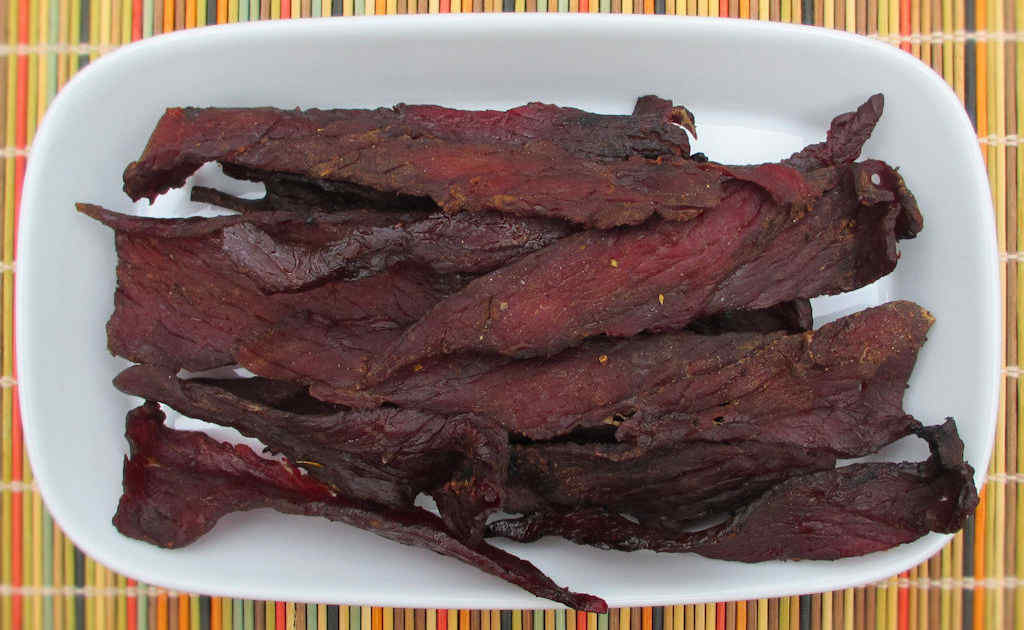
The end result was fantastic. This Teriyaki jerky has great Asian-inspired flavor. The meat was tender, with a little bit of tug, as you’d expect from jerky. We loved it. Everyone loved it.

A Few Notes

The most important things to keep in mind when making jerky is to start with a lean cut of meat (I used a lean top round), sliced super thin, and smoke at a fairly low temperature, 150 – 175 F.

Smoked To Perfection

I lit just a handful of charcoal using my charcoal chimney. The easiest way to do that is to turn the chimney upside down, putting the charcoal where you’d normally put newspaper, and putting newspaper where you’d normally put charcoal. I put just enough unlit charcoal in the bottom of the WSM to cover the bottom grate.

To make slicing the beef easier, I sat it in the freezer for about 30 minutes first. Then I used a very sharp knife to get very thin slices.

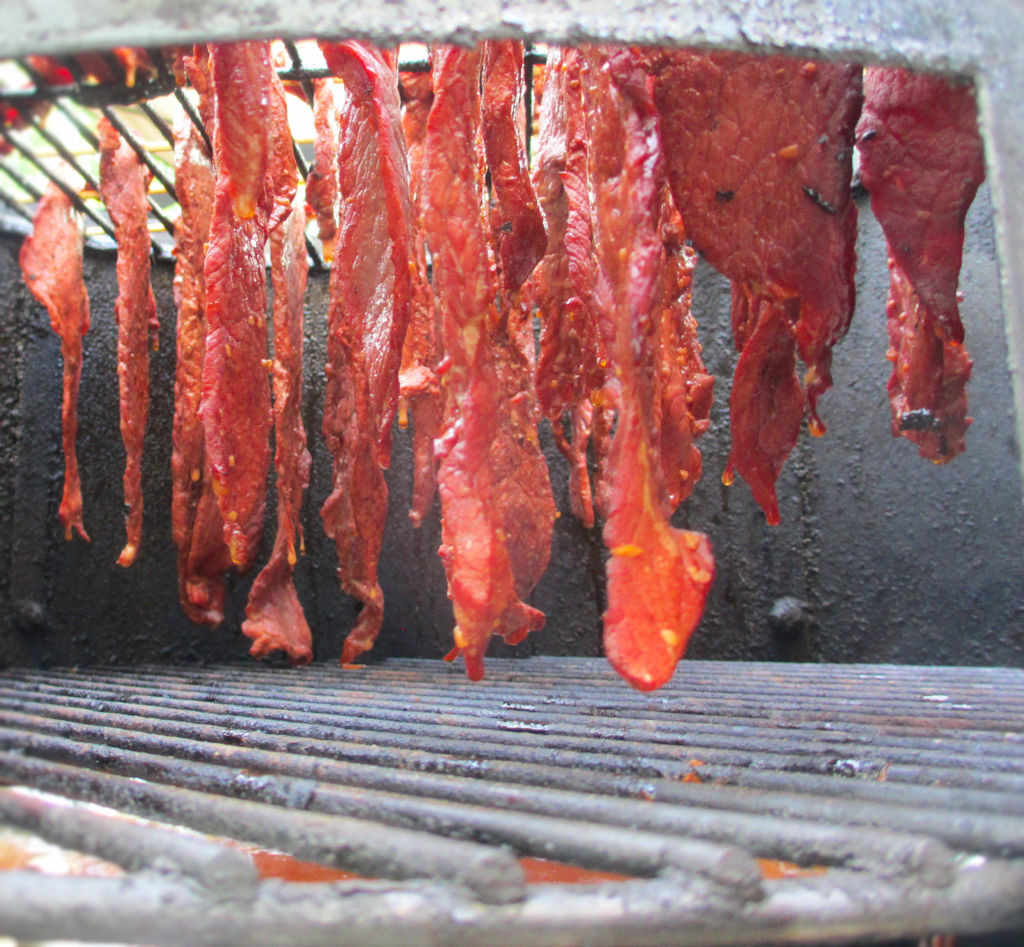
To fit as much jerky on my Weber Smokey Mountain as I could, I suspended the meat on skewers. I was able to fit 3 pounds of jerky on my 18″ cooker (I made two different flavors). I could’ve probably fit 5 or so pounds on without any trouble.

Jerky on the Weber Smokey Mountain

Also check out my black pepper jerky. It has a really great peppery bite to it, with a little heat.

Teriyaki Jerky
Print Pin
5 from 1 vote

Teriyaki Jerky

This Teriyaki jerky has great Asian-inspired flavor. The meat was tender, with a little bit of tug, as you’d expect from jerky. We loved it. Everyone loved it.
Course Appetizer
Cuisine American
Keyword dehydrator, jerky, nesco snackmaster pro, Teriyaki
Prep Time 2 days
Cook Time 6 hours
Total Time 2 days 6 hours
Servings 2.5 pounds
Calories 2621kcal
Author Mike

Ingredients

Instructions

  • Note: Freeze the meat for at least 30 minutes to make slicing easier.
  • Whisk together the remaining ingredients.
  • Place the meat in a large resealable baggie or container. Add the marinade. Stir to coat well.
  • Refrigerate for 2 days, stirring occasionally to make sure the meat gets well coated.
  • Fire up your smoker for cooking 150 – 175 F. Use a light wood, such as apple or pecan.
  • Shaking off any excess marinade. Place the meat on paper towels (use lots of them) and pat dry.
  • Place meat on the smoker (I skewered ours so I could hang it, see the picture above) and smoke for 5-6 hours or until the meat is dry.
  • Let cool for an hour before devouring.

Nutrition

Calories: 2621kcal | Carbohydrates: 62g | Protein: 168g | Fat: 185g | Saturated Fat: 70g | Trans Fat: 11g | Cholesterol: 644mg | Sodium: 7401mg | Potassium: 3171mg | Fiber: 2g | Sugar: 49g | Vitamin A: 45IU | Vitamin C: 8mg | Calcium: 293mg | Iron: 23mg

Nutritional values are approximate.