Grilled Bacon and Cheese Stuffed Mushrooms

These grilled bacon and cheese stuffed mushrooms are the perfect grilled appetizer. Tender mushrooms that still have a little ‘bite’ to them. The cheese mixture is fantastic. Three different cheeses and a little seasoning combine with bacon and bell pepper for bite after bite of deliciousness. I say ‘bite’, but if you use small mushrooms you can pop these little treats into your mouth like popcorn. I did.
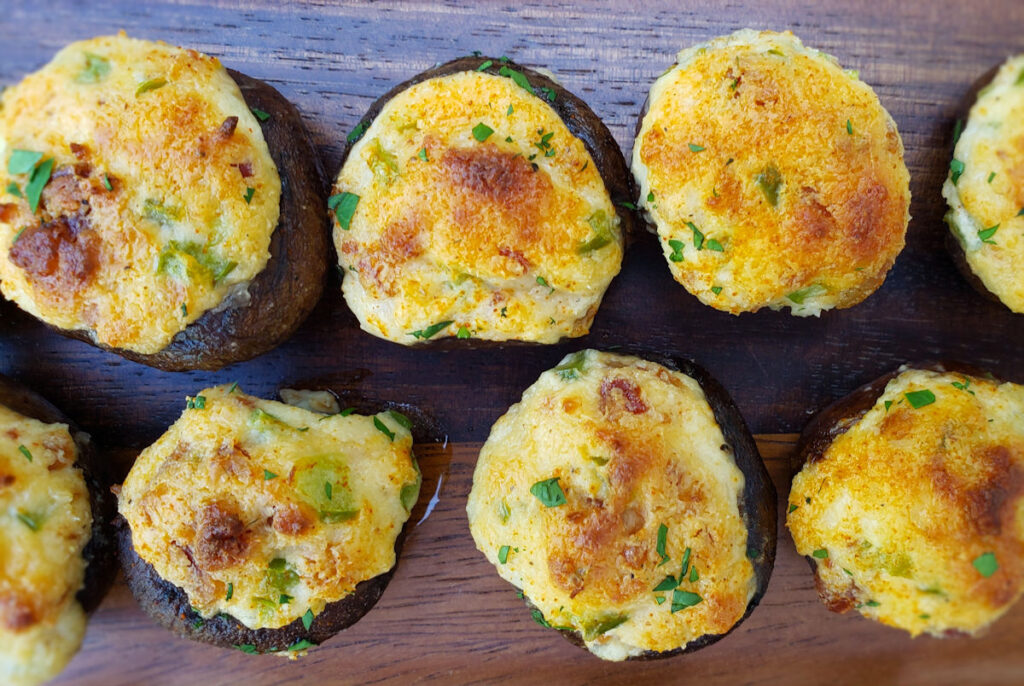
Grilled Bacon and Cheese Stuffed Mushrooms

These disposable Dutch oven pans are perfect for making these grilled bacon and cheese stuffed mushrooms. They’re the perfect size for this recipe. They’re sturdy so you don’t have to worry about them collapsing. I use them for a lot of my grilled dishes.

You can pre-make these mushrooms by doing steps 1-8 then refrigerating the mushrooms for later. Then, when you’re ready to finish them, remove them from the fridge and let come to room temperature for 30 minutes before transferring to a hot grill to cook and heat thoroughly.

You can also make these on a Char-Broil Big Easy.

I highly recommend that you shred or grate your own cheese at home. Don’t buy the pre-shredded or pre-grated stuff. It has stuff added to it to keep it from sticking together. That ‘stuff’ affects how the cheese melts. Shred it yourself and use the good stuff.

Also try my grilled bacon-wrapped jalapeno-stuffed olives.

Grilled Bacon and Cheese Stuffed Mushrooms
Print Pin
5 from 1 vote

Grilled Bacon and Cheese Stuffed Mushrooms

These are the perfect easy appetizers.
Course Appetizer
Cuisine American
Keyword mushroom, stuffed
Prep Time 15 minutes
Cook Time 45 minutes
Servings 6
Calories 159kcal

Ingredients

  • 8 ounces mushrooms 12-16 small whole mushrooms
  • 4 tablespoons butter melted
  • kosher salt to taste
  • 4 ounces cream cheese softened
  • ½ cup Parmesan cheese shredded or grated
  • ¼ cup Mozzarella cheese shredded
  • 2 slices bacon (plus more for garnish if desired) cooked, chopped very fine
  • ¼ small green bell pepper (plus more for garnish if desired) chopped very fine
  • cayenne pepper to taste
  • paprika to taste
  • parsley chopped, for garnish, if desired

Instructions

  • Preheat your oven to 400 F. Spray a small disposable pan with non-stick spray.
  • Clean the mushrooms and remove the stems.
  • Dip the mushrooms cap-side down into the butter and place onto the baking dish cap-side up.
  • Pour the remaining butter into the baking dish.
  • Sprinkle the mushrooms with salt. Bake 10 minutes. The mushrooms should just be soft and most of the water in them should be cooked out.
  • Remove from the oven. Shake any remaining liquid out of the mushrooms into the pan and place them cap-side down.
  • Using a small spoon, gently fill each mushroom with the cheese mixture. Mound it up high. Return to the pan.
  • Sprinkle tops of the mushrooms with paprika.
  • Fire up your grill for cooking at 400 F.
  • Transfer the pan to the grill and cook 15-20 minutes or until the stuffing is hot.
  • Garnish with more bacon, bell pepper and parsley if desired and serve.

Nutrition

Calories: 159kcal | Carbohydrates: 3g | Protein: 8g | Fat: 13g | Saturated Fat: 7g | Polyunsaturated Fat: 1g | Monounsaturated Fat: 4g | Trans Fat: 0.01g | Cholesterol: 34mg | Sodium: 283mg | Potassium: 190mg | Fiber: 0.4g | Sugar: 2g | Vitamin A: 381IU | Vitamin C: 3mg | Calcium: 154mg | Iron: 0.3mg

Nutritional values are approximate.
Grilled Butterflied Chicken Legs

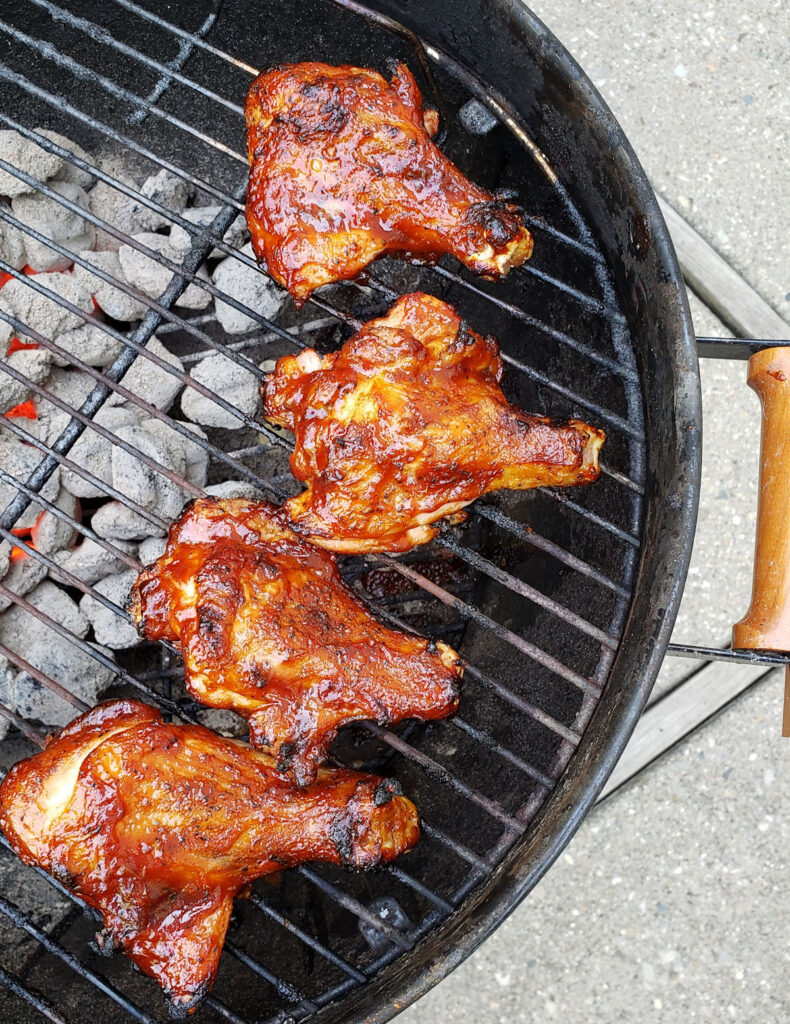
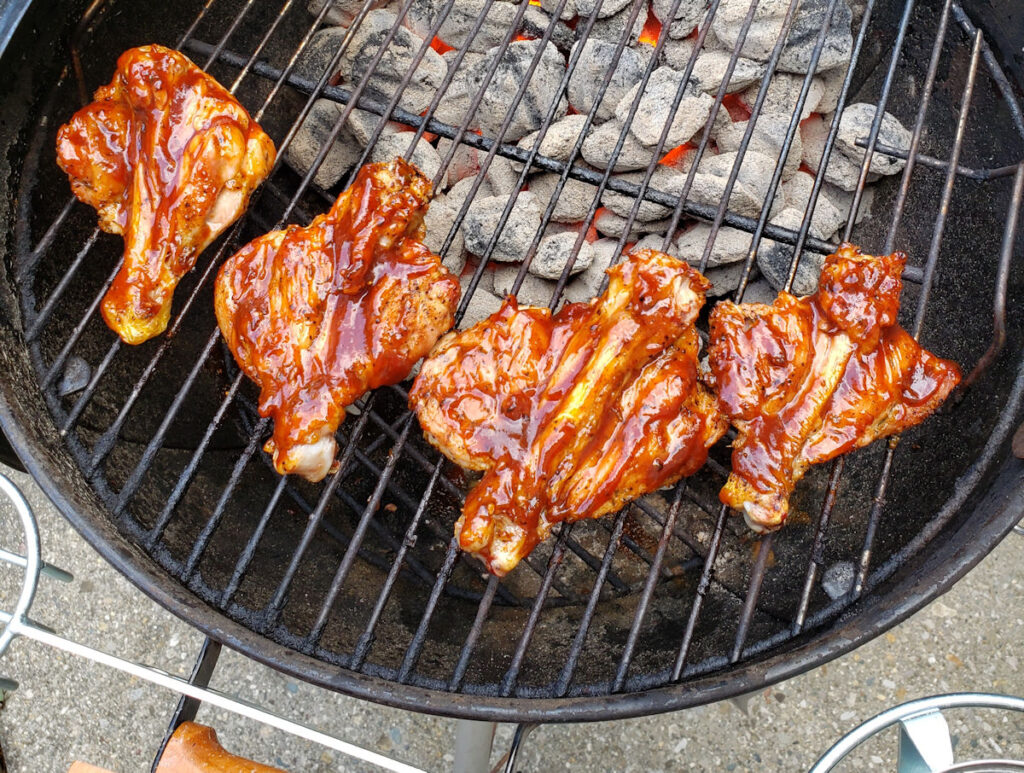
Grilled butterflied chicken legs aren’t new to the grilling scene but they have really grown in popularity since the price of wings has skyrocketed over the last few years. Even though wing prices are starting to come back down, I’ve found these legs to be a great (dare I say better?) main dish no matter what. They cook quickly and very evenly. They eat like thighs but are usually much cheaper. I sauced mine with an OG BBQ sauce. The sauce and skin got a nice little char on them, making this some of the best chicken I’ve had. Over charcoal or gas, this is a winner.

Grilled Butterflied Chicken Legs

Don’t be intimidated by the prospect of making grilled butterflied chicken legs. Butterflying the legs is super-easy, specially after you finish the first one. Just cut down the bone first, then along side the bone, pulling the meat flat around it. I thought they looked a little odd at first, kind of ‘bat-like’ but the (minimal) amount of time it takes to do is worth it in the end. Butterflying also gives you a ‘peak inside’ as it were, allowing you to trim out any tough pieces before cooking. That’s a win.

I don’t mess around when it comes time to sauce my legs. I like a good bit of sauce and that means I need a good brush. And one with a long handle. The grill gets hot and saucing (in particular, heavy saucing) takes a bit of time. No reason to sacrifice some arm hair saucing dinner, I’ve always said.

Grilled Butterflied Chicken Legs

My quick fix BBQ beans are a great side for these legs.

Grilled Butterflied Chicken Legs
Print Pin
5 from 1 vote

Grilled Butterflied Chicken Legs

Over charcoal or gas, these legs are a winner.
Course Main
Cuisine American
Keyword chicken legs
Prep Time 15 minutes
Cook Time 45 minutes
Servings 4
Calories 551kcal

Instructions

  • Set up your grill for cooking at 400 F. I prefer to use a charcoal grill set up for indirect and direct cooking, but you can use any grill you want. You can also cook the chicken over direct heat entirely but the cook time will be shorter and you'll have to watch out that you don't burn them.
  • Place the legs onto a cutting board. Working one at a time, hold the legs so that the least-meaty part of the drumstick (known as the shallow side) is on top. Using a sharp knife (I prefer to use a paring knife), make a cut down from the top of each leg down to the bottom, cutting all the way to the bone right down the center.
  • Push the meat down and away from the bone while cutting along the sides of the bone from top to bottom. I use my thumb to slide between the meat and bone, pushing the meat down and away from the bone. Make sure you don't cut all the way through the meat. You'll end up with a relatively flat piece of meat on each side of the bone, with the mostly detached bone in the middle. I take this opportunity to trim out and tough bits, like tendons, that might be present on the legs so they are more tender.
  • Season both sides of the butterflied legs. Don't be shy. For extra flavor, refrigerate the wings for 1 hour before grilling.
  • Place legs onto the grill bone-side down. Grill for 25-30 minutes or until the internal temperature reaches 145 F.
  • Flip the legs and cook until they reach 165 F, another 5-10 minutes. The legs are now bone-side up.
  • Sauce the butterflied legs liberally with BBQ sauce, flip and with move to direct heat. Cook for 5 minutes.
  • Sauce the tops of the legs and flip. Cook another 5 minutes over direct heat to get the meat-side of the legs a little char.

Nutrition

Calories: 551kcal | Carbohydrates: 0.4g | Protein: 42g | Fat: 41g | Saturated Fat: 11g | Polyunsaturated Fat: 9g | Monounsaturated Fat: 17g | Trans Fat: 0.2g | Cholesterol: 240mg | Sodium: 216mg | Potassium: 523mg | Vitamin A: 237IU | Vitamin C: 1mg | Calcium: 23mg | Iron: 2mg

Nutritional values are approximate.

Sous Vide Grilled Chicken Breast

Salad week was coming. Every few weeks we switch to making salads for a while. Our favorite protein for salad is sous vide grilled chicken breast. My worst fear is that the chicken will not impress. That it’ll be chew and as dry as the desert. Well, no tough, dry chicken here. This chicken comes out crazy juicy, super tender and big-time packed with flavor. Perfect for salads, thanks to a slow cooking process using an immersion circulator. It’s also got a lightly smoky flavor with a great light char. That’s thanks to a few minutes on a hot grill.

Sous Vide Grilled Chicken Breast

I used fresh thyme sprigs when I made this sous vide grilled chicken breast. The thyme flavor isn’t over-powering (I used 2 sprigs per breast). If you want a pronounced herb flavor, add more. You can also use any other fresh herb that you like. You can also leave it out and still have wonderfully tasty chicken. Just don’t be shy with the salt and pepper. This is the time to add flavor, before it’s cooked.

I use an Anova sous vide cooker. It’s my immersion circulator workhorse!

You can use this same recipe for cooking bone-in chicken breasts instead.

Sous Vide Grilled Chicken Breast
Print Pin
5 from 1 vote

Sous Vide Grilled Chicken Breast

The perfect chicken for sandwiches or salads.
Course Main
Cuisine American
Keyword chicken, sous vide
Prep Time 15 minutes
Cook Time 1 hour 15 minutes
Servings 4
Calories 534kcal

Ingredients

Instructions

  • Fill a container with water. Add your immersion circulator and get the temperature to 146.5 F.
  • Brush the chicken breasts with the oil.
  • Season well with salt and pepper. Get the seasoning on all sides and don't be shy with it.
  • Transfer the chicken to a sealable vacuum bag. Add the sprigs of thyme on top.
  • Seal the bag using a vacuum sealer.
  • Transfer the bag to the heater water and cook for 1 hour.
  • Remove the bag from the water.
  • Remove the chicken. Discard the thyme and pat the chicken dry with the a paper towel.
  • Fire up your grill for direct cooking over high heat. We're not looking to cook the chicken (it's already fully cooked). We just want to get some grill marks on it and add some texture.
  • Lightly spray the chicken with non-stick spray (you could also use more olive oil if desired) and transfer to the grill. Grill for just a minute or two and rotate 90 degrees and cook another minute or two.
  • Flip and repeat on the other sides to get grill marks.
  • Remove and let rest 5 minutes before serving.

Nutrition

Calories: 534kcal | Carbohydrates: 1g | Protein: 96g | Fat: 13g | Saturated Fat: 3g | Polyunsaturated Fat: 2g | Monounsaturated Fat: 5g | Trans Fat: 0.1g | Cholesterol: 289mg | Sodium: 678mg | Potassium: 1701mg | Fiber: 1g | Sugar: 0.1g | Vitamin A: 364IU | Vitamin C: 12mg | Calcium: 44mg | Iron: 2mg

Nutritional values are approximate.

Smash Burgers with Zesty Sauce

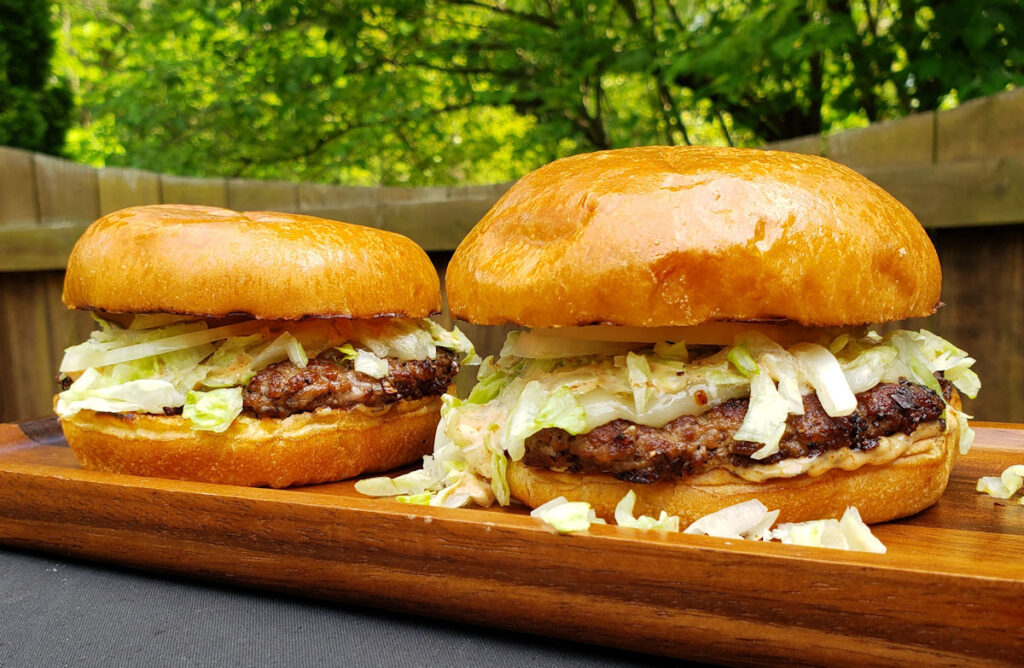
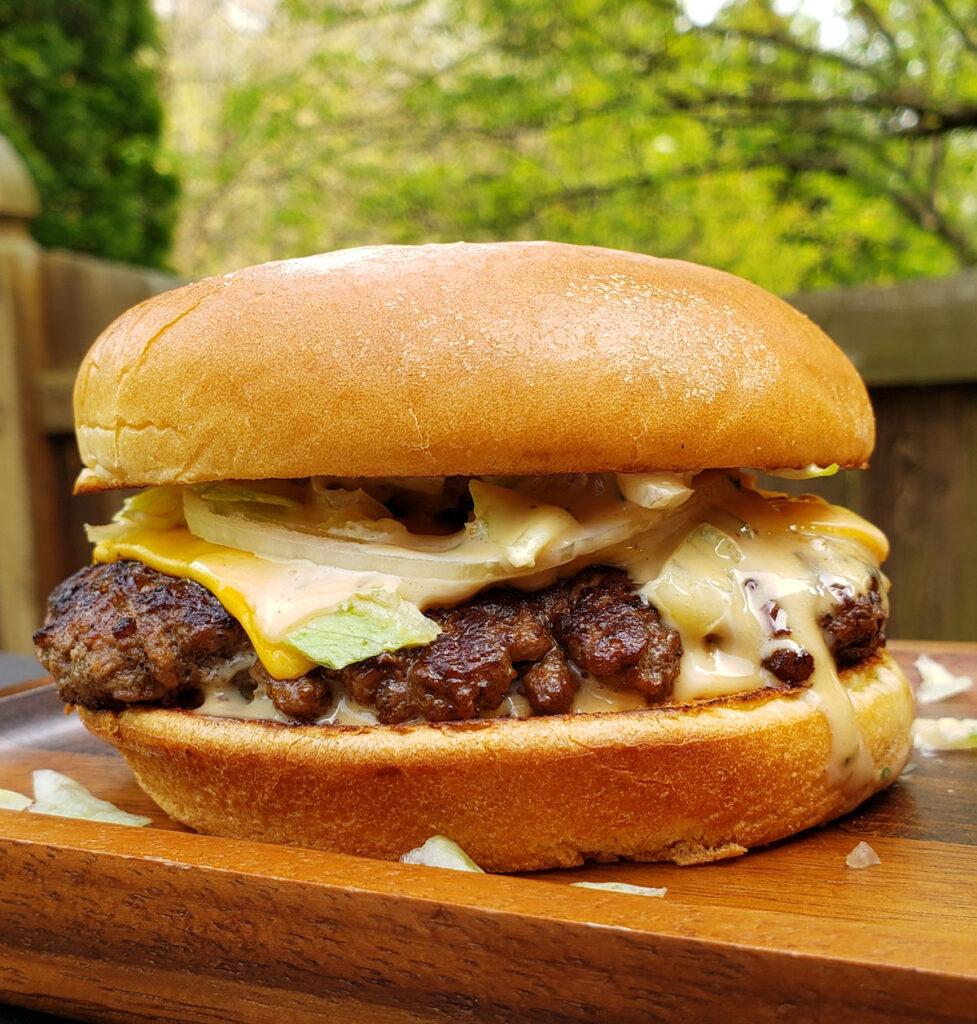
Oh me. This is why today was a happy day. A very happy day. I made smash burgers with zesty sauce. Nothing could make me happier. Perfectly cooked patties with that awesome smash burger crust. Lettuce. Onion. And then there’s the sauce. The amazing sauce. Everything good is in the sauce. Including soy sauce. That’s where this sauce went from fantastic to amazing.

Smash Burgers with Zesty Sauce

I can’t say enough how great these smash burgers with zesty sauce were. And they checked one of my required boxes for burgers: messy. The messier, the better. If it isn’t messy it doesn’t have enough ‘stuff’ on it. These burgers have stuff and then some.

Making these burgers isn’t difficult. You don’t need a bunch of fancy equipment or a lot of time. Just a hot griddle and a burger press. Any griddle will do, whether it’s on a grill (I use my Weber), cooktop, stove or even a standalone outdoor flattop. Just get those patties nice and thin and use quality fresh toppings. And a great sauce.

Also try my steakhouse smash burgers.

Smash Burgers with Zesty Sauce
Print Pin
5 from 1 vote

Smash Burgers with Zesty Sauce

The perfect burgers with the perfect sauce.
Course Main
Cuisine American
Keyword smash burgers
Prep Time 15 minutes
Cook Time 20 minutes
Servings 4
Calories 721kcal

Ingredients

For the sauce (makes extra)

For the burgers

  • 1 pound ground beef formed into four 4-ounce patties
  • kosher salt to taste
  • ground black pepper to taste
  • 4 hamburger buns
  • 4 slices cheddar cheese or American cheese
  • 4 pieces iceberg lettuce torn or chopped
  • 4 slices tomato
  • 4 slices onion
  • 6 slices dill pickle

Instructions

For the sauce

  • Combine all ingredients. Refrigerate at least 30 minutes before serving.

For the burgers

  • Fire up your grill for direct medium-high heat cooking. You can also use an outdoor or indoor griddle or a large skillet on a stove.
  • Season the burger patties with salt and pepper on both sides. Don’t be shy with the seasoning.
  • Place the patties on grill. Smash down with a spatula or grill press.
  • Grill the burgers for 2-3 minutes per side.
  • Top the patties with cheese and grill until they’ve reached your desired doneness and the cheese is melted. Remove from the grill.
  • Toast the buns as desired.
  • Make the burgers by first spreading some of the sauce on the bun bottoms.
  • Add a burger patty.
  • Add onion, lettuce, tomato and pickle slices.
  • Slather the top bun with more of the sauce and serve.

Notes

Patties 4-5 ounces in weight work best.

Nutrition

Calories: 721kcal | Carbohydrates: 32g | Protein: 30g | Fat: 52g | Saturated Fat: 16g | Polyunsaturated Fat: 14g | Monounsaturated Fat: 16g | Trans Fat: 1g | Cholesterol: 109mg | Sodium: 2660mg | Potassium: 823mg | Fiber: 5g | Sugar: 10g | Vitamin A: 1348IU | Vitamin C: 13mg | Calcium: 349mg | Iron: 5mg

Nutritional values are approximate.
Steakhouse Smash Burgers

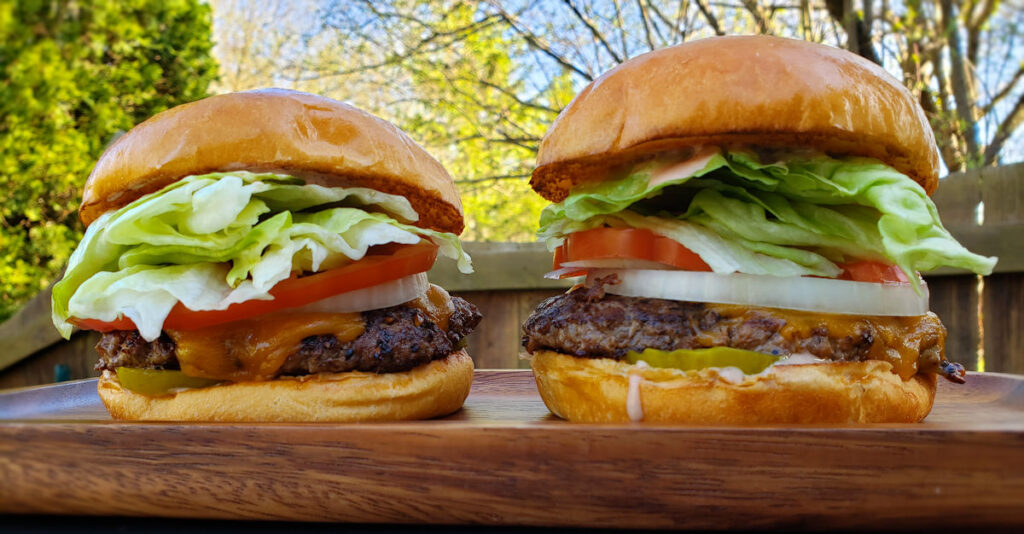
Oh man did these steakhouse smash burgers ever hit the spot. Juicy patties. Crisp fresh toppings. All with a wonderful creamy sauce that has a little tang that’s not so strong it hides all the great burger flavors. These burgers are proof that even the simplest sauce can make a ‘plain’ burger something special. I love smash burgers and this right here is exactly why. You can’t beat them, from ease-of-cooking to fantastic flavor, they’re always a winner.

Steakhouse Smash  Burgers

Making steakhouse smash burgers isn’t difficult. You don’t need a bunch of fancy equipment or a lot of time. Just a hot griddle and a burger press. Any griddle will do, whether it’s on a grill (I use my Weber), cooktop, stove or even a standalone outdoor flattop. Just get those patties nice and thin and use quality fresh toppings. And a great sauce. Once you have the steps down you’ll be cranking out smash burgers all day long with ease.

Of course you can use any toppings you want. Sometimes I just go with cheese. These burgers don’t have to be all fancy fru-fru. They just have to be great (and they are!).

Also try my smash burgers with zesty sauce.

Steakhouse Smash Burgers
Print Pin
5 from 1 vote

Steakhouse Smash Burgers

Get those patties nice and thin and use quality fresh toppings.
Course Main
Cuisine American
Keyword smash burger
Prep Time 15 minutes
Cook Time 22 minutes
Servings 4
Calories 572kcal

Ingredients

For the sauce

For the burgers

  • 1 pound ground beef formed into four 4-ounce patties
  • kosher salt to taste
  • ground black pepper to taste
  • 4 burger buns
  • 4 slices cheddar cheese or American cheese
  • 4 slices onion
  • 1 pieces iceberg lettuce torn or chopped
  • 4 slices tomato
  • 6 slices dill pickle

Instructions

For the sauce

  • In a small bowl, whisk together the mayonnaise and steak sauce. Refrigerate until ready to use.

For the burgers

  • Fire up your grill for direct medium-high heat cooking. You can also use an outdoor or indoor griddle or a large skillet on a stove.
  • Season the burger patties with salt and pepper on both sides. Don’t be shy with the seasoning.
  • Place the patties on grill. Smash down with a spatula or grill press.
  • Grill the burgers for 2-3 minutes per side.
  • Top the patties with cheese and grill until they’ve reached your desired doneness and the cheese is melted. Remove from the grill.
  • Toast the buns as desired.
  • Make the burgers by first spreading some of the sauce on the bun bottoms.
  • Add a burger patty.
  • Add onion, lettuce, tomato and pickle slices.
  • Slather the top bun with more of the sauce and serve.

Notes

Patties 4-5 ounces in weight work best.

Nutrition

Calories: 572kcal | Carbohydrates: 31g | Protein: 29g | Fat: 36g | Saturated Fat: 13g | Polyunsaturated Fat: 5g | Monounsaturated Fat: 13g | Trans Fat: 1g | Cholesterol: 100mg | Sodium: 2450mg | Potassium: 761mg | Fiber: 4g | Sugar: 9g | Vitamin A: 920IU | Vitamin C: 11mg | Calcium: 339mg | Iron: 5mg

Nutritional values are approximate.

Smash Burger Patty Melts

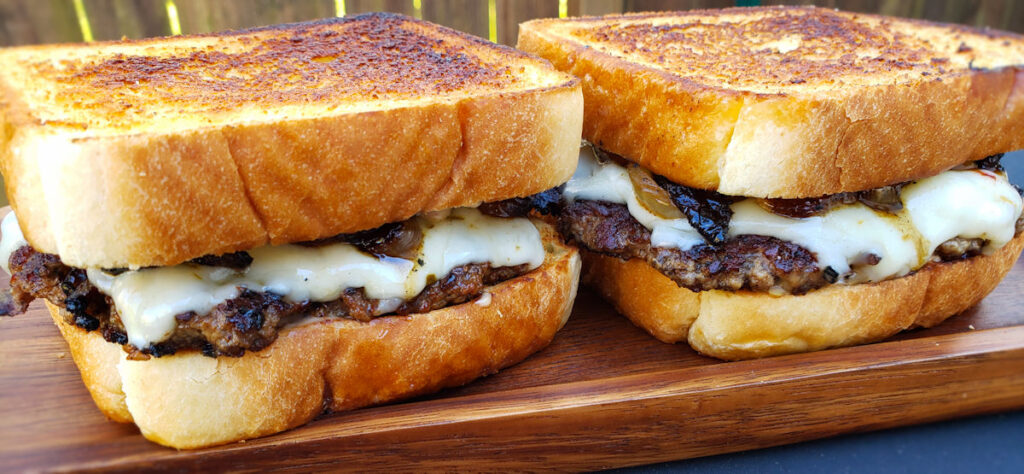
My wife and I had lunch at a burger pub the other day. She ordered their patty melt. It looked (and was) delicious. She said it was the best patty melt she’d ever had. “A challenge!” I thought. Time get make something even better. At home. And I did. These smash burger patty melts are now the best patty melts she’s ever had. They’re tastier. Juicer. And less messy. And made with our favorite, smash burgers instead of overly-thick patties.

Smash Burger Patty Melts

To make smash burger patty melts, you’ll need some sort of griddle or grill pan or even cast iron skillet for your grill. I use a big ole cast iron griddle. Yes, I have one for most of my grills because they’re great for more than just burgers. I find myself using them all of the time. They don’t take up the entire grill surface so I can still cook on the grates too if I need.

I don’t go crazy nuts obsessing about it, but I like to keep my griddle pretty clean. Specially if I’m toasting bread. No one wants yesterdays chicken on today’s Texas toast. I use these scrubby pads attached to a long handle holder that prevents me from burning myself.

Last, I gotta get my patties thin and spread out. I use a burger press. I wrap the bottom in foil for easy clean up. This press makes for fantastic smash burgers with the right thickness so I get that little crunch around the edges. Perfect!

Also try my not-so-plain plain ole smash burgers and my pub sauce smash burgers!

Smash Burger Patty Melts
Print Pin
5 from 1 vote

Smash Burger Patty Melts

Flavor-packed patty melts that never disappoint!
Course Main
Cuisine American
Keyword burgers
Prep Time 15 minutes
Cook Time 30 minutes
Servings 4
Calories 787kcal

Equipment

Ingredients

For the sauce

For the burgers

  • mayonnaise
  • 8 pieces Texas Toast
  • 4 tablespoons unsalted butter cut into squares, divided
  • 1 large sweet onion sliced thin
  • 2 tablespoons Worcestershire sauce
  • 20 ounces ground beef I prefer 5 ounce patties for this. You don't have to be super accurate with the weight.
  • your favorite burger seasoning to taste. Salt and pepper works great too
  • 4 slices Swiss cheese
  • 4 slices pepper jack cheese

Instructions

For the sauce

  • Whisk together all ingredients in a small bowl.
  • Cover and refrigerate until ready to use.

For the burgers

  • Fire up your grill with a griddle or grill pan over direct medium-high heat.
  • Clean your griddle well. I use a brush and water, it works better than a scraper. Just be careful adding water to a hot griddle. DO NOT have any body parts nears the griddle when you add the water as it will instantly create a cloud of very hot steam. Then scrub, scrub, scrub. Repeat as necessary. You want the griddle clean to toast the bread.
  • Lightly spread a thin layer of mayonnaise on one side of each slice of bread. Working in batches if necessary, lay the bread mayo-side down on the hot griddle and toast for 2-3 minutes or until lightly brown and crunchy.
  • Flip and lightly brown the non-mayo sides too. Remove to a plate for the final assembly step.
  • Once the griddle is hot add 2 tablespoons of butter. Once melted add the onion and cook for 20 minutes or longer, until they are golden brown and caramelized. Stir and flip often with a spatula or tongs. If they start to burn reduce the heat. If they get too dry add a bit more butter.
  • Stir in the Worcestershire sauce and cook for 1 more minute. Remove to a bowl and cover with foil or a plate to keep warm.
  • Form burger into 4 5-ounce patties. Don't pack them tightly, just get them lightly shaped.
  • Season beef on both sides. Don't be shy with it.
  • Add remaining 2 tablespoons of butter to the griddle. Add the burgers. Let them cook for 3 minutes then smash out as thinly as possible using a burger press.
  • Continue cooking burgers until you see a bit of a crunchy edge. Flip.
  • Cook burgers another 3 minutes. Add 1 slice of Swiss and 1 slice of pepper jack to each patty.
  • Divide the onion between the patties. Grill another minute or two to melt the cheese.
  • Divide sauce between the non-mayonnaise sides of the bread. Use a little or a lot, it's up to you.
  • Add the cooked patties and top bread slices and serve!

Notes

This recipe is best made using a griddle on a gas or charcoal grill. You can also use a griddle grill. If you don’t have a griddle you can use a large cast iron skillet, but you’ll have to cook the burgers in batches.

Nutrition

Calories: 787kcal | Carbohydrates: 12g | Protein: 35g | Fat: 66g | Saturated Fat: 27g | Polyunsaturated Fat: 10g | Monounsaturated Fat: 22g | Trans Fat: 2g | Cholesterol: 173mg | Sodium: 621mg | Potassium: 620mg | Fiber: 1g | Sugar: 8g | Vitamin A: 742IU | Vitamin C: 9mg | Calcium: 369mg | Iron: 4mg

Nutritional values are approximate.
Easy Spicy Grilled Potatoes

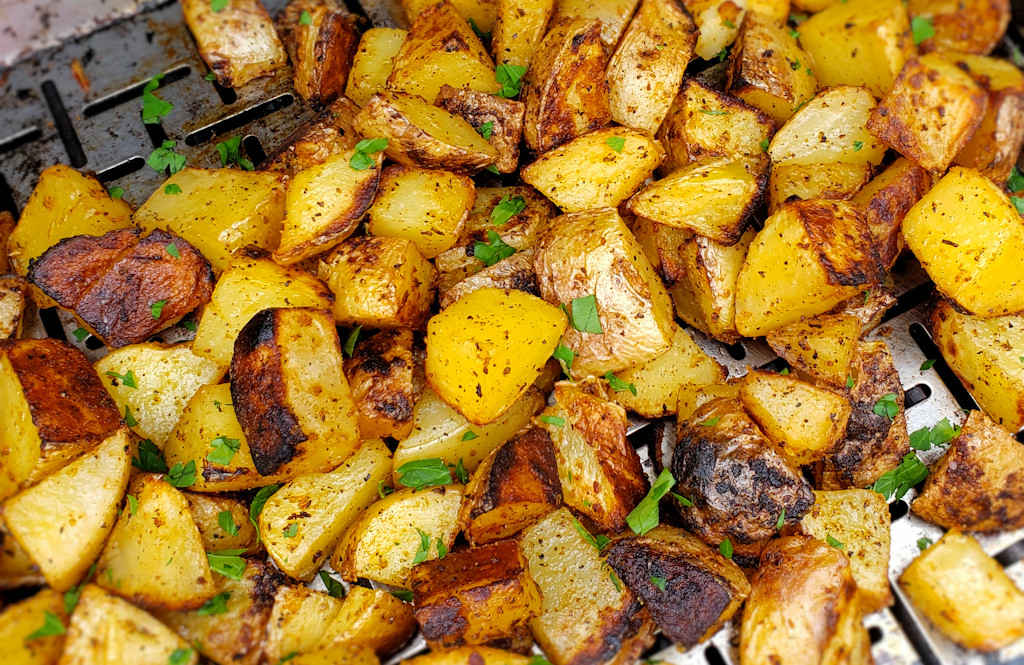
This is my go-to dish when I am looking for a quick side for whatever I’m grilling (I love my Weber grills!) for dinner. These easy spicy grilled potatoes are packed with flavor. Yeah, they have a kick, but I control how much of a kick I’m in the mood for that day. The potatoes come out cooked perfectly. Creamy inside, with a light crunchy grilled exterior. Pre-cooking the potato ensures they all get cooked evenly. There’s nothing worse than biting into a pile of potatoes and finding one that is under-cooked. That’s potato sadness there. No one wants potato sadness!

Easy Spicy Grilled Potatoes

Since I’m already grilling I prefer to pre-bake the potatoes for these easy grilled spicy potatoes on the grill. They can also be done ahead of time in the oven at 400 F. For bigger potatoes I like to use potato nails to make sure the insides get done perfectly.

You can’t make these potatoes without a grill basket. The stainless steel ones from Weber have lasted me forever and the large-sized ones hold a ton of potatoes (or whatever I’m grilling).

The potatoes haven’t done anything to you so be gentle when you flip them. Just one time is all you need.

Easy Spicy Grilled Potatoes
Print Pin
5 from 1 vote

Easy Spicy Grilled Potatoes

This is one of those to-taste recipes.
Course Side
Cuisine American
Keyword grilled, potatoes
Prep Time 10 minutes
Cook Time 1 hour 15 minutes
Servings 4
Calories 146kcal

Ingredients

Instructions

  • Fire up your grill for indirect cooking. You want the temperature at the grates to be 350-400 F.
  • Rinse off the potatoes and pat dry.
  • Use a knife to poke 3-4 holes in the tops of the potatoes, going about 1/2 of the way into the potato.
  • If you’re using potato nails insert them now.
  • Drizzle the potatoes with just a bit of oil. Use your hand to rub the oil all over the potato. If you don’t want to get your hands oily just use a brush.
  • Sprinkle the potatoes with salt. Don’t be shy with it and make sure you get all sides.
  • Transfer the potatoes to the grill and cook for about 30-45 minutes. If you're not sure how consistent or high your grill temperature is, I recommend checking them after 30 minutes.
  • The potatoes are done when you can insert a knife or skewer and it enters the flesh but still meets with some resistance. You aren't fully cooking them, just getting them just soft. You don't want them to fall apart later when you cut them
  • Remove and let cool slightly. Meanwhile, crank up your grill for direct cooking over medium-high heat.
  • Cut the potatoes in 1/4" – 1/2" cubes and transfer to a large bowl.
  • Add a little splash of oil to the potatoes and stir gently to coat.
  • Sprinkle with salt, pepper, cayenne and garlic powder. My suggestion is don't be shy with any of them, but add them all to taste. Stir gently to coat.
  • Transfer the potatoes to a grill basket and place on a hot grill over direct heat.
  • Grill the potatoes until they start to get golden brown with a light char on the bottoms. Flip gently and cook until golden brown on the other side.
  • Remove from grill and transfer the potatoes to a platter. Sprinkle with chopped parsley and serve.

Notes

This is a great recipe for using up those odd-shaped potatoes at the bottom of a bag of potatoes.

Nutrition

Calories: 146kcal | Carbohydrates: 33g | Protein: 4g | Fat: 0.1g | Saturated Fat: 0.05g | Polyunsaturated Fat: 0.1g | Monounsaturated Fat: 0.003g | Sodium: 9mg | Potassium: 769mg | Fiber: 2g | Sugar: 1g | Vitamin A: 2IU | Vitamin C: 11mg | Calcium: 24mg | Iron: 2mg

Nutritional values are approximate.
Pub Sauce Smash Burgers

Oh man did these Pub Sauce smash burgers ever hit the spot. Juicy patties. Crisp fresh toppings. All with a wonderful sauce that is a combination of just about every good burger sauce you can think of. It’s reminiscent of a creamy steak sauce but it’s not too thick. It’s got a hint of sweetness. A bit saltiness. A little Asian-inspired flavor. And my favorite, garlic. Every bite is an unami-festival. These burgers are proof that even the simplest sauce can make a ‘plain’ burger something special. Sure, there are a few ingredients, but nothing fancy and nothing complicated.

Pub Sauce Smash Burgers

Making Pub Sauce smash burgers isn’t difficult. You don’t need a bunch of fancy equipment or a lot of time. Just a hot griddle and a burger press. Any griddle will do, whether it’s on a grill, cooktop, stove or even a standalone outdoor flattop. Just get those patties nice and thin and use quality fresh toppings. And a great sauce.

Also try my smash burger patty melts.

Pub Sauce Smash Burgers
Print Pin
5 from 1 vote

Pub Sauce Smash Burgers

Get those patties nice and thin and use quality fresh toppings.
Course Main
Cuisine American
Keyword smash burgers
Prep Time 15 minutes
Cook Time 20 minutes
Servings 4
Calories 831kcal

Ingredients

For the sauce

For the burgers

  • 1 pound ground beef formed into four 4-ounce patties
  • kosher salt to taste
  • ground black pepper to taste
  • 4 hamburger buns
  • 4 slices cheddar cheese or American cheese
  • 4 pieces iceberg lettuce torn or chopped
  • 4 slices tomato
  • 4 slices onion
  • 6 slices dill pickle chips

Instructions

For the sauce

  • Combine all ingredients. Refrigerate until ready to use.

For the burgers

  • Fire up your grill for direct medium-high heat cooking. You can also use an outdoor or indoor griddle or a large skillet on a stove.
  • Season the burger patties with salt and pepper on both sides. Don’t be shy with the seasoning.
  • Place the patties on grill. Smash down with a spatula or grill press.
  • Grill the burgers for 2-3 minutes per side.
  • Top the patties with cheese and grill until they’ve reached your desired doneness and the cheese is melted. Remove from the grill.
  • Toast the buns as desired.
  • Make the burgers by first spreading some of the sauce on the bun bottoms.
  • Add a burger patty.
  • Add onion, lettuce, tomato and pickle slices.
  • Slather the top bun with more of the sauce and serve.

Notes

Patties 4-5 ounces in weight work best.

Nutrition

Calories: 831kcal | Carbohydrates: 35g | Protein: 31g | Fat: 63g | Saturated Fat: 17g | Polyunsaturated Fat: 21g | Monounsaturated Fat: 19g | Trans Fat: 1g | Cholesterol: 115mg | Sodium: 3111mg | Potassium: 868mg | Fiber: 4g | Sugar: 12g | Vitamin A: 1171IU | Vitamin C: 13mg | Calcium: 358mg | Iron: 5mg

Nutritional values are approximate.
St Louis-Style Ribs using a Rotisserie

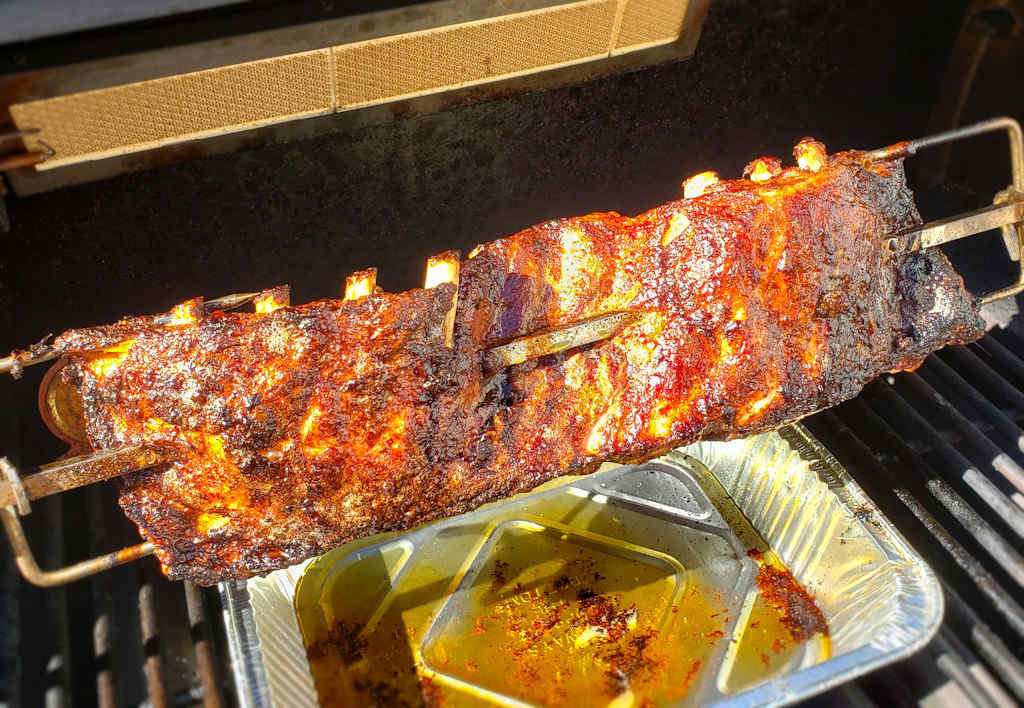
Rotisserie St Louis-style ribs are something I’ve been wanting to make for some time. I usually smoke my ribs, low-and-slow or high-and-fast on my smoker. This time I decided to give ribs on my gas grill a shot to see if I would like them as much as my ‘traditional’ method of cooking ribs. Well, by golly, I did and then some! I really enjoyed these ribs. They had great flavor. They were still moist and were as tender as could be. And they had this slight crunchiness to the skin that was just fantastic. Oh, and they were easy to make to boot! These were winner-winner ribs for sure!

St Louis-Style Ribs using a Rotisserie

When you put your ribs on your grill it’s important that they do not sit (well, spin) over direct heat. If you look at the very far right of my picture above you’ll see that the very end of my rack got a little dark. That’s because there’s a burner right below that part of the ribs. I didn’t realize that until it was too late. I learned from my experience. The rest of the ribs were fantastic and I’d make them again and again (but I’d make sure that they were 100% in indirect heat!).

I put the apple juice into a cheap spray bottle and then spritz the ribs every 30 minutes or so. Spraying them is easier than using a brush and it makes sure I’m not brushing off any of the seasoning.

St Louis-Style Ribs using a Rotisserie
Print Pin
5 from 1 vote

St Louis-Style Ribs using a Rotisserie

These were winner-winner ribs for sure!
Course Main
Cuisine American
Keyword grilled, ribs, rotisserie
Prep Time 15 minutes
Cook Time 3 hours 30 minutes
Servings 4
Calories 630kcal

Ingredients

Instructions

  • Spread the mustard on all sides of the ribs. Just a light coating will do.
  • Sprinkle the rub over the ribs and pat gently to adhere. Don't forget to get the back and sides of the ribs.
  • Fire up your grill for rotisserie cooking over medium-low heat, around 300 F. Place a large drip pan under the rotisserie.
  • Skew the ribs onto the rotisserie. Be careful doing this. Never put your hands where the sharp end can skewer you and not the ribs! Run the spit thru the first and second bone on one end. Bend the ribs slightly (like an 'S') and skewer between the next set of bones where you can skewer without breaking the ribs. Finally run the spit thru the last two bones. Secure with the rotisserie forks. It's ok if you have to remove the spit and try again to get the ribs nice and skewered down the middle. An extra hole or two isn't going to hurt anything!
  • Place the spit onto the grill and start the motor. Close the grill lied and cook for 2 – 3 hours or until the meat on the bones has pulled back from the ends by about 1/2". I like to spray my ribs with apple juice ever 30 minutes while they spin. You can also brush them with the apple juice but do so carefully as you don't want to brush off your seasoning.
  • Brush the ribs with BBQ sauce and let cook another 10 minutes for the sauce to set.
  • Carefully remove the spit from the grill using thick grill gloves and remove the ribs. Cover with foil and let rest 15 minutes before slicing and serving.

Nutrition

Calories: 630kcal | Protein: 35g | Fat: 53g | Saturated Fat: 17g | Polyunsaturated Fat: 9g | Monounsaturated Fat: 19g | Trans Fat: 1g | Cholesterol: 182mg | Sodium: 184mg | Potassium: 551mg | Calcium: 34mg | Iron: 2mg

Nutritional values are approximate.

Spice-Brined Grilled Chicken Breasts

I could not have been happier with how these spice-brined grilled chicken breasts turned out. I was looking for tender, flavor-packed, juicy chicken to use in a big batch of chicken salad. And that’s exactly what I got. I grilled my chicken (in this case, split chicken breasts, but boneless skinless will work just fine too) on cedar planks for a little extra flavor and aroma, but you can skip that and do them directly on your grill grates too.

Spice-Brined Grilled Chicken Breasts

I am not a fan of skin-on chicken when it comes to brining although you can certainly use it if you want. Leaving the skin on normally does help keep the meat from drying out, but that’s not really needed here. And no way is it going to get crispy enough to enjoy. So, skip it if you want. I did. This spice-brined grilled chicken breasts recipe doesn’t need any tinkering with. It’s great just as it is.
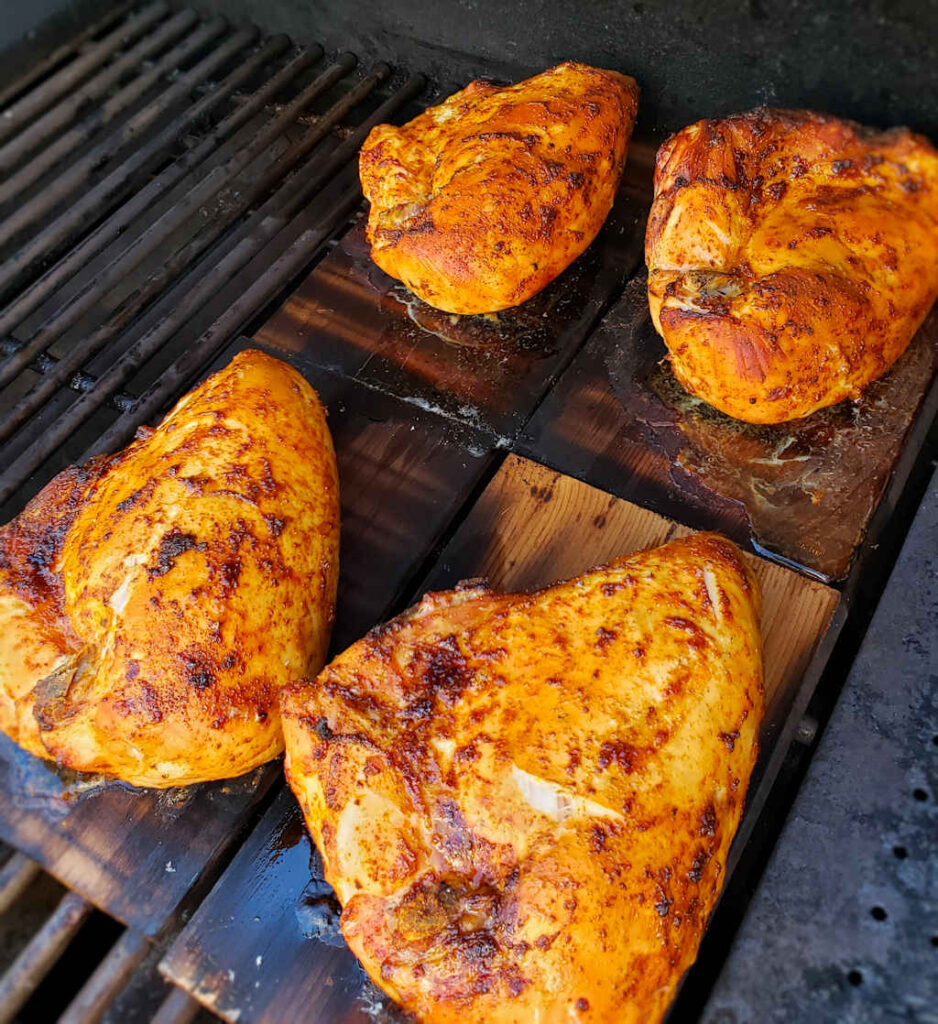
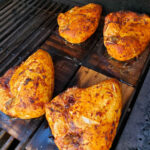
You can use any seasoning on the chicken you want, but I would shy away from anything heavy on salt (you already brined it it) and sugar (it’ll burn over the high grill heat).

Also try my grilled Dijon chicken and my outrageously-good butterflied chicken legs.

Spice-Brined Grilled Chicken Breasts
Print Pin
5 from 1 vote

Spice-Brined Grilled Chicken Breasts

You can use any seasoning on the chicken you want, but I would shy away from anything heavy on salt (you already brined it it) and sugar (it'll burn over the high grill heat).
Course Main
Cuisine American
Keyword brined, poultry
Prep Time 2 hours 15 minutes
Cook Time 2 hours 15 minutes
Servings 8
Calories 701kcal

Ingredients

For the brine

For the chicken

Instructions

For the brine

  • Place water in a large pot over medium-high heat.
  • Stir in the salt, sugar, garlic, sage, basil, peppercorns and the bay leaf. Bring to a simmer and continue simmering, stirring often, for about 20 minutes. Make sure that the salt and sugar are completely dissolved.
  • Remove pot from heat, cover and let cool completely, at least 2 hours.

For the chicken

  • Add the chicken to the brine and transfer the pot to the fridge for 2 hours and up to 4 hours maximum.
  • If cooking the chicken on cedar planks, begin soaking them in water 30 minutes before using.
  • Fire up your grill for direct and indirect cooking.
  • If using planks, char the planks over direct heat on both sides first. Add the chicken and move the planks to indirect heat and continue cooking, 30-45 minutes or until the chicken measures 165 F with a thermometer.
  • Place chicken directly on the grates over high heat and sear on both sides, 2-3 minutes per side. Move the planks to indirect heat and continue cooking, 30-45 minutes or until the chicken measures 165 F with a thermometer.
  • Let chicken rest 10 minutes before serving.

Nutrition

Calories: 701kcal | Carbohydrates: 172g | Protein: 15g | Fat: 4g | Saturated Fat: 2g | Polyunsaturated Fat: 1g | Monounsaturated Fat: 1g | Sodium: 85118mg | Potassium: 1794mg | Fiber: 28g | Sugar: 134g | Vitamin A: 967IU | Vitamin C: 3mg | Calcium: 1669mg | Iron: 57mg

Nutritional values are approximate.