Homemade Red Velvet Klondike Bars

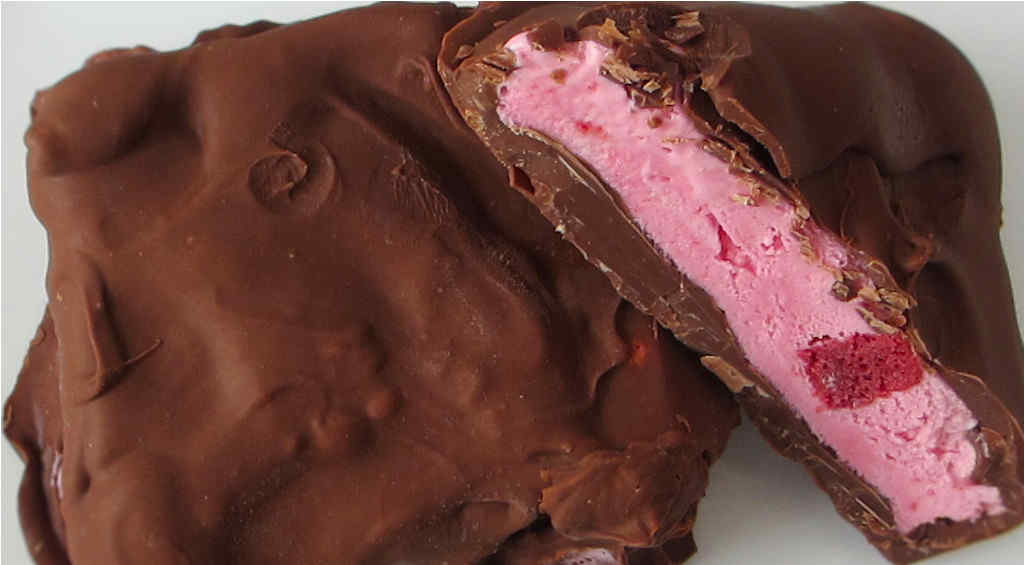
Klondike bars are a very dangerous thing. Whatever gene you have to be born with to control yourself around them is one that I do not have. I thought that the store-bought ones were tempting enough until I made homemade red velvet Klondike bars. Now I know what true temptation is.

Homemade Red Velvet Klondike Bars

I’m not a baker or chocolatier or anything like the experts that make chocolate treats. I was lucky to get the chocolate on these bars in an even remotely even manner. But these homemade red velvet Klondike bars came out tasting fantastic, so I couldn’t care less if some had a bit more chocolate than others.

One of the biggest keys to these bars is the coconut oil. It doesn’t take a lot of the oil, but it’s very important to the texture and sheen of the chocolate.

You can, of course, substitute any ice cream flavor you like. Red velvet ice cream was only available here for a limited time, so I had to grab it while I could. For a simpler but just as crazy good treat, try my homemade mini ice cream sandwiches. If you love red velvet as much as my wife does, my red velvet ice cream cone cupcakes are delicious too!

Also try my frozen yogurt dots.

Homemade Red Velvet Klondike Bars
Print Pin
5 from 1 vote

Homemade Red Velvet Klondike Bars

I thought that the store-bought ones were tempting enough until I made homemade red velvet Klondike bars. Now I know what true temptation is.
Course Dessert
Cuisine American
Keyword dessert, homemade
Prep Time 6 hours
Cook Time 2 hours 20 minutes
Total Time 8 hours 20 minutes
Servings 4 -6 servings
Calories 391kcal

Equipment

Ingredients

Instructions

  • Add ice cream to an 8″ x 8″ baking dish lined with parchment paper. Add enough so that the ice cream is 1/2″ – 1″ thick. Spread out evenly using a spatula.
  • Freeze for at least 6 hours or until the ice cream is completely refrozen.
  • Turn pan upside down to remove the ice cream. Cut into 4-6 equal-sized squares. Return the squares to the freezer to re-freeze.
  • Place coconut oil and chocolate chips into a double boiler over medium heat and and melt, stirring often.
  • Remove chocolate from heat and let cool to room temperature. Do not rush this step.
  • Working quickly, take ice cream squares from freezer and dip into the chocolate.
  • Flip with a fork and quickly remove to parchment paper.
  • Place bars in freezer for 20 minutes.
  • Wrap in thin foil before serving.

Notes

Well-frozen ice cream is key to making sure the chocolate sticks well. Also do not rush cooling the chocolate sauce. It needs to be at room temperature. Any warmer and it will melt the ice cream and not adhere.

Nutrition

Calories: 391kcal | Carbohydrates: 31g | Protein: 5g | Fat: 28g | Saturated Fat: 21g | Cholesterol: 58mg | Sodium: 106mg | Potassium: 263mg | Fiber: 1g | Sugar: 28g | Vitamin A: 556IU | Vitamin C: 1mg | Calcium: 169mg | Iron: 1mg

Nutritional values are approximate.

No Bake Red Velvet Cheesecake

I cannot bake. I’m okay admitting it, too. So when my wife said the other day that she was jonesin’ for a red velvet cupcake, I came up with the next-best-thing: no bake red velvet cheesecake. I opted to make the cheesecake in miniature pre-baked (like I said, I don’t bake, and that includes baking pie crusts!). I like the little crusts because they have built-in portion control. You put a big ole cheesecake in front of me and I might have trouble keeping myself under control. Put a mini cheesecake in front of me and I can manage.

No Bake Red Velvet Cheesecake

You can’t get much easier than this no bake red velvet cheesecake. Just mix a few ingredients together and into the pre-made pie crusts it goes! Great vanilla and cocoa flavor with a perfect creamy texture. Very, very addicting little bites, that’s for sure.

Also try my black forest cheesecake.

No Bake Red Velvet Cheesecake
Print Pin
5 from 1 vote

No Bake Red Velvet Cheesecake

You put a big ole cheesecake in front of me and I might have trouble keeping myself under control. Put a mini cheesecake in front of me and I can manage.
Course Dessert
Cuisine American
Keyword cheesecake
Prep Time 15 minutes
Cook Time 4 hours
Total Time 4 hours 15 minutes
Servings 8
Calories 268kcal

Ingredients

Instructions

  • Place the cream cheese into a mixer bowl and beat until smooth.
  • Add the sour cream, sugar, food coloring, cocoa powder and vanilla extract. Beat until smooth.
  • Gently fold in the whipped topping. Do not over mix.
  • Pour, spoon or pipe the filling into the crust(s).
  • Refrigerate for 4 hours before serving. Top with additional whipped cream if desired.

Nutrition

Calories: 268kcal | Carbohydrates: 21g | Protein: 3g | Fat: 19g | Saturated Fat: 12g | Cholesterol: 47mg | Sodium: 135mg | Potassium: 114mg | Fiber: 1g | Sugar: 21g | Vitamin A: 581IU | Vitamin C: 1mg | Calcium: 80mg | Iron: 1mg

Nutritional values are approximate.

Red Velvet Rice Krispies Treats

These red velvet Rice Krispies treats are as great tasting as they are great looking! They’re so very easy to make and made for a great Valentine’s day snack. Nice and crunchy and sweet, with an amazing red velvet flavor.

Red Velvet Rice Krispies Treats

I made a batch of these Red Velvet Rice Krispies treats for my wife to take to work today. When you cut out the heart shapes you end up with little scraps, which are the perfect snack size!

I love making Rice Krispies treats with a twist. Also try my Shamrock Peeps Rice Krispies. My easy-to-make Rice Krispies with Peeps sryup are great too!

Red Velvet Rice Krispies Treats
Print Pin
5 from 1 vote

Red Velvet Rice Krispie Treats

These treats are as great tasting as they are great looking! They’re so very easy to make and made for a great Valentine’s day snack. Nice and crunchy and sweet, with an amazing red velvet flavor.
Course Dessert
Cuisine American
Keyword red velvet, Rice Krispie treats
Prep Time 5 minutes
Cook Time 30 minutes
Total Time 35 minutes
Servings 24
Calories 68kcal

Ingredients

Instructions

  • Spray a 9″ x 13″ pan with the non-stick spray. Also spray a spatula and the cookie cutter.
  • Melt the butter in a large pot over medium heat.
  • Add in the marshmallows and stir until melted.
  • Stir in the cake mix. The mixture will get thicken as you stir.
  • Pour in the cereal and fold to combine well. The mixture will start to firm up, so work quickly but gently.
  • Pour mixture into the pan and spread out, flattening with the spatula.
  • Place in refrigerator for 15-30 minutes or until set.
  • Cut into hearts. I was able to get 24 hearts using a small Wilton heart cutter.
  • Because we were transporting them, I placed them on wax paper in Tupperware containers and refrigerated them until about 30 minutes before serving.

Nutrition

Calories: 68kcal | Carbohydrates: 1g | Protein: 1g | Fat: 8g | Saturated Fat: 5g | Trans Fat: 1g | Cholesterol: 20mg | Sodium: 1mg | Potassium: 2mg | Sugar: 1g | Vitamin A: 235IU | Calcium: 2mg | Iron: 1mg

Nutritional values are approximate.