Elliott Moss’ Buxton Hall Barbecue’s Book of Smoke is one of my favorite cookbooks. It actually contains more than just recipes, much more, but the recipes are usually very easy to make and yet still fantastic. Smoked grits are about as simple as you can get, but what you do end up with are grits (and I do so love grits) with just a nice hint of smoke. Not crazy overpowering smoke, you want just a hint of it.
Good Grits Make For… Great Grits
One thing I don’t go cheap on is grits. There are a number of small grist mills in Indiana. In fact my father-in-law once worked in the grist mill at Spring Mill State Park. It still operates today, selling freshly ground grits. You can also find quality grits in the grocery store. My motto is: don’t buy the cheap stuff. Grits are a magical thing and being cheap with them just isn’t necessary. To add even more great smoky flavor I use smoked grits to make my grilled corn grits.
I like smoking things that I haven’t smoked before, like these grits. I’ve also smoked peppercorns, which were a new thing for me too. They also came out great.
Smoked grits are about as simple as you can get, but what you do end up with are grits (and I do so love grits) with just a nice hint of smoke. Not crazy overpowering smoke, you want just a hint of it.
Smoked peppercorns are something I’ve been wanting to make for quite some time. I was waiting until I used up the last of the bottle of smoked peppercorns I picked up at Jungle Jim’s outside of Cincinnati. The end result was definitely a lot better than and a lot cheaper than store-bought. This being my first time making these I also learned a lot along the way. I kept some of the peppercorns whole for grinding or cooking later, and some I ground fine for this week’s dishes.
And even though this was my first time, I was beyond happy with the results. It’s kind of hard to mess these up. You’ll want to keep notes on how much wood you use and how long you smoke them. That way the next time you make them you have a starting point. Maybe you’ll want more smoke. Or less. Having those notes will go a long ways to making sure you get the perfect pepper for you!
Grab A Splash Screen
The first thing I needed was some sort of rack to place them on when I put them on the smoker. Someone suggested using a grease splash screen. I found one at Wal-Mart, twisted the handle up, and bam! The perfect tool for smoking peppercorns! I also think this screen will work well when I give smoked salt a try soon!
Smoky. Or Not.
How long you should smoke the peppercorns is up to you. Obviously the longer you smoke them the stronger the smoke flavor. You can go for quite some time, just make sure you keep the temperature around 90 F. You want a cold smoke for the peppercorns, similar to what you’d do for smoking cheese.
This being my first time making these I also learned a lot along the way. I kept some of the peppercorns whole for grinding or cooking later, and some I ground fine for this week’s dishes.
Set up your smoker for cold smoking, 80-90 F. I used 4 lit charcoal briquettes and a large piece of hickory wood. Keep some unlit charcoal on hand for when the charcoal starts to burn out, you may need to add more depending on how long you smoke the peppercorns. You can add unlit charcoal, just make sure you do it soon enough that it gets time to get well-lit from the already-burning coals.
Add the peppercorns to a food-safe screen and place onto the smoker.
Smoke at least 4 hours depending on how much smoke you want. You may want to remove a few peppercorns and grind them to taste for smokiness.
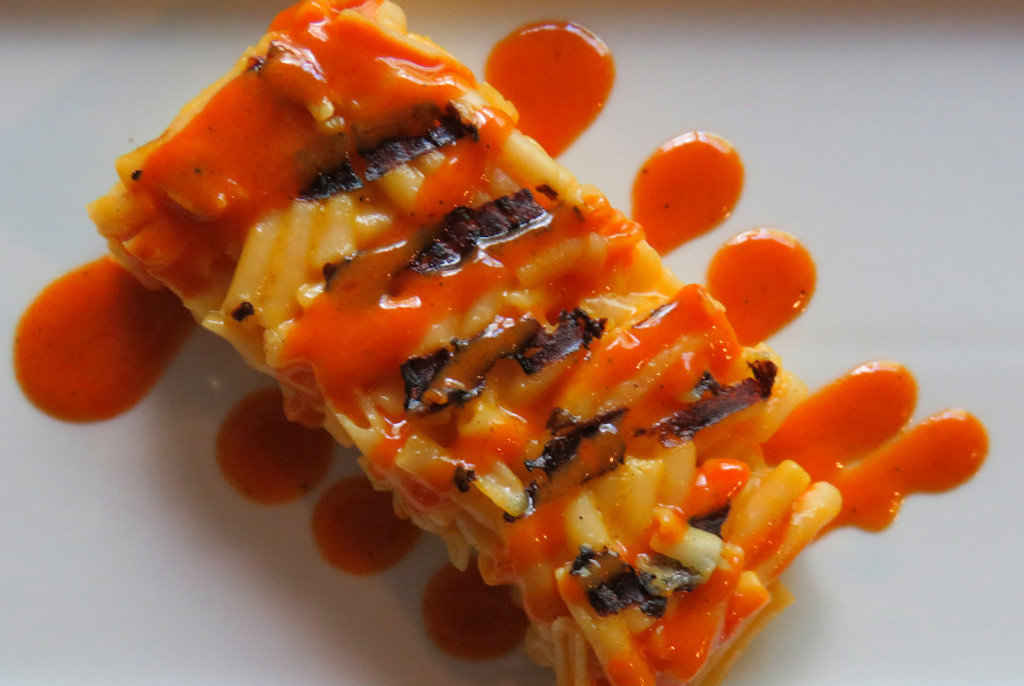
I’m almost too giddy to even write this post. Every time I look at the picture of grilled buffalo mac-and-cheese I flash back to the first time (of many) that I made it. Oooey gooey creaminess with a slight char, drizzled with a spicy homemade Buffalo wing sauce. Make no mistake about it, this is some fantastic macaroni-and-cheese.
A Couple Of Tips
There are two things you have to be mindful of when grilling Buffalo mac-and-cheese. First, make sure your mac is set up good before cutting it. You want it a little solid, a little thick. Second, you want to be careful flipping it on the grill. When the cold mac gets hot it’ll want to return to its original creamy state, and fast. Don’t mess around, flip it, char it, and get it on a plate. Time’s a-wastin’!
I highly recommend that you shred or grate your own cheese at home. Don’t buy the pre-shredded or pre-grated stuff. It has stuff added to it to keep it from sticking together. That ‘stuff’ affects how the cheese melts. Shred it yourself and use the good stuff.
Oooey gooey creaminess with a slight char, drizzled with a spicy homemade Buffalo wing sauce. Make no mistake about it, this is some fantastic macaroni-and-cheese.
Course Side
Cuisine American
Keyword Buffalo, grilled, mac and cheese, macaroni and cheese
For the macaroni-and-cheese (if using made-from-the-box mac, make it per package instructions and skip to step 6)
Bring a large pot of salted water to a boil.
Add pasta and cook until al dente, about 9 minutes.
Drain.
Meanwhile, heat cream in a large skillet.
Add cream cheese and salt and stir until cheese is melted.
Add cheddar and American cheeses and stir until melted.
Add cooked pasta and stir to coat well.
Transfer to a container lined with wax paper. Use a container that is small enough that your mac-and-cheese ends up being at least 1″ thick (thicker is better here).
Place in the fridge and refrigerate at least an hour. You can also place it into the freezer. You want the mac-and-cheese to set up so it can be sliced.
Fire up your grill for direct cooking.
Carefully remove the mac-and-cheese from the container and slice thick.
Transfer to a grill over high heat and grill for just a minute per side, long enough to get grill marks and a bit of a crunch. Do not play with the mac-and-cheese while it’s on the grill or it will crumble. Be careful flipping it. If you lose some, you lose some.
Transfer to a plate and drizzle with plenty of the Buffalo wing sauce.
For the Buffalo wing sauce
Place the butter in a small saucepan over medium heat.
Once the butter is melted add the remaining ingredients.
Bring to a boil then reduce heat to a simmer and continue simmering for 5 minutes, stirring often.
Remove from heat and let cool before using.
Notes
You can also make this using your favorite hot sauce instead of Buffalo wing sauce.
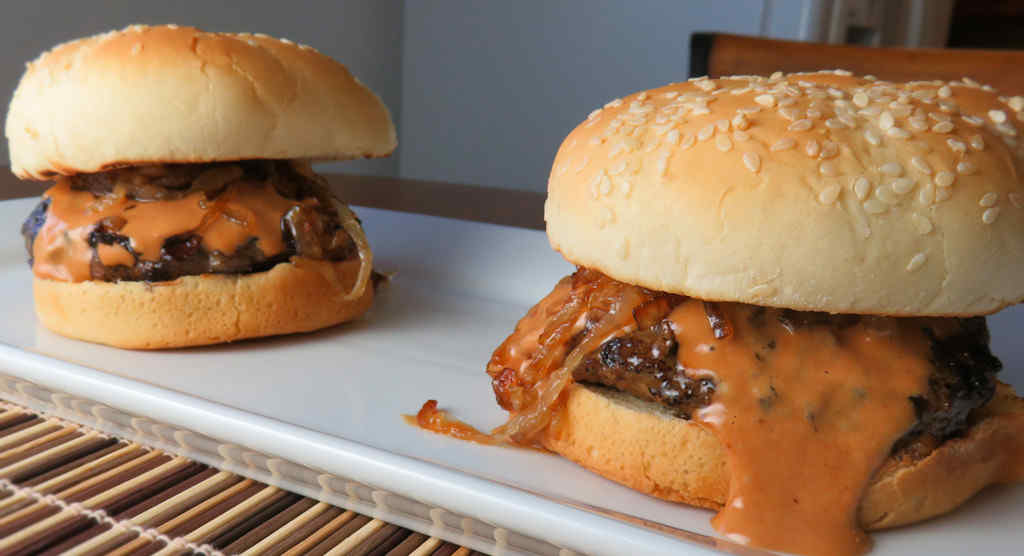
Wow, talk about a burger that just rocketed to the top of our favorite-to-make list. These campfire burgers are just packed with flavor, inside and out. The patties are not boring, combining ground beef with cheese, bacon, Worcestershire sauce and just a hint of smokiness. And then there’s the caramelized onions. Caramelized onions are a wonderful thing but adding balsamic vinegar to them makes them spectacular. And finally, a lightly smoky creamy sauce to top it all off. These burgers are messy, which keeps with my motto: messier is better.
Make Extra Onions. And Sauce.
I recommend making more of the onions than the recipe for these campfire burgers calls for. As in doubling it. On the off-chance that you have leftover onions they are also fantastic on grilled hot dogs. I also recommend making more of the sauce. It’s great to have on hand for, well, hot dogs again, but also po boy sandwiches or even as a dipping sauce for chicken nuggets.
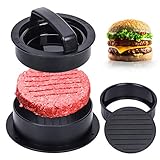
I like to use a burger press when I make burgers. It, in combination with some patty papers, enables me to crank out a whole bunch of equally-sized burger patties in no time at all with little cleanup.
These campfire burgers are just packed with flavor, inside and out. The patties are not boring, combining ground beef with cheese, bacon, Worcestershire and just a hint of smokiness.
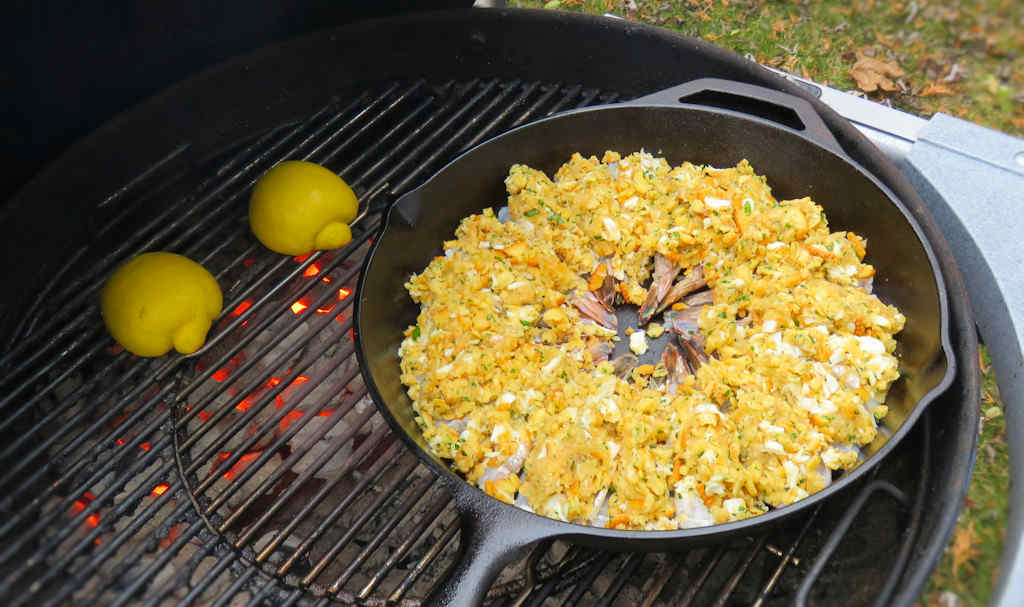
I wanted to seriously up my cooking game. I figured (correctly) that a stop at our local fish mongers, Caplinger’s, would inspire me even more. And so I set off to make crab-stuffed shrimp on the grill. Large shrimp are butterflied, the meat separated from the shells but still connected, and then stuffed with an absolutely delightful mixture of crab and seasonings that reminds me very much of crab cake. I cooked the shrimp over charcoal in a cast-iron skillet, giving the shrimp a light smoky flavor. The end result was out-of-this-world delicious.
These shrimp may seem a bit on the complicated side. Or at least look they are. But they really aren’t. There are basically 3 steps: prepare the shrimp, stuff the shrimp, and cook the shrimp. Now, that’s not so bad, right? The eating them part takes a whole lot less time than the preparing them does. So make extra. A lot extra!
Big Shrimp. Little Shrimp.
For appetizer-sized crab-stuffed shrimp use smaller shrimp, like the 16 count shrimp I used. For main dishes, get some 6-8 count shrimp. The larger the shrimp the easier they are to butterfly and the easier it is to separate the meat from the shell, which is definitely the most difficult part of making these shrimp. The rest is easy peasy.
As I sit here and remember just how fantastic the crab stuffing was in these shrimp, I recall back to the best crabcakes I’ve ever had, at Timbuktu’s in Hanover, Maryland. Their crabcakes have the largest and most delicious chunks of crab in them… mmmmmm…. Boy, they sure were good! I wish I there now!
Use real crab meat for stuffing these shrimp. Not that other stuff. You know the one. Kinda smells crabby. Almost looks crabby. But ain’t crabby. It’s fish. Now, I personally think there’s a place for imitation crab. But this ain’t it.
Large shrimp are butterflied, the meat separated from the shells but still connected, and then stuffed with an absolutely delightful mixture of crab and seasonings that reminds me very much of crab cake.
Fire up your grill for two zone (direct and indirect cooking). Alternatively, you can cook these shrimp in the oven at 350 F.
Cut a slit down the backs of the shrimp. Do not cut all the way thru.
Butterfly the shrimp and remove the vein.
Separate the shell from the meat but do not remove it. The shell will still be attached at the tail, but the meat will not be attached to the shell.
Lightly butter a 7″ cast iron skillet. Add the shrimp, butterflied side up.
Melt 1/2 pound of butter in a large skillet over medium-high heat.
Add the onion and cook for 5 minutes.
Reduce the heat to low and add the garlic and cook for 1 more minute. Remove from heat.
Crumble the crackers into a large bowl. Add the bread, Old Bay seasoning, parsley and salt and pepper to taste. Mix well.
Add most of the melted butter. Do not add any of the onion or garlic, you just want to add the liquid.
Mix and add the mayonnaise. Try to squeeze the mixture together. If it holds together, it’s ready. If it’s too dry add more of the melted butter and a little bit of mayonnaise and mix and try again. Keep adding more butter/mayonnaise until the mixture holds together.
Lightly chop the crab and fold into the cracker mixture.
Working in batches, squeeze a tablespoon or two of the stuffing into a small log shape and place inside the butterflied shrimp. Don’t be shy with the stuffing, you’ll have plenty.
Place over indirect heat or in the oven and cook 20 minutes or until the shrimp is done. The shrimp will be pink in color on the outside and the flesh is opaque. If cooking on the grill rotate your skillet once to achieve consistent cooking.
Place the lemon halves over direct heat on the grill and grill until seared. If cooking in the oven, just use the halves as is – don’t cook them.
Remove skillet and serve with lemon wedges.
Notes
It may seem like a lot of recipe steps, but it’s pretty straightforward and the results are delicious!
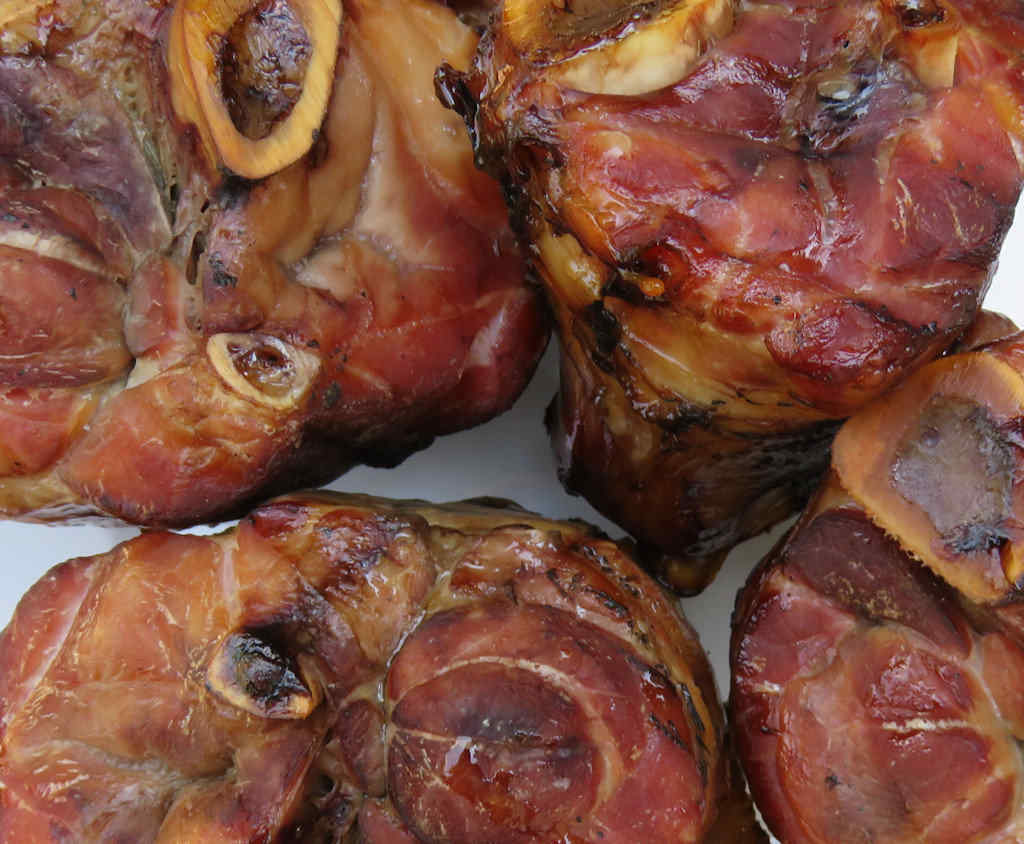
Sometimes what you think might be a mistake can end up being one of the best things that you have ever done. I ordered some pork shanks from our local butcher. My goal was to make pork wings, which are made from the shank. Well, I didn’t explain myself correctly and what I ended up with was a big bag of shanks that had been cut in half, which definitely weren’t going to work for pork wings. After a quick glance around the web and I found tons of great recipes for braising shanks. I also found the idea of smoking them and using them in the place of smoked hocks. Now that’s an idea I can get excited about because I love hocks and beans. Homemade smoked pork shanks to the rescue!
Amazing For Flavoring Soups And Beans
So I took 8 of the shanks (trust me, I have plenty more), brined them for a while and then smoked them. The end result was tender, perfectly smoky-flavored shanks that were amazing in a big pot of beans. I wouldn’t hesitate at all to get more shanks from my butcher for no other reason than to smoke them. They’ll be great this fall and winter in soups and stews.
I prefer to use fruit woods or nut woods when I smoke unless I want a heavier smoke flavor. Pecan, apple or cherry are my favorites. I used pecan for these shanks.
Homemade smoked pork shanks also fit in well with my ‘no empty space on the smoker’ rule. That rule states that if you’re going to fire up your smoker you must use up all available room. No point in wasting smoke. Shanks are the perfect size for using up valuable smoker grate space in my opinion.
I took shanks, brined them for a while and then smoked them. The end result was tender, perfectly smoky-flavored shanks that were amazing in a big pot of beans.
Combine all ingredients in a large pot over medium-high heat.
Bring the water to a simmer and stir until the salt is dissolved.
Remove from heat and let cool completely.
Place shanks into a large resealable container.
Add the marinade. Seal and refrigerate for 1-3 days.
For the smoked pork shanks
Rinse with water and place in cold water for 1 hour.
Fire up your smoker for cooking at 225 F. I used hickory wood and added a few more chunks than I normally would for say ribs so that I got a good strong smoke flavor in the shanks.
Remove the shanks from the brine and pat dry.
Transfer to the smoker and smoke for 3-5 hours until the internal temperature reaches 160 F.
Notes
This recipe can also be used to make fantastic smoked ham hocks.
I’m not sure why I was hankerin’ for egg salad, but I was. But I figured it was time for a little twist on the ole classic, so I decided to fire up my smoker with a few charcoal briquettes and a chunk of apple wood and make smoked eggs. I figured a little smoky flavor would really make for a special egg salad. I was right.
You’ve Got Room. Use It!
Eggs are also a great thing to toss (er, gently of course) onto your smoker (mine’s a Weber) after you’ve finished smoking a pork butt, ribs, brisket or whatever, and you still have a good fire going. They take just two hours. They can have just a hint of smokiness (use a small chunk of light wood). Or they can have a stronger smoke flavor (use hickory). But be careful because it doesn’t take much smoke to overdo it.
I prefer to use fruit or nut woods when I smoke unless I want a heavier smoke flavor. Pecan, apple or cherry are my favorites. I used apple to make this recipe.
I’m not sure why I was hankerin’ for egg salad, but I was. But I figured it was time for a little twist on the ole classic, so I decided to fire up my smoker with a few charcoal briquettes and a chunk of apple wood and make smoked eggs.
Course Side
Cuisine American
Keyword eggs, smoked
Cook Time 14 hourshours
Total Time 14 hourshours
Servings 12eggs
Calories 63kcal
Author Mike
Ingredients
12eggs
Instructions
Fire up your smoker for smoking 225 F – 250 F.
Use a light smoking wood, such as apple. I used one fish-sized chunk of wood, which produced a lightly smoky flavored egg. Use more for stronger flavors.
Smoke for 2 hours.
Remove, let cool slightly then transfer to a fridge overnight.
How do you make a great hot dog better? Yes, you wrap it in bacon. Crispy, yummy bacon. But you’re not done yet. Then you add a good helping of a thick, sweet-heat sauce that makes mustard and ketchup boring. These bacon-wrapped hot dogs with Fire-Eater dog sauce are a great way to change up your everyday dogs. You can add more of your favorite toppings if you like, but don’t bury that great bacon flavor.
Make Extra Sauce. You’ll Need It.
The Fire-Eater dog sauce is also perfect on hamburgers and fries, so make an extra big batch and keep it on hand in the fridge. To make a great smoky version use a hickory BBQ sauce. For an even spicier version use a hot BBQ sauce and add a few splashes of your favorite hot sauce. Bacon-wrapped hot dogs with Fire-Eater dog sauce are good no matter what.
Remember that if you have to refrigerate any leftover sauce, let it sit out on the counter for at least 30 minutes before using. Or warm it up a bit on the stovetop. You don’t want to ‘shock’ hot, just-cooked wings with a cold sauce.
I loved grilled fruit. My wife, not so much. Until now. Grilled maple bacon pineapple rings made a believer out of her with the first bite. Sweet lightly charred pineapple, heavenly real maple syrup and smoky bacon. It’s the perfect simple grilled dessert. Or side dish. I mean, I served it as a side dish. Why not? I’m an adult. I can have dessert any time I want, right?
Coring Made Easy
I bought this really cool pineapple corer from Amazon the other day. I’ve been wanting to use it forever. I picked up a pineapple on sale, got the corer out of the box, and in about a minute I had perfect fresh pineapple rings for these grilled maple bacon pineapple rings. You can also make a pineapple ‘bowl’, great for serving things like fried rice and grilled shrimp with pineapple. It’s a fun little gadget. And it sure does make making these wonderful side (or dessert) a whole heck of a lot easier.
I recommend that you use a grill basket when making this dish. It makes cooking easier and you don’t have to worry about anything falling through the grates. And cleanup is easier too!
Any good bistro has a good bistro burger. And there are as many variations as there are bistros. My first favorite bistro burger was loaded with lettuce, fried egg, bacon, and a whole bunch of other things. My deluxe bistro burger takes a little simpler approach, combining delicious grilled mushrooms and onion with a fantastic sauce. This is one messy burger and that’s a good thing. I’ve always said “The messier it is, the better it’s going to be.”
More Sauce, More Better
The sauce absolutely paired beautifully with the burger. It’s so good that I doubled the sauce recipe.
That Horseradish Kick
I’m a casual fan of horseradish, which means it can easily become too strong for me if there is too much of it in a dish. The amount of horseradish in the sauce on these burgers was just right for me. The same sauce now finds its way onto wraps and sandwiches in our household. It’s just that good.
I like to use a burger press when I make burgers. It, in combination with some patty papers, enables me to crank out a whole bunch of equally-sized burger patties in no time at all with little cleanup.