Butter Pecan Ice Cream

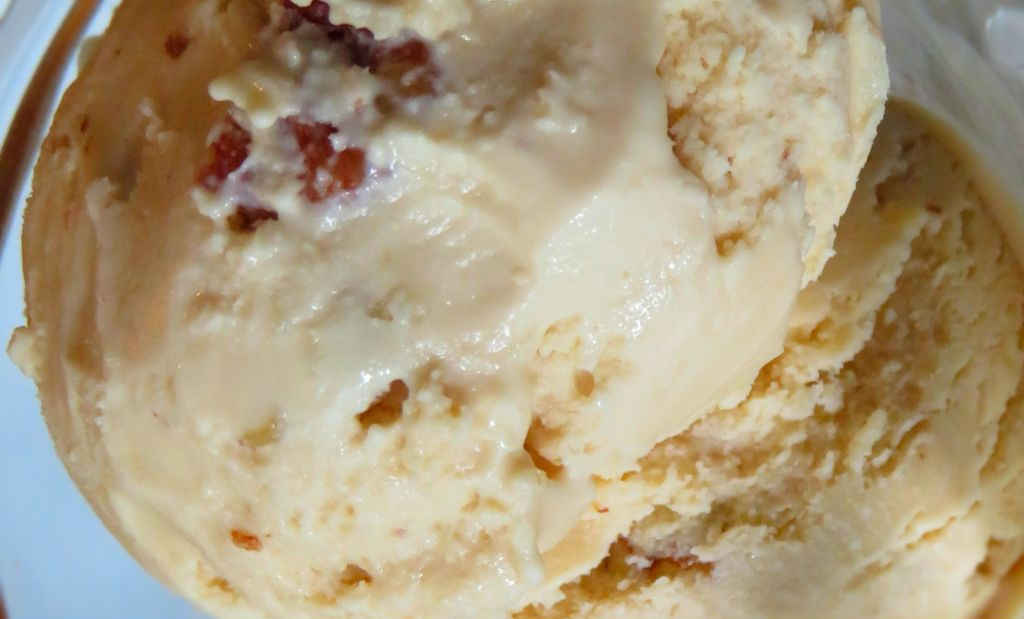
When I picked up a big ole back of fresh-roasted pecans at the Jack and Jill Nut Shop in downtown Nashville, Indiana, I knew exactly where they’d end up: in my butter pecan ice cream. Well, minus the many nuts I ate between the store and home, that is. Roasted pecans and creamy, delicious homemade ice cream is a dangerous combination so make a much bigger batch than you think you’ll need.

Butter Pecan Ice Cream

Ice Cream Magic

I’ve made other ice cream recipes that I’ve found on the internet. Ones that don’t use cream, or steer towards lighter ingredients. And I’ve made them and they were ok. Just ok. This right here is the real deal. You want light you shouldn’t read on. This is the kind of ice cream you enjoy and love. If you need to, go for a walk after eating a bowl. But trust me, while you’re on that walk you’ll be thinking about this butter pecan ice cream.

Also try my chocolate peanut butter ice cream.

Butter Pecan Ice Cream
Print Pin
5 from 1 vote

Butter Pecan Ice Cream

Roasted pecans and creamy, delicious homemade ice cream is a dangerous combination so make a much bigger batch than you think you’ll need.
Course Dessert
Cuisine American
Keyword butter, homemade ice cream, pecans
Prep Time 5 minutes
Cook Time 30 minutes
Total Time 35 minutes
Servings 16 servings
Calories 137kcal

Ingredients

Instructions

  • Note: The day before making the ice cream place the maker bowl in your freezer to get it completely frozen.
  • Place the pecans and butter in a small skillet over medium heat. Stirring constantly, cook until the nuts are just browned. Remove from heat.
  • Place the eggs into a large bowl and whisk.
  • In a small saucepan combine the brown sugar and half-and-half. Stir and bring to a boil over medium-high heat. Remove from heat.
  • Gradually pour mixture into the eggs while whisking constantly.
  • Pour mixture back into the saucepan over medium heat. Stirring often, cook until the mixture thickens, coating the back of a spoon.
  • Remove from heat and stir in the heavy cream, vanilla and toasted pecans.
  • Let cool slightly then pour into your ice cream maker and process according to the maker’s instructions.

Notes

For best results, use full-fat half-and-half and cream.

Nutrition

Calories: 137kcal | Carbohydrates: 15g | Protein: 2g | Fat: 8g | Saturated Fat: 4g | Trans Fat: 1g | Cholesterol: 41mg | Sodium: 24mg | Potassium: 70mg | Fiber: 1g | Sugar: 14g | Vitamin A: 242IU | Vitamin C: 1mg | Calcium: 45mg | Iron: 1mg

Nutritional values are approximate.

Awesome Smoked Chicken Thighs

I have to say that I have become quite addicted to smoking bone-in, skin-on chicken thighs on my Weber Smokey Mountain smoker. They’re crazy easy and a lot more forgiving than say brisket or pork butt. And when they’re on sale they’re a tremendous bargain. I can fill my freezer with delicious pulled, chopped or shredded smoked chicken for darned near nothing. This right here is my go-to method for awesome smoked chicken thighs. You can use boneless and/or skinless but the bones and skin keep them moist and add tons of flavor. I pull the meat away and just chop it for whatever I want, be it sandwiches, nachos, backed potatoes…

Awesome Smoked Chicken Thighs

Perfect Thighs with Tons of Flavor

I do not sauce my thighs while I’m smoking them. Since I’m not sure exactly how I’ll use the meat I keep it ‘dry’. You can always add sauce later, but you can’t un-sauce it. Well, not easily that’s for sure!

I prefer to use fruit or nut woods when I smoke unless I want a heavier smoke flavor. Pecan, apple or cherry are my favorites.

If you prefer your chicken thighs cooked over charcoal, try my grilled sweet-n-spicy chicken thighs. Or go big and make my whole smoked turkey on a WSM (or any smoker for that matter).

Awesome Smoked Chicken Thighs
Print Pin
5 from 1 vote

Awesome Smoked Chicken Thighs

This right here is my go-to method for awesome smoked chicken thighs.
Course Main
Cuisine American
Keyword chicken thighs, smoked
Prep Time 12 hours
Cook Time 2 hours 30 minutes
Total Time 14 hours 30 minutes
Servings 8
Calories 5235kcal

Ingredients

For the brine

Instructions

  • Place chicken into a large resealable container.
  • Whisk together the brine ingredients until the salt has dissolved. Pour over the chicken.
  • Cover and refrigerate overnight.
  • Fire up your smoker for 225 F cooking. Use whichever wood you prefer (I went with apple).
  • Remove chicken from the brine and rinse with cold water.
  • Pat dry then sprinkle liberally with the rub on both sides.
  • Tuck the skin underneath of the thighs and transfer to the smoker.
  • Smoke for 2 hours or more until the internal temperature has reached 165 F.
  • If you wish to sauce your thighs do so in the last 15 minutes of cooking.

Notes

Smoked skin-on thighs will not have a crispy skin because of the low cooking temperature. I prefer to remove the skin, pull the meat away from the bones and chop for sandwiches.

Nutrition

Calories: 5235kcal | Carbohydrates: 73g | Protein: 370g | Fat: 377g | Saturated Fat: 102g | Trans Fat: 2g | Cholesterol: 2223mg | Sodium: 58390mg | Potassium: 4995mg | Fiber: 2g | Sugar: 59g | Vitamin A: 1804IU | Vitamin C: 2mg | Calcium: 277mg | Iron: 17mg

Nutritional values are approximate.

Classic Brat Burgers

I’ve toyed with various bratwurst burgers over the years, and nothing really ever wowed me. I’ve even bought the pre-made brat patties. Nothing wrong with them, but I always felt like I needed something else… something more. And this right here is it. A very simple, very tasty, very juicy brat patty, topped with deliciously crunchy cabbage and onion, with a nice sweet but vinegary dressing to bring it all together. Every great taste in a single bite. These are my go-to classic brat burgers.

Classic Brat Burgers

A Wonderful Taste Combination

I feel like a little sweetness is necessary when it comes to a brat burger. It’s ok to tame it with a little onion and vinegar, but that sweetness still needs to be there. It’s what made these classic brat burgers my favorite. Oh, and my wife loves them too!

I like to use a burger press when I make burgers. It, in combination with some patty papers, enables me to crank out a whole bunch of equally-sized burger patties in no time at all with little cleanup.

Also try my more traditional grilled bratwurst.

Classic Brat Burgers
Print Pin
5 from 1 vote

Classic Brat Burgers

I’ve toyed with various bratwurst burgers over the years, and nothing really ever wowed me. I’ve even bought the pre-made brat patties. Nothing wrong with them, but I always felt like I needed something else… something more. And this right here is it.
Course Main
Cuisine American
Keyword bratwurst, burgers, sausage
Prep Time 10 minutes
Cook Time 15 minutes
Total Time 25 minutes
Servings 6 servings
Calories 1254kcal

Ingredients

For the burgers

  • 3 pounds bratwurst removed from casings
  • 6 onion hamburger buns

For the spread

For the topping

  • 2 cups Napa cabbage thinly sliced
  • 1 cup onion thinly sliced

Instructions

For the burgers

  • Divide the bratwurst into 6 1/2 pound balls and form into patties.
  • Fire up your grill and cook until done about 5 minutes per side until internal temperature reaches 165 F.
  • Remove and toast the buns as desired.
  • Serve patties on buns heaped with plenty of the topping and drizzled with lots of the spread.

For the spread

  • Combine all ingredients. Stir again just before serving.

For the topping

  • Combine all ingredients.

Notes

You can skip the topping ingredients and use pre-made slaw if you want!

Nutrition

Calories: 1254kcal | Carbohydrates: 78g | Protein: 36g | Fat: 89g | Saturated Fat: 26g | Trans Fat: 1g | Cholesterol: 180mg | Sodium: 3480mg | Potassium: 988mg | Fiber: 2g | Sugar: 51g | Vitamin A: 115IU | Vitamin C: 10mg | Calcium: 172mg | Iron: 3mg

Nutritional values are approximate.

Texas Chipotle Burgers

Sure, the patties on these Texas chipotle burgers were packed with flavor, and would be great by themselves. But, it’s the fire-roasted tomato sauce that really, really makes them fantastic. The sauce is what I would call kicked-up ketchup. It compliments the smoky jalapeno kick you get from the chipotle in the burgers just perfectly.

Texas Chipotle Burgers

Like It Spicier?

For a little smokier and a bit spicier topping, add a chipotle or two and some of the adobo sauce into the tomatoes as they cook. You can double the tomato sauce recipe and keep it in the fridge. It’s great for topping not only Texas chipotle burgers, but also hot dogs!

I like to use a burger press when I make burgers. It, in combination with some patty papers, enables me to crank out a whole bunch of equally-sized burger patties in no time at all with little cleanup.

I used some of my homemade chipotles in adobo. They’re actually quite easy to make and are soooo deliciously smoky!

Texas Chipotle Burgers
Print Pin
4 from 1 vote

Texas Chipotle Burgers

Sure, the patties on these Texas chipotle burgers were packed with flavor, and would be great by themselves. But, it’s the fire-roasted tomato sauce that really, really makes them fantastic. 
Course Main
Cuisine American
Keyword burgers, spicy
Prep Time 30 minutes
Cook Time 20 minutes
Total Time 50 minutes
Servings 6 burgers
Calories 616kcal

Ingredients

For the fire-roasted tomato sauce

Instructions

  • Place the meat in a large bowl.
  • Grate half of the onion into the meat. Chop the remaining half and reserve for topping the burgers.
  • Add the Worcestershire sauce, chipotles and adobo, and steak seasoning.
  • Add a splash of oil. Mix well then divide into 4 patties.
  • Fire up your grill.
  • Cook the burgers and toast the buns, as desired.
  • Serve the burgers topped with cheese, the tomato sauce, and chopped onion.

For the fire-roasted tomato sauce

  • Heat a tablespoon of oil in a medium sauce pan.
  • Add the garlic and cook 2-3 minutes.
  • Add the sugar and vinegar. Cook for 2 minutes.
  • Stir in the tomatoes.
  • Season with salt and pepper and let simmer 5-6 minutes.

Notes

Serve with plenty of napkins.

Nutrition

Calories: 616kcal | Carbohydrates: 28g | Protein: 34g | Fat: 40g | Saturated Fat: 16g | Trans Fat: 2g | Cholesterol: 127mg | Sodium: 487mg | Potassium: 601mg | Fiber: 2g | Sugar: 11g | Vitamin A: 478IU | Vitamin C: 4mg | Calcium: 250mg | Iron: 5mg

Nutritional values are approximate.

Crispy Green Beans on the Nesco Snackmaster Pro

These crispy green beans on the Nesco Snackmaster Pro are super packed with green bean flavors. It’s like if you put all of the flavors of 10 beans into each single bean. They do stay crispy for a while, but you’ll want to eat them fairly soon after removing them from your dehydrator to still enjoy that crispiness. If you do have any beans leftover store them in an air-tight container.

Crispy Green Beans on the Nesco Snackmaster Pro

Crispy. Not Soggy.

Don’t be shy with the salt when you remove the beans from the dehydrator. It helps make sure the beans stay dry and crunchy. You want crispy green beans on the Nesco Snackmaster Pro, not soggy ones.

Fresh Beans Only

I don’t think you can use this same technique with frozen or canned beans. Green beans, fresh from the garden or farm are best. This is a great way to use up a batch of beans when you have extras.

I like to load up my dehydrator. To do that I picked up a handful of extra trays. They really add a whole lot more drying space! Since I have to rotate my trays, I write a number on each one on a piece of blue painter’s tape so I can keep track of them.

Also try making raisins using your dehydrator! They’re outstanding!

Crispy Green Beans on the Nesco Snackmaster Pro
Print Pin
4 from 1 vote

Crispy Green Beans on the Nesco Snackmaster Pro

These crispy green beans are super packed with green bean flavors. It’s like if you put all of the flavors of 10 beans into each single bean.
Course Side
Cuisine American
Keyword crispy, dehydrator, green beans, nesco snackmaster pro
Prep Time 10 minutes
Cook Time 12 hours
Total Time 12 hours 10 minutes
Servings 8
Calories 111kcal

Ingredients

Instructions

  • Combine beans and oil in a large bowl and toss to coat.
  • Sprinkle with salt and stir.
  • Transfer beans to dryer racks.
  • Dry at 125 F for 12 hours or until dry and crispy.

Notes

Serve immediately.

Nutrition

Calories: 111kcal | Carbohydrates: 12g | Protein: 3g | Fat: 7g | Saturated Fat: 6g | Sodium: 882mg | Potassium: 359mg | Fiber: 5g | Sugar: 6g | Vitamin A: 1174IU | Vitamin C: 21mg | Calcium: 63mg | Iron: 2mg

Nutritional values are approximate.

Garlic Old Bay Corn on the Char-Broil Big Easy

Note: This recipe was developed using the Char-Broil Big Easy Oil-Less Fryer. If you are cooking using the Char-Broil Smoker-Roaster Grill you should cook with the lid open and the temperature set to High. You might also need to adjust the cooking time.

Garlic Old Bay corn is something I have to make for myself. My wife isn’t a fan of Old Bay seasoning, while I am convinced that it is the best thing ever. So while I make her some honey butter corn-on-the-cob on the Char-Broil Big Easy, I load up on this corn heavily flavored (or lightly flavored… it’s up to you) with garlic and of course Old Bay. It’s reminiscent of a crab or shrimp boil but well, with just corn!

Garlic Old Bay Corn on the Char-Broil Big Easy

Load ‘Em Up!

You can get quite a bit of garlic Old Bay Corn on the Char-Broil Big Easy at once, specially if you use a Bunk Bed basket or two. Keep in mind that the corn towards the bottom of the cooker might be done before those at the top.

Also try my Big Easy lemon pepper corn-on-the-cob.

It’s always a good idea to keep a few spare grease trays on hand for your Char-Broil Big Easy.

Love your Big Easy as much I love mine? Check out my Big Easy Add-Ons page and my free Big Easy eCookbook!

Garlic Old Bay Corn on the Char-Broil Big Easy
Print Pin
5 from 1 vote

Garlic Old Bay Corn on the Char-Broil Big Easy

I load up on this corn heavily flavored (or lightly flavored… it’s up to you) with garlic and of course Old Bay. It’s reminiscent of a crab or shrimp boil but well, with just corn!
Course Side
Cuisine American
Keyword Big Easy, Char-Broil, corn-on-the-cob, garlicky
Prep Time 10 minutes
Cook Time 25 minutes
Total Time 35 minutes
Servings 4 servings
Calories 105kcal
Author Mike

Ingredients

  • 4 ears corn husks and silks removed, cut in half
  • 4 tablespoons unsalted butter
  • 1 teaspoon garlic powder or more, to taste
  • ½ teaspoon Old Bay seasoning I definitely used more since I LOVE Old Bay!

Instructions

  • Fire up your Big Easy.
  • Place the 8 pieces of corn onto pieces of foil.
  • Place the butter, garlic powder and Old Bay in a small saucepan over medium heat and stir until the butter is melted and the seasonings are dissolved. Brush over the tops of the corn. Rotate and brush the other side of the corn.
  • Seal tightly in the foil and place into the Big Easy basket.
  • Cook in the Big Easy for 20-25 minutes or until the corn is tender.

Notes

You’ll need a Bunk Bed basket or two to cook more corn at once on your Big Easy.

Nutrition

Calories: 105kcal | Carbohydrates: 1g | Protein: 1g | Fat: 11g | Saturated Fat: 7g | Trans Fat: 1g | Cholesterol: 30mg | Sodium: 2mg | Potassium: 16mg | Fiber: 1g | Sugar: 1g | Vitamin A: 359IU | Vitamin C: 1mg | Calcium: 6mg | Iron: 1mg

Nutritional values are approximate.

Hatch Chile Pimento Cheese

Pimento cheese makes for a great grilled cheese sandwich. Pimento cheese loaded with roasted Hatch chiles makes for an outstanding grilled cheese sandwich. Or dip. Or burger topping. The cheese melts perfectly. And there’s just that slight green chile flavor. Not overpowering, not spicy. Just a really nice pepper flavor. I like that a lot. These sandwiches are different in a very good way.

Hatch Chile Pimento Cheese

No Hatch Chiles?

If you can’t find Hatch chiles, you can substitute any mild green chile such as a poblano. Or in a pinch you can use canned green chiles. Our market sells 7 ounce cans of roasted green chiles that would work just fine as a substitute in this Hatch chile pimento cheese. That little can works out to be about the same as 3 Hatch chiles after they’ve been chopped. It’s not quite the same flavor, but it’s as close as you can get without having the real thing.

Click here for my roasted Hatch chile recipe.

Hatch Chile Pimento Cheese
Print Pin
5 from 1 vote

Hatch Chile Pimento Cheese

Pimento cheese makes for a great grilled cheese sandwich. Pimento cheese loaded with roasted Hatch chiles makes for an outstanding grilled cheese sandwich. 
Course Main
Cuisine American
Keyword pimento cheese
Prep Time 5 minutes
Total Time 5 minutes
Servings 1 cup
Calories 869kcal

Ingredients

Instructions

  • Place all ingredients except for the cheese into a food processor and process for 10 seconds.
  • Add the cheeses and pulse a few times until combined.

Notes

Roasted green chiles also make for a tasty pimento cheese.

Nutrition

Calories: 869kcal | Carbohydrates: 14g | Protein: 29g | Fat: 78g | Saturated Fat: 29g | Trans Fat: 1g | Cholesterol: 133mg | Sodium: 1569mg | Potassium: 124mg | Fiber: 6g | Sugar: 7g | Vitamin A: 1037IU | Vitamin C: 21mg | Calcium: 839mg | Iron: 1mg

Nutritional values are approximate.

Cheeseburgers in Paradise

Both of the Cheeseburger in Paradise restaurants near us have closed. Thankfully, I picked up a copy of Margaritaville: The Cookbook, so I can make some of my restaurant favorites at home. And that starts with making the signature burgers, Cheeseburgers in Paradise.

Cheeseburgers in Paradise

Burgers That’ll Make You Happy

Delicious old-school burgers with a few twists that make them unique and oh-so-yummy. These Cheeseburgers in Paradise are what burgers are supposed to be: moist, seasoned well, and topped with a sauce (and some juices) that drips down your arms with every bite. The messier the better, I’ve always said.

The Perfect Burger Seasoning

I do admit that I used slightly less cumin than the original recipe called for. My wife’s not a big fan of cumin. The seasoning was still out-of-this-world fantastic. I always keep some on hand in an air-tight container for those times when I’m throwing some burgers on the griddle, which is often.

You might think that the dressing looks a lot like Thousand Island dressing. The addition of lime really makes it special and different. That reminds me, you’ll also want to try my Thousand Island BBQ smash burgers.

Now if only someone would set me up with a free week at the Margaritaville Resort in Gatinburg!

Cheeseburgers in Paradise
Print Pin
5 from 1 vote

Cheeseburgers in Paradise

Delicious old-school burgers with a few twists that make them unique and oh-so-yummy. These burgers are what burgers are supposed to be: moist, seasoned well, and topped with a sauce.
Course Main
Cuisine American
Keyword burgers, copycat
Prep Time 15 minutes
Cook Time 20 minutes
Total Time 35 minutes
Servings 4 Servings
Calories 1023kcal

Ingredients

For the burgers

  • 1 ½ pounds ground beef I prefer an 80/20 blend
  • 1 tablespoon house seasoning blend see below
  • 8 slices American cheese
  • ½ cup Paradise Island dressing see below
  • 4 buns split, lightly toasted
  • 2 cups iceberg lettuce shredded
  • 8 slices tomato
  • slices dill pickle chips

For the Margaritaville house seasoning

For the Paradise Island dressing

Instructions

For the Margaritaville house seasoning

  • Combine all ingredients. Store any leftovers in an air-tight container.

For the Paradise Island dressing

  • Whisk together all ingredients. Keep refrigerated until ready to use.

For the burgers

  • Divide and shape the beef into 4 equally-sized patties. Season liberally with the house seasoning.
  • Cook as desired. I prefer to cook mine on a griddle over a hot grill, but you can also make them in a skillet.
  • Top each patty with 2 slices of the cheese.
  • Slather the buns with the dressing. Add the lettuce, patty, tomato, pickles and top bun.

Notes

Give the sauce another stir before using.

Nutrition

Calories: 1023kcal | Carbohydrates: 50g | Protein: 45g | Fat: 71g | Saturated Fat: 24g | Trans Fat: 3g | Cholesterol: 175mg | Sodium: 3553mg | Potassium: 870mg | Fiber: 3g | Sugar: 12g | Vitamin A: 1158IU | Vitamin C: 12mg | Calcium: 526mg | Iron: 16mg

Nutritional values are approximate.

Creamy Pasta Salad

Whenever my wife and I go antiquing we like to pack a light lunch for the trip. Taking our lunch instead of eating out means that way we maximize our antiquing time. But just because lunch is hauled in a cooler doesn’t mean that it’s going to be boring. I made a few fantastic Italian cold-cut wraps and this absolutely delicious creamy pasta salad for our last trip. We both could’ve eaten the salad all afternoon long, but that would’ve meant little time for looking for antiques! Perfectly creamy, with a little crunch from the onion, peas and pickles. Oh, and cheese.

Creamy Pasta Salad

Change Is Good

For a great twist on this creamy pasta salad substitute chopped green or black olives for the diced pickles. Another great change is to use smoked cheddar cheese instead of extra sharp cheddar.

Better The Next Day

This salad is even better (I wouldn’t have thought it could be any better!) the next day. Just cover and put the refrigerator overnight. Give it a quick stir before serving.

I almost always use Blue Plate mayonnaise in the dishes I make. I think it is the best around. If you can’t find it locally you can pick it up online for a fair price.

Also our try our amazing old fashioned macaroni salad.

Creamy Pasta Salad
Print Pin
5 from 1 vote

Creamy Pasta Salad

Perfectly creamy, with a little crunch from the onion, peas and pickles. Oh, and cheese.
Course Side
Cuisine American
Keyword creamy, pasta salad
Prep Time 1 hour
Cook Time 15 minutes
Total Time 1 hour 15 minutes
Servings 10 servings
Calories 338kcal

Ingredients

Instructions

  • Cook the pasta per package instructions. Drain well, transfer to a large bowl, cover and refrigerate for 1 hour to cool.
  • Add the peas, cheese, pickles, onion and pimento and fold to combine.
  • In a separate bowl whisk together the mayonnaise, cream, mustard and sugar. Fold into the pasta mixture.
  • Season with salt and pepper and serve.

Notes

Always stir before serving.

Nutrition

Calories: 338kcal | Carbohydrates: 29g | Protein: 6g | Fat: 22g | Saturated Fat: 6g | Trans Fat: 1g | Cholesterol: 26mg | Sodium: 685mg | Potassium: 174mg | Fiber: 3g | Sugar: 6g | Vitamin A: 478IU | Vitamin C: 12mg | Calcium: 33mg | Iron: 1mg

Nutritional values are approximate.

Cafeteria-Style Pizza

Am I the only one that actually enjoyed the pizza from the high school cafeteria? Maybe I was just lucky and our school had a special recipe that resulted in good pizza. This cafeteria-style pizza is mighty good too. Maybe this is the recipe! It’s definitely easy. It’s mighty tasty. And it makes a big ole pan of pizza in no time. That’s a win for me.

Cafeteria-Style Pizza

Edge To Edge Is Our Pledge

The key to making cafeteria-style pizza is pouring out the batter and getting it nice and even, from pan edge-to-pan edge. It’s actually quite easy to do. And it’s much, much easier than rolling your own dough out, believe me. It’s like making pancakes, really.

I highly recommend that you shred or grate your own cheese at home. Don’t buy the pre-shredded or pre-grated stuff. It has stuff added to it to keep it from sticking together. That ‘stuff’ affects how the cheese melts. Get the real stuff.

You can use whatever toppings you normally like on your pizza. Don’t go crazy with the sauce. You don’t want to drench the dough. A little will go a long ways. In the end you’ll have a great easy pizza!

Also checkout my copycat Pizza Hut pan pizza.

Cafeteria-Style Pizza
Print Pin
5 from 1 vote

Cafeteria-Style Pizza

Am I the only one that actually enjoyed the pizza from the high school cafeteria? Maybe I was just lucky and our school had a special recipe that resulted in good pizza. This cafeteria-style pizza is mighty good too.
Course Main
Cuisine American
Keyword pizza
Prep Time 15 minutes
Cook Time 35 minutes
Total Time 50 minutes
Servings 6 servings
Calories 487kcal

Ingredients

Instructions

  • Preheat oven to 425 F. 
  • In a large bowl, whisk the flour, salt, Italian seasoning, pepper, eggs and milk until smooth.
  • Lightly spray a 15″ x 10″ baking sheet with non-stick spray.
  • Pour the flour mixture into prepared baking sheet. Spread out evenly and to the edges using a spatula or the back of a large spoon.
  • Sprinkle the top of the batter with the sausage, pepperoni and ham.
  • Bake for 20 minutes.
  • Remove from oven and spread pizza sauce evenly over pizza. The dough might be bubbly, just try to get the sauce as even as you can.
  • Sprinkle with the mozzarella cheese and bake another 10-15 minutes or until the cheese is melted.

Notes

Use freshly shredded cheese for the best results.

Nutrition

Calories: 487kcal | Carbohydrates: 22g | Protein: 26g | Fat: 33g | Saturated Fat: 13g | Trans Fat: 1g | Cholesterol: 147mg | Sodium: 1704mg | Potassium: 503mg | Fiber: 2g | Sugar: 5g | Vitamin A: 677IU | Vitamin C: 6mg | Calcium: 257mg | Iron: 3mg

Nutritional values are approximate.