Rotisserie Roasted Potatoes

Oh how I do love roasted potatoes. I love the creamy insides. I love the crispy, golden skin. Baby potatoes are my favorites, but I’ll take a good roasted fingerling any day of the week, too! My ‘weapon of choice’ this time for making roasted potatoes was my gas grill rotisserie. It’s something I’ve been wanting to do for a while. Sure, I can roast potatoes directly on the grill or in a grill basket, but without paying attention to them, I can end up with an un-even roasting. Not with the rotisserie. Perfect potatoes, all around!

Rotisserie Roasted Potatoes

No Bouncing Around, Please

I think one of the reasons my rotisserie roasted potatoes are so fantastic is the type of basket that I use. I could’ve used one of my bigger baskets, the one I use for peanuts, but I didn’t want my potatoes bouncing around like a bunch of bingo balls. So instead I used my only Fire flat rotisserie basket. This lovely toy locks the potatoes in (you want to use ones that are all about the same size) and keeps them from banging into each other. You don’t want scarred, bashed in potatoes. And you want as much of the oil and seasoning to stay on as possible. This basket performs perfectly.

Also try my rotisserie French fries.

Rotisserie Roasted Potatoes
Print Pin
5 from 1 vote

Rotisserie Roasted Potatoes

Oh how I do love roasted potatoes. I love the creamy insides. I love the crispy, golden skin. Baby potatoes are my favorites, but I'll take a good roasted fingerling any day of the week,
Course Side
Cuisine American
Keyword roasted potatoes, rotisserie
Prep Time 20 minutes
Cook Time 10 minutes
Servings 8
Calories 175kcal

Equipment

Ingredients

Instructions

  • Fill a pot fitted with a steamer rack with 1"-2" of water and bring to a boil.
  • Scrub the potatoes clean and add to the basket. Cover and let steam for 10 minutes or until just tender when poked with a toothpick. Transfer the potatoes to a colander to drain.
  • Fire up your grill for high heat cooking. You want direct heat below (and around) where your rotisserie basket will be.
  • Place the potatoes in a bowl and toss with a few splashes of oil and season well with salt and pepper.
  • Transfer the potatoes to the rotisserie, close and place on the grill.
  • Turn on the rotisserie, close the grill and let the potatoes roast for 10 minutes. Check for color. If the skin has a bit of a char to it remove and serve, otherwise keep grilling, checking every 5 minutes for doneness.

Notes

I prefer to steam, or partially cook, the potatoes before placing into the rotisserie. I like to grill them over very high heat so that the skin gets a slight crunch to it. If you cook the raw potatoes over very high heat without pre-cooking them the outsides may burn before the potatoes are tender inside.

Nutrition

Calories: 175kcal | Carbohydrates: 40g | Protein: 5g | Fat: 1g | Saturated Fat: 1g | Polyunsaturated Fat: 1g | Monounsaturated Fat: 1g | Sodium: 14mg | Potassium: 955mg | Fiber: 5g | Sugar: 2g | Vitamin A: 5IU | Vitamin C: 45mg | Calcium: 27mg | Iron: 2mg

Nutritional values are approximate.

Simple Cauliflower Fried Rice

I have to admit it, I was very highly skeptical when it came time to make this simple cauliflower fried rice. My wife wanted a lower carbohydrate dish she could take for her lunches, and this is the one she picked. Well, my skepticism was unfounded, because it’s not just good, it’s great! By golly, I thought I was eating fried rice!

Simple Cauliflower Fried Rice

It’s Magic!

Making the ‘rice’ is easy. Just chop cauliflower florets fine, until they start to look like rice grains. A quick fry in hot oil, and boom! Cauliflower rice! Great as a side dish, simple cauliflower fried rice can be turned into a main dish in no time by adding cooked chicken.

I went light on the sesame oil and used the full amount of soy sauce.

Also try my Cajun shrimp fried rice.

Simple Cauliflower Fried Rice
Print Pin
4 from 1 vote

Simple Cauliflower Fried Rice

I have to admit it, I was very highly skeptical when it came time to make this simple cauliflower fried rice. Well, my skepticism was unfounded, because it’s not just good, it’s great!
Course Main or Side
Cuisine Asian-Inspired
Keyword cauliflower, fried rice
Prep Time 10 minutes
Cook Time 15 minutes
Servings 6 servings
Calories 245kcal

Ingredients

  • ½ head cauliflower
  • 1 tablespoon olive oil
  • 2 tablespoons sesame oil divided
  • 4 eggs beaten
  • kosher salt
  • ground black pepper
  • 1 onion finely chopped
  • 2 cups carrots finely chopped
  • 2 tablespoons ginger grated
  • 4 cloves garlic minced
  • 1 cup peas frozen
  • 2 cups chicken cooked, cooled, chopped (if serving as a main dish)
  • ¼ cup soy sauce

For serving

Instructions

  • Rough chop the cauliflower and place into a food processor.
  • Pulse a few times until the cauliflower looks like tiny pieces of rice. Do not over process.
  • Add a tablespoon of olive oil to a large skillet over medium-high heat.
  • Add the cauliflower and saute for 5-10 minutes or until tender. Remove to a plate.
  • Wipe the skillet clean and add 1 tablespoon of sesame oil.
  • Add the eggs to the skillet, season and cook, stirring scramble for 3-5 minutes or until eggs are cooked through.
  • Transfer eggs to a plate. Wipe the pan clean.
  • Add the second tablespoon of sesame oil to the skillet.
  • Add the onion and carrots, cooking for 5 or so minutes, until softened.
  • Add the garlic and ginger to the skillet and cook for 1 minute.
  • Add the riced cauliflower, frozen peas and diced chicken (if using) to the skillet and cook for another 5 minutes or until cauliflower rice is cooked through, but still is a bit crunchy.
  • Add the egg back to the skillet, breaking it up as you stir.
  • Add the soy sauce and stir.
  • Sprinkle with sesame seeds. green onion and cashews to garnish.

Notes

You can substitute peanuts for the cashews.

Nutrition

Calories: 245kcal | Carbohydrates: 17g | Protein: 13g | Fat: 15g | Saturated Fat: 3g | Trans Fat: 1g | Cholesterol: 123mg | Sodium: 663mg | Potassium: 546mg | Fiber: 4g | Sugar: 6g | Vitamin A: 7522IU | Vitamin C: 38mg | Calcium: 77mg | Iron: 2mg

Nutritional values are approximate.

Cajun Shrimp Fried Rice

One of my wife’s favorite dishes is fried rice. She requests it often. I thought it was time to throw a curve ball and make a little twist, on the classic that she loves so much. Failure was not an option, because messing with a long-time favorite is risky business. I dove in and made Cajun shrimp fried rice. A fantastic variation on the classic, this dish contains wonderfully spicy shrimp in a traditional rice mixture. This was a major hit. My wife loved it!

Cajun Shrimp Fried Rice

You Could Add Stuff… Or Not.

This Cajun shrimp fried rice was perfect just as it was. I didn’t really feel a need to mess with it. Oh, I thought well, I could add some roasted peanuts or cashews. Or more sesame oil. Yeah, I could’ve done that. But I might’ve gotten looks. Best to make it just as it’s written, because it’s great!

Also try my cauliflower fried rice.

Cajun Shrimp Fried Rice
Print Pin
4 from 1 vote

Cajun Shrimp Fried Rice

This Cajun shrimp fried rice was perfect just as it was. I didn't really feel a need to mess with it.
Course Main
Cuisine Cajun
Keyword Cajun, fried rice
Prep Time 15 minutes
Cook Time 30 minutes
Servings 6
Calories 153kcal

Ingredients

Instructions

  • Cook the rice per package instructions. Remove from heat and keep covered when done.
  • Place the shrimp into a medium bowl. Add the chili powder, paprika, garlic powder, cayenne and salt and pepper. Toss gently to coat well.
  • Add a splash of oil to a wok or large skillet over medium-high heat.
  • Add the eggs and cook, whisking or stirring as they cook, 1-2 minutes. Remove to a plate.
  • Increase heat to high and add the sesame oil.
  • Add the onion, bell pepper, and green onion whites. Cook 1-2 minutes.
  • Add the garlic and pepper flakes and cook another minute.
  • Add the shrimp and cook until no longer translucent, tossing constantly, 2-3 minutes.
  • Add rice. Stir then let cook 2-3 minutes to brown.
  • Add in the egg, soy sauce and fish sauce. Stirring constantly, cook another 2 minutes.
  • Serve top with the chopped green onion tops.

Notes

Add a few roasted peanuts for a little crunch.

Nutrition

Calories: 153kcal | Carbohydrates: 28g | Protein: 6g | Fat: 2g | Saturated Fat: 1g | Polyunsaturated Fat: 1g | Monounsaturated Fat: 1g | Trans Fat: 1g | Cholesterol: 31mg | Sodium: 442mg | Potassium: 164mg | Fiber: 1g | Sugar: 1g | Vitamin A: 659IU | Vitamin C: 17mg | Calcium: 31mg | Iron: 1mg

Nutritional values are approximate.

Ranch Saltines

After making a sleeve of Fire-Eater saltines the other day, I had to keep trying other flavors. I mean, there’s good and then there’s crazy good. These Ranch saltines are definitely crazy good. Great Ranch flavor on a crunchy yummy cracker. That’s all you’ll need, trust me. Yes, you could slather a bit of cream cheese on them too, but I found them addicting enough just as they are. It’s the easiest snack cracker you could ever make.

Ranch Saltines

Buy It Or Make It

Buy Ranch seasoning in bulk or if you prefer you can make it at home. Check out my homemade version. And add more if you want. I’m a Ranch addict, so I put extra on my Ranch saltines.

I use the same base recipe any time that I make flavored saltine crackers: a sleeve of crackers, 1/3 cup of oil, and whatever flavoring I am using. It’s just that simple.

Ranch Saltines
Print Pin
5 from 1 vote

Ranch Saltines

These Ranch saltines are definitely crazy good. Great Ranch flavor on a crunchy yummy cracker. That’s all you’ll need, trust me.
Course Appetizer
Cuisine American
Keyword crackers, Ranch
Prep Time 8 hours
Total Time 8 hours
Servings 8 servings
Calories 84kcal
Author Mike

Ingredients

Instructions

  • Place crackers in a large resealable bag or container.
  • Pour in the oil.
  • Sprinkle with the seasoning.
  • Seal and gently toss to coat.
  • Let sit (on the counter) for 12 hours to get ‘happy’, tossing gently every once-in-a-while.
  • Serve as-is or with cream cheese for topping.

Notes

Also great served with Swiss or pepper jack cheese!

Nutrition

Calories: 84kcal | Carbohydrates: 1g | Protein: 1g | Fat: 9g | Saturated Fat: 7g | Sodium: 142mg | Potassium: 1mg | Fiber: 1g | Sugar: 1g | Vitamin A: 1IU | Calcium: 1mg | Iron: 1mg

Nutritional values are approximate.

Sous Vide Pepper and Garlic Jerky on the Nesco Snackmaster Pro

I’m a big fan of beef jerky, I’ve made it for years. And as good as it always was, I was always searching for a way to perfect my technique. More flavor. More tender, but still with a slight tug. Sous vide has done that for me and more. It’s the only way I make jerky now, drying it on my Nesco Snackmaster Pro. Sometimes I make my own flavors and sometimes, I order packages seasonings, like this Pepper and Garlic flavor from Wilton’s. This is great peppery jerky. It has a hint of garlic, but the main flavor is wonderful pepper and lots of it. I loved it!

Sous Vide Pepper and Garlic Jerky on the Nesco Snackmaster Pro

Always Great, Time After Time

This approach to jerky is simple and highly repeatable so it’s not like you have to stress over the next batch being just as good as the last. Just mix up the seasoning with a bit of cure and add to thinly-sliced beef. A few hours in sous vide then onto the Nesco Snackmaster Pro dehydrator until perfectly dried. Not too tender, not too tough. Each and every time. Sous vide Pepper and Garlic Jerky on the Nesco Snackmaster Pro is easy and fantastic!

I like my jerky to be pretty flavorful so I usually end up adding a bit more seasoning than the manufacturer recommends. The Pepper and Garlic flavored seasoning definitely packs the pepper punch. But a little more punch is… better!

Check out my guide to using the Nesco Snackmaster Pro. You will be making fantastic jerky at home in no time at all!

Sous Vide Pepper and Garlic Jerky on the Nesco Snackmaster Pro
Print Pin
5 from 1 vote

Sous Vide Pepper and Garlic Jerky on the Nesco Snackmaster Pro

I like my jerky to be pretty flavorful so I usually end up adding a bit more seasoning than the manufacturer recommends. The Pepper and Garlic flavored seasoning definitely packs the pepper punch. But a little more punch is… better!
Course Appetizer
Cuisine American
Keyword dehydrator, jerky, nesco snackmaster pro, spicy
Prep Time 15 minutes
Cook Time 9 hours
Servings 1 pound
Calories 2304kcal

Ingredients

Instructions

  • Set up your immersion circulator for 108 F sous vide.
  • Combine the jerky seasoning and salt cure per package instructions. Wilbur's has an excellent conversion chart if you need to adjust your quantities for the amount of beef being used. For the cure, visit this link here. For converting the sure cure quantity, visit this link.
  • Place the meat into a large bowl and sprinkle with the seasoning/cure mixture. DO NOT ADD WATER. Using your hands, mix the seasonings and meat well.
  • Transfer the meat to a sealable bag and vacuum seal. Make sure there are no leaks.
  • Transfer bag to sous vide setup and heat for 2 hours.
  • Increase temperature to 130 F and heat for an additional 4 hours.
  • Turn on your dehydrator and heat it to 160 F.
  • Remove the meat from the bag and transfer to the dehydrator. Do not overlap the pieces.
  • Dry for 2-3 hours. Let cool before storing.

Notes

Use more of the seasoning for more flavor.

Nutrition

Calories: 2304kcal | Protein: 156g | Fat: 181g | Saturated Fat: 70g | Trans Fat: 11g | Cholesterol: 644mg | Sodium: 608mg | Potassium: 2449mg | Calcium: 163mg | Iron: 18mg

Nutritional values are approximate.

Crispy Parmesan Potatoes

We were looking for the perfect side for our Stove Top stuffing meatloaf. We thought perhaps it would be mashed potatoes. Creamy homemade mashed potatoes would definitely be good with the wonderful brown gravy from the meatloaf. But we both wanted something a little crunchy, something roasted… something with more flavor than ‘just’ mashed potatoes. These crispy Parmesan potatoes were definitely the perfect side. We could not have found a better pairing for our stick-to-our-ribs meatloaf! The crispy edges were a good contrast to the meatloaf.

Crispy Parmesan Potatoes

The Right Bite

The original recipe for these crispy Parmesan potatoes called for using fingerling potatoes. As much as we both love fingerlings, we felt that cubed Russets would give us more of that crunchy texture, more of that wonderful roasted-ness that we were both craving. Plus, I couldn’t find any fingerlings at my grocery store!

We made the right call as they were fantastic! Fingerlings probably would’ve been just fine. If I could’ve found them!

I highly recommend that you shred or grate your own cheese at home. Don’t buy the pre-shredded or pre-grated stuff. It has stuff added to it to keep it from sticking together. That ‘stuff’ affects how the cheese melts. Shred it yourself and use the good stuff.

Also try my crispy homemade potato chips and my parmesan garlic potatoes.

Crispy Parmesan Potatoes
Print Pin
5 from 1 vote

Crispy Parmesan Potatoes

We were looking for the perfect side for our Stove Top stuffing meatloaf and this is it!
Course Side
Cuisine American
Keyword crispy, Parmesan, potatoes
Prep Time 15 minutes
Cook Time 45 minutes
Servings 6
Calories 158kcal

Ingredients

Instructions

  • Preheat oven to 400 F.
  • Wash potatoes and pat dry.
  • Cut into 1/2" cubes.
  • Transfer to a large bowl.
  • Drizzle potatoes with the olive oil
  • Sprinkle with the salt, paprika, garlic powder, onion powder and pepper.
  • Toss gently to coat evenly.
  • Transfer potatoes to a sheet pan.
  • Spread them out evenly so they do not overlap.
  • Roast in the oven until the potatoes start to turn golden brown, about 30 minutes.
  • Flip the potatoes.
  • Sprinkle with the cheese.
  • Return to the oven and continue to roast until golden brown, about 10 more minutes.
  • Remove from oven and transfer to a serving dish.
  • Sprinkle with parsley and serve.

Notes

You may want to add a pinch or two of salt along with the Parmesan.

Nutrition

Calories: 158kcal | Carbohydrates: 27g | Protein: 7g | Fat: 3g | Saturated Fat: 2g | Polyunsaturated Fat: 0.2g | Monounsaturated Fat: 1g | Cholesterol: 6mg | Sodium: 609mg | Potassium: 620mg | Fiber: 2g | Sugar: 1g | Vitamin A: 312IU | Vitamin C: 9mg | Calcium: 136mg | Iron: 1mg

Nutritional values are approximate.

Just-Like-Grandma’s Potato Salad

Everyone knows that grandma makes the best potato salad. No matter how you try, you can’t make yours quite as good. Well, this just-like-grandma’s potato salad is pretty darned close. I certainly had no problem devouring a big heaping helping of it. Or two. Yeah, it might look like grandma went through a lot of trouble, but this salad is actually pretty easy to make and boy, is it every delicious.

Just-Like-Grandma's Potato Salad

Better Mayonnaise Makes Better Salads

One thing that really makes just-like-grandma’s potato salad so good is the mayonnaise. You can’t use just anything, in my opinion. No, for that over-the-top great salad you want the best. So grab a jar of your favorite and you’ll be happy just like I was!

Most folks boil or bake their potatoes for potato salad. I prefer to steam mine in a steam basket. The potatoes keep their shape that way. It doesn’t really matter so much for the taste, but I think they look just a bit better and they hold up better, longer.

I almost always use Blue Plate mayonnaise in the dishes I make. I think it is the best around. If you can’t find it locally you can pick it up online for a fair price.

Also try my sweet and sassy potato salad.

Just-Like-Grandma's Potato Salad
Print Pin
5 from 1 vote

Just-Like-Grandma’s Potato Salad

It might look like grandma went through a lot of trouble, but this salad is actually pretty easy to make and boy, is it every delicious.
Course Side
Cuisine American
Keyword potato salad
Prep Time 15 minutes
Cook Time 30 minutes
Servings 6
Calories 745kcal

Ingredients

Instructions

  • Cook the potatoes in a heavily-salted pot of gently boiling water until tender.
  • Drain and let cool enough to handle then cut into 1/2" cubes.
  • In a large bowl, combine the relish, mustard, garlic powder, onion powder, smoked paprika, eggs, onion, bell pepper, 1 1/2 cups of mayonnaise and salt and pepper, to taste. If the mixture is too dry add more mayonnaise and stir.
  • Add the potatoes and stir gently to coat.
  • Serve sprinkled with additional paprika.

Notes

I prefer to steam my potatoes so the skins stay intact.

Nutrition

Calories: 745kcal | Carbohydrates: 67g | Protein: 15g | Fat: 48g | Saturated Fat: 8g | Polyunsaturated Fat: 26g | Monounsaturated Fat: 12g | Trans Fat: 1g | Cholesterol: 210mg | Sodium: 723mg | Potassium: 1835mg | Fiber: 7g | Sugar: 10g | Vitamin A: 559IU | Vitamin C: 36mg | Calcium: 79mg | Iron: 4mg

Nutritional values are approximate.

Grilled Radishes with Gorgonzola Butter

This is not my first time grilling radishes. I’ve even grilled black radishes before. And golden ones too. But this is my first time serving them grilled as an appetizer. A wonderful creamy gorgonzola butter tames the heat from the radishes, which take on a slightly soft exterior but still crunchy insides. These grilled radishes with gorgonzola butter are a little different and quite good. Never would I thought that radishes would make for a great appetizer. I’m happy that I made them. Very happy.

Grilled Radishes with Gorgonzola Butter

Cheese And Radishes? Yes. Oh Yes.

You don’t want to overcook your grilled radishes with gorgonzola butter. It’s easier if you select ones that are all roughly the same size so that they all cook in about the same amount of time. You want them to still have just a bit of crunch to them. You don’t want them all soft and mushy. They don’t take long to cook. Feel free to test them as you go with a fork or a skewer.

Got leftover gorgonzola butter? It’s great on burgers or grilled steaks.

I always use a grill basket when I make dishes like this one.

Grilled Radishes with Gorgonzola Butter
Print Pin
4 from 1 vote

Grilled Radishes with Gorgonzola Butter

Select radishes that are all roughly the same size so that they all cook in about the same amount of time.
Course Side
Cuisine American
Keyword gorgonzola butter, grilled, radishes
Prep Time 15 minutes
Cook Time 15 minutes
Servings 6
Calories 102kcal

Ingredients

For the Gorgonzola butter

  • 2 ounces Gorgonzola cheese crumbled
  • 4 tablespoons unsalted butter softened

For the grilled radishes

Instructions

For the Gorgonzola butter

  • Place the Gorgonzola and butter in a blender.
  • Pulse a few times until creamy smooth.

For the grilled radishes

  • Fire up your grill for direct cooking, 400 – 450 F.
  • Cut radishes in half.
  • Place in a bowl.
  • Drizzle with a little oil and season well with salt and pepper.
  • Stir to coat.
  • Transfer to a grill basket or skewer if desired. You can also cook the radishes directly on the grill if they are large enough to not fall between the grates.
  • Place the radishes on the grill and cook over high heat 4-5 minutes per side or until lightly browned.
  • Serve immediately with the gorgonzola butter for dipping.

Notes

Also great served with Ranch or blue cheese dressing for dunking!

Nutrition

Calories: 102kcal | Carbohydrates: 1g | Protein: 2g | Fat: 10g | Saturated Fat: 7g | Polyunsaturated Fat: 1g | Monounsaturated Fat: 3g | Trans Fat: 1g | Cholesterol: 27mg | Sodium: 136mg | Potassium: 46mg | Fiber: 1g | Sugar: 1g | Vitamin A: 306IU | Vitamin C: 1mg | Calcium: 54mg | Iron: 1mg

Nutritional values are approximate.

Barbacoa Beef Sandwiches

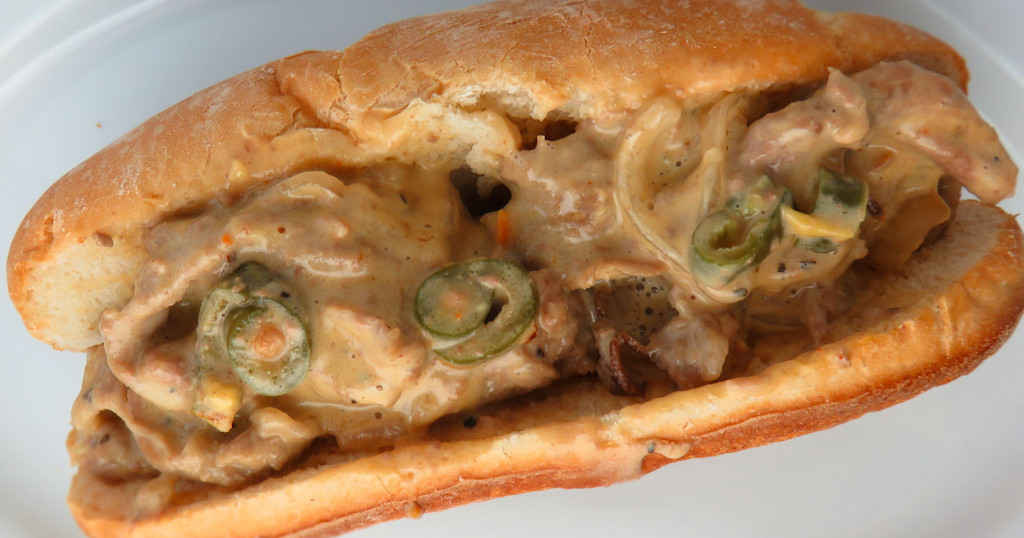
Give me a big ole slow cooker full of tender, juicy, flavor-packed, fall-apart beef and I’m going to make a sandwich. 9 out of 10 times that’s where it’ll end up. Piled high on a big loaf of French bread, like these barbacoa beef sandwiches. Nothing fancy. Nothing difficult. But it is messy. A good kind of messy. What’s the point of eating a sandwich if it’s not messy?

Barbacoa Beef Sandwiches

Messy. Like It’s Supposed To Be.

If you take a big bite of a sandwich and juices run down your arms, it’s a good sandwich. These barbacoa beef sandwiches are gonna run and then some. I love the combination of the tender meat and crunchy lettuce, offset by a creamy jalapeno-cilantro spread that brings just a bit of heat. It’s a great all-around sandwich.

I almost always use Blue Plate mayonnaise in the dishes I make. I think it is the best around. If you can’t find it locally you can pick it up online for a fair price.

Also try my slow cooker BBQ beef sandwiches.

Barbacoa Beef Sandwiches
Print Pin
4 from 1 vote

Barbacoa Beef Sandwiches

I love the combination of the tender meat and crunchy lettuce, offset by a creamy jalapeno-cilantro spread that brings just a bit of heat. It's a great all-around sandwich.
Course Main
Cuisine American
Keyword beef, crockpot, sandwich, slow cooker
Prep Time 15 minutes
Total Time 15 minutes
Servings 6 servings
Calories 369kcal

Ingredients

For the sandwich

  • 1 loaf French bread halved horizontally, scoop out bread as desired
  • ½ batch slow cooker barbacoa beef warmed
  • 2 handfuls iceberg lettuce shredded

For the Jalapeno-Cilantro Crema (makes enough for several sandwiches)

Instructions

For the Jalapeno-Cilantro Crema

  • Whisk together all ingredients. Keep refrigerated until ready to use. The sauce gets thicker the longer it sits.

For the sandwich

  • Warm the bread, if desired.
  • Spread the crema on both halves of the bread. Mound high with the meat and lettuce.
  • Cut into 6 sandwiches and serve.

Notes

Keep some napkins nearby! You’ll need them!

Nutrition

Calories: 369kcal | Carbohydrates: 40g | Protein: 9g | Fat: 19g | Saturated Fat: 4g | Trans Fat: 1g | Cholesterol: 13mg | Sodium: 664mg | Potassium: 155mg | Fiber: 2g | Sugar: 3g | Vitamin A: 268IU | Vitamin C: 14mg | Calcium: 51mg | Iron: 3mg

Nutritional values are approximate.

Garlic Potatoes in Dill Sauce using the Char-Broil Big Easy

Note: This recipe was developed using the Char-Broil Big Easy Oil-Less Fryer. If you are cooking using the Char-Broil Smoker-Roaster Grill you should cook with the lid open and the temperature set to High. You might also need to adjust the cooking time.

You probably usually think of using your Char-Broil Big Easy only when cooking a main dish. Like a turkey or chicken. But, don’t forget that it’s also great for making delicious, easy, side dishes. Certainly ones like these garlic potatoes in dill sauce using the Char-Broil Big Easy. In no time you have the perfect potatoes. Tender inside. Lightly crunchy outside. All in a lip-smacking great dill sauce that I just could not get enough of. Dill and potatoes are the perfect match.

Garlic Potatoes in Dill Sauce using the Char-Broil Big Easy

Add A Bunk Bed Basket For More Room

You can fit a single disposable pan (for 3/4 pounds of potatoes) in the basket that comes with your Big Easy. Get a bunk bed basket and you can do a full 1 1/2 pounds of potatoes at once. For this reason, you have to get a bunk bed basket for your Char-Broil Big Easy to make more great side dishes like these garlic potatoes in dill sauce!

It’s always a good idea to keep a few spare grease trays on hand for your Char-Broil Big Easy.

Also try my cheesy Ranch potatoes, also made on a Big Easy.

Love your Big Easy as much I love mine? Check out my Big Easy Add-Ons page and my free Big Easy eCookbook!

Garlic Potatoes in Dill Sauce using the Char-Broil Big Easy
Print Pin
5 from 1 vote

Garlic Potatoes in Dill Sauce using the Char-Broil Big Easy

Although you can cook the potatoes in the Big Easy from start to finish, I recommend using a microwave to par-cook them first.
Course Side
Cuisine American
Keyword Big Easy, Char-Broil, potatoes
Prep Time 5 minutes
Cook Time 15 minutes
Servings 6
Calories 189kcal

Ingredients

  • 1 ½ pounds small potatoes halved if desired
  • 8 ounces chive and onion cheese spread
  • ¼ cup milk
  • ½ medium green bell pepper chopped
  • 1 ½ tablespoon fresh dill chopped

Instructions

  • Fire up your Big Easy. Meanwhile, prepare the potatoes.
  • Place the potatoes into a microwave-safe bowl.
  • Microwave for 3 minutes on high.
  • Stir and check for doneness.
  • Microwave another 2 minutes (or longer if needed) until just tender. Do not over-cook, they need to have a little bite to them.
  • Place the cream cheese, milk and peppers in a microwave-safe bowl and cook on high 40-50 seconds or until the cheese is melted.
  • Stir in the dill. Add to the potatoes and stir to coat completely.
  • Divide the potatoes between two disposable pans and transfer the pans to a Big Easy basket fitted with a Bunk Bed so you can cook both pans at the same time.
  • Place the basket into the Big Easy and cook for 10 minutes or until the potatoes start to turn golden brown around the edges.
  • Carefully remove the pans from the Big Easy and serve.

Notes

Give the potatoes a stir before serving.

Nutrition

Calories: 189kcal | Carbohydrates: 23g | Protein: 5g | Fat: 9g | Saturated Fat: 5g | Polyunsaturated Fat: 1g | Monounsaturated Fat: 1g | Cholesterol: 25mg | Sodium: 186mg | Potassium: 511mg | Fiber: 3g | Sugar: 3g | Vitamin A: 422IU | Vitamin C: 30mg | Calcium: 73mg | Iron: 1mg

Nutritional values are approximate.