Chipotle Cornbread

I made a big ole pot of chili. I needed some cornbread. But not any ordinary cornbread. No, I wanted something different, with a bit of a kick to stand up to the definitely-kickin’ chili. This chipotle cornbread stepped up to the challenge in a big way. A hint of heat and a heat of smokiness. And the perfect texture to boot. Perfect for crumbling into my chili.

Chipotle Cornbread

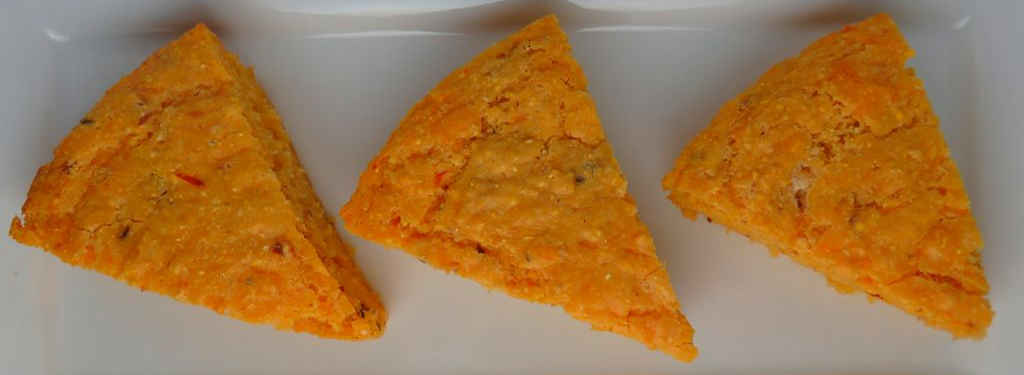
That Great Cornbread Texture

Make sure that your buttermilk is super cold and that the melted butter has cooled before adding it to the buttermilk. The two will form an curd-looking mixture. Do not over mix it. You want a little texture to your chipotle cornbread.

For even more of a spicy kick add a fire-roasted diced jalapeno or two to the batter. For a bit more smoky flavor, use a shredded smoked cheddar cheese (I smoke my own cheese. It’s awesome!).

Although you can use pie plates as I mention in the recipe, this cornbread is also fantastic when made in a cast iron skillet.

Also try my grilled jalapeno honey butter cornbread and my not-grilled jalapeno cornbread..

Chipotle Cornbread
Print Pin
5 from 1 vote

Chipotle Cornbread

A hint of heat and a heat of smokiness. And the perfect texture to boot. Perfect for crumbling into my chili.
Course Bread
Cuisine American
Keyword cornbread, spicy
Prep Time 5 minutes
Cook Time 25 minutes
Total Time 30 minutes
Servings 6 servings
Calories 332kcal

Ingredients

Instructions

  • Preheat oven to 350 F. Spray a round pie pan or 8″ x 8″ baking dish with non-stick spray.
  • In a large bowl combine the cornmeal, flour, baking powder and salt.
  • In another bowl combine the buttermilk, adobo, honey, eggs, chipotle pepper and butter. Add to the dry ingredients and stir until smooth and combined.
  • Fold in the cheese.
  • Pour batter into the pan and bake for 25 minutes or until done. Let rest 10 minutes before slicing and serving.

Notes

Substitute pepper jack for the cheddar for a little more kick!

Nutrition

Calories: 332kcal | Carbohydrates: 43g | Protein: 13g | Fat: 12g | Saturated Fat: 6g | Trans Fat: 1g | Cholesterol: 87mg | Sodium: 1310mg | Potassium: 224mg | Fiber: 3g | Sugar: 6g | Vitamin A: 368IU | Vitamin C: 1mg | Calcium: 329mg | Iron: 3mg

Nutritional values are approximate.

Biscuits + Groovy The Johnny Hash

I watch the show Eat Street on the Cooking Channel because I love food trucks. Whenever there’s one near me I stop and get something, anything. One of the episodes of Eat Street had the host, James Cunningham, stop at the Biscuits + Groovy trailer in Austin, TX. Because my wife and I love biscuits and gravy I knew instantly that I was going to make some of the dishes they serve up. I mean, dang, look at the menu! Everything sounds fantastic, including The Johnny Hash. Biscuits, white pepper gravy, diced potatoes, bacon and breakfast sausage, topped with cheese and garnished with green onions. This ain’t no light breakfast, it’s the breakfast of champions!

Biscuits + Groovy The Johnny Hash

Start With Great Biscuits

I’m definitely not a food industry expert, but I do recognize a good concept when I see it. All of the biscuit dishes from Biscuits + Groovy start with great buttermilk biscuits. You can then build from there, like with the Johnny Hash. It’s definitely loaded with all things good and breakfasty.

Get The Real Deal

If I was anywhere near Austin, Texas right now I’d be in line at the Biscuits + Groovy trailer and my stomach would be growling!

I highly recommend that you shred or grate your own cheese at home. Don’t buy the pre-shredded or pre-grated stuff. It has stuff added to it to keep it from sticking together. That ‘stuff’ affects how the cheese melts. Shred it yourself and use the good stuff.

Also try the Biscuits + Groovy The Donna Summer.

Biscuits + Groovy The Johnny Hash
Print Pin
5 from 1 vote

Biscuits + Groovy The Johnny Hash

Biscuits, white pepper gravy, diced potatoes, bacon and breakfast sausage, topped with cheese and garnished with green onions. This ain’t no light breakfast, it’s the breakfast of champions!
Course Breakfast
Cuisine American
Keyword biscuits, gravy
Prep Time 15 minutes
Cook Time 45 minutes
Total Time 1 hour
Servings 2 servings
Calories 671kcal

Ingredients

For the white pepper gravy

Instructions

For the white gravy

  • Melt the butter in a small saucepan.
  • Whisk in the flour.
  • Whisk in the milk until smooth. Gravy will continue to thicken. If too thick add a bit more milk.
  • Season with salt and pepper to taste.

For the biscuits, breakfast links and bacon

  • Preheat oven to 350 F.
  • Line a large baking sheet with aluminum foil. Add the sausage links and bacon.
  • Bake for 20 minutes. Flip links and bacon. Cook for 5 more minutes then remove the links. Continue to cook until done. Remove and let cool slightly before chopping the bacon and slicing the links into bite-sized pieces. Note: If you want a little crispiness to your links place them under the broiler for 2-3 minutes after you’ve removed the bacon.
  • In the other pan, place the biscuits and cook per package instructions.

Making the biscuits

  • Split biscuits and place on a plate.
  • Add potatoes, gravy, meats and cheese.
  • Top with chives or green onions. Serve.

Notes

Use whole milk for the best results.

Nutrition

Calories: 671kcal | Carbohydrates: 54g | Protein: 23g | Fat: 40g | Saturated Fat: 13g | Trans Fat: 1g | Cholesterol: 77mg | Sodium: 1056mg | Potassium: 798mg | Fiber: 2g | Sugar: 9g | Vitamin A: 290IU | Vitamin C: 9mg | Calcium: 202mg | Iron: 4mg

Nutritional values are approximate.

Cajun Injected Chicken using the Vortex

I cook a lot, and I do mean a lot, of chicken using my Vortex. Wings and thighs are my favorite and I’ve cooked them countless delicious ways. But I’d never injected my chicken until now. This Cajun injected chicken using the Vortex is just packed with bite after bite of crazy good flavor. Moist doesn’t even come close to describing the meat. And yet it still has the perfect texture and that great crunchy skin.

Cajun Injected Chicken using the Vortex

For Low-Salt, Make The Seasoning At Home

Store-bought Cajun seasoning can be a bit on the salty side. If you prefer to use less salt I recommend that you make your own seasoning and use as much or as little salt as you wish. That way you can tailor your Cajun injected chicken using the Vortex to your individual tastes.

You’ll also want to make my Vortex Nashville hot chicken and my easy Cajun fried chicken.

Cajun Injected Chicken using the Vortex
Print Pin
5 from 1 vote

Cajun Injected Chicken using the Vortex

I cook a lot, and I do mean a lot, of chicken using my Vortex. Wings and thighs are my favorite and I’ve cooked them countless delicious ways. But I’d never injected my chicken until now. 
Course Main
Cuisine American
Keyword fried chicken, injected, Vortex
Prep Time 12 hours
Cook Time 45 minutes
Total Time 12 hours 45 minutes
Servings 8 servings
Calories 319kcal

Equipment

Ingredients

For the chicken

  • 3-4 pounds chicken pieces I used skin-on, bone-in chicken thighs
  • ¼ cup Cajun seasoning

For the injection

Instructions

  • Rub the chicken with the seasoning. Cover and refrigerate overnight.
  • Remove chicken from the fridge and let come to room temperature while you fire up your grill with the Vortex insert.
  • While the coals are getting hot, combine the injection ingredients. Using a syringe, inject the liquid in several spots in each piece of chicken.
  • Transfer chicken to the edges of your grill, around the Vortex.
  • Cook for approximately 45 minutes or until the chicken reaches 165 F as measured in several locations.

Notes

Store-bought Cajun seasoning can be quite salty. For a less salty version make your own and reduce the amount of salt.

Nutrition

Calories: 319kcal | Carbohydrates: 4g | Protein: 22g | Fat: 24g | Saturated Fat: 9g | Trans Fat: 1g | Cholesterol: 102mg | Sodium: 86mg | Potassium: 347mg | Fiber: 2g | Sugar: 1g | Vitamin A: 2864IU | Vitamin C: 5mg | Calcium: 27mg | Iron: 2mg

Nutritional values are approximate.

Deli Sandwich Spread

I love having sandwiches for lunch. They can be anywhere from simple to fancy, depending on my mood (and available time). I knew by the end of last week that there was going to be a sandwich-kind-of-weekend coming up, so I made a nice big batch of this fantastically simple but oh-so-delicious deli sandwich spread. Nice and creamy, perfectly spreadable, it has a nice herby hint. I felt fru-fru eating my sandwich, and that takes something let me tell you!

Deli Sandwich Spread

Great With Some Added Kick, Too!

For a little kick, add a pinch or two of red pepper flake to this deli sandwich spread. Stir and let the spread set an extra hour or so in the fridge. It definitely gets better with time but if you’re in a hurry go for it. Slather it on and eat it up. It’s still great stuff no matter when you eat it.

This spread is also great on wraps.

Substitute Creole mustard for the Dijon for a down-south twist.

I almost always use Blue Plate mayonnaise in the dishes I make. I think it is the best around. If you can’t find it locally you can pick it up online for a fair price.

Try my stuffed deli sandwich too. It’ll make you happy.

Deli Sandwich Spread
Print Pin
5 from 1 vote

Deli Sandwich Spread

I knew by the end of last week that there was going to be a sandwich-kind-of-weekend coming up, so I made a nice big batch of this fantastically simple but oh-so-delicious deli sandwich spread. Nice and creamy, perfectly spreadable, it has a nice herby hint.
Course Sauce
Cuisine American
Keyword sandwich, sauce
Prep Time 5 minutes
Total Time 5 minutes
Servings 8
Calories 148kcal

Equipment

Ingredients

Instructions

  • In a small bowl, combine all the ingredients.
  • Cover and refrigerate for at least 1 hour before serving.

Notes

Give the spread a good stir before serving.

Nutrition

Calories: 148kcal | Carbohydrates: 1g | Protein: 1g | Fat: 16g | Saturated Fat: 3g | Trans Fat: 1g | Cholesterol: 12mg | Sodium: 188mg | Potassium: 36mg | Fiber: 1g | Sugar: 1g | Vitamin A: 82IU | Vitamin C: 1mg | Calcium: 19mg | Iron: 1mg

Nutritional values are approximate.

Mandarin Teriyaki Jerky on the Nesco Snackmaster Pro

Teriyaki jerky is a big favorite of mine. Every few batches of jerky that I make is teriyaki of some kind or another. I picked up a package of Hi Mountain’s Mandarin Teriyaki jerky mix at Cabella’s and quickly made a batch of Mandarin Teriyaki Jerky on the Nesco Snackmaster Pro. This mandarin teriyaki doesn’t have a strong teriyaki flavor and it’s not meant to. It’s a very subtle teriyaki flavor, with an even more subtle hint of mandarin orange. It’s a nice change from its stronger teriyaki cousin.

Mandarin Teriyaki Jerky on the Nesco Snackmaster Pro

Rotating Your Trays

Make sure you rotate your trays every 2 hours or so when you make up a batch of Mandarin Teriyaki jerky on the Nesco Snackmaster Pro. The bottom trays will not dry as quickly as those on top. Rotating the trays will give you nice, even drying and perfect jerky on every level.

Extra Trays Are A Good Thing

I like to load up my dehydrator. To do that I picked up a handful of extra trays. They really add a whole lot more drying space! Since I have to rotate my trays, I write a number on each one on a piece of blue painter’s tape so I can keep track of them.

Also try my fiery Teriyaki jerky.

Check out my guide to using the Nesco Snackmaster Pro. You will be making fantastic jerky at home in no time at all!

Mandarin Teriyaki Jerky on the Nesco Snackmaster Pro
Print Pin
5 from 1 vote

Mandarin Teriyaki Jerky on the Nesco Snackmaster Pro

The mandarin teriyaki doesn’t a strong teriyaki flavor and it’s not meant to. It’s a very subtle teriyaki flavor, with an even more subtle hint of mandarin orange. It’s a nice change from it’s stronger teriyaki cousin.
Course Dehydrator
Cuisine Jerky
Keyword Asian, dehydrator, jerky, nesco snackmaster pro
Prep Time 8 hours
Cook Time 6 hours
Total Time 14 hours
Servings 8 servings
Calories 288kcal
Author Mike

Ingredients

Instructions

  • Place beef in a resealable bag or container.
  • In a small bowl whisk together the seasoning, curing salt and water.
  • Pour over the meat and seal. Shake to coat.
  • Refrigerate the meat for up to 8 hours, shaking or massaging every hour or so to get the marinade distributed and absorbed evenly.
  • Remove meat from the marinade and add to a jerky gun.
  • Squeeze out onto Nesco trays. Do not overlap meat.
  • Add the dehydrator top, set to maximum temperature setting and dehydrate for 5 hours, rotating the trays (bottom to top) every 2 hours or so.
  • To test for doneness remove a piece and let cool slightly. Try to bend the meat. If it gives and starts to tear at the bend it is done. If it bends without tearing return to the dehydrator and let it run another 15 minutes and test again. If the meat is crunchy it is overdone but still good. It’s really a personal preference as to how you like your jerky. Soft, chewy, crunchy. There’s no wrong here.
  • Let cool before storing in an airtight container.

Notes

Add more seasoning if you want a stronger flavor, but this jerky isn’t meant to be real strong.

Nutrition

Calories: 288kcal | Protein: 19g | Fat: 23g | Saturated Fat: 9g | Trans Fat: 1g | Cholesterol: 81mg | Sodium: 77mg | Potassium: 306mg | Calcium: 21mg | Iron: 2mg

Nutritional values are approximate.

Smoked Velveeta

Oh, yes, people laughed when I brought up the idea of smoking Velveeta. “Why?” “Are you insane?” You name it, I heard it. But I was not deterred. In my mind I had already tasted smoked Velveeta mac-and-cheese and grilled cheese sandwiches. And they tasted fantastic.

Smoked Velveeta

Amazingly Delicious

I used the exact same process that I use for cold smoking cheese blocks except that I froze the Velveeta overnight first. Velveeta gets soft even at room temperature. By freezing it I was helping to guarantee that it didn’t melt on a smoker. And it didn’t! It came out absolutely amazing! Next time, I’m loading up my smoker big time with Velveeta! This stuff is awesome!

I use a smoke tube when cold smoking. It gives me perfect control over the temperature and produces consistent smoke. I buy wood pellets (I used apple) and fill the tube completely, then light one end. The tube stays lit for a few hours, perfect for smoking cheese or anything else that doesn’t need higher heat. I highly recommend it. It’s also great for adding smoke flavor to dishes being cooked on a gas grill.

The first thing I made with smoked Velvetta was, of course, macaroni and cheese!

Smoked Velveeta
Print Pin
4.50 from 2 votes

Smoked Velveeta

Oh, yes, people laughed when I brought up this idea.
Course Side
Cuisine American
Keyword cheese, smoked
Prep Time 1 day
Cook Time 1 hour
Total Time 1 day 1 hour
Servings 1 pound
Calories 1007kcal
Author Mike

Ingredients

Instructions

  • Unwrap the Velveeta. Place on a plate and place in the freezer for at least 24 hours.
  • Fire up your smoker for cold smoking.
  • Make sure you keep the temperature below 90 F, and preferably at 70 F.
  • Place the Velveeta on a grate or in a disposable pan and transfer to the smoker.
  • Smoke for 30 minutes to 2 hours depending on how strong you want the smoke flavor. If the cheese begins to sweat wipe it dry and make sure the temperature is staying low.
  • Remove from the smoker and let cool completely. Place in a vacuum sealer bag or resealable bag and close. Refrigerate for at least 2 weeks before using.

Notes

Make sure you unwrap the Velveeta completely before freezing!
If you don’t have a smoke tube you can still cold smoke with just a few briquettes and a chunk or two of wood.

Nutrition

Calories: 1007kcal | Carbohydrates: 54g | Protein: 89g | Fat: 48g | Saturated Fat: 32g | Cholesterol: 191mg | Sodium: 7194mg | Potassium: 1565mg | Sugar: 39g | Vitamin A: 4454IU | Vitamin C: 1mg | Calcium: 2604mg | Iron: 1mg

Nutritional values are approximate.

Sesame Ginger Chicken on the Char-Broil Big Easy

Note: This recipe was developed using the Char-Broil Big Easy Oil-Less Fryer. If you are cooking using the Char-Broil Smoker-Roaster Grill you should cook with the lid open and the temperature set to High. You might also need to adjust the cooking time.

Sesame ginger chicken on the Char-Broil Big Easy is an example of just how easy making good chicken can be. A quick marinade in salad dressing and into the cooker. No mess, no fuss, no babysitting a grill. In no time you get juicy, tender, super tasty chicken with a hint of sesame and ginger.

Sesame Ginger Chicken on the Char-Broil Big Easy

Deliciously Moist And Tender, Every Time

I prefer split chicken breasts, but any cut of chicken will do. And I tend to prefer bone-in pieces. They will end up being juicier and more flavorful than boneless cuts.

I used a bottle of Newman’s Own Sesame Ginger salad dressing as the marinade for the chicken. You can use your favorite brand or flavor of dressing, but steer clear of any that contain sugary things like… sugar. Or honey. Or brown sugar. The Big Easy cooks at a fairly high temperature. Sugary marinades will char and char good in no time. If you do use one that contains sugar, you’ll want to rinse off the chicken before putting it into the cooker. Yes, you’ll lose some flavor (the marinade will still be inside of the chicken), but you won’t run the risk of burning your dish.

It’s always a good idea to keep a few spare grease trays on hand for your Char-Broil Big Easy.

Love your Big Easy as much I love mine? Check out my Big Easy Add-Ons page and my free Big Easy eCookbook!

Sesame Ginger Chicken on the Char-Broil Big Easy
Print Pin
5 from 1 vote

Sesame Ginger Chicken on the Char-Broil Big Easy

Sesame ginger chicken is a mighty fine example of just how easy making good chicken can be. A quick marinade in salad dressing and into the cooker.
Course Main
Cuisine American
Keyword Big Easy, Char-Broil, chicken
Prep Time 4 hours
Cook Time 1 hour 20 minutes
Total Time 5 hours 20 minutes
Servings 4 servings
Calories 258kcal
Author Mike

Ingredients

Instructions

  • Place the chicken into a resealable bag or container.
  • Add marinade to taste. Toss to coat.
  • Seal and refrigerate for at least 4 hours, turning occasionally.
  • Fire up your Big Easy.
  • Transfer the chicken to the Big Easy basket.
  • Cook for approximately 20 minutes per pound or until it reaches 165 F as checked in several places.
  • Remove and let rest 10 minutes before serving.

Notes

Feel free to substitute other chicken cuts.

Nutrition

Calories: 258kcal | Protein: 48g | Fat: 6g | Saturated Fat: 1g | Trans Fat: 1g | Cholesterol: 145mg | Sodium: 262mg | Potassium: 836mg | Vitamin A: 68IU | Vitamin C: 3mg | Calcium: 11mg | Iron: 1mg

Nutritional values are approximate.

Mock Bacon Filets

My wife loves filet mignon. On occasion I will grab an entire beef tenderloin and cut it into filets. But, let’s face it, filets aren’t the cheapest cut of meat. Not even close. That’s when it’s time to make these mock bacon filets. Mushroom-stuffed patties wrapped in bacon, topped with more mushrooms and a wonderful sauce. The sauce really is amazing. And they’re incredibly easy to make.

Mock Bacon Filets

Surprisingly Awesome

These mock bacon filets are almost meatloaf-like. That’s a good thing since I’m a meatloaf-aholic. I have to say that the sauce is very, very good. So good in fact that we decided (after our first bite) to use it to glaze our next meatloaf. The sauce really compliments the dish perfectly. So perfectly that you won’t miss not having real filets. I could eat way, way too many of these.

I love to cook these filets in a cast iron skillet. It just makes life easier and better. Since this dish starts on the stove and finishes in the oven, it’s simpler to use a single pan for both steps. The recipe does make 4 large patties, so a larger skillet is a must.

Sometimes I got the piggy route and make bacon-wrapped pork medallions instead!

Mock Bacon Filets
Print Pin
5 from 1 vote

Mock Bacon Filets

Let’s face it, filets aren’t the cheapest cut of meat. That’s when it’s time to make these mock bacon filets. Mushroom-stuffed patties wrapped in bacon, topped with more mushrooms and a wonderful sauce. And they’re incredibly easy to make.
Course American
Cuisine Main
Keyword beef, filets
Prep Time 15 minutes
Cook Time 1 hour 10 minutes
Total Time 1 hour 25 minutes
Servings 4 servings
Calories 747kcal

Ingredients

For the patties

For the sauce

Instructions

For the patties

  • Preheat your oven to 350 F.
  • Place the bacon on a foil-lined baking sheet and place into the oven to partially cook the bacon while assembling the patties. You do not want the bacon to get crispy, just slightly done. Remove and let cool.
  • In a large bowl, combine the ground beef, bell pepper, onion, chili sauce, Worcestershire sauce, basil, salt and pepper.
  • Form the meat into 8 equally-sized patties.
  • Melt the butter in a medium skillet.
  • Add the mushrooms and saute until soft.
  • Spoon a small amount (do not use them all) of the mushrooms into the center of 4 of the patties.
  • Cover with the other patties and pinch along the edges to seal.
  • Wrap patties with the bacon and secure with toothpicks.
  • Transfer to a shallow pan.
  • Pour sauce over patties and bake for 45 minutes.
  • Garnish with remaining mushrooms and serve.

For the sauce

  • Combine all ingredients.

Notes

The hot sauce adds more flavor than kick.

Nutrition

Calories: 747kcal | Carbohydrates: 21g | Protein: 44g | Fat: 54g | Saturated Fat: 22g | Trans Fat: 3g | Cholesterol: 178mg | Sodium: 1588mg | Potassium: 1573mg | Fiber: 6g | Sugar: 13g | Vitamin A: 1343IU | Vitamin C: 29mg | Calcium: 88mg | Iron: 7mg

Nutritional values are approximate.

Hot Dog Burnt Ends

If you’ve never made or tried burnt ends, I highly recommend them. As great as smoked brisket is, burnt ends are brisket candy. Highly addicting, they are a real treat. But hey, they do take time and brisket isn’t always the cheapest cut. So what to do if you want to feed a crowd of some meat candy without breaking the bank? Yep, you guessed it: hot dog burnt ends. Smoked hot dogs covered in a caramelized sauce, you’ll never eat those little sausage thingies again. Perfect for a party, these goodies will disappear in no time.

Hot Dog Burnt Ends

Easy But With A Big Reward

There’s absolutely nothing challenging about making these hot dog burnt ends. If you don’t have a smoker (I love my Weber smoker!) you can make the entire dish on a grill. You can even use a gas grill. If you do, I recommend you use a smoky BBQ sauce to add a little of that great I-made-these-on-a-smoker even-though-I-didn’t flavor.

SPAM makes for great burnt ends too!

Hot Dog Burnt Ends
Print Pin
5 from 1 vote

Hot Dog Burnt Ends

Smoked hot dogs covered in a caramelized sauce, you’ll never eat those little sausage thingies again. Perfect for a party, these goodies will disappear in no time.
Course Appetizer
Cuisine American
Keyword hot dogs, smoked
Prep Time 15 minutes
Cook Time 2 hours
Total Time 2 hours 15 minutes
Servings 16
Calories 166kcal
Author Inspired by a recipe from Hey Grill Hey

Ingredients

Instructions

  • Fire up your smoker for 225 F. Use any wood you like, these turn out great whether they are smoked over fruit wood or a stronger wood such as mesquite.
  • Squeeze the mustard over the dogs then brush around all sides. (I found it easier to just spread the mustard with my hands).
  • Sprinkle the rub over all sides of the dogs.
  • Transfer to your smoker and smoke for 1 hour.
  • Meanwhile, fire up your grill for medium heat cooking (or pre-heat your oven to 375 F).
  • Remove dogs and cut into thirds (about 1 1/2" pieces).
  • Transfer to a disposable pan.
  • Combine the butter, brown sugar and BBQ sauce and pour over the hot dogs.
  • Stir and place on your grill (or in the oven).
  • Cook dogs an addition 30-45 minutes, stirring every 10 minutes, until the hot dogs have begun to caramelize.
  • Remove and let cool slightly before serving.

Notes

Serve with warmed BBQ sauce for dipping, if desired.

Nutrition

Calories: 166kcal | Carbohydrates: 15g | Protein: 5g | Fat: 10g | Saturated Fat: 4g | Trans Fat: 1g | Cholesterol: 28mg | Sodium: 422mg | Potassium: 94mg | Fiber: 1g | Sugar: 6g | Vitamin A: 109IU | Vitamin C: 1mg | Calcium: 19mg | Iron: 1mg

Nutritional values are approximate.

Slow Cooker Vietnamese Ribs

I almost bailed. I almost didn’t post these slow cooker Vietnamese ribs. To be truthful, they stunk up the house. Seriously. There’s tons of fish sauce in them, and if you’ve used fish sauce before you know it stinks. And then some. But, here’s the crazy part: they’re crazy delicious. That surprised the heck out of me.

Slow Cooker Vietnamese Ribs

I Had No Idea

That fishy smell disappeared and left me with a rack of completely fall-off-the-bone ribs that I devoured like I hadn’t eaten in two weeks. Who would’ve thought? Slow cooker Vietnamese ribs are amazing. This is one of the most surprisingly good dishes I’ve ever had. I was totally wrong to be pessimistic about these ribs.

I’d keep an eye on these after about 6 hours. I cooked mine the full 7 hours before placing them under the broiler. You may want to take the ribs out sooner if you prefer yours to stick to the bone a bit instead of completely falling off. Mine definitely came out tender.

Also try my oven baked ribs, sweet-and-sour grilled country-style ribs, and my slow cooker baby back ribs.

Slow Cooker Vietnamese Ribs
Print Pin
5 from 1 vote

Slow Cooker Vietnamese Ribs

After a few hours you are rewarded with a rack of completely fall-off-the-bone ribs that are completely different than any ribs you've had before.
Course Main
Cuisine American
Keyword crockpot, ribs, slow cooker
Prep Time 15 minutes
Cook Time 8 hours
Total Time 8 hours 15 minutes
Servings 1 rack
Calories 1587kcal

Ingredients

Instructions

  • Place ribs into the slow cooker.
  • Stir together the shallot, fish sauce, salt and pepper.
  • Pour over ribs.
  • Cover and cook on low for 7 hours or until the meat is starting to fall off the bones, rotating the ribs after 3 1/2 hours.
  • Turn on your broiler. Carefully transfer the ribs to a foil-lined baking sheet and place under the broiler, meat side up, for 4-5 minutes or until nicely browned.
  • Pour the juices that remain in the slow cooker thru a sieve and into a sauce pan.
  • Bring to a boil and then reduce to a simmer for 15 minutes until nice and thick.
  • Serve ribs brushed with reduced sauce.

Notes

Keep an eye on the ribs when placing under the broiler.

Nutrition

Calories: 1587kcal | Carbohydrates: 81g | Protein: 113g | Fat: 93g | Saturated Fat: 33g | Trans Fat: 1g | Cholesterol: 391mg | Sodium: 6219mg | Potassium: 1792mg | Fiber: 2g | Sugar: 76g | Vitamin A: 139IU | Vitamin C: 5mg | Calcium: 229mg | Iron: 6mg

Nutritional values are approximate.