Spicy Frito Pie

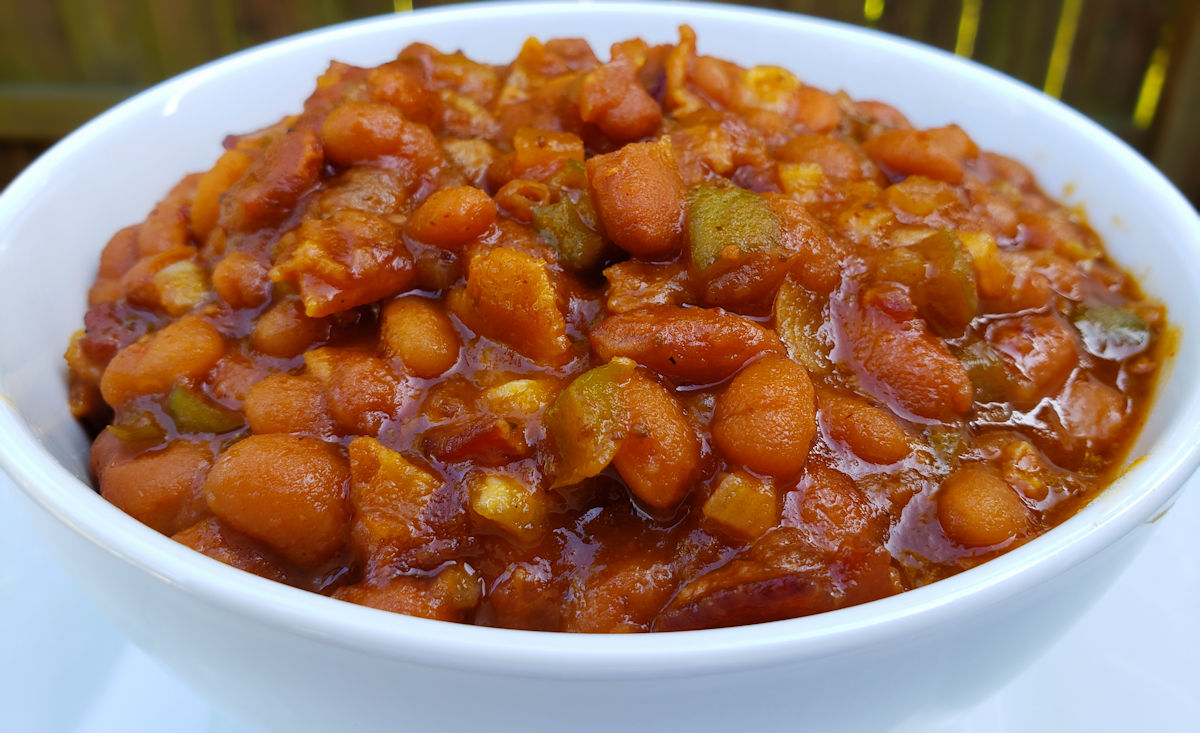
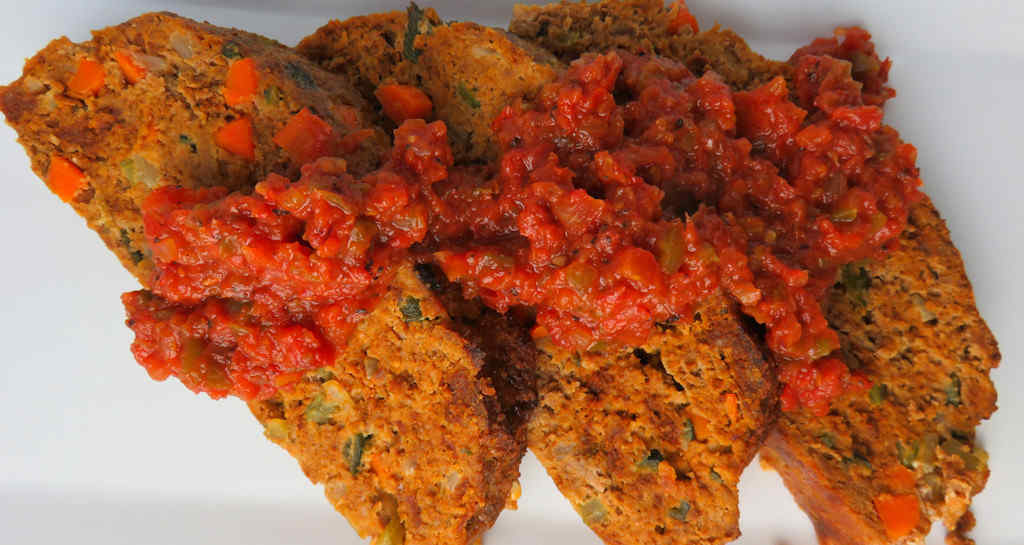
Man oh man did this spicy Frito pie ever hit the spot. The weather took a weird turn for a few days and I needed something to warm me up. This dish did it. And oh was it ever so yummy. And very easy to make to boot. Usually, you might expect a Frito pie to be served as a casserole or even in a bag of Fritos. I kinda made mine more of a twist on nachos. No matter how you do it, the delicious meat sauce and cheese go great with crunchy salty corn chips.

Spicy Frito Pie

As Spicy As You Want It To Be

With just a few little changes, you can make this Frito pie mild or hot. First up, the taco seasoning. Easy enough to use a hot spice mix. Or not. I like to use my homemade version so I can change up the heat level depending on my mood for the day. For the tomatoes I used Rotel with habaneros. The hot stuff. Yeah baby. That got us going. And finally I added a few jalapeno slices just for good measure.

I like to heat and serve this dish using my fajita skillets. They’re great for keeping food hot and melting cheese. You can also make this dish on a plate. Just top the hot meat with the cheese. It’ll melt a bit and you don’t have to worry about using the oven. Up to you. It’ll be great either way.

I’m kinda picky about my shredded cheese. I want it to be creamy. And I want it to melt nice and ooey gooey. That’s why I shred my own. The anti-caking agents used in the pre-shredded stuff prohibit good melting. It only takes a second (with the right tool) to shred it myself, and the results are worth it!

Also try my delicious cowboy pasta!

Spicy Frito Pie
Print Pin
5 from 1 vote

Spicy Frito Pie

This dish is sure to disappear in no time!
Course Main
Cuisine American
Keyword beef, spicy
Prep Time 5 minutes
Cook Time 45 minutes
Servings 8
Calories 456kcal

Equipment

Ingredients

Instructions

  • Preheat the oven to 350 F.
  • Lightly brown the ground beef in a large skillet over medium-high heat, breaking it up as you go.
  • Sprinkle the beef with the taco seasoning and stir.
  • Add the onion and bell pepper. Cook, stirring, until the beef is done and the vegetables are soft. Drain any excess grease.
  • Reduce heat to medium-low and add the tomatoes with their juices along with the Worcestershire, enchilada sauce and salt and pepper to taste.
  • Bring to a simmer, stirring, and let simmer for 5 minutes.
  • Add a layer of chips to each skillet and top with the meat mixture. Sprinkle with cheese.
  • Bake in the oven 5-10 minutes or until the cheese is melted.
  • Be careful removing from the oven. The pans and their handles will be hot. Don't forget to use an oven mitt or glove.

Notes

Substitute pepper jack for the cheddar and add some jalapeno slices when serving for a more kicked-up version!

Nutrition

Calories: 456kcal | Carbohydrates: 12g | Protein: 28g | Fat: 32g | Saturated Fat: 14g | Polyunsaturated Fat: 1g | Monounsaturated Fat: 12g | Trans Fat: 1g | Cholesterol: 109mg | Sodium: 814mg | Potassium: 561mg | Fiber: 2g | Sugar: 8g | Vitamin A: 779IU | Vitamin C: 25mg | Calcium: 253mg | Iron: 4mg

Nutritional values are approximate.

Spicy Chili Cheese Hot Dogs

Chili and hot dogs go together like butter and popcorn. Or peas and carrots. Actually better than those pairings. Me, I like a little kick so I made spicy chili cheese hot dogs. That perfect pairing just got even better. And even better, they definitely satisfy my ‘messier is better’ theory because these dogs are definitely messy. Don’t be tempted to eat these with a fork and knife. That’s not right. You gotta get in there and get messy!

Spicy Chili Cheese Hot Dogs

Easy. Or Not.

You can take two routes when making some spicy chili cheese hot dogs. You could grab a can of meatless chili out of the pantry. And a jar of jalapeno queso. Even some pre-cut onions. In just a few minutes you could be enjoying these dogs. Or you could make some chili, throw together a cheese sauce, and go the from-scratch route. Either way, they’re gonna be good. It’s up to you.

If I’ve got the time I’ll cook my dogs on the grill. Nothing beats a juicy, beefy dog over charcoal. But if I don’t, it’s off the air fryer I got. Not only does the air fryer cook dogs up great, it also toasts the buns perfectly.

I use a pretty straight-forward air fryer, that doesn’t have a lot of bells (ok, it has a bell for when the timer goes off!) and whistles. It gets the job done.

Check out my life of the best hot dog recipes!

Spicy Chili Cheese Hot Dogs
Print Pin
5 from 1 vote

Spicy Chili Cheese Hot Dogs

Messier is better. Here's proof.
Course Main
Cuisine American
Keyword hot dogs
Prep Time 5 minutes
Cook Time 10 minutes
Servings 4
Calories 271kcal

Ingredients

  • 4 hot dogs cooked as desired
  • 4 hot dog buns warmed
  • ½ cup chili warmed. use no-bean chili. you might want a little more than 1/2 cup
  • 1 jalapeño stemmed, seeded, diced
  • ¼ cup cheese sauce warmed, you might want a little more than 1/4 cup
  • ¼ cup onion chopped

Instructions

  • Place the hot dogs onto the buns.
  • Divide the chili between the hot dogs.
  • Add the jalapeno to the warmed cheese sauce and stir.
  • Divide between the hot dogs.
  • Add the onion.
  • Serve!

Notes

I like to cut a shallow slit down the dogs lengthwise before cooking. The hot dogs open up a bit while cooking. This allows the toppings to settle in to the dog, not spilling out when you take a bite.

Nutrition

Calories: 271kcal | Carbohydrates: 33g | Protein: 10g | Fat: 11g | Saturated Fat: 3g | Polyunsaturated Fat: 2g | Monounsaturated Fat: 3g | Cholesterol: 22mg | Sodium: 641mg | Potassium: 201mg | Fiber: 1g | Sugar: 5g | Vitamin A: 296IU | Vitamin C: 32mg | Calcium: 88mg | Iron: 3mg

Nutritional values are approximate.

Spicy Barbecue-and-Bacon Baked Beans on the Char-Broil Big Easy

It’s summer time. And summer is good. Summer is better, though, with a big ole plate of spicy barbecue-and-bacon baked beans on the Char-Broil Big Easy. These are some of the most flavor-packed beans you’ll find. And talk about easy to make, too! It’s not quite as easy as open a bunch of cans and heat, but it’s close to being that easy. A little time in the oil-less fryer and you’re ready to devour some tasty beans. Double, triple or quadruple the recipe and you’ve got a great dish for a picnic or family get-together!

Spicy Barbecue-and-Bacon Baked Beans on the Char-Broil Big Easy

Packed With Flavor

Much of the flavor in these spicy barbecue-and-bacon baked beans on the Char-Broil Big Easy comes from the Ranch style beans. Then along comes a bit of jalapeno spiciness. And just a hint of sweetness. For the BBQ sauce I went with a nice hickory BBQ sauce to add a bit of that outdoorsy flavor.

The bunk bed basket lets you double the amount of cooking space you have on your Big Easy. And it’s easy to take in and out of the cooker too!

Use a bunk bed in conjunction with these disposable pans and you’ll be able to make a double-batch of these beans!

It’s always a good idea to keep a few spare grease trays on hand for your Char-Broil Big Easy.

Also try my apple pie baked beans on the Char-Broil Big Easy.

Spicy Barbeque-and-Bacon Baked Beans on the Char-Broil Big Easy
Print Pin
5 from 1 vote

Spicy Barbecue-and-Bacon Baked Beans on the Char-Broil Big Easy

Use a hickory BBQ sauce to add a bit of that outdoorsy flavor.
Course Side Dish
Cuisine American
Keyword baked beans, spicy
Prep Time 10 minutes
Cook Time 1 hour 15 minutes
Servings 6
Calories 386kcal

Ingredients

Instructions

  • Cook the bacon until about 3/4ths done. I do this in an oven at 350 F for about 30 minutes, but you can also use a skillet on the stove top. Drain.
  • Fire up your Big Easy.
  • Spray an 8" round disposable Dutch oven pan or use some other pan that will fit into the Big Easy.
  • In a large bowl combine beans, barbecue sauce, jalapeno, onion, brown sugar and mustard.
  • Stir in the bacon.
  • Pour mixture into the pan and transfer to the Big Easy basket and into the cooker.
  • Bake 45 minutes or until bubbly hot and the onions are just tender.

Notes

Add sliced hot dogs to make this a great beans-and-weiners dish!

Nutrition

Calories: 386kcal | Carbohydrates: 68g | Protein: 10g | Fat: 9g | Saturated Fat: 3g | Polyunsaturated Fat: 2g | Monounsaturated Fat: 4g | Trans Fat: 0.02g | Cholesterol: 17mg | Sodium: 1223mg | Potassium: 743mg | Fiber: 8g | Sugar: 41g | Vitamin A: 97IU | Vitamin C: 8mg | Calcium: 105mg | Iron: 3mg

Nutritional values are approximate.

Slow Cooked Jalapeno Corn

Ah, glorious sweet corn. It makes me happy whenever corn is in season. I love it any way you can cook it. This slow cooked jalapeno corn version adds a bit of heat (though really, it’s quite tame) from jalapenos. It’s tremendously creamy and sweet. It’s also perfect for a get-together since it makes a pretty good size batch. You can halve it if you need, or double it for an even bigger crowd.

Slow Cooked Jalapeno Corn

Light On The Heat. Heavy On The Flavor.

You can leave out the jalapenos. But I think you’ll want to add something in place of it, like minced sweet onion. Don’t go crazy with it. I think you need just a little something for a little bite in this slow cooked jalapeno corn. I mean, it does have ‘jalapeno’ in the name!

Although I slow cooked the corn in my oven, you can also cook it on a grill or even a smoker. Just keep your temperature around 250 F and the corn will come out delicious.

If it’s in season, I grab my sweet corn from My Dad’s Sweet Corn!

Also try my cedar planked sweet corn.

Slow Cooked Jalapeno Corn
Print Pin
5 from 1 vote

Slow Cooked Jalapeno Corn

Ah, glorious sweet corn. It makes me happy whenever corn is in season. I love it any way you can cook it. This slow cooked jalapeno corn version adds a bit of heat (though really, it’s quite tame) from jalapenos, and tremendous creamy sweetness.
Course Side
Cuisine American
Keyword corn, crockpot, slow cooker
Prep Time 15 minutes
Cook Time 2 hours
Total Time 2 hours 15 minutes
Servings 16
Calories 223kcal

Ingredients

  • 24 ears fresh corn shucked and kernels cut from the cobs
  • 2 cups heavy cream
  • 2 sticks butter cubed
  • 1 teaspoon paprika
  • 1 teaspoon kosher salt
  • 1 teaspoon ground black pepper
  • 6 cloves garlic minced
  • 4 jalapenos sliced very thin

Instructions

  • Preheat the oven to 250 degrees F.
  • Place corn in a large disposable roasting pan.
  • Add remaining ingredients and stir.
  • Cover with foil and bake for 1 1/2 hours – 2 hours or until the corn is tender.
  • Stir before serving.

Notes

Add seranos or habaneros for an even spicier version of this recipe.

Nutrition

Calories: 223kcal | Carbohydrates: 27g | Protein: 5g | Fat: 13g | Saturated Fat: 7g | Trans Fat: 1g | Cholesterol: 41mg | Sodium: 178mg | Potassium: 402mg | Fiber: 3g | Sugar: 9g | Vitamin A: 738IU | Vitamin C: 14mg | Calcium: 25mg | Iron: 1mg

Nutritional values are approximate.

Mexican Meatloaf

I love meatloaf, and I’m not afraid to make it a little different than what one might consider a traditional meatloaf (though I love that too. Gimme plenty of potatoes and carrots too!). This Mexican meatloaf takes meatloaf to a new spicy, flavor-packed place. There’s absolutely nothing boring about it, that’s for sure, from the tender moist meat mixture, packed with vegetables, to the spicy smoky tomato salsa topping. Is it just as great the next day? Oh, it’s even better!

Mexican Meatloaf

No Mushy Meatloaf!

I have a little rule about my meatloaf. I like to keep my vegetables cut a bit bigger than most. They don’t need to be cooked until mushy. They need to be a little crunchy, but not super crunchy. I don’t want the vegetables to get lost in the this fantastic Mexican meatloaf meatiness.

I love chipotles in adobo sauce. They aren’t too particularly hot, but the smokiness adds a great flavor to just about any dish.

Also try my delicious barbecue meatloaf.

Mexican Meatloaf
Print Pin
4 from 1 vote

Mexican Meatloaf

This Mexican meatloaf takes meatloaf to a new spicy, flavor-packed place. There’s absolutely nothing boring about it, that’s for sure, from the tender moist meat mixture, packed with vegetables, to the spicy smoky tomato salsa topping. Is it just as great the next day? Oh, it’s even better!
Course Main
Cuisine American
Keyword meatloaf, Mexican
Prep Time 15 minutes
Cook Time 1 hour 30 minutes
Total Time 1 hour 45 minutes
Servings 8
Calories 680kcal

Ingredients

For the meatloaf

For the salsa

Instructions

  • Preheat oven to 375 F.
  • Heat the oil in a large skillet over medium-high heat.
  • Add the onion, carrots and celery and cook until just starting to soften, 8-10 minutes.
  • Add the garlic and cook another 1 minute.
  • Remove from heat and let cool.
  • Transfer the vegetables to a large bowl.
  • Add the ground beef, chorizo and the roasted poblano.
  • In a separate bowl combine the salt, pepper, cayenne, ketchup, and sour cream.
  • Add mix to the meat mixture.
  • Add bread crumbs and mix everything together. Thoroughly. Using your hands. Don't be shy.
  • Spray x 9″ x 13″ pan with non-stick spray.
  • Add meat and form into a loaf.
  • Place into the oven and bake until the meat reaches 165 F, 60-90 minutes.
  • Remove from the oven and let rest 10 minutes before slicing.
  • Serve topped with the salsa from below.

For the salsa

  • Add the canned tomatoes, onion, garlic, and serrano peppers to a blender and pulse until chunky.
  • Transfer to a skillet over medium heat and add the brown sugar, chipotle peppers and adobo sauce and mustard.
  • Simmer until thick then season with salt.

Notes

You can substitute your favorite salsa for the homemade version.

Nutrition

Calories: 680kcal | Carbohydrates: 38g | Protein: 34g | Fat: 43g | Saturated Fat: 16g | Trans Fat: 1g | Cholesterol: 205mg | Sodium: 1196mg | Potassium: 643mg | Fiber: 3g | Sugar: 21g | Vitamin A: 3558IU | Vitamin C: 30mg | Calcium: 114mg | Iron: 4mg

Nutritional values are approximate.

Spicy Green Chile Guacamole

I backed up the truck on some Hatch chiles this year. I ended up roasting almost all of them. They’re a really wonderful thing, and I’ve found myself using them in a lot of dishes. If I had more room I’d probably get two cases next year. One of my favorite things to make that uses roasted Hatch chiles is this spicy green chile guacamole.

Spicy Green Chile Guacamole

Different. Better.

The addition of chiles (and tomatillos) to guacamole really makes for something different. Tastier. A little thicker. And just slightly spicy. I’m not always a big fan of tomatillos, but I found that this guacamole called for just the right amount of them. I’ll be making this again and again.

I also found that this spicy green chile guacamole lasts longer than my usual guacamole recipe. I mean, lasts longer in the fridge. On the off chance that there’s leftovers, that is. It won’t last long once you serve it.

Also try my powdered gaucamole mix. It’s easy to make, using ingredients you already have in your pantry.

If you can’t find Hatch chiles locally, you can always order them online.

Spicy Green Chile Guacamole
Print Pin
5 from 1 vote

Spicy Green Chile Guacamole

One of my favorite things to make that uses roasted Hatch chiles is this spicy green chile guacamole.
Course Appetizer
Cuisine American
Keyword guacamole
Prep Time 10 minutes
Total Time 10 minutes
Servings 8 servings
Calories 54kcal

Equipment

Ingredients

  • 2 green chiles roasted. Hatch or Anaheim, poblanos in a pinch, seeds and membranes removed
  • ½ pound tomatillos husked, roasted
  • 1 avocado pitted, flesh removed
  • 2 cloves garlic
  • ½ cup cilantro
  • 1 teaspoon lime juice
  • ¼ cup water
  • kosher salt to taste

Instructions

  • Place all ingredients into a blender or food process and process until smooth.
  • If the mixture is too thick add a bit more water and pulse a few times.

Notes

If you don’t have roasted chiles and tomatillos on hand, just toss fresh chiles and tomatillos on the grill (or under the broiler) until charred on all sides. Let cool slightly then remove the charred skins.

Nutrition

Calories: 54kcal | Carbohydrates: 5g | Protein: 1g | Fat: 4g | Saturated Fat: 1g | Sodium: 40mg | Potassium: 207mg | Fiber: 3g | Sugar: 2g | Vitamin A: 137IU | Vitamin C: 8mg | Calcium: 7mg | Iron: 1mg

Nutritional values are approximate.

Spicy Bacon Burger

Messy and spicy. That’s all I need to know. Plenty of crispy bacon too. And a little of ‘garden’. Nothing really that fancy, just a good juicy spicy bacon burger with plenty of kick. Thanks to the spicy cheese and a very spicy sauce. It’s not over-the-top crazy spicy, but it definitely has some kick!

Spicy Bacon Burger

Delicious Burgers With The Perfect Kick

I usually cook my spicy bacon burger on the grill, but not on the grates. Instead I use a griddle insert that is made of cast iron. The insert gets screaming hot, like a griddle from a diner. You know, the diners that make great burgers. When you cook on grates the juices drip down into the grill, lost forever. When you cook on the griddle the juices hang out, flavoring the patties and keeping them moist. You can’t go wrong griddling burgers in my opinion. You can also cook the bacon on the griddle, but I usually bake my bacon.

I like to use a burger press when I make burgers. It, in combination with some patty papers, enables me to crank out a whole bunch of equally-sized burger patties in no time at all with little cleanup.

Also try my Louisiana burgers and my butter burgers. And you have to have my pepper crusted bacon cheeseburgers! They’re all seriously good.

Spicy Bacon Burger
Print Pin
5 from 1 vote

Spicy Bacon Burger

Messy and spicy. That’s all I need to know. Plenty of crispy bacon too. And a little of ‘garden’. Nothing really that fancy, just a good juicy spicy bacon burger with plenty of kick. 
Course Main
Cuisine American
Keyword burgers
Prep Time 15 minutes
Cook Time 1 hour
Total Time 1 hour 15 minutes
Servings 3 servings
Calories 957kcal

Ingredients

For the burger

  • 1 pound ground beef I prefer a 85/15% mix
  • Kosher salt
  • ground black pepper
  • 12 slices bacon
  • 3 sesame seed hamburger buns
  • 3 slices extra sharp cheddar cheese
  • 3 slices habanero jack cheese
  • Green leaf lettuce
  • 6 slices tomato
  • 6 slices red onion

For the sauce

Instructions

For the burger

  • Preheat oven to 380 F.
  • Divide the ground beef into 3 equally sized patties. Season well with salt and pepper.
  • Place bacon slices on a baking sheet lined with aluminum foil. Bake for 40 minutes, flipping once, until done but not overly crispy. Remove to a paper towel-lined plate to drain.
  • Fire up your grill and cook the burgers until the desired doneness is reached.
  • Toast the buns if desired.
  • Top patties with cheese and melt.
  • Slather the buns with the sauce. Add the patties, lettuce, tomato, red onion and cooked bacon.

For the sauce

  • Whisk together all ingredients until smooth.

Notes

Add a few pinches of red pepper flake to your ground beef before forming the patties for even more kick!

Nutrition

Calories: 957kcal | Carbohydrates: 29g | Protein: 67g | Fat: 63g | Saturated Fat: 26g | Trans Fat: 2g | Cholesterol: 216mg | Sodium: 1808mg | Potassium: 1076mg | Fiber: 2g | Sugar: 6g | Vitamin A: 906IU | Vitamin C: 13mg | Calcium: 481mg | Iron: 6mg

Nutritional values are approximate.

Spicy Buttermilk Fried Chicken using the Vortex

This. Right. Here. Absolutely divine ‘fried’ chicken, hot off my charcoal grill. Yes, grill. Before I got a Vortex, I had no idea that not only could I make fried chicken on a grill, I could make it with almost no effort at all. No deep fryer, no mess.

This spicy buttermilk fried chicken using the Vortex is beyond tender and juicy. It has a wonderful spicy kick to it, but it’s not overwhelming. And the skin? Oh, crunchy and delicious. Perfection without the oil.

Spicy Buttermilk Fried Chicken using the Vortex

Perfect Not-Fried Fried Chicken

There’s absolutely nothing I would change about this recipe for spicy buttermilk fried chicken using the Vortex. I enjoyed every single bite immensely. I think it’s the perfect fried chicken, and considering that I made it on my Weber grill without deep frying it, I just could not possibly be happier with it.

To make sure the skin crisps up good and that the chicken pieces cook evenly, do not over-crowd them on your grill. Also, I do not flip my chicken as it cooks. I put it on, close the lid, and don’t mess with the chicken for 45 minutes. Just let it do its thing.

I also make a crazy good spicy BBQ chicken using the Vortex. And Granny’s Secret fried chicken and my Korean fried chicken are amazing too!

Spicy Buttermilk Fried Chicken using the Vortex
Print Pin
5 from 1 vote

Spicy Buttermilk Fried Chicken using the Vortex

This. Right. Here. Absolutely divine ‘fried’ chicken, hot off my charcoal grill. Yes, grill.
Course Main
Cuisine American
Keyword fried chicken, Vortex
Prep Time 12 hours
Cook Time 45 minutes
Total Time 12 hours 45 minutes
Servings 10 pieces
Calories 565kcal

Ingredients

For the buttermilk marinade

For the seasoning mix

For the chicken coating

For the egg wash

For cooking

Instructions

  • Combine the buttermilk marinade ingredients (except for the chicken) in a large resealable container.
  • Add the chicken and toss to coat. Cover and refrigerate for at least 12 hours.
  • Combine all of the seasoning mix ingredients. Divide into two equally-sized batches.
  • Fire up your charcoal grill with the Vortex in the center. Make sure the lid and bottom air vents are open.
  • Whisk together the coating ingredients and place into a large resealable bag.
  • Whisk together the egg wash ingredients and place into a pie pan or large bowl.
  • Working in batches, remove the chicken from the marinade and shake off the excess.
  • Sprinkle with one half of the seasoning mix.
  • Transfer to the egg wash and coat well.
  • Shake off the excess and add to the baggie. Seal and shake to coat.
  • Arrange chicken around the edges of your grill (once the coals are hot and ashed over). Cover and cook for 45 minutes, rotating the lid every 15 minutes.
  • The last 5 minutes of cooking lightly brush the tops of the chicken with the oil to help crisp the skin even more.
  • Once chicken is done (165 F as measured in several places), remove and let cool slightly before serving.

Notes

To cook 10-12 pieces of chicken at once you’ll need at least a 22″ charcoal grill

Nutrition

Calories: 565kcal | Carbohydrates: 46g | Protein: 35g | Fat: 26g | Saturated Fat: 9g | Trans Fat: 1g | Cholesterol: 165mg | Sodium: 4690mg | Potassium: 721mg | Fiber: 3g | Sugar: 11g | Vitamin A: 1313IU | Vitamin C: 22mg | Calcium: 371mg | Iron: 5mg

Nutritional values are approximate.

Cracked Pepper N’ Garlic Ground Beef Jerky on the Nesco Snackmaster Pro

I love making jerky on my dehydrator. I’ve been using ground top round for my ground beef jerky, but any lean ground meat will work. I tend to prefer jerky with a lot of flavor. I’m not really into mellow jerky. Which is why I enjoyed the heck out of this Cracked Pepper N’ Garlic Ground Beef Jerky on the Nesco Snackmaster Pro made using a seasoning  from Hi Mountain that I picked up at our nearby Cabela’s.

Cracked Pepper N Garlic Ground Beef Jerky on the Nesco Snackmaster Pro

Very Peppery. Very Good.

The jerky is definitely peppery (I used more seasoning than the package calls for because hey, like I said, I like my jerky to be packed with flavor!) with a nice hint of garlic that isn’t overwhelming. Cracked Pepper N’ Garlic Ground Beef Jerky on the Nesco Snackmaster Pro is so really, really tasty that you’ll enjoy more than you may want (so make a double batch!).

I grind my meat using my own grinder, but if you’re friends with your butcher (and you should be), you can get him to trim and grind it for you. Or if you prefer sliced jerky, your butcher can do that for you too. That’s why they’re there. Getting to know your butcher is a really good idea. Take the time to say ‘hi’ even if you don’t need anything the next time you see them.

I like to load up my dehydrator. To do that I picked up a handful of extra trays. They really add a whole lot more drying space! Since I have to rotate my trays, I write a number on each one on a piece of blue painter’s tape so I can keep track of them.

Also try my Hi Mountain pepperoni and sweet and spicy jerky.

Cracked Pepper N' Garlic Ground Beef Jerky on the Nesco Snackmaster Pro
Print Pin
5 from 1 vote

Cracked Pepper N’ Garlic Ground Beef Jerky on the Nesco Snackmaster Pro

The jerky is definitely peppery (I used more seasoning than the package calls for because hey, like I said, I like my jerky to be packed with flavor!) with a nice hint of garlic that isn’t overwhelming. 
Course Dehydrator
Cuisine Jerky
Keyword beef, dehydrator, jerky, nesco snackmaster pro
Prep Time 8 hours
Cook Time 6 hours
Total Time 14 hours
Servings 1 pound
Calories 1243kcal
Author Mike

Ingredients

Instructions

  • Place beef in a resealable bag or container.
  • Place meat, seasoning, curing salt and water into a mixer and mix for 5 minutes.
  • Transfer meat to a resealable container or bag and refrigerate for up to 8 hours, massaging every hour or so to get the marinade distributed and absorbed evenly.
  • Remove meat from the marinade. Add to a jerky gun and squeeze out onto Nesco trays.
  • Add the dehydrator top, set to maximum temperature setting and dehydrate for 5 hours, rotating the trays (bottom to top) every 2 hours or so.
  • To test for doneness remove a piece and let cool slightly. Try to bend the meat. If it gives and starts to tear at the bend it is done. If it bends without tearing return to the dehydrator and let it run another 15 minutes and test again. If the meat is crunchy it is overdone but still good. It’s really personal preference as to how you like your jerky. Soft, chewy, crunchy. There’s no wrong here.
  • Let cool before storing in an airtight container.

Notes

I personally feel that the flavor is too mellow when mixing per the package instructions, 2 1/2 teaspoons per pound. I use a heaping tablespoon. You may want to first make a pound per the package instructions and see if you want a stronger flavor.

Nutrition

Calories: 1243kcal | Protein: 194g | Fat: 45g | Saturated Fat: 20g | Trans Fat: 3g | Cholesterol: 562mg | Sodium: 605mg | Potassium: 3139mg | Calcium: 85mg | Iron: 22mg

Nutritional values are approximate.

Fiery Smoked Chuck Roast

Chuck roast goes on sale here every so often and since I’m a huge fan of smoked chuck, I always rummage through the meat case and find some that has nice marbling and is the same thickness throughout and rush home to toss it on the smoker. One of my favorite dishes is this fiery smoked chuck roast.

Fiery Smoked Chuck Roast

Nice-n-Spicy

I’ve smoked Cajun chuck roast, Barbacoa-style, and just ‘plain’ ole chuck roast and all were fantastic. This time I decided to go the spicy route and marinate the roast overnight in Goya’s chipotle marinade. The beef took on a wonderful flavor that wasn’t overly spicy but still had a really nice kick. Perfect on a sandwich, and much cheaper than brisket.

Smoked chuck roast looks and ‘acts’ pretty much like smoked brisket. It slices well if you prefer yours sliced. It chops well if you’re into that. And it pulls great too. I like mine pulled just like pulled pork BBQ. Mounded high on a bun I’m a very happy guy. Fiery smoked chuck roast makes me happy.

Serve with your favorite BBQ sauce, if you wish!

Fiery Smoked Chuck Roast
Print Pin
5 from 1 vote

Fiery Smoked Chuck Roast

The beef takes on a wonderful flavor that isn’t overly spicy but still has a really nice kick. Perfect on a sandwich, and much cheaper than brisket.
Course Main
Cuisine American
Keyword beef, smoked, spicy
Prep Time 1 day
Cook Time 6 hours
Total Time 1 day 6 hours
Servings 10 servings
Calories 245kcal

Equipment

Ingredients

Instructions

  • Place the chuck roast into a resealable container or bag.
  • Add the marinade. Seal and toss to coat.
  • Refrigerate overnight.
  • Fire up your smoker for cooking at 250 F.
  • Shake off any excessive marinade and sprinkle the roast with the chipotle chili powder.
  • Smoke for two hours.
  • Transfer meat to a large piece of foil and seal tightly.
  • Return to the smoker and smoke another 4-5 hours or until the internal temperature reaches 200 F.
  • Remove from the smoker and let rest 30 minutes before slicing or chopping.

Notes

Nutritional values do not include the Goya Mojo Chipotle Marinade.

Nutrition

Calories: 245kcal | Protein: 26g | Fat: 16g | Saturated Fat: 7g | Trans Fat: 1g | Cholesterol: 94mg | Sodium: 110mg | Potassium: 452mg | Vitamin A: 18IU | Calcium: 23mg | Iron: 3mg

Nutritional values are approximate.