Visit my other site, For The Wing, for all things chicken-wing!
Sometimes I make my own wing sauces, and sometimes I buy wing sauces from the local grocery store (or online). I love the variety. I recently picked up a bottle of Heritage Fare garlic wings sauce. Think Buffalo wing sauce, but with a really great garlic hit. Seriously, Heritage Fare garlic wings sauce is drink-it-out-of-the-bottle good. Specially if you’re a huge garlic fan like me. It’s hard to put too much garlic in anything when it comes to my tastes!
On the off chance that you have leftover wing sauce (be it Heritage Fare or any other brand), in most cases you’ll have to refrigerate it until you make your next batch of wings. When you do go to cooking more wings, make sure you warm the sauce up a bit before tossing it with your hot wings. You definitely don’t want to put a cold sauce over hot wings.
I absolutely love chicken wings, cooked any way, with any sauce (or without). I love them so much that I created a free eCookbook that is full of my favorite wing recipes.
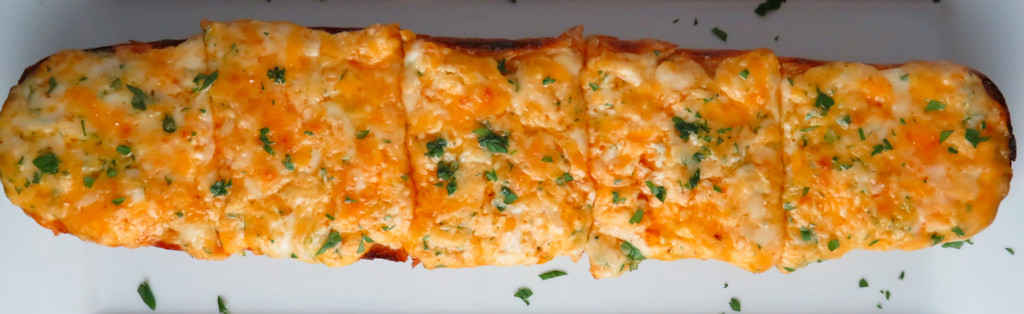
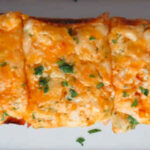
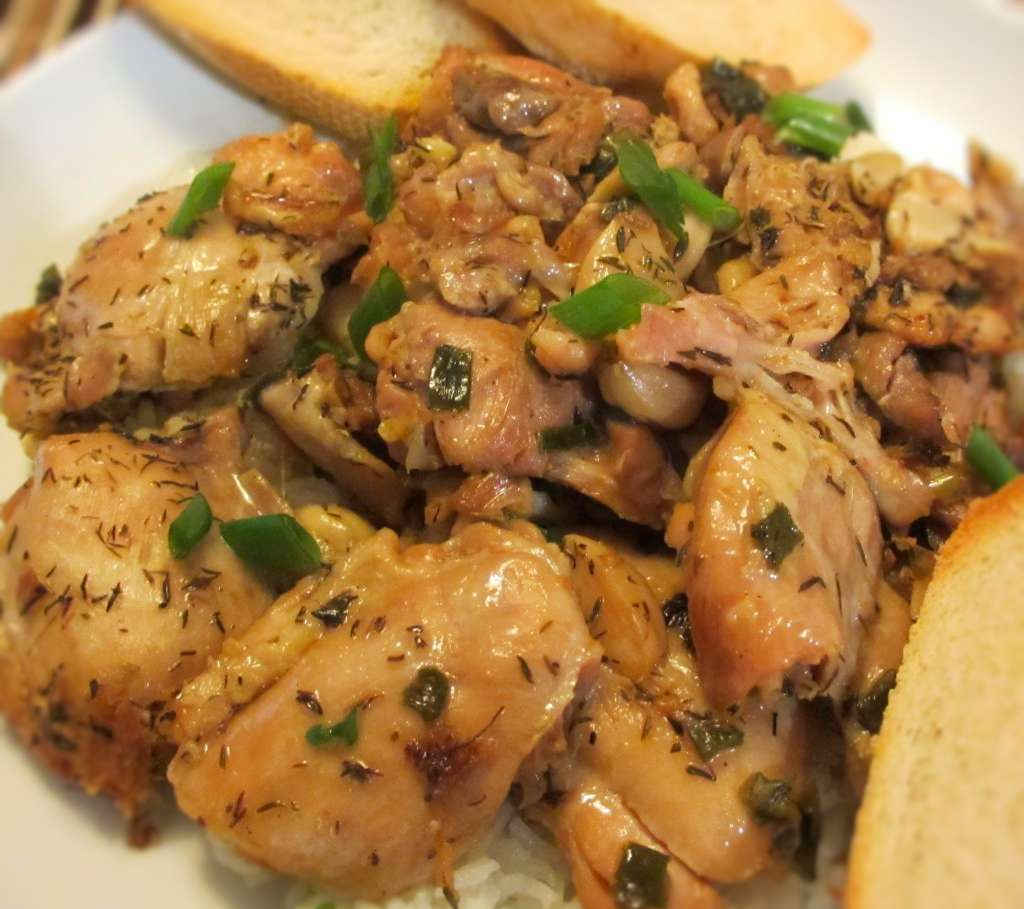
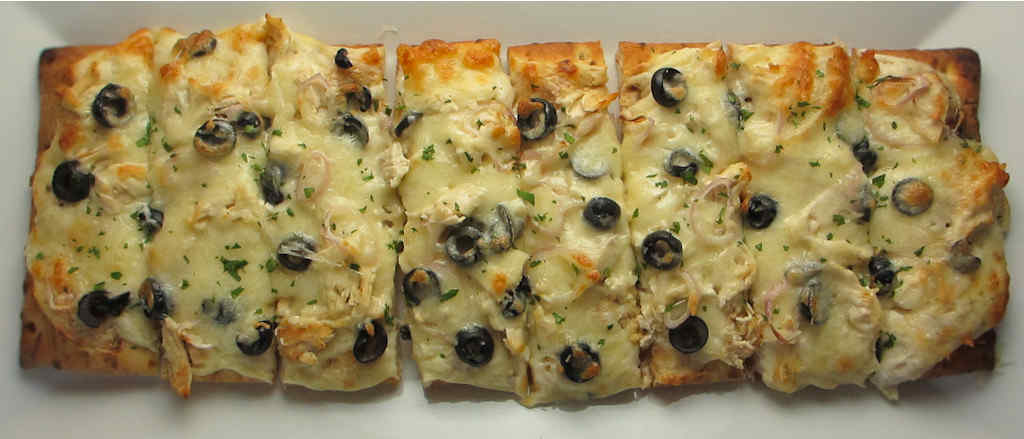
This white garlic chicken pizza reminded me that I really need to eat more white sauce pizza. I usually opt for red, making my own sauce, but the creamy, garlicky, cheesy sauce on this pizza was fantastic. Black olives, shallot, moist and tender chicken and Mozzarella topped it all off delicious bite-after-bite.
I used chicken that I had roasted on my Char-Broil Big Easy when making this white garlic chicken pizza, but any cooked chicken will do. Grab a rotisserie chicken next time you’re at the store and shred or chop it. Perfect.
I highly recommend that you shred or grate your own cheese at home. Don’t buy the pre-shredded or pre-grated stuff. It has stuff added to it to keep it from sticking together. That ‘stuff’ affects how the cheese melts. Shred it yourself and use the good stuff.
I love making jerky on my dehydrator. I’ve been using ground top round for my ground beef jerky, but any lean ground meat will work. I tend to prefer jerky with a lot of flavor. I’m not really into mellow jerky. Which is why I enjoyed the heck out of this Cracked Pepper N’ Garlic Ground Beef Jerky on the Nesco Snackmaster Pro made using a seasoning from Hi Mountain that I picked up at our nearby Cabela’s.
The jerky is definitely peppery (I used more seasoning than the package calls for because hey, like I said, I like my jerky to be packed with flavor!) with a nice hint of garlic that isn’t overwhelming. Cracked Pepper N’ Garlic Ground Beef Jerky on the Nesco Snackmaster Pro is so really, really tasty that you’ll enjoy more than you may want (so make a double batch!).
I grind my meat using my own grinder, but if you’re friends with your butcher (and you should be), you can get him to trim and grind it for you. Or if you prefer sliced jerky, your butcher can do that for you too. That’s why they’re there. Getting to know your butcher is a really good idea. Take the time to say ‘hi’ even if you don’t need anything the next time you see them.
I like to load up my dehydrator. To do that I picked up a handful of extra trays. They really add a whole lot more drying space! Since I have to rotate my trays, I write a number on each one on a piece of blue painter’s tape so I can keep track of them.
Cracked Pepper N’ Garlic Ground Beef Jerky on the Nesco Snackmaster Pro
The jerky is definitely peppery (I used more seasoning than the package calls for because hey, like I said, I like my jerky to be packed with flavor!) with a nice hint of garlic that isn’t overwhelming.
Course Dehydrator
Cuisine Jerky
Keyword beef, dehydrator, jerky, nesco snackmaster pro
2teaspoonscuring saltcomes with the seasoning (optional if you’re going to refrigerate the finished product)
½cupwater
Instructions
NOTE: I personally feel that the flavor is too mellow when mixing per the package instructions, 2 1/2 teaspoons per pound. I use a heaping tablespoon. You may want to first make a pound per the package instructions and see if you want a stronger flavor.
Place beef in a resealable bag or container.
Place meat, seasoning, curing salt and water into a mixer and mix for 5 minutes.
Transfer meat to a resealable container or bag and refrigerate for up to 8 hours, massaging every hour or so to get the marinade distributed and absorbed evenly.
Remove meat from the marinade. Add to a jerky gun and squeeze out onto Nesco trays.
Add the dehydrator top, set to maximum temperature setting and dehydrate for 5 hours, rotating the trays (bottom to top) every 2 hours or so.
To test for doneness remove a piece and let cool slightly. Try to bend the meat. If it gives and starts to tear at the bend it is done. If it bends without tearing return to the dehydrator and let it run another 15 minutes and test again. If the meat is crunchy it is overdone but still good. It’s really personal preference as to how you like your jerky. Soft, chewy, crunchy. There’s no wrong here.
This was my first time cooking lobster tails. Prior to this great moment in history I had no experience cutting the shells, cleaning them or even buying them. I wanted everything to be as easy to do as possible, so I opted to cook garlic lobster tails on the Char-Broil Big Easy. I could not have been happier with the results. Tender, buttery, garlicky lobster tails cooked absolutely spot-on perfect. And with just a slight kick of Cajun seasoning.
Note: This recipe was developed using the Char-Broil Big Easy Oil-Less Fryer. If you are cooking using the Char-Broil Smoker-Roaster Grill you should cook with the lid open and the temperature set to High. You might also need to adjust the cooking time.
You could add whatever seasonings you want to these garlic lobster tails on the Char-Broil Big Easy. I figured since this was my first experience with cooking lobster tails I would go simple. Cook time was about 20 minutes for the two tails I used. Make sure you select tails that are as close to the same size as possible so they cook in the same amount of time. If you use a bunk bed basket to cook on multiple levels at once, keep in mind that some levels may cook at a different rate than others. Always check the temperatures (you’re aiming for 140-145 F) in all tails before removing them to serve. You definitely do not want to overcook them or they will become tough and you will be sad.
Using kitchen shears, cut the lobster tails down the back to the tail. Do not cut the tail, you want the end of the lobster to stay intact.
Gently pry the shells open just enough to get your fingers inside to separate the meat from the shell and remove any vein that may be present. Rinse with cold water and pat try.
Divide garlic and butter between the tails.
Drizzle with the lemon juice and sprinkle with the seasonings.
Transfer tails to the Big Easy basket and Bunk Bed basket. Add lemon wedges.
Lower into the Big Easy and cook for 15-20 minutes or until the lobsters reach 145 F. and the meat is opaque Do not over cook.
Until 15 minutes ago, our gotta-have-it-garlic bread was our favorite garlic bread. This chipotle garlic cheese bread is similar in that, boy, is it ever packed with flavor, but oh does it ever bring the cheese. It reminds me of the garlic cheese bread Pizza Hut used to have on the menu but with ten times the flavor and cheese (which reminds me… be sure to check out my copycat of Pizza Hut’s pan pizza). It’s seriously over the top, but really, when you make garlic cheese bread are you thinking ‘healthy’? It’s an indulgence. And then some.
You can make this chipotle garlic cheese bread ahead of time. Just wrap it in foil (loosely, so that the cheese doesn’t stick to the foil) and keep it in the fridge. When you’re ready to reheat it just toss it in a 350 F oven for 10-15 minutes until hot. Let it cool slightly before slicing or the ooey gooey cheese will run all over the place.
Combine the butter and chipotle chili powder in a large bowl. Add more seasoning if you want it spicier.
Add the remaining ingredients except for the bread (and parsley garnish). Gently fold to combine.
Place bread halves onto a baking sheet lined with aluminum foil.
Spread the cheese mixture onto the bread. Don’t be shy. If you have leftover mixture consider yourself lucky (not all loaves are the same size, so it happens!).
Place bread under the broiler until starting to brown, 3-5 minutes.
Remove from the oven and let cool slightly before garnishing with parsley and slicing for serving.
Visit my other site, For The Wing, for all things chicken-wing!
These savory garlic Parmesan wings were just fantastic. Nutty Parmesan cheese pairs well with earthy garlic. For me, just a little bit of cool Ranch dressing for dipping is all that is required. I want to enjoy the flavor of the wings, so I just dip a bit, if at all. These wings have some of the best flavor of any wings I’ve ever made or had. I regret not making more when I made them for lunch the other day!
I cooked these garlic Parmesan wings on my Weber charcoal grill using the Vortex insert, which gives me that great crunchy skin and fantastic grilled flavor without a lot of effort. In fact, just about no effort whatsoever.
If you want a bit of a kick, add a few pinches of red pepper flake to the sauce.
I absolutely love chicken wings, cooked any way, with any sauce (or without). I love them so much that I created a free eCookbook that is full of my favorite wing recipes.
These savory garlic Parmesan chicken wings were just fantastic. Nutty Parmesan cheese pairs well with earthy garlic. For me, just a little bit of cool Ranch dressing for dipping is all that is required.
Course Appetizer
Cuisine American
Keyword garlic Parmesan, wings
Prep Time 1 hourhour
Cook Time 45 minutesminutes
Total Time 1 hourhour45 minutesminutes
Servings 6
Calories 488kcal
Author Mike
Ingredients
For the wings
3-4poundschicken wingsflats and drumettes separated, tips discarded or saved for making chicken broth
Yummy, buttery, garlicky, herby bread. All good things. And very easy to make since I used pre-made pizza dough. I’m not that great at tying knots into raw dough strips, it would seem. But that didn’t matter a bit. These buttery garlic herb knots came out tasting perfect.
For the marinara I used my absolutely go-to homemade pizza sauce. It has the perfect pizza sauce flavor. I make it by the gallon (well, it seems that way at least) and freeze it in small portions so I always have it on hand. It’s perfect for dipping a few buttery garlic herb knots.
Serve a little warmed pizza sauce or marinara on the side for dipping the bread. I use these little sauce dipping cups. They’re the perfect single-serve size!
Marinaraor pizza sauce, warmed, for dipping (optional)
Instructions
Preheat oven to 425 F.
In a small saucepan, melt the butter.
Stir in the thyme, rosemary, 1 tablespoon of the Parmesan, and the garlic powder.
Lightly dust a work surface with flour.
Remove pizza crusts from tubes and unroll onto the surface. Roll out into rectangles.
Brush tops of dough with butter mixture. Fold dough over on top of itself.
Using a pizza cutter, cut each dough in half, then repeat until you have 8 strips about an inch wide. You don’t have to get too particular in how wide they are on how straight they are cut.
Grab ends of each strip and ‘tie’ them into a knot. Gently, don’t pull on the ends real hard or the dough will break.
Lay knots onto a baking sheet (you’ll need two pans) sprayed with non-stick spray. Fold the tips of the dough under the knots so they don’t cook too fast.
Bake 18-20 minutes or longer depending on how golden brown you want your knots.
Remove from oven and let cool slightly. Brush with remaining butter and sprinkle with remaining cheese and serve hot with warmed marinara sauce for dipping if desired.
Visit my other site, For The Wing, for all things chicken-wing!
I’m a huge fan of making chicken wings without saucing them in the traditional Buffalo wing manner. I season them and let them marinate for a bit, then cook them. When they are done I toss them with more seasoning and serve them ‘dry’, with a dipping sauce on the side. This time I used the Garlic Sriracha seasoning from Weber, which is a little spicy, for some garlic Sriracha dry wings. Dry doesn’t mean flavorless. In fact, it means quite the opposite!
These garlic Sriracha dry wings came out absolutely fantastic. There’s enough spicy kick to wake you up. The garlic adds a really great almost earthy flavor. I cooled them off with just straight-up Ranch dressing for dipping. Also try my blackened dry wings.
I cooked the wings using a Vortex insert on my grill. Check out my post on cooking chicken wings for all the great ways of cooking wings, from grilling to baking.
I absolutely love chicken wings, cooked any way, with any sauce (or without). I love them so much that I created a free eCookbook that is full of my favorite wing recipes.
These garlic shrimp packets is the easiest way to cook a big batch of great shrimp quick. Perfectly garlicky, with a little red pepper kick. I made extra shrimp and had them the next day as shrimp cocktail. Fantastic! I could’ve eaten them all day long.
The perfect bread for sopping up the delicious yum-yum juice that pools at the bottom of the garlic shrimp packets is our favorite gotta-have-it garlic bread.
Sure, I normally roast my garlic in the oven or on the grill, but I found this technique which uses a slow cooker to be completely fool-proof, and it has the added benefit of making the house smell wonderful all day long. Slow cooker roasted garlic is easier than the same thing made any other way. And cleanup is a breeze, too.
Sure, I normally roast my garlic in the oven or on the grill, but I found this technique which uses a slow cooker to be completely fool-proof, and it has the added benefit of making the house smell wonderful all day long.