Black Pepper Biscuits

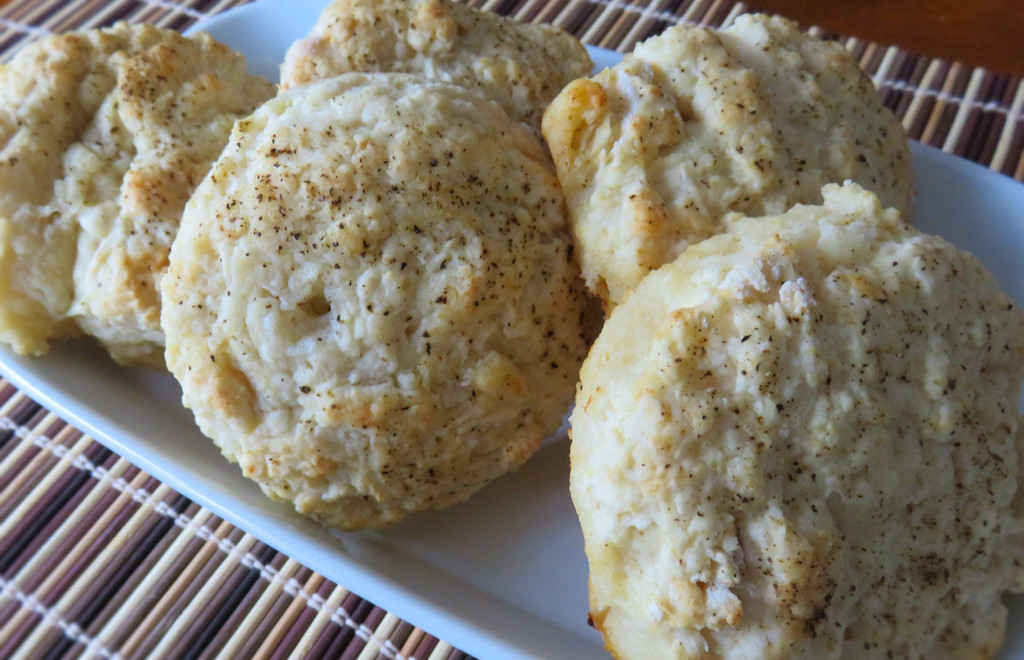
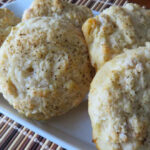
I’ve always wanted to make my own biscuits from scratch. I finally stepped up to the challenge after watching Trisha Yearwood make these black pepper biscuits on her TV show. I figured heck, I can do that. So I did. And I was so happy that I did. These black pepper biscuits are ‘meaty’. They are not your light and fluffy little light clouds of dough. They hold up to anything and they taste absolutely divine. Buttermilk and butter… oh pinch me.

Black Pepper Biscuits

Butter Perfection

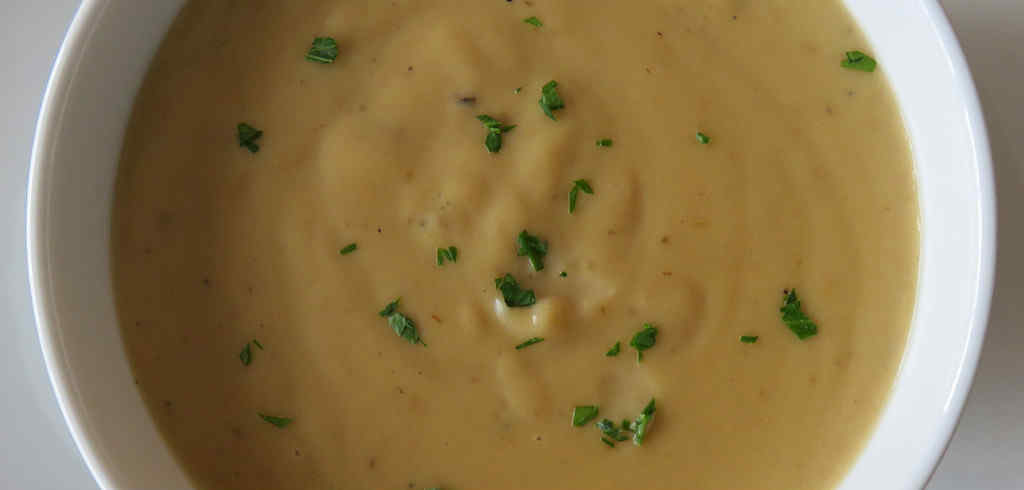
The key to these black pepper biscuits is the butter. Make absolutely sure you cut the butter into small pieces. Big ones will not do. I cut the 6 tablespoon chunk into teaspoon pats first, then I cut each pat into 9 small pieces. That worked perfectly for me. If you leave the butter too big your biscuits might just fall apart. At the least you’ll have a hard time forming them into biscuits to start with. So, smaller is better! And when they come out of the oven all hot and yummy, drizzle them with my black pepper honey.

If you want that great homemade biscuit flavor but without the work, try my bread machine southern biscuits too!

Black Pepper Biscuits
Print Pin
5 from 1 vote

Black Pepper Biscuits

These black pepper biscuits are ‘meaty’. They are not your light and fluffy little light clouds of dough. They hold up to anything and they taste absolutely divine. Buttermilk and butter… oh pinch me.
Course Bread
Cuisine American
Keyword biscuits, homemade
Prep Time 5 minutes
Cook Time 25 minutes
Total Time 30 minutes
Servings 10
Calories 183kcal

Ingredients

Instructions

  • Preheat oven to 450 F.
  • Sift the flour, baking powder, salt and baking soda into a large bowl.
  • Add the butter cubes. Break up any pieces that stick together. Use your fingers to combine the butter with the flour mixture.
  • Add the buttermilk and stir until a dough forms.
  • Lightly pack the dough with your hands and place onto a lightly floured surface. Use the palms of your hands to flatten out into a 1″ thick shape.
  • Use a 2 1/2″ biscuit cutter to cut the dough into rounds. Transfer to a baking sheet lined with a silicon mat or parchment paper. Use any remaining dough scraps by pressing them back together with your hands and cutting more biscuits.
  • Brush the tops of the biscuits with the heavy cream and sprinkle generously with the black pepper.
  • Bake until starting to turn golden brown, 10-12 minutes.

Notes

Use full-fat heavy cream and buttermilk for best results.

Nutrition

Calories: 183kcal | Carbohydrates: 23g | Protein: 4g | Fat: 8g | Saturated Fat: 5g | Trans Fat: 1g | Cholesterol: 23mg | Sodium: 410mg | Potassium: 66mg | Fiber: 1g | Sugar: 1g | Vitamin A: 272IU | Vitamin C: 1mg | Calcium: 88mg | Iron: 1mg

Nutritional values are approximate.

Slow Cooker Tennessee-Style Potatoes

Slow cooker Tennessee-style potatoes have quickly become one of my favorite side dishes to make. You start with your pretty-much-standard mashed potatoes. Well, except you boil the potatoes in a flavor mix of chicken bouillon and garlic-infused water. Then you transfer them to the slow cooker where they get even creamier and even smoother. Perfect for a cold day here in Indiana. Perfect for a potluck or family get-together. The potatoes may seem like the usual. But, cooking them in the flavored water really makes for a different, richer flavor.

Slow Cooker Tennessee-Style Potatoes

Don’t Throw Out The Water!

Be sure you don’t throw out the water used to boil the potatoes when they are done. Reserve a cup or so in case the slow cooker Tennessee-style potatoes get a bit thick while cooking. If that happens don’t add a lot of the water. Just add a bit, stir, and see if they’re creamy enough. If not, add a bit more.

Give my corn mashed potatoes and my slow cooker garlic Ranch potatoes a try too.

Slow Cooker Tennessee-Style Potatoes
Print Pin
5 from 1 vote

Slow Cooker Tennessee-Style Potatoes

Slow cooker Tennessee-style potatoes have quickly become one of my favorite side dishes to make. You start with your pretty-much-standard mashed potatoes, except you boil the potatoes in a flavor mix of chicken bouillon and garlic-infused water. 
Course Side
Cuisine American
Keyword crockpot, potatoes, slow cooker
Prep Time 15 minutes
Cook Time 3 hours 30 minutes
Total Time 3 hours 45 minutes
Servings 10
Calories 242kcal
Author Mike

Ingredients

Instructions

  • Bring a large pot of salted water to a boil.
  • Add the potatoes, garlic and bouillon and cook until the potatoes are tender but still slightly firm, 15-20 minutes.
  • Drain the potatoes, reserving 1-2 cups of the boiling liquid.
  • Return the potatoes to the pot.
  • Add the sour cream and cream cheese and mash until smooth, adding boiling liquid if too thick.
  • Season with salt and pepper and transfer to a slow cooker.
  • Cook on low for 2-3 hours.
  • Stir in the butter.
  • Melt, season with salt and pepper, and serve.

Notes

Russets make the best potatoes, but you can also use golden potatoes.

Nutrition

Calories: 242kcal | Carbohydrates: 36g | Protein: 4g | Fat: 10g | Saturated Fat: 6g | Trans Fat: 1g | Cholesterol: 25mg | Sodium: 44mg | Potassium: 1038mg | Fiber: 4g | Sugar: 3g | Vitamin A: 302IU | Vitamin C: 20mg | Calcium: 27mg | Iron: 2mg

Nutritional values are approximate.

Spicy White Chicken Chili

Whew, oh boy! This spicy white chili chicken isn’t some boring, barely-seasoned, overly-tame, put-you-to-sleep white chicken chili, no sir! You pretty much open your pantry and grab everything in it that is spicy and throw it in a pot with some chicken, some beans, some roasted peppers, and some broth. Done! Not too much later you get rewarded with something you’ll want to make again and again. I didn’t used to be a fan of chicken chili. But I sure am now.

Spicy White Chicken Chili

A Bowl Of Greatness

I really enjoyed the smokiness of this spicy white chicken chili. There are so many different flavors coming together in every spoonful. I’m thinking you could easily make this a beef chili by substituting cooked crumbled ground beef (or small pieces of chuck) along with beef broth. Or you can easily go the turkey route, using crumbled cooked ground turkey.

I like to use my good ole trusty Dutch oven to make this chili and pretty much darned near anything like it on my stovetop. It’s nice and big and sturdy. That extra weight helps it maintain and distribute heat perfectly. As an added bonus, it’s actually pretty easy to clean up too!

Also try my 6 bean chili. Because more beans is more better.

Spicy White Chicken Chili
Print Pin
5 from 1 vote

Spicy White Chicken Chili

Whew, oh boy! This spicy white chili chicken isn’t some boring, barely-seasoned, overly-tame, put-you-to-sleep white chicken chili, no sir! 
Course Main
Cuisine American
Keyword chicken, chili
Prep Time 15 minutes
Cook Time 1 hour
Total Time 1 hour 15 minutes
Servings 8 servings
Calories 133kcal

Equipment

Ingredients

Instructions

  • Heat oil in large Dutch or pot over medium-high heat.
  • Add onion and cook for 5 minutes.
  • Add the garlic and cook for another minute.
  • Add cumin, chili powder, cayenne, chipotle powder and salt and pepper and stir.
  • Add roasted poblanos, roasted jalapeno, green chiles, cilantro, 3 1/2 cups of the chicken broth, chicken, lime zest and juice.
  • Bring to a boil then reduce to a simmer. Cover and cook 30 minutes.
  • Add the beans and cook another 15 minutes, adding more broth if necessary.
  • Serve with desired toppings.

Notes

This is a great way to use rotisserie chicken.

Nutrition

Calories: 133kcal | Carbohydrates: 9g | Protein: 15g | Fat: 5g | Saturated Fat: 1g | Cholesterol: 39mg | Sodium: 542mg | Potassium: 416mg | Fiber: 2g | Sugar: 3g | Vitamin A: 1198IU | Vitamin C: 40mg | Calcium: 49mg | Iron: 2mg

Nutritional values are approximate.

Homemade Fire Starter Cubes

I’ve been using the FireStarters lighter cubes from Weber for years. They’re fantastic for getting a chimney or Vortex full of charcoal going in no time. At less than $0.15 a piece they’re an inexpensive way to get a fire going. But, I decided to see if I could make homemade fire starter cubes. What I ended up with light very, very well and burn for a good amount of time. The final cost was less than $0.10 for each cube, not exactly a huge savings, but that was only part of my reason for the pursuit.

Homemade Fire Starter Cubes

Quick-Lighting, Long-Lasting

You need just 4 things to make homemade fire starter cubes. It doesn’t get much easier.

Homemade Fire Starter Cubes

The cubes don’t have to be perfect. Just fill them with wood, add the wax, and let cool. They burn for about 7 minutes, more than enough to light charcoal.

Homemade Fire Starter Cubes

My most common use for starter cubes is getting my Vortex BBQ going. The cubes make the process easier and faster!

These are also great for starting a chimney full of charcoal.

Homemade Fire Starter Cubes
Print Pin
5 from 1 vote

Homemade Fire Starter Cubes

Author Mike

Equipment

Ingredients

  • Wood chips I found a big bag of alder wood chips on the clearance rack for $1. You can also substitute hamster cage liner from what I’ve heard
  • 1 pound household paraffin wax
  • 4 cardboard egg cartons do NOT use Styrofoam cartons

Instructions

  • Place the wax in the crock pot or double boiler over slowly boiling water until melted.
  • Separate the bottom of the egg cartons and discard the tops.
  • Fill each egg cavity with the wood chips. I started by only filling them 1/4th of the way through but later found that you can fill them completely.
  • Add the wax until the cavity is full.
  • Let cool overnight before cutting into individual cubes.
  • To light, place under a chimney full of charcoal, open-side up (so that the melting wax doesn’t drip down) and light with a match or lighter.

Notes

Store in an air-tight container for best results.

Nutritional values are approximate.

KFC Roasted Chicken on the Char-Broil Big Easy

Note: This recipe was developed using the Char-Broil Big Easy Oil-Less Fryer. If you are cooking using the Char-Broil Smoker-Roaster Grill you should cook with the lid open and the temperature set to High. You might also need to adjust the cooking time.

Wow, such great flavor in every bite! The seasoning on the chicken I roasted in the Big Easy was fantastic, nicely herby. It’s a copycat of the roasted chicken Kentucky Fried Chicken used to have on the menu years ago. KFC dropped the idea, but now you can have that great taste at home. I believe KFC removed the skin from the chicken. I’ll leave the decision to do that or not to you.

KFC-Roasted-Chicken-on-the-Char-Broil-Big-Easy

More Seasoning, More Flavor

I admit, I’m often pretty heavy-handed with seasonings, especially when it comes to chicken. I find that chicken needs all the flavor help it can get. This KFC roasted chicken seasoning clone is so good I put on a little extra. It would also be fantastic on a turkey cooked in the Char-Broil Big Easy.

KFC came out with roasted chicken to compete with Boston Market. Check out my copycats of Boston Market’s Tuscan herb chicken and Famous Dave’s Roasted chicken, also made on the Char-Broil Big Easy.

It’s always a good idea to keep a few spare grease trays on hand for your Char-Broil Big Easy.

Love your Big Easy as much I love mine? Check out my Big Easy Add-Ons page and my free Big Easy eCookbook!

KFC-Roasted-Chicken-on-the-Char-Broil-Big-Easy
Print Pin
5 from 1 vote

KFC Roasted Chicken on the Char-Broil Big Easy

Wow, such great flavor in every bite! The seasoning on the chicken was fantastic, nicely herby. It’s a copycat of the roasted chicken Kentucky Fried Chicken used to have on the menu years ago. 
Course Main
Cuisine American
Keyword Big Easy, Char-Broil, chicken
Prep Time 10 minutes
Cook Time 1 hour 20 minutes
Total Time 1 hour 30 minutes
Servings 4 servings
Calories 259kcal
Author Mike

Ingredients

  • 4 chicken breasts bone-in split

For the spice mix

Instructions

  • Fire up your Big Easy.
  • Rinse the chicken and pat dry.
  • Combine the spice mix ingredients.
  • Apply the seasoning and transfer the chicken to the Big Easy basket.
  • Cook for approximately 20 minutes per pound or until it reaches 165 F as checked in several places.
  • Remove and let rest 10 minutes before serving.

Notes

You can use your favorite chicken cuts.

Nutrition

Calories: 259kcal | Carbohydrates: 1g | Protein: 48g | Fat: 6g | Saturated Fat: 1g | Trans Fat: 1g | Cholesterol: 145mg | Sodium: 553mg | Potassium: 844mg | Fiber: 1g | Sugar: 1g | Vitamin A: 83IU | Vitamin C: 3mg | Calcium: 15mg | Iron: 1mg

Nutritional values are approximate.

Quick Fix Seasoned Tater Tots

Ya know, it just doesn’t have to be fancy to be good. I’m a big time tater tot addict. I have been since I was a kid and I remain so to this day. Back then all I needed was butter on my tots. Yep, butter. Now, I want a little more flavor, but without going crazy. So I just grab some seasoning mix out of the pantry, do a little sprinkle or two (or three) and it’s time for more grown-up quick fix seasoned tater tots.

Quick Fix Seasoned Tater Tots

No More Boring Tots For Me

Someday I will tackle making my own tater tots from scratch. They’re really not that difficult to make, from what I can tell. Why have I waited so long to try it? Well, I have to say, I’ve been making seasoned tater tots for many, many years, and I sure would hate to mess with tradition. There’s a lot of memories in those bags of potatoes. I like to bake mine a little longer than the bag says. I like mine super-duper crunchy. Not coincidentally, I like my hash browns the same way!

Also try my copycat of Primanti Brother’s Terror Tots. For fast easy, you can’t beat my quick fix Asian fries or my pizza-flavored tots.

Quick Fix Seasoned Tater Tots
Print Pin
5 from 1 vote

Seasoned Tater Tots

Ya know, it just doesn’t have to be fancy to be good. I’m a big time tater tot addict. I have been since I was a kid and I remain so to this day. 
Course Side
Cuisine American
Keyword tater tots
Cook Time 25 minutes
Total Time 25 minutes
Servings 8
Calories 2kcal
Author Mike

Ingredients

Seasoning (pick one)

Instructions

  • Bake the tater tots per package instructions.
  • Transfer tots to a large bowl.
  • Sprinkle with the desired seasoning and gently toss to coat.
  • Transfer tots to a serving plate and serve.

Notes

Serve immediately.

Nutrition

Calories: 2kcal | Carbohydrates: 1g | Protein: 1g | Fat: 1g | Saturated Fat: 1g | Sodium: 76mg | Potassium: 1mg | Fiber: 1g | Sugar: 1g | Vitamin A: 88IU | Vitamin C: 1mg | Calcium: 1mg | Iron: 1mg

Nutritional values are approximate.

Spicy Jalapeno Ground Beef Jerky on the Nesco Snackmaster Pro

I love making jerky on my dehydrator. I’ve been using ground top round for my ground beef jerky, but any lean ground meat will work. This spicy jalapeno ground beef jerky on the Nesco Snackmaster Pro is right up my alley. It has a nice kick, but not overwhelming. I’m a big fan of spicy jerky, and though the heat here isn’t high, it’s there just enough to really enjoy. And share. The jerky has the perfect ‘bite’, just a little tug.

Spicy Jalapeno Ground Beef Jerky on the Nesco Snackmaster Pro

Remember To Rotate Your Trays

Make sure you rotate your trays every 2 hours or so when you make spicy jalapeno ground beef jerky on your Nesco Snackmaster Pro. The bottom trays will not dry as quickly as those on top. Rotating the trays will give you nice, even drying and perfect jerky on every level.

I like to load up my dehydrator. To do that I picked up a handful of extra trays. They really add a whole lot more drying space! Since I have to rotate my trays, I write a number on each one on a piece of blue painter’s tape so I can keep track of them.

Try these other great jerky flavors from Eastman Outdoors: Cajun, whiskey pepper, mesquite, sweet habanero and hickory.

Check out my guide to using the Nesco Snackmaster Pro. You will be making fantastic jerky at home in no time at all!

Spicy Jalapeno Ground Beef Jerky on the Nesco Snackmaster Pro
Print Pin
5 from 1 vote

Spicy Jalapeno Ground Beef Jerky on the Nesco Snackmaster Pro

This spicy jalapeno ground beef jerky is right up my alley. It has a nice kick, but not overwhelming. 
Course Dehydrator
Cuisine Jerky
Keyword beef, dehydrator, jerky, nesco snackmaster pro
Prep Time 8 hours
Cook Time 6 hours
Total Time 14 hours
Servings 1 pound
Calories 2304kcal
Author Mike

Ingredients

Instructions

  • NOTE: The package for the Eastman Outdoors jerky seasoning states that it makes up to 5 pounds of jerky. I personally feel that the flavor is too mellow, so I use just about an entire package for 1 pound of jerky. I end up with a little left over seasoning, which I store in a labelled air-tight container. I’ll eventually mix it with more seasoning. I think I can get 3 pounds of well-seasoning jerky out of two packages of Eastman Outdoors mix.
  • Place beef in a resealable bag or container.
  • In a small bowl whisk together the seasoning, curing salt and water. Pour over the meat and seal. Shake to coat.
  • Refrigerate the meat for up to 8 hours, shaking or massaging every hour or so to get the marinade distributed and absorbed evenly.
  • Remove meat from the marinade and add to a jerky gun. Squeeze out onto Nesco trays. Do not overlap meat.
  • Add the dehydrator top, set to maximum temperature setting and dehydrate for 5 hours, rotating the trays (bottom to top) every 2 hours or so.
  • To test for doneness remove a piece and let cool slightly. Try to bend the meat. If it gives and starts to tear at the bend it is done. If it bends without tearing return to the dehydrator and let it run another 15 minutes and test again. If the meat is crunchy it is overdone but still good. It’s really a personal preference as to how you like your jerky. Soft, chewy, crunchy. There’s no wrong here.
  • Let cool before storing in an airtight container.

Notes

This recipe is for starting with 2 pounds of meat. You’ll end up with about 1 pound in the end. You can easily double/triple/etc this recipe for large quantities of meat, however 5-6 pounds is about all you can fit onto a Nesco Snackmaster Pro fitted with 12 trays (the unit comes with 5).

Nutrition

Calories: 2304kcal | Protein: 156g | Fat: 181g | Saturated Fat: 70g | Trans Fat: 11g | Cholesterol: 644mg | Sodium: 614mg | Potassium: 2449mg | Calcium: 167mg | Iron: 18mg

Nutritional values are approximate.

Copycat Ruby Tuesday Croutons

Going to the salad bar at Ruby Tuesday is a treat for us. Luckily, there’s a Ruby Tuesday right down the street from our house. They always keep the salad bar super-duper cold and super-duper stocked. Never have I gone up with my plate and said “oh no! there’s only one pea left!” (I love peas on a salad).

When I get to the end of the salad bar, I find my two favorite things: Ranch dressing and pumpernickel croutons. Now, there’s an art and an order to putting them on your salad, mind you. You do NOT put the dressing on first. I used to think you had to to keep the croutons from sliding off. No, the croutons go first, and lots of them. Make sure you kinda wedge them in any nooks and crannies so they don’t fall off. Then drizzle with the dressing, getting half of the croutons nice and Ranchy while leaving the rest naked. Trust me on this. Do it next time you hit up the Ruby Tuesday salad bar.

Copycat Ruby Tuesday Croutons

Fresh Is Best

I used a fresh loaf of pumpernickel bread when I made copycat Ruby Tuesday croutons. Fresh bread takes longer to bake but I think it makes for a better duplicate of the original: a little crunch but mostly soft and tender crouton. You do not want a hard, dry crouton that bursts into a billion pieces when you bite into it. If you do use older or stale bread, keep an eye on them while baking because they won’t take as long.

Also try my fried goat cheese croutons. Oh yeah. They’re very good.

Copycat Ruby Tuesday Croutons
Print Pin
2.78 from 9 votes

Copycat Ruby Tuesday Croutons

I used a fresh loaf of pumpernickel bread when I made copycat Ruby Tuesday croutons. Fresh bread takes longer to bake but I think it makes for a better duplicate of the original: a little crunch but mostly soft and tender crouton. 
Course Bread
Cuisine American
Keyword croutons
Prep Time 5 minutes
Cook Time 10 minutes
Total Time 15 minutes
Servings 4 cups
Calories 693kcal

Ingredients

  • 4 cups pumpernickel cut into 1/2″ cubes
  • 4 tablespoons unsalted butter melted
  • ½ teaspoon garlic powder
  • ½ teaspoon kosher salt plus a bit more

Instructions

  • Preheat oven to 375 F.
  • Place breadcrumbs into a large bowl.
  • Place butter into a small bowl. Stir in the garlic powder and salt.
  • Pour butter mixture over breadcrumbs and toss gently to coat.
  • Pour bread out onto a large baking sheet (or two) and spread out evenly.
  • Bake for 10 minutes and check for crispness. Bake longer if needed, but check every minute or so.
  • Remove and let cool before using. Sprinkle with more salt if desired.

Notes

You can substitute dark rye in a pinch, but the flavor won’t quite be the same.

Nutrition

Calories: 693kcal | Carbohydrates: 113g | Protein: 21g | Fat: 19g | Saturated Fat: 8g | Trans Fat: 1g | Cholesterol: 30mg | Sodium: 1703mg | Potassium: 500mg | Fiber: 15g | Sugar: 1g | Vitamin A: 350IU | Vitamin C: 1mg | Calcium: 165mg | Iron: 7mg

Nutritional values are approximate.

Baked Italian Sub Pizza

This baked Italian sub pizza packs on everything I love about a classic Italian sub (er… hoagie). Sandwich meats. Black olives and banana peppers (yum). Cheese. Lots of cheese. Some more cheese. And just a bit of Italian dressing and basil. Quick to make and quick to disappear, these pizzas make for a great fast lunch or dinner. Every bite sure is tasty gooey cheesy!

Baked Italian Sub Pizza

The Best Toppings In Every Bite

To spice this baked Italian sub pizza up, use hot banana peppers, spicy salami and maybe toss a few jalapeno slices on there to boot. Oh, and a good bit of dried red pepper flake ain’t gonna hurt either.

I highly recommend that you shred or grate your own cheese at home. Don’t buy the pre-shredded or pre-grated stuff. It has stuff added to it to keep it from sticking together. That ‘stuff’ affects how the cheese melts. Shred it yourself and use the good stuff.

Also try my French bread pizza rustica.

This recipe was inspired by a recipe from My Fridge Food.

Baked Italian Sub Pizza
Print Pin
5 from 1 vote

Baked Italian Sub Pizza

This baked Italian sub pizza packs on everything I love about a classic Italian sub (er… hoagie). 
Course Main
Cuisine American
Keyword French bread, pizza
Prep Time 15 minutes
Cook Time 12 minutes
Total Time 27 minutes
Servings 2 servings
Calories 1092kcal

Equipment

Ingredients

Instructions

  • Preheat oven to 425 F.
  • Cut the bread in half lengthwise and place on a foil-lined baking sheet.
  • Brush the insides of each half of bread with the Italian dressing.
  • Divide the tomato, salami, ham, olives and peppers between the two bread halves.
  • Add cheeses.
  • Sprinkle with crumbled basil and place in the oven for 10-12 minutes or until the cheese is melted and the bread is crispy.
  • Cut into slices and serve.

Notes

Wrap any leftover pizza in foil and refrigerate. Reheat at 350 F for 15 minutes.

Nutrition

Calories: 1092kcal | Carbohydrates: 124g | Protein: 55g | Fat: 42g | Saturated Fat: 16g | Trans Fat: 1g | Cholesterol: 97mg | Sodium: 3085mg | Potassium: 860mg | Fiber: 7g | Sugar: 12g | Vitamin A: 1446IU | Vitamin C: 28mg | Calcium: 462mg | Iron: 9mg

Nutritional values are approximate.

Homemade Cream of Mushroom Soup

This is quite easily and most definitely the best cream of mushroom soup we’ve ever had. Eating it was an absolute pleasure. Packed with mushroom flavor and velvety smooth, it’s divine. Perfect on a cool fall day with flurries coming down.

It’s hard to take a great picture of what is essentially a brown soup, but I tried. The picture definitely does not do the flavor of this cream of mushroom soup justice. No picture could.

Homemade Cream of Mushroom Soup

Mushrooms. Everywhere.

To get such great mushroom flavor, this soup is packed with mushrooms, both fresh and dried that have been reconstituted. If you really, really love meaty mushrooms, then you’ll love this soup right out of the pot. If you love mushrooms but don’t prefer a lot of them, serve the creamy soup with a few spoonfuls of the mushrooms added in at the end.

I like to use my good ole trusty Dutch oven to make this soup and pretty much darned near anything like it on my stovetop. It’s nice and big and sturdy. That extra weight helps it maintain and distribute heat perfectly. As an added bonus, it’s actually pretty easy to clean up too!

Also try my delicious cream of celery soup and my creamy cheddar soup.

Cream of Mushroom Soup
Print Pin
5 from 1 vote

Homemade Cream of Mushroom Soup

To get such great mushroom flavor, this soup is packed with mushrooms, both fresh and dried that have been reconstituted. If you really, really love meaty mushrooms, then you’ll love this soup right out of the pot. 
Course Main
Cuisine American
Keyword mushroom, soup
Prep Time 15 minutes
Cook Time 1 hour
Total Time 1 hour 15 minutes
Servings 6
Calories 622kcal

Ingredients

Instructions

  • Place the dried porcini mushrooms into a small bowl and cover with hot water. Set aside to allow to reconstitute until soft. Reserve the liquid and slice the mushrooms.
  • Meanwhile, warm the chicken stock in a small pot.
  • Melt the butter in a medium pot over medium-high heat.
  • Add the onion and celery and saute for 5 minutes.
  • Add the sliced mushrooms and cook another 10 minutes.
  • Add the flour and stir. The mixture will get thick.
  • Reduce heat to low and cook for 10 minutes.
  • Stir in the warmed chicken stock, the liquid from the reconstituted porcini mushrooms, and the heavy cream..
  • Season with salt and pepper to taste.
  • Bring to a simmer and let simmer for 30 minutes, stirring occasionally.
  • Serve.

Notes

There are a lot of mushrooms in this soup. They are needed to give it such a fantastic mushroom flavor, but if you find them to be too much in the soup, just serve the creamy liquid portion with as little or as much of the mushroom ‘meat’ as you wish. We enjoyed the soup served both ways, with or without the mushrooms.

Nutrition

Calories: 622kcal | Carbohydrates: 41g | Protein: 12g | Fat: 48g | Saturated Fat: 29g | Trans Fat: 1g | Cholesterol: 140mg | Sodium: 271mg | Potassium: 828mg | Fiber: 4g | Sugar: 5g | Vitamin A: 1623IU | Vitamin C: 4mg | Calcium: 58mg | Iron: 2mg

Nutritional values are approximate.