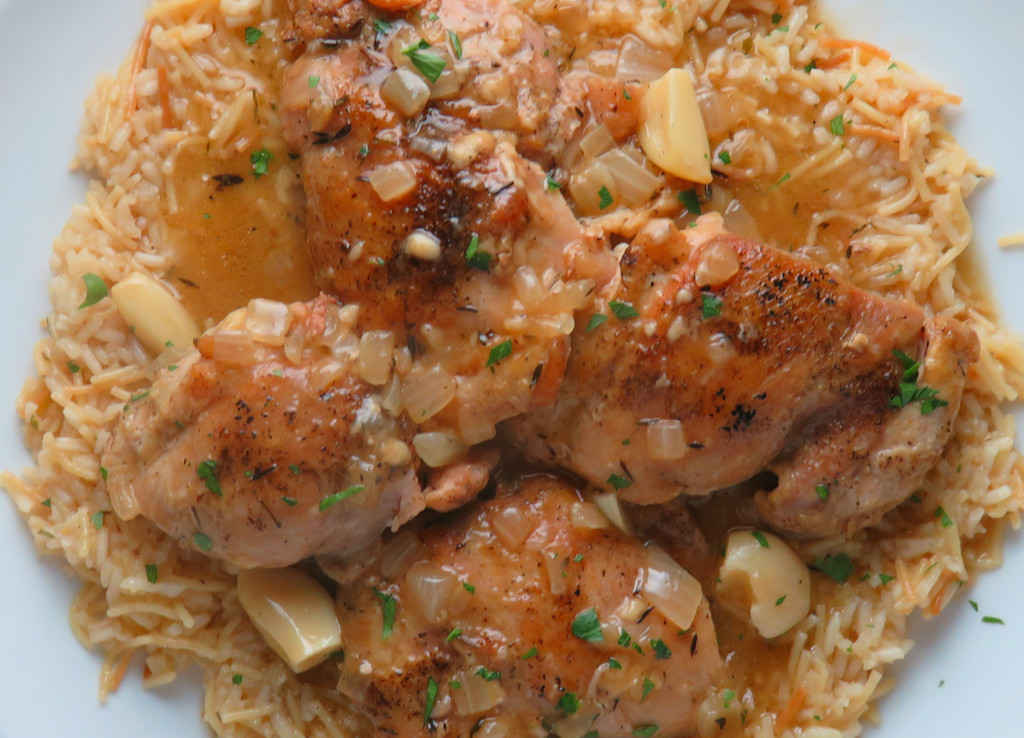
If I’d known how easy it is to make a copycat of the great side dish, Rice-A-Roni, I would’ve already been making it for years. Rice-A-Roni was a staple in our house when I was growing up. For some reason I loved the smell of the seasoning packet that came with Rice-A-Roni. This recipe is a spot-on copy of what I remember, from the seasoning to the aroma to the texture, all using ingredients that I always have on hand.
Great By Itself. Really.
I could actually eat Rice-A-Roni (the original or this copycat) by itself. But, given the chance, I like to cover it in a generous amount of gravy. It’s like chicken and rice soup I guess. Mighty tasty chicken and rice soup at that.
Chicken base can be found by the chicken broth or bouillon in the grocery store. I love the flavor of chicken base, so I added a bit more than the teaspoon that the recipe calls for.
My bacony chicken and rice (leaving out the rice) is fantastic over this rice. Beyond fantastic, really.
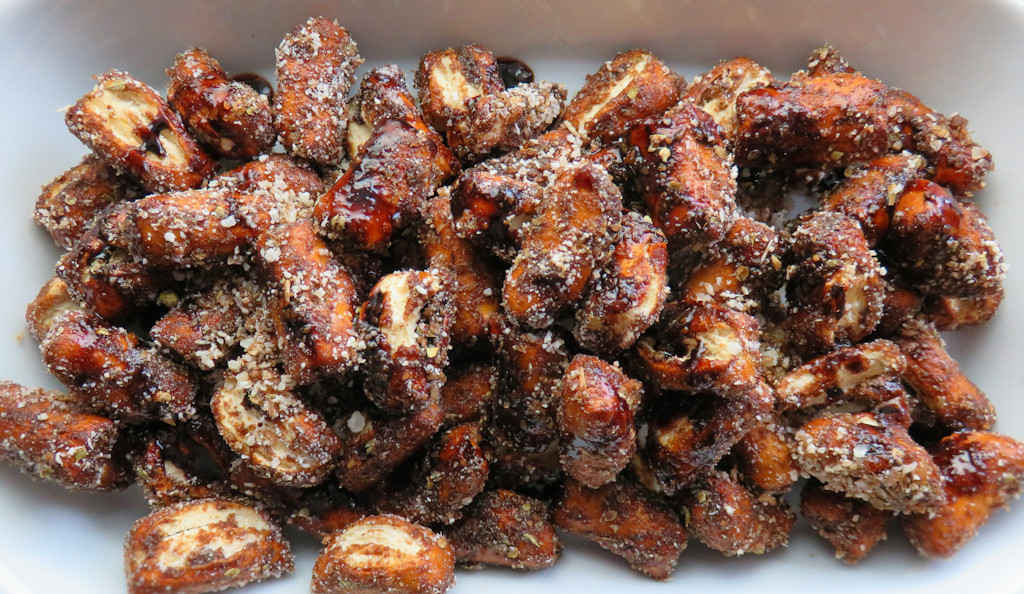
My goodness. Putting a bowl of these balsamic pretzel bites in front of me requires me to exercise self-control like I’ve rarely been forced to do before. Balsamic pretzel bites are a totally different take on the usual salty, often cheesy, tasty morsels. The balsamic glaze takes about 20 minutes to make, but it’s so worth the effort. You want the glaze to be a bit thick, thick enough that it sticks to the back of a spoon. The tart sweetness of the balsamic vinegar works perfectly on pretzels.
Fantastically Delicious
You can use any glaze actually. You don’t have to use ‘just’ balsamic. I’m contemplating trying some of the same glazes I use even on the grill. Peach mango habanero, or sweet and spicy apricot come to mind. It often pays to think outside the box!
My goodness. Putting a bowl of these balsamic pretzel bites in front of me requires me to exercise self-control like I’ve rarely been forced to do before. Balsamic pretzel bites are a totally different take on the usual salty, often cheesy, tasty morsels. T
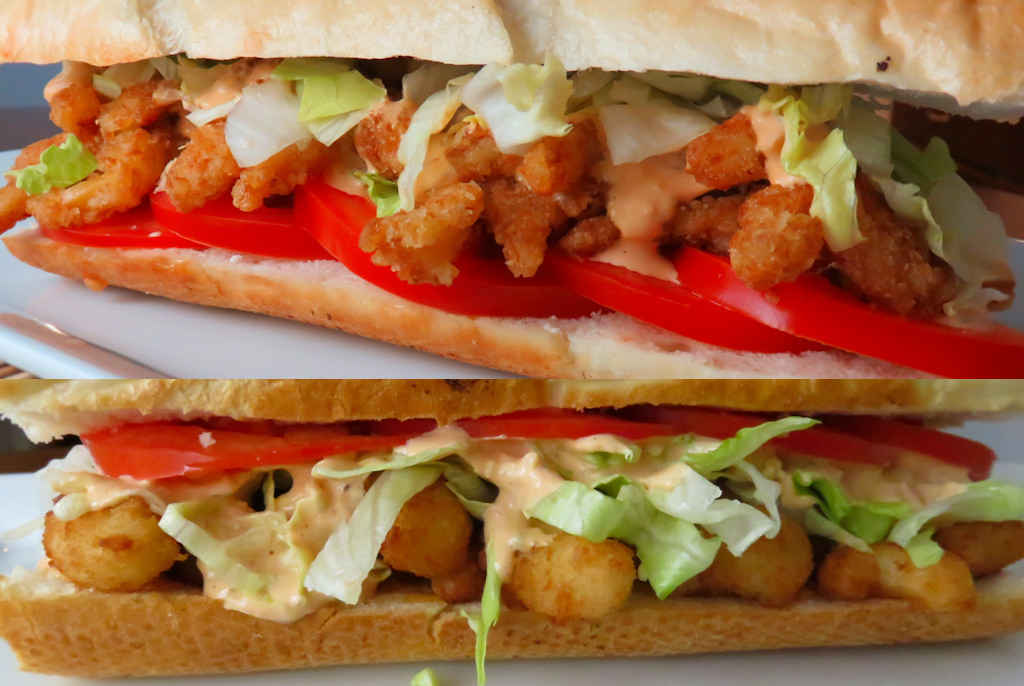
I’m a big fan of po boy sandwiches. Sometimes fancy, sometimes not so fancy. Last weekend I made two ‘cheater’ fried clam and fried shrimp po boys. I call them ‘cheater’ because I used frozen already-fried seafood. But just because I’m cheating doesn’t mean I’m not going to step up my game a bit by adding a fantastic chipotle tartar sauce. A bit spicy and a bit tangy, this is the perfect tartar sauce to kick up any seafood.
Thicker Is Better
You want to use a mayonnaise that isn’t too thin or your chipotle tartar sauce will, of course, be thin. Not that that’s a bad thing, but most people like a nice, thick tartar sauce. You could call it a remoulade or comeback sauce if yours turns out a bit on the thin side!
I almost always use Blue Plate mayonnaise in the dishes I make. I think it is the best around. If you can’t find it locally you can pick it up online for a fair price.
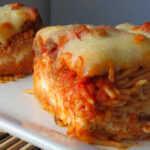
I was going to change the name of this dish to just ‘spaghetti casserole’ because (before I made it) I thought that calling it Million Dollar Spaghetti was a bit pretentious. Well, as you can tell, I didn’t change the name. That’s because, yeah, Million Dollar Spaghetti is the perfect name for it.
If you close your eyes and take a bite of this spaghetti you’ll almost think you are eating lasagna. Actually, it’s very close in flavor to my mom’s easy lasagna, a recipe I make and devour regularly. Spaghetti sauce, Italian sausage, pasta, a little Italian seasoning and plenty of cheese. What’s not to love?
Great. Until Its Gone.
Million Dollar Spaghetti was a huge hit in our house. We were sad when the last piece disappeared. But not super sad since we knew it won’t be long until we make this again. And again.
Jazz It Up
You can easily change this recipe up to meet your own tastes. Maybe add some fresh mushrooms in when you cook the sausage. Or a few bell peppers. For me, a pinch or two of red pepper flake is always a good idea too. You don’t have to use an expensive jarred spaghetti sauce, either. Good ole Prego (I used Italian Sausage and Garlic) works just great!
I highly recommend that you shred or grate your own cheese at home. Don’t buy the pre-shredded or pre-grated stuff. It has stuff added to it to keep it from sticking together. That ‘stuff’ affects how the cheese melts. Shred it yourself and use the good stuff.
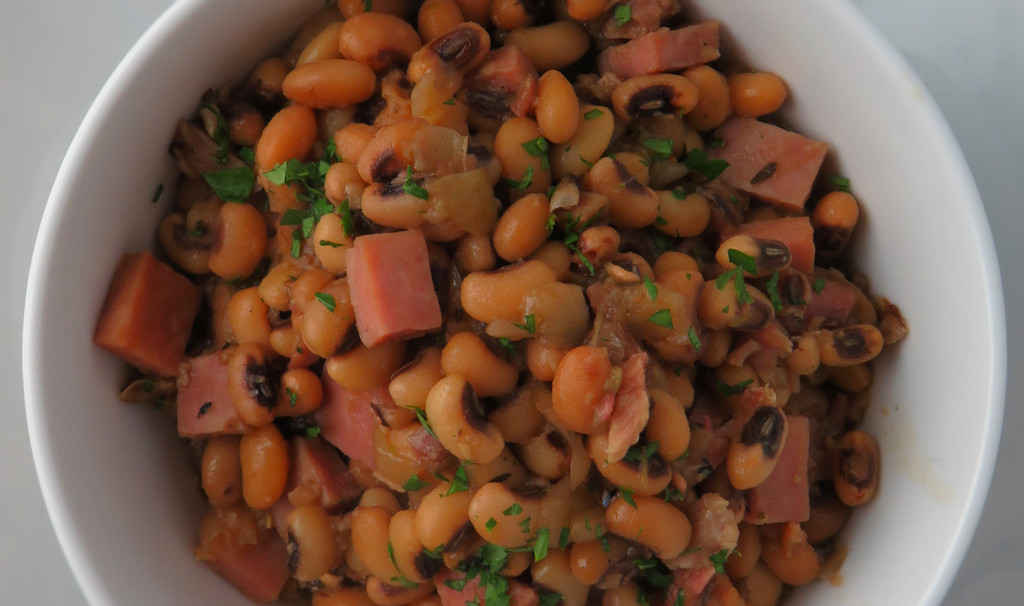
Slow cooker black eyed peas are a wonderful thing. I grew up surrounded by them, it seemed. Canned black eyed peas in the cupboard. Dried black eyed peas in the pantry. Black eyed peas in the garden. They made an appearance at almost every dinner, and my dad still has them very, very often. And by very often I mean every single day. He has never burned out on them, and I can understand why.
A Great Side Dish. And A Great Main Dish.
This is my favorite way to prepare black eyed peas. For a little smokiness I add a smoked pork shank. And for a little spiciness I add a little jalapeno. To make it a main dish I add chopped smoked ham. For a side dish, I’d leave out the ham. Probably.
I avoid cooking dried beans in water if possible. I prefer chicken broth. It adds so much more flavor to the beans. I seem to always have gallons of chicken broth on hand. I save my vegetable and chicken trimmings, freezing them, and once I have enough I make a huge pot of broth. Slow cooker black eyed peas cooked in broth is a magical thing.
This is my favorite way to prepare black eyed peas. For a little smokiness I add a smoked pork shank. And for a little spiciness I add a little jalapeno.
Cover and cook on low for 8 hours. Note: If you wish to add smoked ham, do so 6 hours into cooking.
Remove ham hock and let cool slightly.
Cut meat from the bone, chop, and return to the slow cooker.
Remove the bay leaf before serving.
Notes
You don’t want to overcook the peas. Since slow cooker temperatures can vary, check them after 6 hours and every 30 minutes after to test for doneness.
I love making treats like this southwestern snack mix for my wife to take to work and share with her co-workers. Of course, whatever she takes has to be yummy. It also has to make a pretty good-sized batch, enough to feed over 20 people. And sometimes, I like to sneak in just a bit of spiciness. This mix checks all of the boxes, and it’s easy to make to boot. Popcorn, Chex cereal, Fritos and Cheez-Its. All those goodies in one bowl.
It’s Easy. And Yummy.
I used my homemade taco seasoning when I made the Southwestern snack mix. I like being able to control the spiciness and the texture. Also, I often grind my spice mixes to get them a bit finer. I want to avoid the chances of someone biting into a bit chunk of say, oregano. You can of course use a packet of taco seasoning. If you’re making the mix for a crowd you might want to use the mild mix instead of the spicy.
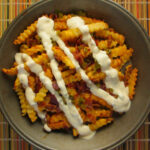
There’s no reason for frozen fries to be boring, especially when it doesn’t take much to make them really fantastic. Add a little cheese. A little bacon. A little heat, of course. And a sauce. In no time you’ll be chowing down on delicious fries like these Texas fries. And, in no time, they will be gone.
Wait… Ranch On Fries?
Hidden Valley has a big variety of Ranch dressings available, so if ‘regular’ Ranch is a little too ‘regular’ for you, try something like Sriracha or Fiesta Ranch instead. Either is great on Texas fries. You don’t have to settle for the ‘usual’ ketchup. Trust me on this. Ranch is better.
I highly recommend that you shred or grate your own cheese at home. Don’t buy the pre-shredded or pre-grated stuff. It has stuff added to it to keep it from sticking together. That ‘stuff’ affects how the cheese melts. Shred it yourself and use the good stuff.
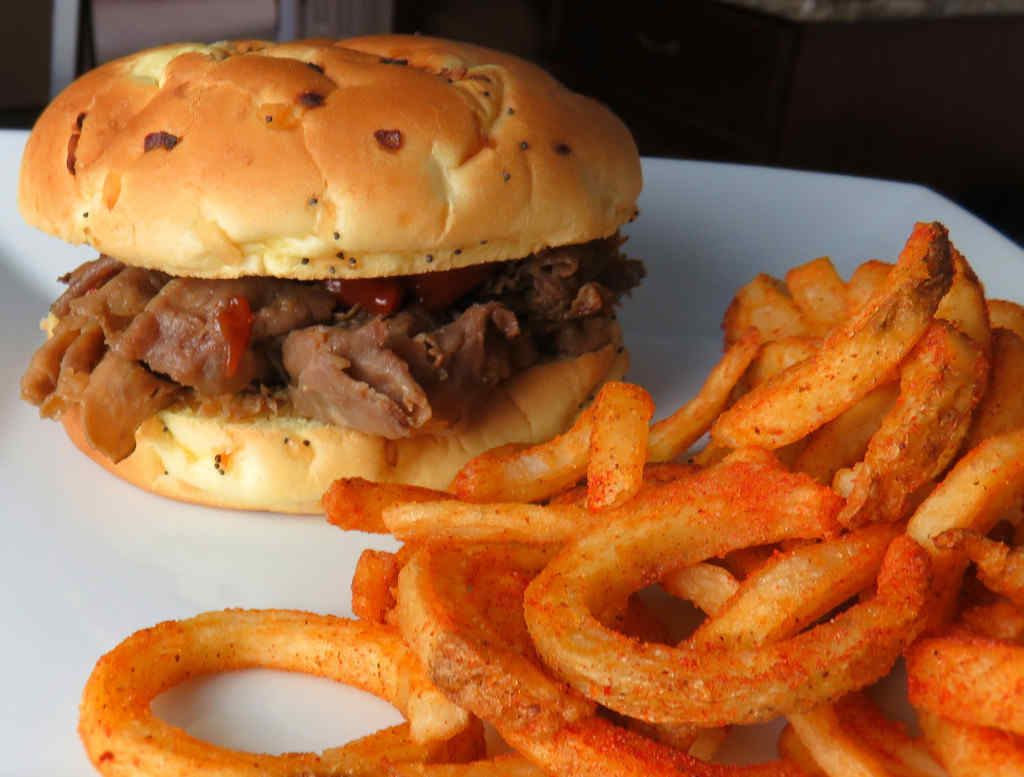
A few years back I made a copycat of Arby’s Beef-n-Cheddar sandwich, one of my all-time favorites by a country mile. A commercial came on the tv a few days ago for Arby’s roast beef sandwiches, and I instantly started jonesin’ for one. As much as I loved my copycat Arby’s Beef-n-Cheddar, I wanted to take a copycat of the roast beef sandwich to a new level. The level of true copycat-ness. And here it is. Tender, tasty thin-sliced beef. Tangy Arby’s sauce. Onion buns. And of course, seasoned curly fries. It’s impossible to make enough of it because no matter what, I’m going to make it disappear.
Ok, So I Kinda Made A Change
I actually used Sriracha ketchup for making the Arby’s sauce, and left out adding any additional hot sauce. It had some kick, and wasn’t 100% a copycat of the original, but it was fantastic. In fact, I’d recommend that Arby’s make a Sriracha version of the sauce for their restaurants. It’d be a big hit, trust me.
Double The Sauce, Double The Fun
If you’re like me and you’re kind of addicted to Arby’s sauce, I’d double the amount below. If it’s not running down your forearm when you take a big bite of this copycat Arby’s roast beef sandwich, you’re not doing it right!
Tender, tasty thin-sliced beef. Tangy Arby’s sauce. Onion buns. And of course, seasoned curly fries. It’s impossible to make enough of it because no matter what, I’m going to make it disappear.
Note: This recipe was developed using the Char-Broil Big Easy Oil-Less Fryer. If you are cooking using the Char-Broil Smoker-Roaster Grill you should cook with the lid open and the temperature set to High. You might also need to adjust the cooking time.
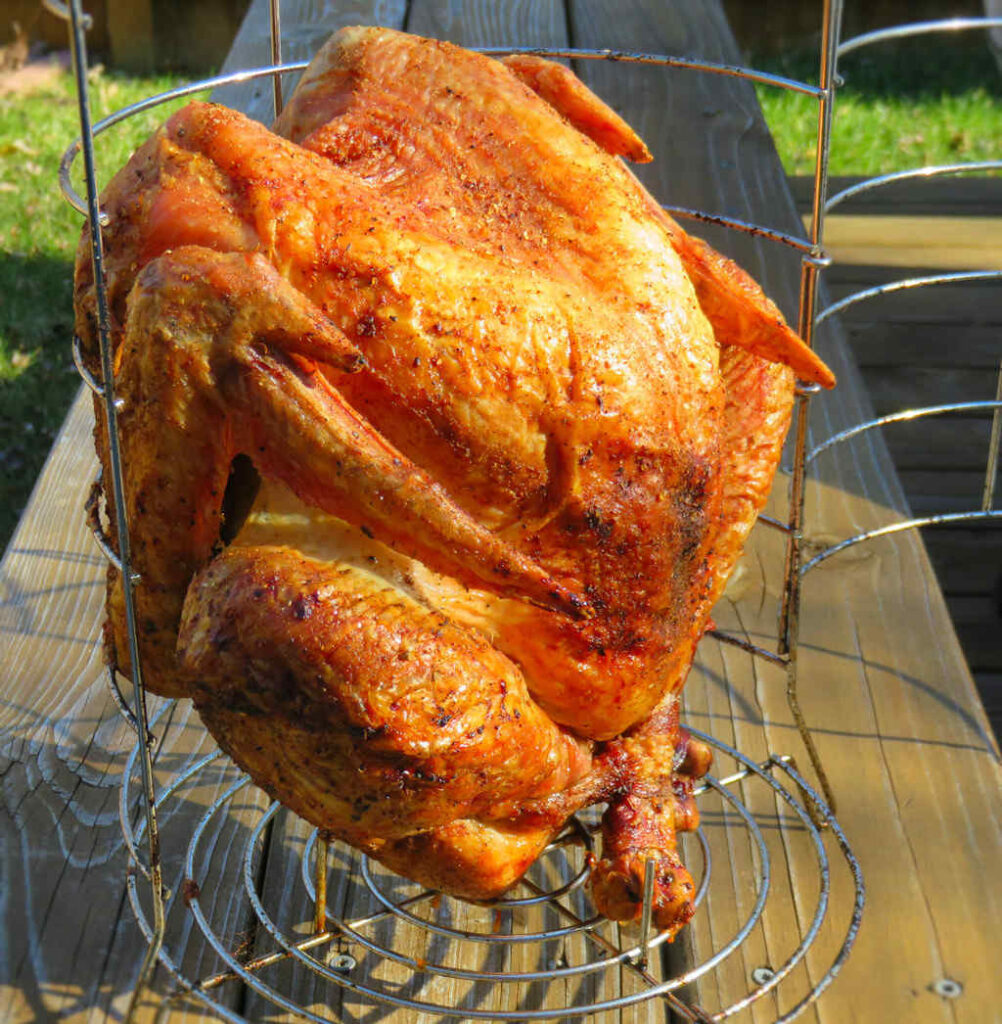
I’ve roasted a ton of turkeys in my Char-Broil Big Easy. It’s why I originally bought the oil-less fryer. I loved it so much the first time that I bought two more, keeping one at my parents house for a fantastic holiday turkey. This time I set out to keep the process as absolutely simple as possible. No brines. No fancy rubs. Just a 16 pound turkey, a little oil, and some seasoning and 10 minutes per pound.
Easy Every Single Time
There’s really nothing easier than cooking poultry on the Big Easy. It really is as easy as fire it up, put it in, walk away and come back later. Unless the weather conditions are really adverse, you can count on 10 minutes per pound for a turkey.
One Big Bird
I cooked a nice big 16 pound turkey in exactly 160 minutes. That’s in 30 degree weather with a very light breeze. I kept the lid off the Big Easy until the last 30 minutes to then add a little color.
I started with a pre-brined turkey. You can certainly get a natural, un-brined turkey and go thru that process, and I have. But for this cook it was about easy, and easy means getting a turkey that’s already in a solution that brined the bird for me. You can also inject your turkey for even more flavor, like my Cajun-injected bird on the Big Easy. Or try my buttermilk-marinated turkey.
You can use the basket that comes with your Big Easy, but I admit it’s a bit challenging getting a big bird in/out of it. If you’re going to do any amount of cooking on the Big Easy (and you should) I recommend that you at least get the hinged basket like you see in the picture above. It really makes getting the turkey in or out very simple indeed. See my thoughts on the accessories for the Big Easy here.
Your favorite seasoningsalt and pepper are just fine too! DO NOT use a seasoning mix that contains sugar as it might burn under high temperatures.
Instructions
Fire up your Big Easy.
Remove the turkey from the packaging along with any turkey neck and giblets that might be there.
Rinse the turkey in cold water and dab dry with paper towels.
Very lightly coat the turkey (inside and out) with the oil. You only want enough to help the seasoning adhere and to help crisp the skin.
Season the turkey liberally inside and out.
Place the turkey into the Big Easy basket and lower into the cooker.
Cook for 10 minutes per pound. Check for doneness, 180°F in the thighs and legs, and 170°F in the breast. Always check in multiple locations.
Remove the basket from the Big Easy and let the turkey rest for 15 minutes before carving.
Notes
I used a pre-brined turkey. You can easily identify a bird that is already in a brine solution by looking for the words ‘Contains up to 8% of a solution of water, salt, spices, and natural flavor’ or something similar on the packaging.
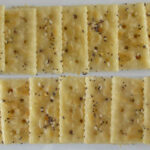
Ever since I made a batch of Fire-Eater saltines I just cannot stop making flavor after flavor of crackers. You can use just about any seasoning you like, but whatever you do, you have to make these bagel-seasoned saltines. Poppy and sesame seeds combined with onion and garlic flavors, with just a hint of fennel (use a little or a lot, but start with a little) make for the perfect combination. There’s really no point in only making one sleeve of these saltines, they won’t last that long at all.
More Seasoning, More Better
The seasoning may have trouble adhering to the crackers. If that happens to you add a bit more oil. Or just sprinkle the saltines with a bit more seasoning right before serving. Either way, everyone will love these bagel-seasoned saltines.
I just cannot stop making flavor after flavor of crackers. You can use just about any seasoning you like, but whatever you do, you have to make these bagel-seasoned saltines.