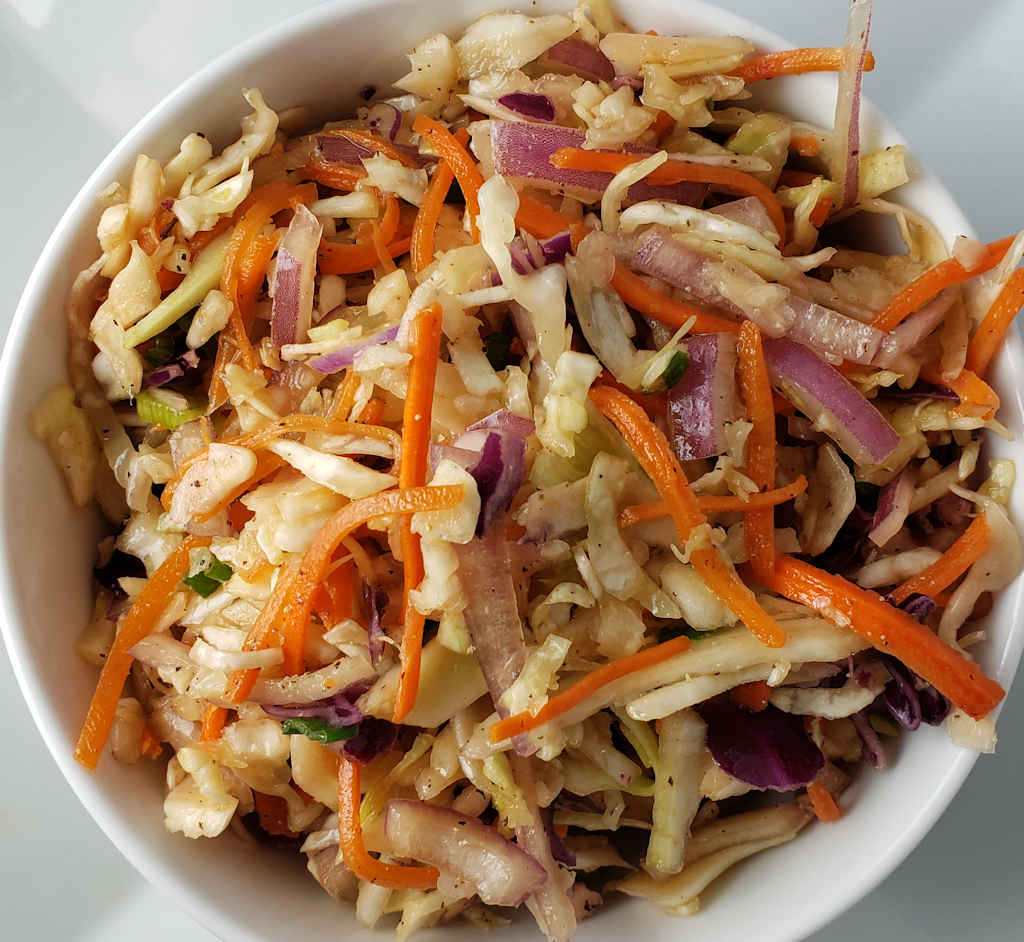
Oh I’ve made fru-fru mac-and-cheese before. Heck, I’ve made the stuff out of the box before. But ya know, this copycat KFC macaroni and cheese puts them all to shame. It’s crazy easy to make, like most stove-top versions. And it’s soooo creamy. And yummy. You can make an absolutely huge batch of this in no time and feed a crowd. Or you can keep it for yourself. It’s your call.
Ok, the recipe for copycat KFC macaroni and cheese does not call for a light dusting of paprika before serving. That was my idea. You don’t have to do it. Or you can use cayenne for a little kick. I’m quite sure the original version from Kentucky Fried Chicken had neither paprika or cayenne!
Oh I’ve made fru-fru mac-and-cheese before. Heck, I’ve made the stuff out of the box before. But ya know, this copycat KFC macaroni and cheese puts them all to shame.
Course Side
Cuisine American
Keyword copycat, Kentucky Fried Chicken, KFC, mac and cheese, macaroni and cheese
Sometimes, I just want something easy, something hassle-free, for a nice lunch on a cold day. No troubles, but flavorful. This celery and cheddar soup takes only a few minutes to put together, and just a few hours to cook in a slow cooker. When it’s done, you get to enjoy a creamy, smooth cheesy soup that has a wonderful hint of celery. This soup does not skimp on flavor. It looks deceptively fancy, but it’s so easy to make.
The only change I’d make to this celery and cheddar soup would be to substitute a 4 ounce jar of pimentos (drained) for the red bell pepper. Sometimes in winter good bell peppers can be hard to find. Pimentos (or chopped jarred roasted red peppers) make for a great substitute. I also like to use roasted red peppers as a substitute. They come in jars and can be found near the pickles in the grocery store.
Every time I make a recipe that calls for shredded cheese I remember how happy I am that I bought a cheese grater/shredder. No more of that pre-shredded stuff for me. It doesn’t melt right.
This celery and cheddar soup takes only a few minutes to put together, and just a few hours to cook in a slow cooker. When it’s done, you get to enjoy a creamy, smooth cheesy soup that has a wonderful hint of celery.
This is by far my favorite, hands-down, go-to recipe for Mexican rice. The flavors are so incredible, so good, that i could just sit down with a bowl of this rice and have it for dinner. And the house smells so awesome while it is cooked. It definitely gets my tummy growling. This is a keeper.
Frying the rice gives it a fantastic color and great texture. A little bite, but not crunchy. The sauce used for cooking the rice has such a rich flavor. I love it.
You have to make sure you really thoroughly rinse the rice for this Mexican rice to come out perfect. Get ride of that starch. Don’t rush it. Keep rinsing and rinsing until the water is clear. Anything less is… well, less.
I like to use my good ole trusty Dutch oven to make this soup and pretty much darned near anything like it on my stovetop. It’s nice and big and sturdy. That extra weight helps it maintain and distribute heat perfectly. As an added bonus, it’s actually pretty easy to clean up too!
This is by far my favorite, hands-down, go-to recipe for Mexican rice. The flavors are so incredible, so good, that i could just sit down with a bowl of this rice and have it for dinner.
Note; This dish is best made in a Dutch oven or large oven-safe pot.
Preheat oven to 350 F.
Place tomato and onion into a blender and pureé.
Rinse the rice by placing in a strainer and running under cold water. You want the water from the rice to be clear. Don't rush this, it's an important step. It usually takes me at least 5 minutes, stirring the rice occasionally to make sure that all the rice grains get rinsed well. Drain well when done.
Heat the oil in a Dutch oven over high heat.
Add the rice and fry for 6-8 minutes, stirring often, until it is golden brown.
Reduce the heat to medium and add the garlic and 2
Reduce heat to medium, add garlic and 2 of the jalapenos. Stir while cooking for 2 minutes.
Add in the tomato mixture and salt. Bring a boil then remove from heat and cover.
Place a lid on the Dutch oven and transfer to the oven for at least 30 minutes. Check on it after 15 minutes to make sure there's enough liquid (if not, add just a bit of water).
Check if the rice is done. If not return to the oven 5 minutes at a time, checking on it, until perfect.
Remove the rice from the oven. Stir in the cilantro, last jalapeno and lime juice. Serve.
Brussels sprouts were on sale. That’s how I ended up making a Caesar salad. I could’ve grilled them. Or roasted them. But I had salad on the brain. Simple salad. I didn’t want a bunch of ingredients, or have to make a dressing. That’s how I ended up with this Brussels sprouts Caesar salad. Shred and slice some sprouts, toss in pre-made Caesar salad dressing, toss on a few Croutons and grab a fork. Time to eat.
I absolutely love the crunch and rawness of this Brussels sprouts Caesar salad. I don’t like them chopped into super tiny bits, I like to keep some bigger pieces so I get all that crunch. This is a really great way to throw together a quick salad that looks great and tastes even better.
Fit a food processor with a slicer blade. Feed Brussel sprouts thru the food processor. Alternatively, slice sprouts thin with a knife.
Drizzle the salad with the dressing and stir to coat. Season with salt and pepper and stir again. If the salad is too dry add more dressing and stir more.
I needed a side dish for lunches last week. This old fashioned macaroni salad was just what I was looking for. This brought back memories of the macaroni salad people would take to pitch-ins. It is deliciously creamy and has some crunch from the carrots and celery. It has a hint of sweetness from the sugar which is tamed by the apple cider vinegar. Elbow is my preferred pasta for this salad, but you could use whatever you have on hand.
I like that the sauce in this salad isn’t runny like a lot of recipes or the kind that you buy in the deli at the grocery store. The next time I make this old fashioned macaroni salad, I will add peas to it. You could also add cheese, ham or bacon to make it your own.
I recently discovered Blue Plate mayonnaise, which I think is the best around. If you can’t find it locally you can pick it up online for a fair price.
I was wandering around the produce section of our local grocery store when I came across the Brussels sprouts. There they sat, on sale, beckoning me. Normally I’d roast them or sous vide them or grill them, but this time I decided to try something new: pickling. It took no time at all to make a few jars of the sprouts. Unfortunately, because I have no patience, they then have to sit in the fridge for four or so days to get ‘happy;.
Pickled Brussels sprouts are delicious. They remind me a bit of cucumber pickles but with a much different texture. The insides are like tender cabbage. I find it hard to stop eating them. They’re great as a side snack or even chopped onto a pulled pork sandwich.
I like a little kick to my pickled vegetables, so I did add a bit more red pepper flake than the recipe calls for. If you prefer yours even hotter, I recommend the four pepper blend from the Flatiron Pepper Company.
You can use this recipe for pickled Brussels sprouts for other vegetables, too.
Cook 10 trimmed and halved Brussels sprouts in a large stockpot of boiling water until bright green, about 5 minutes.
Drain and rinse under cold running water.
Bring 3/4 cup water, 1/4 cup white vinegar, and 1 tsp. coarse kosher salt to a simmer in stockpot over medium; simmer until salt dissolves.
Combine 10 black peppercorns, 1/4 tsp. yellow mustard seeds, 1 sliced garlic clove, a pinch of crushed red pepper, and 1 fresh bay leaf in a sterilized pint jar.
Place Brussels sprouts in jar; add hot vinegar mixture. (You may have some leftover liquid.)
Cool to room temperature. Cover with lid, and chill 4 days or up to 2 weeks before serving.
I’m a big fan of Hasselback potatoes. They’re like a cross between scalloped potatoes and baked potatoes. They look cool and are actually pretty easy to make. This time I took my classic favorite Hasselback potato recipe and threw in a twist: I baked the potatoes on my grill on a cedar plank. The plank added a wonderful aroma and flavor to the potatoes. Not too much, but just enough to make me say “Wow, that’s great and different!”.
Cutting a potato Hasselback-style is actually pretty easy. In no time you too can be enjoying some cedar planked Hasselback potatoes. You can just put a wooden spoon along the potato and slice them manually. The spoon will stop you from going all the way through the potato. Or you can ‘cheat’ like I do and get a Hasselback potato slicer (see below). It holds the potato in place. It also makes sure that each cut is the same thickness. And of course, it prevents you from cutting the potato too far. Hey, who doesn’t need another kitchen gadget!
I’m a big fan of Hasselback potatoes. They’re like a cross between scalloped potatoes and baked potatoes. They look cool and are actually pretty easy to make.
Cut the potatoes in Hasselback fashion. I use a tool to do this (link above). You can also lay wooden spoons alongside the potato. As you cut the potato into slices, the spoons will prevent you from cutting all the way through.
Gently and carefully lightly spread the potato segments apart.
Brush the tops of the potatoes with the oil. Try to get some down inside the segments, but don't over-oil them. You want just a light coating.
Generously salt and pepper the potatoes.
Fire up your grill for direct cooking. Remove the plank from the water and place over the fire. Char on both sides then remove the plank to indirect cooking. You want a cook temperature of around 400 F.
Transfer the potatoes to the plank and cook for 30-40 minutes until a toothpick (I use a thin skewer) inserts easily into the potato. I find it's easier to poke it from the side, into the ends.
If you wish to serve with cheese melted over the top, just sprinkle the potatoes with the cheese and cook another 5 minutes.
When I am making baby or fingerling potatoes, I almost always keep them whole. I know, cutting them in half gives you more surface area for seasonings, but I really, really love the ‘pop’ of biting into a baby potato. It’s probably just me but that’s why I kept these Parmesan garlic potatoes whole. Hey, they’re not that big and boy do they cook up creamy good. Smothered in tons of garlic and cheese, I absolutely loved them.
I mentioned fingerling potatoes. This dish would also be great using fingerling potatoes. Ditto with baby yellow potatoes.
You can bake these potatoes in the oven or grill on the grill. If you’re heading outdoors with them, I recommend using a grill basket.
I really, really love the ‘pop’ of biting into a baby potato. It’s probably just me but that’s why I kept these Parmesan garlic potatoes whole. Hey, they’re not that big and boy do they cook up creamy good. Smothered in tons of garlic and cheese, I absolutely loved them.
Course Side
Cuisine American
Keyword garlic Parmesan, potatoes
Prep Time 5 minutesminutes
Cook Time 30 minutesminutes
Total Time 35 minutesminutes
Servings 8
Calories 118kcal
Author Inspired by a recipe from The Recipe Critic
Yeah, I coulda just turned on the oven, tossed in a few waffle fries, and had a side for my burgers in less than 30 minutes. And I would’ve been fairly happy with that. But why not spend any extra minute or two and turn those fries into something special? These Cajun cheesy waffle fries prove just how easy it is to turn a simple side into something fantastic. Smoky bacon, sharp onion and creamy cheese, all on top of waffle fries seasoned well with Cajun seasoning. Just a bit of heat, just a bit of spiciness. Perfect.
Mix it up a bit. I’ve made these Cajun cheesy waffle fries with smoked cheddar, leaving out the bacon, for a wonderful twist. Don’t have green onion? Red onion, minced, works great too! Instead of Cajun seasoning, use your favorite. I like blackened seasoning. Or smoked paprika. You can’t really mess these up. Oh, and sure, if you don’t have waffle fries, good ole French fries work great too! And you don’t have to use pre-make fries, either. You can fry your own. Use a mandolin to make potatoes into those fun waffle shapes.
Preheat your oven to 450 F. Line a large baking sheet with foil or use a silpat.
Add the fries and arrange them into one layer. Bake for 15 minutes.
Sprinkle the fries with half of the Cajun seasoning and flip. Return to the oven and bake another 10-15 minutes or until golden brown with crispy edges.
Sprinkle tops of fries with the cheese, remaining Cajun seasoning, and the bacon. Return to the oven and bake another 5 minutes to melt the cheese.
Sprinkle with green onion and serve with Ranch dressing.
My wife and I are always on the lookout for a great, easy recipe for a dish she can take with her to work for her lunches. This Arkansas slaw has quickly become a favorite. It’s one she makes often and never tires of, and that’s a major plus.
On the surface, this Arkansas slaw is pretty much your standard slaw. But, it’s the addition of apple and celery that really make it different. Super crunchy, with a great dressing, it holds up for days, making it perfect for those workweek lunches, a picnic, or a family get-together.
I use pre-packaged slaw mix almost every time I make a slaw at home. Yeah, I could grab some cabbage, some carrots and whatever else and chop it myself, but those little bags are usually cheap, priced nicely, and always look good in the grocery case.
I recently discovered Blue Plate mayonnaise, which I think is the best around. If you can’t find it locally you can pick it up online for a fair price.
I lived in Arkansas for a number of years and for the life of me I don’t know what makes this ‘Arkansas Slaw’. Maybe it’s just called that because it’s amazing… like Arkansas! There! I figured it out!