Grilled Buffalo Mac-and-Cheese

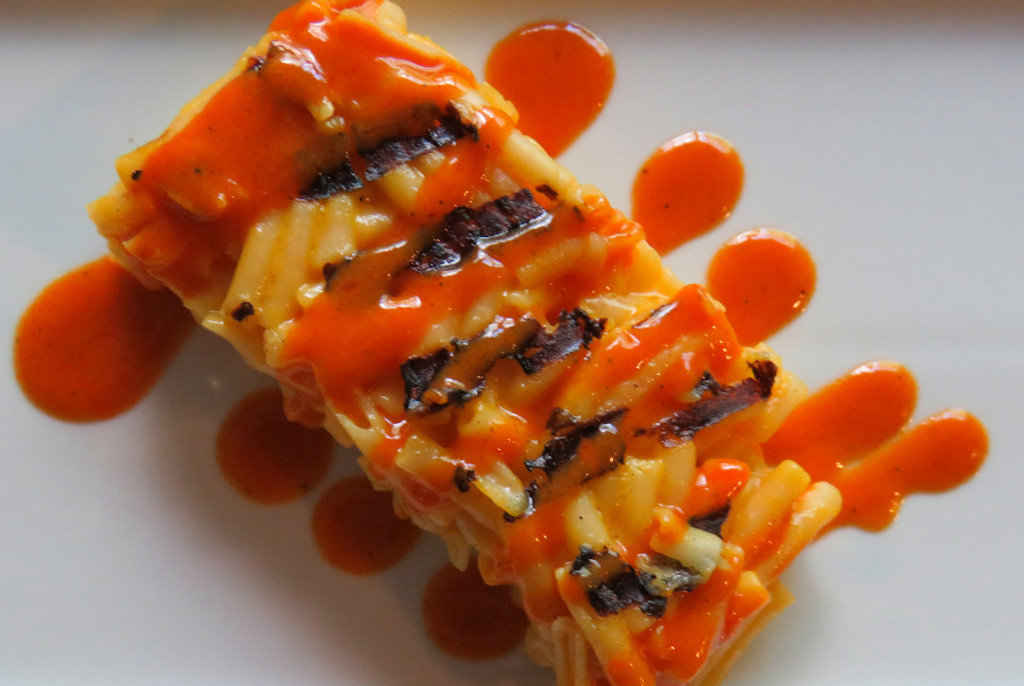
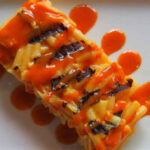
I’m almost too giddy to even write this post. Every time I look at the picture of grilled buffalo mac-and-cheese I flash back to the first time (of many) that I made it. Oooey gooey creaminess with a slight char, drizzled with a spicy homemade Buffalo wing sauce. Make no mistake about it, this is some fantastic macaroni-and-cheese.

Grilled Buffalo Mac-and-Cheese

A Couple Of Tips

There are two things you have to be mindful of when grilling Buffalo mac-and-cheese. First, make sure your mac is set up good before cutting it. You want it a little solid, a little thick. Second, you want to be careful flipping it on the grill. When the cold mac gets hot it’ll want to return to its original creamy state, and fast. Don’t mess around, flip it, char it, and get it on a plate. Time’s a-wastin’!

I highly recommend that you shred or grate your own cheese at home. Don’t buy the pre-shredded or pre-grated stuff. It has stuff added to it to keep it from sticking together. That ‘stuff’ affects how the cheese melts. Shred it yourself and use the good stuff.

Did you know you can also grill cornbread? It’s crazy good too!  You can also smoke your mac-and-cheese and really impress everyone.

Grilled Buffalo Mac-and-Cheese
Print Pin
5 from 1 vote

Grilled Buffalo Mac-and-Cheese

Oooey gooey creaminess with a slight char, drizzled with a spicy homemade Buffalo wing sauce. Make no mistake about it, this is some fantastic macaroni-and-cheese.
Course Side
Cuisine American
Keyword Buffalo, grilled, mac and cheese, macaroni and cheese
Prep Time 15 minutes
Cook Time 1 hour 30 minutes
Total Time 1 hour 45 minutes
Servings 4 servings
Calories 654kcal
Author Mike

Ingredients

For the macaroni-and-cheese (or substitute the stuff from the box)

  • Kosher salt
  • 1 ½ cups elbow macaroni
  • 1 cup heavy cream half-and-half also works well
  • 1 ounce cream cheese at room temperature
  • ¼ teaspoon garlic salt
  • ½ cup extra sharp Cheddar cheese shredded
  • 2-4 slices American cheese

For the Buffalo wing sauce

Instructions

For the macaroni-and-cheese (if using made-from-the-box mac, make it per package instructions and skip to step 6)

  • Bring a large pot of salted water to a boil.
  • Add pasta and cook until al dente, about 9 minutes.
  • Drain.
  • Meanwhile, heat cream in a large skillet.
  • Add cream cheese and salt and stir until cheese is melted.
  • Add cheddar and American cheeses and stir until melted.
  • Add cooked pasta and stir to coat well.
  • Transfer to a container lined with wax paper. Use a container that is small enough that your mac-and-cheese ends up being at least 1″ thick (thicker is better here).
  • Place in the fridge and refrigerate at least an hour. You can also place it into the freezer. You want the mac-and-cheese to set up so it can be sliced.
  • Fire up your grill for direct cooking.
  • Carefully remove the mac-and-cheese from the container and slice thick.
  • Transfer to a grill over high heat and grill for just a minute per side, long enough to get grill marks and a bit of a crunch. Do not play with the mac-and-cheese while it’s on the grill or it will crumble. Be careful flipping it. If you lose some, you lose some.
  • Transfer to a plate and drizzle with plenty of the Buffalo wing sauce.

For the Buffalo wing sauce

  • Place the butter in a small saucepan over medium heat.
  • Once the butter is melted add the remaining ingredients.
  • Bring to a boil then reduce heat to a simmer and continue simmering for 5 minutes, stirring often.
  • Remove from heat and let cool before using.

Notes

You can also make this using your favorite hot sauce instead of Buffalo wing sauce.

Nutrition

Calories: 654kcal | Carbohydrates: 43g | Protein: 14g | Fat: 48g | Saturated Fat: 29g | Trans Fat: 1g | Cholesterol: 152mg | Sodium: 1656mg | Potassium: 285mg | Fiber: 2g | Sugar: 3g | Vitamin A: 1775IU | Vitamin C: 34mg | Calcium: 279mg | Iron: 1mg

Nutritional values are approximate.

Sno-Cone Syrup

Yes, I do have a machine that shaves ice. I mean, why wouldn’t I? Everyone loves sno-cones. I used to buy big bottles of sno-cone syrup at the store (due to occasional laziness) and finally asked myself how hard could it really be to make some at home? The answer? It’s not hard at all and the homemade sno-cone syrup flavors are so much more bold. I keep a few different ones on hand in squeeze bottles, ready to make delicious sno-cones at a moment’s notice.

Sno-Cone Syrup

Summer Fun

Here’s the ice shaver that I use. It’s small, fairly cheap, and has held up for years. Just add a few ice cubes and turn it on and it starts shooting out perfectly shaved ice in an instant. This is what makes summer fun! And it brings back a lot of childhood memories too!

Also try my cherry limeade.

Sno-Cone Syrup
Print Pin
5 from 1 vote

Sno-Cone Syrup

Yes, I do have a machine that shaves ice. I mean, why wouldn’t I? Everyone loves sno-cones. 
Course Dessert
Cuisine American
Keyword syrup
Cook Time 1 hour
Total Time 1 hour
Servings 2 cups
Calories 774kcal
Author Mike

Equipment

Ingredients

Instructions

  • Combine the sugar and water in a saucepan.
  • Bring to a boil over high heat and let boil for 1 minute, stirring.
  • Remove from heat and stir in the flavor packet.
  • Allow to cool in the fridge for 1 hour before using.

Notes

Keep syrup in the fridge until ready to use.

Nutrition

Calories: 774kcal | Carbohydrates: 200g | Sodium: 8mg | Potassium: 4mg | Sugar: 200g | Calcium: 6mg | Iron: 1mg

Nutritional values are approximate.

Beer-Can Seasoned Chicken on the Char-Broil Big Easy

Note: This recipe was developed using the Char-Broil Big Easy Oil-Less Fryer. If you are cooking using the Char-Broil Smoker-Roaster Grill you should cook with the lid open and the temperature set to High. You might also need to adjust the cooking time.

I’m a big fan of making beer can chicken. Weber has a beer can seasoning that hits the spot with the perfect combination of spices. It’s perfect for making beer-can seasoned chicken on the Char-Broil Big Easy. Nothing could be easier. I will warn you, though, the crispy skin comes out absolutely delicious. The advantage of being the person cooking the chicken is that you get first dibs on it and the rest of the chicken.

Beer-Can Seasoned Chicken on the Char-Broil Big Easy

Oh, So Good!

The seasoning is so good you can leave out the beer can. Beer-can seasoned chicken on the Char-Broil Big Easy is so darned good! The Big Easy cooks up chicken so moist and tender you won’t notice it’s not there, and the Weber seasoning packs such great flavor you’ll be as happy as if you did use the beer.
If you do decide to also add a beer can don’t use a strongly-flavored beer or it might drown out the great seasonings. And of course, you’re not required to use beer in a beer-can chicken. Many sodas and even wine work just as well.

For something different, try my beer can cabbage on the Big Easy. It’s different for sure!

It’s always a good idea to keep a few spare grease trays on hand for your Char-Broil Big Easy.

Love your Big Easy as much I love mine? Check out my Big Easy Add-Ons page and my free Big Easy eCookbook!

Beer-Can Seasoned Chicken on the Char-Broil Big Easy
Print Pin
5 from 1 vote

Beer-Can Seasoned Chicken on the Char-Broil Big Easy

The seasoning is so good you can leave out the beer can. The Big Easy cooks up chicken so moist and tender you won’t notice it’s not there, and the Weber seasoning packs such great flavor you’ll be as happy as if you did use the beer.
Course Main
Cuisine American
Keyword Big Easy, Char-Broil, chicken
Cook Time 1 hour 30 minutes
Total Time 1 hour 30 minutes
Servings 1 chicken
Calories 2kcal
Author Mike

Ingredients

Instructions

  • Fire up your Big Easy.
  • Lightly coat the outside of the chicken with oil.
  • Sprinkle seasoning liberally all over the chicken, inside and out.
  • Place chicken into your Big Easy basket and lower into the cooker.
  • Cook for about 20 minutes per pound until the chicken reaches 165 F as measured in several places.
  • Let rest 10 minutes before carving.

Notes

Make sure you don’t get a chicken that’s bigger than your Big Easy basket!

Nutrition

Calories: 2kcal | Protein: 1g | Fat: 1g | Saturated Fat: 1g | Cholesterol: 1mg | Sodium: 1mg | Potassium: 2mg | Vitamin A: 1IU | Vitamin C: 1mg | Calcium: 1mg | Iron: 1mg

Nutritional values are approximate.

Smokehouse BBQ Sauce

I’m always on the lookout for a different sauce for my smoked ribs, pulled pork, or whatever meats I’m cooking on my smoker. It’s not because I don’t already have a good collection of sauces that I love. It’s because sometimes you just want something different. This smokehouse BBQ sauce intrigued me when I first saw it because it had both chile peppers and lemon juice. I thought, well, that’s new. So I made it and it came out great on a nice big rack of smoked spare ribs!

Smokehouse BBQ Sauce

The Perfect Flavor Combination

Thick but not too thick, this smokehouse BBQ sauce has a hint of spiciness, a hint of smokiness, and a slight vinegar kick. In a way it’s a combination of many BBQ sauces, from Kansas City to Memphis to the Carolinas. Different, but different in a very good, very tasty way. And it has the perfect consistency for sticking to my ribs, my chicken, my pulled pork…. anything!

I like to keep my sauces in squeeze bottles. I love squirting sauce onto burgers, hot dogs, sandwiches… Anything that can be squirted! I write the contents and date-of-mixing on painter’s blue tape and put that on the bottles so I can keep track of them.

Also try my smokehouse beans.

Smokehouse BBQ Sauce
Print Pin
5 from 1 vote

Smokehouse BBQ Sauce

This smokehouse BBQ sauce intrigued me when I first saw it because it had both chile peppers and lemon juice. I thought, well, that’s new. So I made it and it came out great on a nice big rack of smoked spare ribs!
Course BBQ Sauce
Cuisine American
Keyword barbecue, BBQ, sauce
Prep Time 5 minutes
Cook Time 45 minutes
Total Time 50 minutes
Servings 4 cups
Calories 236kcal

Ingredients

Instructions

  • Heat a large saucepan over medium heat.
  • Add the chiles and toast for 2-3 minutes.
  • Turn and continue toasting until softened.
  • Add the water and bring to a boil.
  • Reduce heat to a simmer and simmer for 5 minutes.
  • Remove from heat and let stand for 10 minutes.
  • Remove peppers to a cutting board, but reserve the water.
  • Remove stems and seeds from the peppers and chop lightly.
  • Transfer to a blender and add the reserved water.
  • Puree until smooth and return to the saucepan.
  • Add the remaining ingredients except for the lemon and butter.
  • Bring sauce to a boil and reduce to a simmer and continue simmering for 30 minutes until the desired thickness is achieved.
  • Stir in the lemon juice and add the butter and stir until melted.

Notes

Store sauce in the fridge until ready to use.

Nutrition

Calories: 236kcal | Carbohydrates: 27g | Protein: 2g | Fat: 13g | Saturated Fat: 7g | Trans Fat: 1g | Cholesterol: 31mg | Sodium: 893mg | Potassium: 589mg | Fiber: 1g | Sugar: 18g | Vitamin A: 977IU | Vitamin C: 20mg | Calcium: 76mg | Iron: 3mg

Nutritional values are approximate.

Slow Cooker Chili Cheese Corn

One of my favorite things to do in the summer (around July 4th here in Indiana) is to buy a lot of sweet corn and put it up for the winter. I do mean a lot of sweet corn. For the two of us that often means 100-150 ears at once. It’s a good day’s work, but well worth it later in the year, especially when I can use it to make great-tasting dishes like this slow cooker chili cheese corn. I really enjoy cooking corn in the slow cooker. The corn keeps its light crunch, and all of the sweetness. Add a bit of roasted green chiles and cream cheese and you have a truly fantastic side dish.

Slow Cooker Chili Cheese Corn

Adjusting The Spiciness

For a little more kick, use diced roasted jalapenos instead when you make this slow cooker chili cheese corn. Or for less kick, roast a poblano (or even green bell pepper) under your broiler until blackened, then remove the burnt skin, seeds and chop. For no kick, use a green or red bell pepper. You’ll still at least get some color and pepper flavor. No matter what you use, it’ll add a nice contrast to the sweetness and creaminess of the corn.

Also try my coyote sweet corn.

Slow Cooker Chili Cheese Corn
Print Pin
5 from 1 vote

Slow Cooker Chili Cheese Corn

 I really enjoy cooking corn in the slow cooker. The corn keeps it’s light crunch, and all of the sweetness. Add a bit of roasted green chiles and cream cheese and you have a truly fantastic side dish.
Course Side
Cuisine American
Keyword corn, crockpot, slow cooker
Prep Time 5 minutes
Cook Time 4 hours
Total Time 4 hours 5 minutes
Servings 8
Calories 104kcal
Author Mike

Equipment

Ingredients

Instructions

  • Place all ingredients into the slow cooker in the order listed.
  • Cook on high for 3-4 hours, stirring occasionally, until the cheese has melted.

Notes

Substitute jalapenos for the chiles for a nice kicked-up version.

Nutrition

Calories: 104kcal | Carbohydrates: 17g | Protein: 3g | Fat: 4g | Saturated Fat: 2g | Trans Fat: 1g | Cholesterol: 8mg | Sodium: 78mg | Potassium: 180mg | Fiber: 2g | Sugar: 4g | Vitamin A: 330IU | Vitamin C: 4mg | Calcium: 12mg | Iron: 1mg

Nutritional values are approximate.

Campfire Burgers

Wow, talk about a burger that just rocketed to the top of our favorite-to-make list. These campfire burgers are just packed with flavor, inside and out. The patties are not boring, combining ground beef with cheese, bacon, Worcestershire sauce and just a hint of smokiness. And then there’s the caramelized onions. Caramelized onions are a wonderful thing but adding balsamic vinegar to them makes them spectacular. And finally, a lightly smoky creamy sauce to top it all off. These burgers are messy, which keeps with my motto: messier is better.

Campfire Burgers

Make Extra Onions. And Sauce.

I recommend making more of the onions than the recipe for these campfire burgers calls for. As in doubling it. On the off-chance that you have leftover onions they are also fantastic on grilled hot dogs. I also recommend making more of the sauce. It’s great to have on hand for, well, hot dogs again, but also po boy sandwiches or even as a dipping sauce for chicken nuggets.

I like to use a burger press when I make burgers. It, in combination with some patty papers, enables me to crank out a whole bunch of equally-sized burger patties in no time at all with little cleanup.

Also try my chili crunch burgers.

Campfire Burgers
Print Pin
5 from 1 vote

Campfire Burgers

These campfire burgers are just packed with flavor, inside and out. The patties are not boring, combining ground beef with cheese, bacon, Worcestershire and just a hint of smokiness.
Course Main
Cuisine American
Keyword burgers
Prep Time 15 minutes
Cook Time 40 minutes
Total Time 55 minutes
Servings 4 burgers
Calories 643kcal

Ingredients

For the Caramelized Onions

For the Campfire Sauce

For the burgers

Instructions

For the Caramelized Onions

  • Heat the oil in large skillet over medium heat.
  • Add the onions and sprinkle with salt.
  • Toss to coat and cook for 20 minutes, stirring often, until the onions are brown and caramelized.
  • Add the balsamic vinegar, stir, and cook for 2 more minutes. Remove from heat.

For the Campfire Sauce

  • Whisk all ingredients until smooth.

For the burgers

  • Fire up your grill for direct and indirect cooking.
  • Place meat into a large bowl.
  • Add all of the remaining ingredients except for the buns and mix well.
  • Form into 4 equally-sized patties.
  • Grill as desired.
  • Assemble the burgers by adding cooked patties to the bun bottoms. Add onions and plenty of the Campfire sauce.

Notes

Serve with plenty of napkins!

Nutrition

Calories: 643kcal | Carbohydrates: 36g | Protein: 28g | Fat: 42g | Saturated Fat: 14g | Trans Fat: 1g | Cholesterol: 101mg | Sodium: 1071mg | Potassium: 559mg | Fiber: 2g | Sugar: 14g | Vitamin A: 143IU | Vitamin C: 5mg | Calcium: 175mg | Iron: 4mg

Nutritional values are approximate.

Beer-Can Cabbage on the Char-Broil Big Easy

Note: This recipe was developed using the Char-Broil Big Easy Oil-Less Fryer. If you are cooking using the Char-Broil Smoker-Roaster Grill you should cook with the lid open and the temperature set to High. You might also need to adjust the cooking time.

I’m a big fan of making beer-can chicken. I end up with tender, moist flavor-packed chicken every time. That’s why I was so intrigued with the idea of making beer-can cabbage on the Char-Broil Big Easy. Just like with chicken, the cabbage came out tender and tasty. Absolutely perfect, chopped and mounded on top of a pulled pork sandwich.

Beer-Can Cabbage on the Char-Broil Big Easy

Amaze Your Friends. And Yourself.

I used a head of purple cabbage to make my beer-can cabbage on the Char-Broil Big Easy. You want to make sure you get one that is big enough to hold a beer can. The can doesn’t have to fit entirely inside of the cabbage, but you want it to go at least three inches. The hardest part of making beer-can cabbage is definitely the process of hollowing out the center of the cabbage. You don’t want to hollow out too much, so be careful.

Choosing Your Beer

Of course, the stronger the beer, the stronger the beer flavor will be in the cooked cabbage. I used a very light American beer. Since I was using the cabbage on a pulled pork sandwich I didn’t want something overwhelming.

It’s always a good idea to keep a few spare grease trays on hand for your Char-Broil Big Easy.

Also try my more-traditional beer-can chicken on the Char-Broil Big Easy.

Love your Big Easy as much I love mine? Check out my Big Easy Add-Ons page and my free Big Easy eCookbook!

Beer-Can Cabbage on the Char-Broil Big Easy
Print Pin
4 from 1 vote

Beer-Can Cabbage on the Char-Broil Big Easy

Absolutely perfect, chopped and mounded on top of a pulled pork sandwich.
Course Side
Cuisine American
Keyword Big Easy, cabbage, Char-Broil
Prep Time 10 minutes
Cook Time 1 hour 15 minutes
Total Time 1 hour 25 minutes
Servings 1 cabbage
Calories 380kcal
Author Mike

Ingredients

Instructions

  • Fire up your Big Easy.
  • Cut out the core of the cabbage.
  • Open beer. Drink half and then place the can in the holder, if using.
  • Using a spoon, carve out enough of the center of the cabbage so that the beer can (and holder) fit at least halfway inside the cabbage
  • Insert the beer can.
  • Rub the outside of the cabbage with a little bit of oil, then sprinkle with salt and pepper.
  • Transfer to the Big Easy basket and lower into the cooker.
  • Cook for 1 hour or until tender. (Test by carefully inserting a skewer).
  • Carefully remove the basket from the Big Easy. You don’t want to spill the hot beer on yourself.
  • Let cool for 15 minutes before removing the cabbage to chop or slice as desired.

Notes

You’ll want to use a beer can chicken holder to help keep the cabbage from falling over.

Nutrition

Calories: 380kcal | Carbohydrates: 65g | Protein: 13g | Fat: 1g | Saturated Fat: 1g | Sodium: 178mg | Potassium: 1640mg | Fiber: 23g | Sugar: 29g | Vitamin A: 890IU | Vitamin C: 332mg | Calcium: 377mg | Iron: 4mg

Nutritional values are approximate.

Crab-Stuffed Shrimp

I wanted to seriously up my cooking game. I figured (correctly) that a stop at our local fish mongers, Caplinger’s, would inspire me even more. And so I set off to make crab-stuffed shrimp on the grill. Large shrimp are butterflied, the meat separated from the shells but still connected, and then stuffed with an absolutely delightful mixture of crab and seasonings that reminds me very much of crab cake. I cooked the shrimp over charcoal in a cast-iron skillet, giving the shrimp a light smoky flavor. The end result was out-of-this-world delicious.

Crab-Stuffed Shrimp

Big Shrimp. Little Shrimp.

For appetizer-sized crab-stuffed shrimp use smaller shrimp, like the 16 count shrimp I used. For main dishes, get some 6-8 count shrimp. The larger the shrimp the easier they are to butterfly and the easier it is to separate the meat from the shell, which is definitely the most difficult part of making these shrimp. The rest is easy peasy.

As I sit here and remember just how fantastic the crab stuffing was in these shrimp, I recall back to the best crabcakes I’ve ever had, at Timbuktu’s in Hanover, Maryland. Their crabcakes have the largest and most delicious chunks of crab in them… mmmmmm….

Also try my delicious Buffa-Que shrimp.

Crab-Stuffed Shrimp
Print Pin
5 from 1 vote

Crab-Stuffed Shrimp

Large shrimp are butterflied, the meat separated from the shells but still connected, and then stuffed with an absolutely delightful mixture of crab and seasonings that reminds me very much of crab cake. 
Course Main
Cuisine American
Keyword shrimp, stuffed
Prep Time 20 minutes
Cook Time 20 minutes
Total Time 40 minutes
Servings 4 servings
Calories 674kcal

Ingredients

  • 1 pound shrimp jumbo, 6-8 count (I used smaller, 16 count shrimp)
  • ½ pound unsalted butter plus more for the skillet
  • ½ sweet onion chopped
  • 2 cloves garlic minced
  • 1 ½ sleeves Ritz crackers crumbled
  • 2 slices white bread crusts removed, cubed
  • ½ teaspoon Old Bay seasoning
  • parsley chopped
  • kosher salt to taste
  • ground black pepper to taste
  • 2 tablespoons mayonnaise plus more if needed
  • ½ pound lump crab
  • 1 lemon halved

Instructions

  • Fire up your grill for two zone (direct and indirect cooking). Alternatively, you can cook these shrimp in the oven at 350 F.
  • Cut a slit down the backs of the shrimp. Do not cut all the way thru.
  • Butterfly the shrimp and remove the vein.
  • Separate the shell from the meat but do not remove it. The shell will still be attached at the tail, but the meat will not be attached to the shell.
  • Lightly butter a 7″ cast iron skillet. Add the shrimp, butterflied side up.
  • Melt 1/2 pound of butter in a large skillet over medium-high heat.
  • Add the onion and cook for 5 minutes.
  • Reduce the heat to low and add the garlic and cook for 1 more minute. Remove from heat.
  • Crumble the crackers into a large bowl. Add the bread, Old Bay seasoning, parsley and salt and pepper to taste. Mix well.
  • Add most of the melted butter. Do not add any of the onion or garlic, you just want to add the liquid.
  • Mix and add the mayonnaise. Try to squeeze the mixture together. If it holds together, it’s ready. If it’s too dry add more of the melted butter and a little bit of mayonnaise and mix and try again. Keep adding more butter/mayonnaise until the mixture holds together.
  • Lightly chop the crab and fold into the cracker mixture.
  • Working in batches, squeeze a tablespoon or two of the stuffing into a small log shape and place inside the butterflied shrimp. Don’t be shy with the stuffing, you’ll have plenty.
  • Place over indirect heat or in the oven and cook 20 minutes or until the shrimp is done. The shrimp will be pink in color on the outside and the flesh is opaque. If cooking on the grill rotate your skillet once to achieve consistent cooking.
  • Place the lemon halves over direct heat on the grill and grill until seared. If cooking in the oven, just use the halves as is – don’t cook them.
  • Remove skillet and serve with lemon wedges.

Notes

It may seem like a lot of recipe steps, but it’s pretty straightforward and the results are delicious!

Nutrition

Calories: 674kcal | Carbohydrates: 13g | Protein: 36g | Fat: 54g | Saturated Fat: 30g | Trans Fat: 2g | Cholesterol: 434mg | Sodium: 1475mg | Potassium: 330mg | Fiber: 2g | Sugar: 4g | Vitamin A: 1448IU | Vitamin C: 25mg | Calcium: 258mg | Iron: 4mg

Nutritional values are approximate.

Smoked Pork Shanks

Sometimes what you think might be a mistake can end up being one of the best things that you have ever done. I ordered some pork shanks from our local butcher. My goal was to make pork wings, which are made from the shank. Well, I didn’t explain myself correctly and what I ended up with was a big bag of shanks that had been cut in half, which definitely weren’t going to work for pork wings.

After a quick glance around the web and I found tons of great recipes for braising shanks. I also found the idea of smoking them and using them in the place of smoked hocks. Now that’s an idea I can get excited about because I love hocks and beans. Smoked pork shanks to the rescue!

Smoked Pork Shanks

Amazing For Flavoring Soups And Beans

So I took 8 of the shanks (trust me, I have plenty more), brined them for a while and then smoked them. The end result was tender, perfectly smoky-flavored shanks that were amazing in a big pot of beans.

I wouldn’t hesitate at all to get more shanks from my butcher for no other reason than to smoke them. They’ll be great this fall and winter in soups and stews.

I prefer to use fruit or nut woods when I smoke unless I want a heavier smoke flavor. Pecan, apple or cherry are my favorites. I used pecan for these shanks.

Smoked pork shanks also fit in well with my ‘no empty space on the smoker’ rule. That rule states that if you’re going to fire up your smoker you must use up all available room. No point in wasting smoke. Shanks are the perfect size for using up valuable smoker grate space in my opinion.

Also try my homemade tasso ham.

Smoked Pork Shanks
Print Pin
5 from 1 vote

Smoked Pork Shanks

I took shanks, brined them for a while and then smoked them. The end result was tender, perfectly smoky-flavored shanks that were amazing in a big pot of beans.
Course Main
Cuisine American
Keyword pork, smoked
Prep Time 3 days 1 hour
Cook Time 5 hours
Total Time 3 days 6 hours
Servings 8 shanks
Calories 102kcal

Equipment

Ingredients

For the smoke pork shanks

  • 4 pork shanks Cut in half. Ask your butcher to cut them for you, so you'll end up with 8 smoke shanks in the end

For the brine

Instructions

For the brine

  • Combine all ingredients in a large pot over medium-high heat.
  • Bring the water to a simmer and stir until the salt is dissolved.
  • Remove from heat and let cool completely.
  • Place shanks into a large resealable container.
  • Add the marinade. Seal and refrigerate for 1-3 days.

For the smoked pork shank

  • Rinse with water and place in cold water for 1 hour..
  • Fire up your smoker for cooking at 225 F. I used hickory wood and added a few more chunks than I normally would for say ribs so that I got a good strong smoke flavor in the shanks.
  • Remove the shanks from the brine and pat dry.
  • Transfer to the smoker and smoke for 3-5 hours until the internal temperature reaches 160 F.

Notes

This recipe can also be used to make fantastic smoked ham hocks.

Nutrition

Calories: 102kcal | Carbohydrates: 26g | Protein: 1g | Fat: 1g | Saturated Fat: 1g | Cholesterol: 1mg | Sodium: 9456mg | Potassium: 21mg | Fiber: 1g | Sugar: 25g | Vitamin A: 23IU | Vitamin C: 1mg | Calcium: 34mg | Iron: 1mg

Nutritional values are approximate.

Beer Can Chicken Jambalaya

I made a lot, and I do mean a lot, of beer can chickens on my Char-Broil Big Easy last weekend. So, I had a good amount of chicken on hand. That got me to thinking beer can chicken jambalaya. I took the classic jambalaya recipe from Chef John Folse and used my tender, incredibly flavorful beer can chicken instead of browned fresh chicken.

Beer Can Chicken Jambalaya

Deliciousness In Every Bite

There’s no loser in this beer can chicken jambalaya, but for me the winner is the rice (well, and me for getting to eat it). It absorbs flavors from the vegetables and meats and broth and spices and turns out just flat-out incredible. This is one rich, tasty dish. I make this often because it seems I often have leftover beer can chicken.

You can add shrimp to this jambalaya if you want, but I prefer mine without it. It’s hard to re-heat shrimp leftovers without them becoming way too tough. This recipe makes a big, big batch. Since there’s only two of us I was guaranteed to have leftovers and then some.

Also try my copycat of Zatarain’s jambalaya.

Beer Can Chicken Jambalaya
Print Pin
5 from 1 vote

Beer Can Chicken Jambalaya

I took the classic jambalaya recipe from Chef John Folse and used my tender, incredibly flavorful beer can chicken instead of browned fresh chicken.
Course Main
Cuisine American
Keyword jambalaya
Prep Time 15 minutes
Cook Time 1 hour 30 minutes
Total Time 1 hour 45 minutes
Servings 16
Calories 551kcal

Equipment

Ingredients

  • 2 tablespoons vegetable oil
  • 2 pounds smoked sausage sliced
  • 2 cups onion diced
  • 2 cups celery diced
  • 1 cup green bell pepper diced
  • ½ cup garlic minced
  • 8 cups chicken stock
  • 3 pounds cooked beer can chicken shredded or cubed
  • 2 cups mushrooms sliced
  • 1 cup green onions sliced
  • ½ cup parsley chopped
  • kosher salt to taste
  • cayenne pepper I used 2-3 tablespoons, to taste
  • hot sauce I used 1/4 cup or more, to taste
  • 5 cups rice uncooked

Instructions

  • Heat oil in a very large (7 quart or larger) Dutch oven.
  • Add the sausage and brown lightly on all sides. Remove.
  • Add the onion, celery, and bell pepper. Saute for 5 minutes.
  • Add the garlic and cook another minute.
  • Add the stock. Bring to a boil and reduce to a simmer and continue simmering for 15 minutes.
  • Add the chicken, reserved smoked sausage, mushrooms, green onions, parsley, salt, cayenne pepper and hot sauce.
  • Cover and simmer another 15 minutes.
  • Add the rice, reduce heat to low, cover and cook for 45 minutes or until the rice is tender, stirring every 15 minutes.

Notes

This dish is even better using andouille sausage!

Nutrition

Calories: 551kcal | Carbohydrates: 57g | Protein: 23g | Fat: 25g | Saturated Fat: 9g | Trans Fat: 1g | Cholesterol: 74mg | Sodium: 698mg | Potassium: 538mg | Fiber: 2g | Sugar: 4g | Vitamin A: 373IU | Vitamin C: 15mg | Calcium: 54mg | Iron: 2mg

Nutritional values are approximate.