Beef Summer Sausage

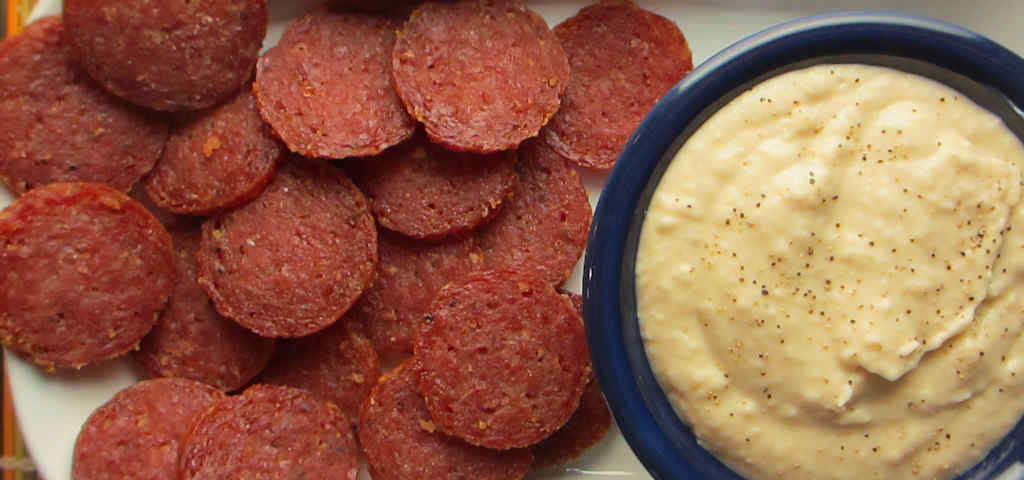
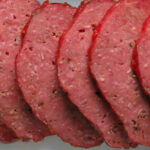
Well, hot diggity dog! Get me some cheese and crackers and get them fast! This beef summer sausage came out tasting fantastic! Perfect texture, too. Boy, I could not have been happier with it. For my first time (of many) this was one of the best things I’ve ever made! I’m just giddy as can be! Great beefy flavor with a hint of smoke and pepper.

Beef Summer Sausage

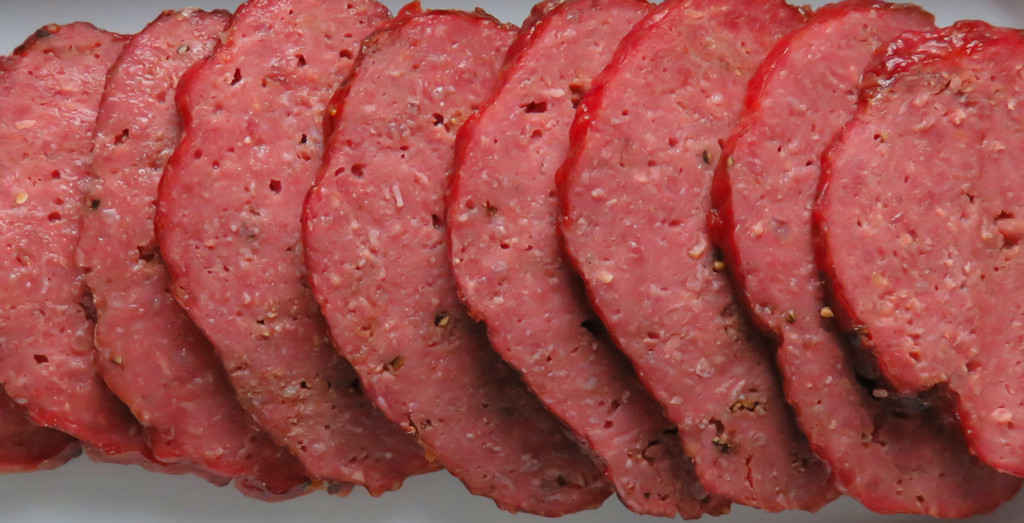
This Is One Tasty Summer Sausage

I made my beef summer sausage ‘log’ a bit bigger round than I had thought, close to 2 inches. Not that that was a bad thing, but next time I’ll shoot for a size that fits more perfectly onto a cracker. A little meaty overhang isn’t a bad thing, mind you.

And I might add a bit of heat next time. I’m thinking that a few good sized pinches of red pepper flake ought to do it!

Also try my homemade Italian sausage. I love serving smoked sausage with my Sriracha mustard dipping sauce.

Beef Summer Sausage
Print Pin
5 from 1 vote

Beef Summer Sausage

Well, hot diggity dog! Get me some cheese and crackers and fast! This beef summer sausage came out tasting fantastic! Perfect texture, too. 
Course Appetizer
Cuisine American
Keyword beef, sausage
Prep Time 5 minutes
Cook Time 16 hours
Total Time 16 hours 5 minutes
Servings 1 pound
Calories 2304kcal

Ingredients

  • 2 pounds ground beef the leanest you can find, preferably
  • 2 tablespoons Morton's Tender Quick
  • 1 tablespoon liquid smoke
  • 1 teaspoon smoked black pepper or use regular black pepper and add a bit more Liquid Smoke
  • 1 teaspoon garlic salt

Instructions

  • Place the meat into a bowl and add the Tender Quick. Mix well. Cover and refrigerate overnight.
  • The next day, start by preheating your oven to 225 F.
  • Add the Liquid Smoke, pepper and garlic salt to the meat and mix very well.
  • Divide the meat into two equally-sized halves and form into logs.
  • Transfer to a baking sheet and bake for 4 hours.
  • Remove and let cool completely before slicing thin and serving with sliced cheeses and crackers.

Notes

Refrigerate any leftovers.

Nutrition

Calories: 2304kcal | Protein: 156g | Fat: 181g | Saturated Fat: 70g | Trans Fat: 11g | Cholesterol: 644mg | Sodium: 2967mg | Potassium: 2450mg | Calcium: 165mg | Iron: 18mg

Nutritional values are approximate.

Salami Chips with White Bean Dip

Salami chips with a white bean dip are a dangerously tempting thing. Crunchy meaty yummy. It’d be difficult to make them even taste even better, but you can by serving them with a roasted garlic white bean dip. The creamy dip (almost like a hummus) complements the salami perfectly. This makes for a great easy appetizer or snack for the big game. Whomever said that you can’t have a super-meaty appetizer was wrong. Actually, I don’t know if anyone ever said that. Someone probably did at some point. And they were wrong!

Salami Chips with White Bean Dip

Remove The Casing

Most grocery stores sell a variety of different styles of salami. Grab a few different flavors and mix them up on the plate of salami chips with white bean dip. Many salamis have a very thick casing, which not all people enjoy. You can remove it quite easily after slicing the salami thin. I just use a small pairing knife to get it started then pull it off with my fingers.

I like my dip to be fairly smooth but not creamy. If you like yours to be smoother, just process it a bit longer in your food processor. Don’t go crazy. Process just a bit at a time. Remember you can process it longer, but you can’t un-process it!

Also try my smoked glazed salami.

Salami Chips with White Bean Dip
Print Pin
4 from 1 vote

Salami Chips with White Bean Dip

Salami chips with a white bean dip are a dangerously tempting thing. Crunchy meaty yummy. It’d be difficult to make them even better, but you can by serving them with a roasted garlic white bean dip.
Course Appetizer
Cuisine American
Keyword beans, dip, salami
Prep Time 10 minutes
Cook Time 1 hour
Total Time 1 hour 10 minutes
Servings 4 servings
Calories 138kcal
Author Mike

Ingredients

For the white bean dip

For the salami chips

  • 4 ounces salami sliced thin

Instructions

For the white bean dip

  • Pre-heat oven to 375 F.
  • Cut top off the garlic and drizzle with 1 teaspoon of the olive oil.
  • Wrap in foil and place in oven for 40-45 minutes or until soft.
  • Remove and let cool slightly.
  • Squeeze garlic from the cloves and add to a food processor.
  • Add remaining ingredients and puree until smooth. Add more water if the mixture is too thick.
  • Serve with the salami chips.

For the salami chips

  • Place salami on a parchment-lined baking sheet or on a rack over a baking sheet.
  • Bake for 10-15 or until starting to crisp and curl at the edges.
  • Remove and let cool and crisp more.

Notes

The technique also works on other dried meats, even pepperoni!

Nutrition

Calories: 138kcal | Carbohydrates: 3g | Protein: 7g | Fat: 11g | Saturated Fat: 4g | Cholesterol: 22mg | Sodium: 900mg | Potassium: 145mg | Fiber: 1g | Sugar: 1g | Vitamin A: 30IU | Vitamin C: 4mg | Calcium: 21mg | Iron: 1mg

Nutritional values are approximate.

Homemade Gummy Bears

Oh my, how much fun were these homemade gummy bears to make and eat! They have the same texture as store-bought gummy bears. Packed with flavor. Some gummy bears were ‘normal’. Some I added a bit of citric acid to make them nice and sour!

I purchased a few gummy bear molds from Amazon (you can see the link below the recipe). The molds came with droppers that made filling the molds much easier. You’ll still make a little mess, get a bit of the gelatin on top of the molds and not in them, but that’s ok. They clean up easily and you’ll have great looking homemade gummy bears!

Homemade Gummy Bears

The No Bubble Zone

The only thing you have to watch for when filling the molds is air bubbles. You don’t want bubbles to form or your candies won’t look as fancy. They’ll still taste great, of course, but you want them to be pretty too! When filling the dropper make sure you get only liquid and not air or any of the bubbles that tends to form on top. If you do get bubbles I’ve found that you can usually pop them using the tip of the dropper.

A Little Bit Of Sour

The citric acid adds just a bit of sour flavor, but the candies will not be overly sour. I started by adding 1/8 teaspoon of citric acid and found it barely detectable. A 1/4 teaspoon amount is about right for me. If you want your gummy bears super sour you might want to try 1/2 or even 3/4 teaspoon.

Here’s how one of my molds looked after being filled. The recipe below will make 120 (more or less) gummy bears. Be sure that you have room in your freezer for 3 of the molds before starting.

homemade-gummy-bears-mold

I also love making homemade Jolly Rancher lollipops and Cheezit crackers.

Homemade Gummy Bears
Print Pin
5 from 1 vote

Homemade Gummy Bears

Oh my, how much fun were these homemade gummy bears to make and eat! They have the same texture as store-bought gummy bears. Packed with flavor. 
Course Snack
Cuisine American
Keyword candy, homemade
Cook Time 30 minutes
Total Time 30 minutes
Servings 1 servings
Calories 18kcal
Author Mike

Ingredients

Instructions

  • Place the water in a small saucepan.
  • Add the gelatin packages and citric acid if using.
  • Set heat to medium low and stir.
  • Continue heating for 15 minutes, stirring slowly to ensure that the gelatin dissolves.
  • Use a large eyedropper to transfer the liquid to the silicon molds.
  • Place in freezer for 10-15 minutes or until the gelatin has set.
  • Remove and serve.

Notes

Store candies in the fridge until ready to serve.
This recipe makes around 120 gummy bears.

Nutrition

Calories: 18kcal | Carbohydrates: 1g | Protein: 3g | Sodium: 16mg | Potassium: 1mg | Sugar: 1g | Calcium: 5mg | Iron: 1mg

Nutritional values are approximate.

Cola Milkshake

Coke in a milkshake??? That’s what I was thinking. But then I saw the light. This cola milkshake was fantastic. Easy, of course. The soda adds a malt-like flavor, which I didn’t expect. I guarantee that this milkshake disappeared a lot quicker than it took to make.

I used decaf diet Coke. You don’t want a strong-flavored soda that would overwhelm the ice cream flavors. Regular Coke would work perfectly as well. This cola milkshake is somewhat reminiscent of a float, but with all the flavors in a creamy shake.

Cola Milkshake

I’m A Kid Again!

I love making and drinking milkshakes. They remind me of my days as a kid when I could drink as many of them as I could find. I have to exercise a bit more control now, but I still enjoy them.

We often make ice cream at home. It’s really easier than I ever thought it would be. We got an inexpensive maker that more than does the job.

Try my chocolate with Nutella, maple bacon (yes, bacon), and old fashioned malted milkshakes.

Cola Milkshake
Print Pin
5 from 1 vote

Cola Milkshake

 This cola milkshake was fantastic. Easy, of course. The soda adds a malt-like flavor, which I didn’t expect. I guarantee that this milkshake disappeared a lot quicker than it took to make.
Course Dessert
Cuisine American
Keyword milkshake
Prep Time 10 minutes
Total Time 5 minutes
Servings 2
Calories 456kcal

Equipment

Ingredients

  • 4 scoops vanilla ice cream
  • 2 scoops chocolate ice cream
  • ½ cup Coke cold (I used Diet decaf Coke)
  • ¼ cup whole milk

Instructions

  • Place all ingredients into a blender and process until somewhat smooth but still a little chunky.

Notes

Try this using Cherry Coke too!

Nutrition

Calories: 456kcal | Carbohydrates: 57g | Protein: 8g | Fat: 23g | Saturated Fat: 14g | Cholesterol: 83mg | Sodium: 171mg | Potassium: 467mg | Fiber: 2g | Sugar: 52g | Vitamin A: 878IU | Vitamin C: 1mg | Calcium: 276mg | Iron: 1mg

Nutritional values are approximate.

Buffalo Chicken Dip

My wife and I recently visited Scotty’s Brewhouse, in West Lafayette, Indiana (which sadly, is now closed). Before dinner we decided to try an appetizer, the 7 Tidals Buffalo chicken dip. One bite in and we both agreed that I had to make the same dip at home. My version is close, very close. And it’s crazy good. Not terribly hot or spicy, just right actually.

Buffalo Chicken Dip

Blue Cheese. Or Not.

To match Scotty’s Buffalo chicken dip you’ll want to also add a few small crumbles of blue cheese to the cream cheese mixture. We found the dip to be fantastic without it. You can also substitute a blue cheese dressing for the Ranch for more blue cheese flavor. And for extra kick, add a few drops (ok, more than a few drops) of hot sauce to the Frank’s wing sauce.

Also try my Buffalo wing hummus, Buffalo queso dip (oh yes!) and my beef enchilada dip (yum!).

Buffalo Chicken Dip
Print Pin
4 from 1 vote

Buffalo Chicken Dip

Crazy good. Not terribly hot or spicy, just right actually.
Course Appetiser
Cuisine American
Keyword Buffalo, chicken, dip
Prep Time 5 minutes
Cook Time 1 hour
Total Time 1 hour 5 minutes
Servings 12 servings
Calories 246kcal

Ingredients

  • 1 ½ pounds chicken breasts boneless skinless, 1 very large breast or 2 medium
  • 12 ounce Frank’s RedHot Sauce
  • 8 ounces cream cheese softened
  • 1 cup Ranch dressing the better the dressing the better the dip will be
  • ½ cup celery chopped
  • ½ cup extra sharp cheddar cheese shredded
  • Tortilla chips celery sticks, carrots, for serving

Instructions

  • Preheat your oven to 375.
  • Spray a 9″ x 9″ baking dish with non-stick spray.
  • Bring a large saucepan of water to a boil. Add the chicken and poach until cooked, 10-15 minutes depending on how thick the chicken is.
  • Remove and let cool slightly then shred with a fork.
  • Transfer chicken to a large bowl and add the entire bottle of wing sauce. Stir to combine well.
  • Pour the chicken into the baking dish and spread out evenly.
  • Add the cream cheese and Ranch dressing to a medium saucepan over medium heat. Stir until the cheese is melted, then whisk until smooth.
  • Pour the cheese mixture over the chicken and spread out evenly.
  • Sprinkle top with the celery.
  • Bake for 15 minutes.
  • Sprinkle top with cheese and bake another 10 minutes until hot and bubbly.
  • Remove and let rest for 10 minutes before serving.

Notes

Substitute pepper jack or habanero jack for an even spicier version.

Nutrition

Calories: 246kcal | Carbohydrates: 2g | Protein: 15g | Fat: 20g | Saturated Fat: 7g | Trans Fat: 1g | Cholesterol: 69mg | Sodium: 380mg | Potassium: 264mg | Fiber: 1g | Sugar: 1g | Vitamin A: 345IU | Vitamin C: 1mg | Calcium: 63mg | Iron: 1mg

Nutritional values are approximate.

Fiesta Tortilla Wrap Bites

A few times a year my wife and I take a drive down to the Exit 76 Antique Mall in Edinburgh, Indiana. About 30 minutes or so south of Indianapolis, the mall is stuffed with tons and tons of antiques, collectibles, arts, crafts, toys… just about anything you can imagine. To maximize our browsing time I like to pack quick and easy lunches, like these Fiesta tortilla wrap bites. They’re easy to make but full of flavor. And they travel well.

Fiesta Tortilla Wrap Bites

Perfect Meal For That Day Trip

The antique mall has a little sitting area. They have tables that are perfect for grabbing a bite to eat before antiquing. The area used to be a Subway, years ago.

The filling used in these wraps can be used for other treats too. Like for topping cut cucumbers, or as a dip. It’d also be great as the filling for a grilled cheese sandwich. Or on top of hot dogs. It’s great stuff.

I highly recommend that you shred or grate your own cheese at home. Don’t buy the pre-shredded or pre-grated stuff. It has stuff added to it to keep it from sticking together. That ‘stuff’ affects how the cheese melts. Shred it yourself and use the good stuff.

Also try my grilled chicken wrap with southwestern dipping sauce.

Fiesta Tortilla Wrap Bites
Print Pin
4 from 1 vote

Fiesta Tortilla Wrap Bites

Easy to make but full of flavor. And they travel well.
Course Appetizer
Cuisine American
Keyword southwestern, wraps
Prep Time 15 minutes
Cook Time 2 hours
Total Time 2 hours 15 minutes
Servings 30 bites
Calories 80kcal
Author Mike

Equipment

Ingredients

Instructions

  • Place all ingredients except for the tortillas in a large bowl and mix well.
  • Divide mixture between the tortillas.
  • Tightly roll the tortillas and wrap in plastic wrap.
  • Refrigerate for 2-8 hours to let the wraps set up then slice as desired.

Notes

Add a little minced jalapeno for a nice kick.

Nutrition

Calories: 80kcal | Carbohydrates: 5g | Protein: 2g | Fat: 6g | Saturated Fat: 3g | Cholesterol: 14mg | Sodium: 177mg | Potassium: 55mg | Fiber: 1g | Sugar: 1g | Vitamin A: 249IU | Vitamin C: 5mg | Calcium: 51mg | Iron: 1mg

Nutritional values are approximate.

Buffalo Wing Hummus

If you follow this blog you know that I’m a lover of all things Buffalo-wing-flavored. From wraps to pizza to cauliflower. And of course, chicken wings! I’m not picky as long as it has that great vinegary heat with a hint of butter. So why wouldn’t I make Buffalo wing hummus? Yep, smooth hummus with that sneak-up-on-you spicy classic flavor. Perfect and as an added bonus it was a big hit at our last family get-together. As much as I liked it, I can’t say I was expecting such high praise for it! It was a happy day for sure!

Buffalo Wing Hummus

A Different Tasting Hummus

There’s nothing wrong with dipping pita bread in this Buffalo wing hummus, but since there’s wing flavors in there, don’t forget to have some celery and carrot sticks around too. Just to keep it ‘classic’.

It’s up to you to decide how chunky or creamy you want your hummus to be. If this is your first time making it I suggest that you start out slow. Process it in your food processor just a bit and take a taste. Want it creamer? Keep going. Error on the side of caution, though. You can’t un-process it!

Also try my Buffalo chicken dip.

Buffalo Wing Hummus
Print Pin
5 from 1 vote

Buffalo Wing Hummus

Yep, smooth hummus with that sneak-up-on-you spicy flavor. Perfect and a big hit at our last family get-together.
Course Appetizer
Cuisine American
Keyword Buffalo, hummus
Prep Time 5 minutes
Cook Time 5 minutes
Total Time 10 minutes
Servings 4 cups
Calories 315kcal

Ingredients

Instructions

  • Place all ingredients plus 1/2 cup of the reserved chickpea liquid into a food processor.
  • Puree until very smooth. Add more reserved chickpea liquid as needed.
  • Serve with sliced carrots and celery and warmed pita chips.

Notes

I recommend using a BBQ sauce with no overwhelming flavors, such as hickory or fruits or one that is particularly spicy!

Nutrition

Calories: 315kcal | Carbohydrates: 43g | Protein: 14g | Fat: 11g | Saturated Fat: 1g | Sodium: 362mg | Potassium: 490mg | Fiber: 10g | Sugar: 9g | Vitamin A: 138IU | Vitamin C: 19mg | Calcium: 90mg | Iron: 4mg

Nutritional values are approximate.

No Carb Sherbet Pops

These no carb sherbet (er, sherbert as I was raised to call it) pops are proof that going low carb does not mean getting no flavor. Packed with your favorite gelatin flavor (in our case yummy raspberry), it’s the perfect treat for a hot day. Or cool day, as was the case here. I made pops, but you can also just pour the sherbet mixture into single-serve cups and freeze them.

The original recipe for no carb sherbet pops calls for using a small 4-serving box of gelatin, which is perfect. For double the flavor use the bigger 0.6 ounce box.

No Carb Sherbet Pops

Make Some For The Adults, Too

For an adult version, substitute wine or champagne for the club soda. If you don’t mind a few carbs add in some fruit before or after you puree the mixture.

I admit that any time I get to break out my popsicle molds I get all giddy. I know that fun times and good flavors are coming!

For another no-carb summer treat, try my sno-cones and my cherry Slurpee, which can also be made low-carb. My orange dreamsicle is fantastic, but sadly, not low-carb.

No Carb Sherbet Pops
Print Pin
5 from 1 vote

No Carb Sherbet Pops

These no carb sherbet (er, sherbert as I was raised to call it) pops are proof that going low carb does not mean getting no flavor. Packed with your favorite gelatin flavor (in our case yummy raspberry), it’s the perfect treat for a hot day. 
Course Dessert
Cuisine American
Keyword dessert
Prep Time 5 minutes
Cook Time 10 minutes
Total Time 15 minutes
Servings 6 pops
Calories 10kcal
Author Mike

Ingredients

  • 1 0.3 ounce flavored gelatin sugar-free. Use your favorite flavor. For extra flavor, use a 0.6 ounce box.
  • â…“ cup water boiling
  • 1 tablespoon heavy whipping cream
  • ½ teaspoon vanilla extract
  • â…“ cup club soda cold, plus more
  • 1 ½ cup ice crushed

Instructions

  • Place Jello-O into a medium-sized bowl.
  • Add the boiling water and stir until the Jell-O is dissolved.
  • Whisk in the heavy whipping cream, vanilla and 1/3 cup of soda water.
  • Place the ice into a blender.
  • Add the Jell-O mixture and puree until smooth. If the mixture is too thick add more club soda, a bit at a time.
  • Pour into popsicle molds and freeze until set.

Notes

You can substitute whole milk for the cream.

Nutrition

Calories: 10kcal | Carbohydrates: 1g | Protein: 1g | Fat: 1g | Saturated Fat: 1g | Cholesterol: 3mg | Sodium: 7mg | Potassium: 3mg | Sugar: 1g | Vitamin A: 37IU | Vitamin C: 1mg | Calcium: 4mg | Iron: 1mg

Nutritional values are approximate.

Nashville Hot Pickles

Ever since I made a crazy good batch of Nashville Hot Chicken I’ve been jonesin’ for that same great hot crunchy experience on other foods. Like fried pickles. Making these Nashville Hot Pickles was easy, and boy are they packed with a nice kick! I didn’t go the mild route with these, that’s for sure. And to make sure I kept the burn going I served the pickles with a habanero ranch sauce for dipping. If you like spicy, then you’ve come to the right place!

Nashville Hot Pickles

Crunchy And Spicy Perfection

You’re going to see other great dishes like this one for Nashville Hot Pickles here on Life’s A Tomato. I love that great crunchy breading and that fiery hot seasoning. Next up? I’m thinking chicken fingers! Or maybe nuggets! And maybe even chicken wings.

If I’m cooking for a crowd, I’ll break out my big deep fryer. But, if it’s just the two of us, I’ll fire up my Fry Daddy fryer. It’s the perfect size for both of us. It fries everything perfectly. And as an added bonus, it doesn’t use a lot of oil, which saves me money.

I get out my big deep fryer when it’s time to fry a large batch of food. It comes to temperature quickly and it maintains that temperature perfectly. It has a built-in oil filter and storage unit so I can re-use the oil several times.

Also try my jalapeno bottle caps and my copycat of Hooter’s fried pickles.

Print Pin
5 from 1 vote

Nashville Hot Pickles

Making these Nashville Hot Pickles was easy, and boy are they packed with a nice kick! I didn’t go the mild route with these, that’s for sure.
Course Appetizer
Cuisine American
Keyword deep-fried, pickles, spicy
Prep Time 10 minutes
Cook Time 30 minutes
Servings 16
Calories 91kcal
Author Mike

Ingredients

For the dip

  • 1 cup milk or buttermilk
  • 2 large eggs
  • 1 tablespoon hot sauce

For the dredge

For frying

For the spicy coating

For serving

Instructions

For the dip

  • Whisk together the milk, eggs and hot sauce in a pie pan or shallow bowl.

For the dredge

  • Whisk together the flour and salt in a pie pan or shallow bowl.

For frying

  • Heat a few inches of oil in a deep fryer or Dutch oven to 325 F.
  • Working in batches, dredge the pickles in the flour. Shake off excess.
  • Dip pickles into the milk mixture. Shake off the excess.
  • Return the pickles to the flour and dredge again. Shake off excess.
  • Transfer pickles to the hot oil and fry until golden brown, about 2 minutes.
  • Place on a rack to cool and drain.

For the spicy coating

  • When you’re done frying the pickles, ladle 1/3 cup of the hot oil into a small sauce pan and whisk in the spicy coating ingredients.
  • Brush mixture over the pickles. The more you brush on, the hotter it’ll be.

Notes

You can also serve the coating on the side, for dipping!

Nutrition

Calories: 91kcal | Carbohydrates: 16g | Protein: 4g | Fat: 1g | Saturated Fat: 1g | Trans Fat: 1g | Cholesterol: 25mg | Sodium: 578mg | Potassium: 115mg | Fiber: 1g | Sugar: 2g | Vitamin A: 357IU | Vitamin C: 6mg | Calcium: 38mg | Iron: 1mg

Nutritional values are approximate.

Deep-Fried Chickpeas

Roasted chickpeas just won’t stay crunchy for long. As they cool they get soft and mushy. Ewwwww! The only way to get really crunchy, really great chickpeas is to deep-fry them. Then hit them with your favorite seasonings. Kosher or sea salt and freshly ground black pepper are perfect. You don’t have to go crazy with them, you can keep them simple. Then devour.

Deep-Fried Chickpeas

Make Extra. They’ll Be Gone In No Time

I suggest you double the recipe when making these deep-fried chickpeas as you’ll eat half of them while you are finishing cooking the other half. They’ll stay crunchy longer than roasted peas, but they will get softer as time goes on. You won’t have to worry about that because they won’t last that long.

If I’m cooking for a crowd, I’ll break out my big deep fryer. But, if it’s just the two of us, I’ll fire up my Fry Daddy fryer. It’s the perfect size for both of us. It fries everything perfectly. And as an added bonus, it doesn’t use a lot of oil, which saves me money.

I get out my big deep fryer when it’s time to fry a large batch of food. It comes to temperature quickly and it maintains that temperature perfectly. It has a built-in oil filter and storage unit so I can re-use the oil several times.

Also try my Kale chips.

Deep-Fried Chickpeas
Print Pin
5 from 1 vote

Deep-Fried Chickpeas

The only way to get really crunchy, really great chickpeas is to deep-fry them. Then hit them with your favorite seasonings. 
Course Appetizer
Cuisine American
Keyword chickpeas, deep-fried
Prep Time 15 minutes
Cook Time 15 minutes
Total Time 30 minutes
Servings 4 servings
Calories 1kcal
Author Mike

Equipment

Ingredients

Instructions

  • Empty can into a sieve.
  • Rinse and drain well.
  • Dump beans out onto a kitchen towel or a few layers of paper towels.
  • Pat beans dry. Be thorough – they need to be as dry as possible.
  • Heat 1/2″ of oil in a Dutch oven to 325 F.
  • Working in batches, SLOWLY add the beans to the hot oil. The beans will most likely splatter, especially if they aren't very dry, so keep your face and hands back as you add them to the hot oil.
  • Fry for 4-5 minutes or until golden brown.
  • Remove to a paper towel-lined plate to drain.
  • Sprinkle with seasoning while they are still hot.
  • Serve hot or cooled.

Notes

Be very careful adding the peas to the hot oil!

Nutrition

Calories: 1kcal | Carbohydrates: 1g | Protein: 1g | Fat: 1g | Sodium: 1mg | Potassium: 1mg | Fiber: 1g | Sugar: 1g | Vitamin A: 1IU | Vitamin C: 1mg | Calcium: 1mg | Iron: 1mg

Nutritional values are approximate.