Note: This recipe was developed using the Char-Broil Big Easy Oil-Less Fryer. If you are cooking using the Char-Broil Smoker-Roaster Grill you should cook with the lid open and the temperature set to High. You might also need to adjust the cooking time.
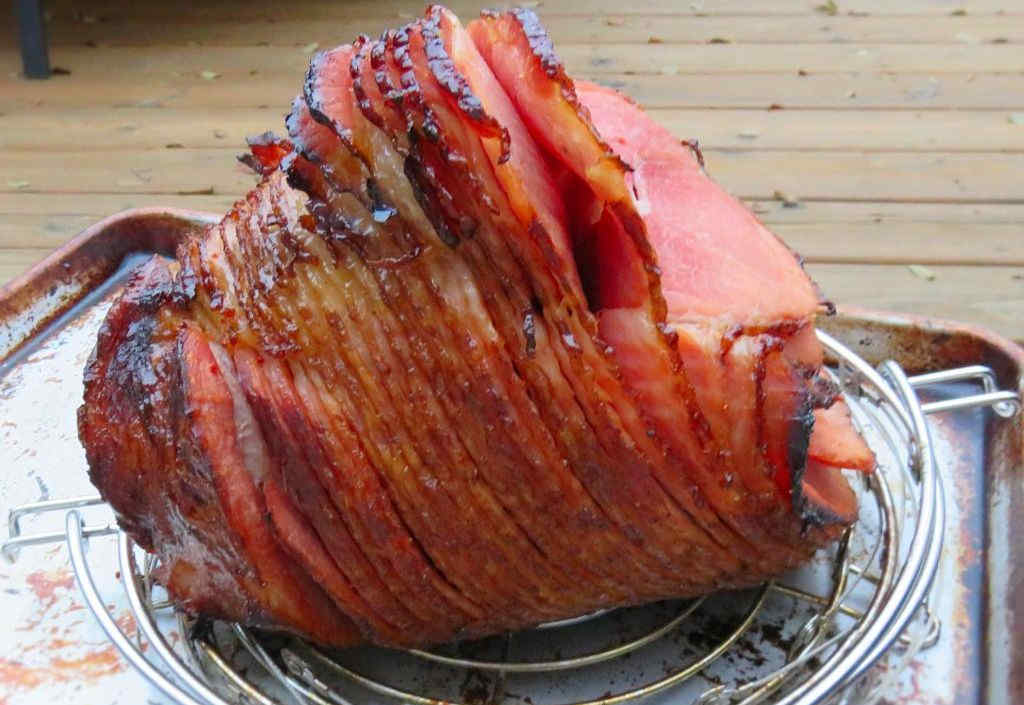
Yeah baby! Back up the truck to some fantastic ham flavor! This southern honey glazed ham, cooked up crazy good on my Char-Broil Big Easy, was the epitome of easy to make. Using the new Better Basket I was able to fit a 10 pound ham into my Big Easy with plenty of room to spare. The glaze adds a wonderful sweetness and elevates this ham way beyond just a plain ole pre-cooked spiral ham. Tender and moist with a nice little light crunch around the edges, this is my kind of yummy!
Don’t Buy The Biggest Ham In The Store!
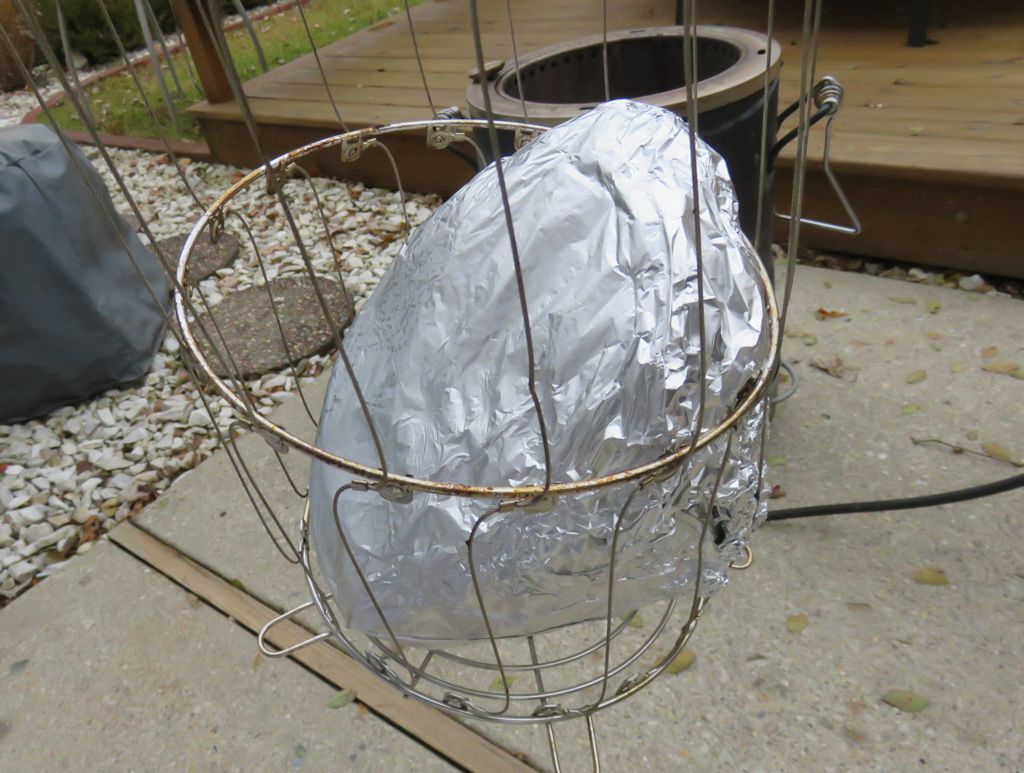
I just glazed the ham, wrapped it in foil, and let it ‘get happy’ on the Big Easy for 10 minutes per pound. As can be seen, the Better Basket made getting the ham in and out a breeze. You can certainly use the standard basket that comes with the Big Easy. You might have to use a little more elbow grease getting it in and out of the basket. Also be careful that you don’t get a ham that is bigger than your basket!
As Easy As It Can Get
Cooking (well, heating) a spiral ham on a Big Easy is super easy. Also try my spiral ham on the Big Easy. If you love that glaze, try my honey-glazed ham.
I’ve also included the recipe for my favorite ham gravy. Moreover, it has a nice pineapple flavor that compliments the ham perfectly. Just drizzle a bit over the sliced ham before serving.

It’s always a good idea to keep a few spare grease trays on hand for your Char-Broil Big Easy.

Love your Big Easy as much I love mine? Check out my Big Easy Add-Ons page and my free Big Easy eCookbook!

Southern Honey Glazed Ham on the Char-Broil Big Easy
Ingredients
- 8-10 pound ham bone-in spiral sliced cooked
For the glaze
- ½ cup honey
- ½ cup brown sugar
- ½ cup sweet tea brewed
- 1 tablespoon your favorite BBQ rub
- 1 tablespoon coarse ground mustard
- 1 tablespoon bourbon optional
- 1 tablespoon corn starch
- 1 tablespoon cold water
For the pineapple gravy
- ⅓ cup brown sugar
- 2 tablespoons cornstarch
- 1 cup pineapple juice
- 1 cup water
- 1 tablespoon unsalted butter
- 2 teaspoons apple cider vinegar
- Pinch kosher salt
Instructions
- Fire up your Big Easy.
- Remove the ham from the packaging and place on a large piece of foil. Place it like you would in the Big Easy basket. Larger hams will have to be stood on edge.
- Combine the honey, brown sugar, tea, rub, mustard and bourbon (if using) in a small saucepan over medium heat. Bring to a slow boil and let simmer for 10 minutes or until reduced by a third.
- In a small glass combine the corn starch and water. Slowly whisk the mixture into the glaze. Continue whisking until thick.
- Brush half of the glaze over the ham. Seal tightly in the foil, leaving the seam at the top for easy access later. Transfer to the Big Easy and cook (heat) for approximately 10 minutes per pound or until the ham reaches 145 F as tested in several places.
- Remove the basket from the Big Easy and carefully remove the foil. It’s ok if you don’t remove the foil under the ham, just remove it from the top and sides. The Better Basket makes this very easy to do. With the regular basket you’ll need to be very careful not to burn yourself on the basket, or remove the ham first to un-foil it.
- Brush the ham with the remaining glaze and return to the Big Easy, un-foiled, for 10-15 minutes more to set the glaze.
- Remove the basket from the Big Easy. Carefully remove the ham to a cutting board and cover with foil. Let rest at least 15 minutes before slicing.
For the pineapple gravy
- Whisk together the brown sugar and cornstarch in a large bowl.
- Whisk in the pineapple juice and water.
- Add to a medium saucepan. Bring to a slow boil over medium heat, stirring constantly until thick.
- Remove from heat and stir in the butter, apple cider and a pinch of salt until the butter has melted.
Notes
Nutrition
Nutritional values are approximate.