Slow Cooker Holiday Green Bean Casserole

We’ve all had it. The traditional holiday green bean casserole. Good stuff, but not much of a ‘wow’ factor. Well, scrap that and move on to this slow cooker holiday green bean casserole. Same idea, but oh, so much better.

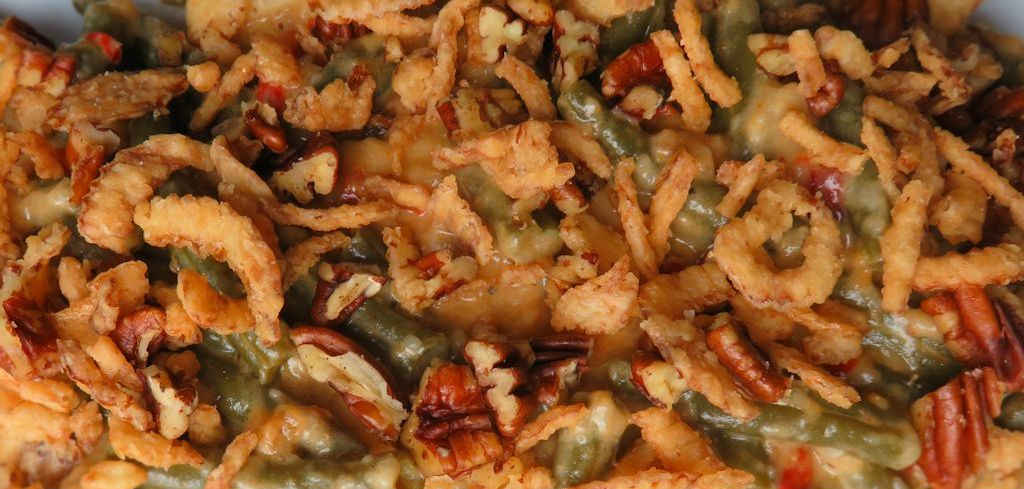
My wife told me to make this again before we were halfway thru the first batch. There’s nothing about it that’s not great. Beans in creamy Alfredo sauce, flavored with water chestnuts, mushrooms and pimentos (or in my case, roasted red bell peppers) and a little cheese. And yes, French fried onions and toasted pecans. This slow cooker green bean casserole screams holidays.

Slow Cooker Holiday Green Bean Casserole

Forget Grandma’s Casserole (Sorry)

I made this early enough in the fall to get fresh green beans, which I blanched first. Frozen beans work just fine too. And, if you’re like me you’ll want extra French fried onions. No, they’re not for the dish. They’re for munching on while you watch everything cook in the slow cooker. I could eat them like potato chips. Just put them in a bowl and pass it on over!

Also try my copycat of Stove Top’s chicken stuffing and my super-yummy Swiss vegetable medley!

If it’s Christmas time, why not also make some Christmas stocking pizzas?

Slow Cooker Holiday Green Bean Casserole
Print Pin
5 from 1 vote

Slow Cooker Holiday Green Bean Casserole

We’ve all had it. The traditional holiday green bean casserole. Well, scrap that and move on to this slow cooker holiday green bean casserole. Same idea, but oh, so much better.
Course Side
Cuisine American
Keyword casserole, crockpot, green beans, slow cooker
Prep Time 10 minutes
Cook Time 4 hours 30 minutes
Total Time 4 hours 40 minutes
Servings 8 servings
Calories 128kcal

Ingredients

Instructions

  • If using fresh green beans, first blanch the beans in boiling water for 2-3 minutes then place in an ice bath to cool. Drain well.
  • In a large bowl combine the beans, Alfredo sauce, water chestnuts, mushrooms, pimentos, Parmesan, pepper and a third of the French fried onions.
  • Lightly spray your slow cooker with non-stick spray and add the bean mixture.
  • Cover and cook on low for 4 1/2 hours, stirring occasionally.
  • Just prior to serving, toast the remaining French fried onions along with the pecans in a small skillet over medium heat.
  • Sprinkle over casserole and serve.

Notes

The pecans add a wonderful crunch.

Nutrition

Calories: 128kcal | Carbohydrates: 9g | Protein: 7g | Fat: 8g | Saturated Fat: 3g | Cholesterol: 9mg | Sodium: 209mg | Potassium: 279mg | Fiber: 4g | Sugar: 4g | Vitamin A: 888IU | Vitamin C: 14mg | Calcium: 195mg | Iron: 1mg

Nutritional values are approximate.

Pineapple Donuts

Wow. My mind was telling me “Hey, look! A donut!”. But my taste buds were telling me “Those aren’t donuts! Those look really different and cool!”. Pineapple donuts! Woo hoo!

Pineapple rings coated in a simple batter that cooks up golden brown delicious (GBD), reminiscent of ‘normal’ donuts, are fantastic. Drizzled with maple syrup and sprinkled with confectioners sugar, they are sweet with a crazy pineapple twist.

Pineapple Donuts

The Perfect Dessert

These little slices of heaven make for an outstandingly good dessert.

I bought this really cool pineapple corer from Amazon the other day that I’ve been just waiting to use so I picked up a pineapple on sale, got the corer out of the box, and in about a minute I had perfect fresh pineapple rings for these pineapple donuts.

The corer can also be used to make a pineapple ‘bowl’, great for serving things like fried rice and grilled shrimp with pineapple. It’s a fun little gadget.

Also try my glazed baked mini-donuts.

Pineapple Donuts
Print Pin
4 from 2 votes

Pineapple Donuts

My mind was telling me that I was about to devour donuts. But my taste buds told me that, hey, these aren't donuts!
Course Dessert
Cuisine American
Keyword deep-fried, pineapple
Prep Time 5 minutes
Cook Time 10 minutes
Total Time 15 minutes
Servings 6 servings
Calories 143kcal

Ingredients

Instructions

  • Heat 2 inches of oil in a Dutch oven or deep fryer to 365 F.
  • Whisk together the Bisquick, egg and milk.
  • Dip pineapple rings into the batter and coat completely.
  • Fry the rings until golden brown, turning once.
  • Serve immediately sprinkled with powdered sugar and drizzled with maple syrup.

Notes

A little whipped cream on top is great too!

Nutrition

Calories: 143kcal | Carbohydrates: 23g | Protein: 3g | Fat: 5g | Saturated Fat: 1g | Cholesterol: 30mg | Sodium: 275mg | Potassium: 140mg | Fiber: 1g | Sugar: 12g | Vitamin A: 100IU | Vitamin C: 5.4mg | Calcium: 72mg | Iron: 0.8mg

Nutritional values are approximate.

Spicy Roasted Chicken Legs on the Char-Broil Big Easy

Note: This recipe was developed using the Char-Broil Big Easy Oil-Less Fryer. If you are cooking using the Char-Broil Smoker-Roaster Grill you should cook with the lid open and the temperature set to High. You might also need to adjust the cooking time.

The Kick’N chicken I made on my Big Easy not too long ago really got me jonesin’ for more legs. These spicy roasted chicken legs on the Char-Broil Big Easy have a nice little kick to them. And they also have a wonderful buttery flavor kissed with a bit of citrus. Although I’m usually a split chicken breast guy, the Big Easy cooks any cut, such as legs, absolutely perfect.

Spicy Roasted Chicken Legs on the Char-Broil Big Easy

Perfectly Spicy

Even if you like spicy, go easy on the cayenne first as you add it to the butter. Don’t go crazy with it. Add some and give it a taste. You can add more. It’s really hard to take it back out!

No matter what, these spicy roasted chicken legs are a treat that cook up in no time on your Char-Broil Big Easy.

Having a bunk bed basket makes it easier to cook just about anything on the oil-less fryer. It doubles the amount of cooking space.

Also try my nuclear chicken, made on the Big Easy.

It’s always a good idea to keep a few spare grease trays on hand for your Char-Broil Big Easy.

Love your Big Easy as much I love mine? Check out my Big Easy Add-Ons page and my free Big Easy eCookbook!

Spicy Roasted Chicken Legs on the Char-Broil Big Easy
Print Pin
5 from 1 vote

Spicy Roasted Chicken Legs on the Char-Broil Big Easy

 These spicy roasted chicken legs have a nice little kick to them. And they also have a wonderful buttery flavor kissed with a bit of citrus. Although I’m usually a split chicken breast guy, the Big Easy cooks any cut, such as legs, absolutely perfect.
Course Main
Cuisine American
Keyword Big Easy, Char-Broil, chicken
Prep Time 15 minutes
Cook Time 45 minutes
Total Time 1 hour
Servings 4 servings
Calories 570kcal

Ingredients

Instructions

  • Fire up your Big Easy.
  • Place the legs into the Big Easy baskets. Try to not crowd them.
  • Melt the butter in a small saucepan.
  • Add the remaining ingredients and stir. Brush 1/3rd of the mixture over the legs and transfer to the Big Easy.
  • Cook for 30 minutes then brush with another 1/3rd of the butter mixture.
  • Cook another 15 minutes or until the chicken temperature reaches 165 F as measured in several places, making sure to not touch the bone.
  • Brush with the remaining butter mixture and cook 5 more minutes.
  • Remove and serve.

Notes

Note: You’ll need a Bunk Bed Basket for your Big Easy to cook more than 4 legs at a time.

Nutrition

Calories: 570kcal | Carbohydrates: 3g | Protein: 43g | Fat: 42g | Saturated Fat: 12g | Trans Fat: 1g | Cholesterol: 242mg | Sodium: 386mg | Potassium: 574mg | Fiber: 1g | Sugar: 1g | Vitamin A: 380IU | Vitamin C: 4mg | Calcium: 51mg | Iron: 2mg

Nutritional values are approximate.

Copycat Cheeseburger Hamburger Helper

I admit that back in my bachelor gotta-make-something-for-dinner-but-I-can’t-cook days I went through my share of boxes of Hamburger Helper. Easy to make and hearty, any flavor of Hamburger Helper would do. That’s why I just had to make this copycat version of the classic cheeseburger mix. Just as easy as the stuff out of the box and darn tasty too! Now I can make this copycat Cheeseburger Hamburger Helper without being a bachelor!

Copycat Cheeseburger Hamburger Helper

It Doesn’t Have To Be Kid-Friendly

You can easily modify this recipe and make your own. Add jalapenos or a dash or two of cayenne pepper for a little kick. Swap Monterey Jack cheese for the cheddar. Use ground turkey instead of ground beef and add a pinch or two of dried sage. Your copycat cheeseburger Hamburger Helper doesn’t have to be exactly like the stuff out of the box, but it’s ok if it is!

Also try my copycat of the not-so-cheesy classic Hamburger helper.

This recipe is based on a recipe from KitchMe.

Copycat Cheeseburger Hamburger Helper
Print Pin
3.75 from 4 votes

Copycat Cheeseburger Hamburger Helper

I admit that back in my bachelor gotta-make-something-for-dinner-but-I-can’t-cook days I went through my share of boxes of Hamburger Helper. Easy to make and hearty, any flavor would do. That’s why I just had to make this copycat version of the classic cheeseburger mix. Just as easy as the stuff out of the box and darn tasty too!
Course Main
Cuisine American
Keyword copycat, Hamburger helper
Prep Time 5 minutes
Cook Time 15 minutes
Total Time 20 minutes
Servings 4 servings
Calories 688kcal

Equipment

Ingredients

Instructions

  • Crumble the ground beef into a large skillet over medium high heat and cook until done. Drain off any excess fat.
  • Stir in the all but the cheese and bring to a boil. Reduce heat to a simmer, cover, and simmer for 10-12 minutes or until the pasta is tender.
  • Stir in the cheese until melted.
  • Remove from heat, uncover and let rest 5 minutes before serving topped with additional cheese.

Notes

It’s not copycat, but I also like to make this dish using pepper jack cheese.

Nutrition

Calories: 688kcal | Carbohydrates: 49g | Protein: 37g | Fat: 37g | Saturated Fat: 17g | Trans Fat: 1g | Cholesterol: 122mg | Sodium: 889mg | Potassium: 631mg | Fiber: 2g | Sugar: 9g | Vitamin A: 558IU | Vitamin C: 3mg | Calcium: 376mg | Iron: 3mg

Nutritional values are approximate.

Tater Tot Potato Skins

My wife declared these as “the only way we will cook tater tots from now on”. And I am in total agreement with her too. Just like potato skins they have a crunchy side and a soft side and taste, well, potato-y. They are topped with our favorite potato skin toppings, cheese, green onion and sour cream. These tater tot potato skins can be served as appetizers at your next party. Or serve them as a side at your next grill-out. Make sure you make lots of them, though, because they are crazy addicting.

Tater Tot Potato Skins

A Few Notes

You can actually skip the thawing of the tater tots and squash the tots after they have been in the oven for 10 minutes. I found this works fine, but not quite as well as when you fully thaw the tater tots first. They don’t squash out quite as flat, but they still get super duper crispy crunchy, which is the goal.

Squirty Sour Cream

I spoon sour cream into a squirt bottle to top these tater tot potato skins nice and evenly. You can of course spoon the sour cream directly on top, but I usually end up with a little too much in one spot and not enough in another. The squirt bottle solves that problem.

I highly recommend that you shred or grate your own cheese at home. Don’t buy the pre-shredded or pre-grated stuff. It has stuff added to it to keep it from sticking together. That ‘stuff’ affects how the cheese melts. Shred it yourself and use the good stuff.

Also try my tater tot nachos.

Tater Tot Potato Skins
Print Pin
5 from 1 vote

Tater Tot Potato Skins

We declared these as “the only way we will cook tater tots from now on”.
Course Appetizer
Cuisine American
Keyword potato skins, tater tots
Prep Time 5 minutes
Cook Time 30 minutes
Total Time 35 minutes
Servings 16 servings
Calories 162kcal

Equipment

Ingredients

  • 2 pounds tater tots thawed completely
  • 1 cup extra sharp cheddar cheese shredded
  • ½ cup sour cream
  • 4 green onions sliced
  • 8 slices bacon cooked, crumbled

Instructions

  • Preheat oven to 400 F.
  • Spray two large baking sheets with non-stick spray (I found that a Silpat mat works best)
  • Use the back of a large spoon to flatten the tots. Don’t press too hard if they don’t flatten immediately.
  • Place into the oven for 10 minutes. Check if any of the tots need a bit more flattening.
  • Continue baking for another 10 minutes or until the tots are turning golden brown.
  • Sprinkle with cheese and continue baking until crispy.
  • Remove from the oven.
  • Transfer to a platter and drizzle with the sour cream and sprinkle with the green onions and bacon.

Notes

Best served immediately. You don’t want the toppings to make the tots soggy.

Nutrition

Calories: 162kcal | Carbohydrates: 15g | Protein: 4g | Fat: 10g | Saturated Fat: 4g | Trans Fat: 1g | Cholesterol: 15mg | Sodium: 361mg | Potassium: 196mg | Fiber: 1g | Sugar: 1g | Vitamin A: 149IU | Vitamin C: 5mg | Calcium: 69mg | Iron: 1mg

Nutritional values are approximate.

Pepper Onion Beer Sauce

I had a bunch of ham leftover from cooking a big ham on my Char-Broil Big Easy. And I do mean a bunch. I could’ve made more sandwiches. Or I could dice up some ham for omelets. Instead, I decided to warm up some nice thick slices and top them with this wonderful pepper onion beer sauce. It looks like your pretty standard vegetable topping, but with a twist: orange marmalade. Whoa! I wasn’t expecting that!

Pepper Onion Beer Sauce

A Great Sauce For Chicken, Too!

This pepper onion beer sauce really goes well with ham, but I also think it’d complement grilled chicken just as well. Don’t like orange marmalade? I bet you could substitute your favorite marmalade or preserves.

I like to use my good ole trusty Dutch oven to make this sauce and pretty much darned near anything like it on my stovetop. It’s nice and big and sturdy. That extra weight helps it maintain and distribute heat perfectly. As an added bonus, it’s actually pretty easy to clean up too!

Also try my cherry sauce glazed ham.

Pepper Onion Beer Sauce
Print Pin
4 from 1 vote

Pepper Onion Beer Sauce

I decided to warm up some nice thick slices of ham and top them with this wonderful pepper onion beer sauce. It looks like your pretty standard vegetable topping, but with a twist: orange marmalade.
Course Sauce
Cuisine American
Keyword beer, sauce, vegetable
Prep Time 10 minutes
Cook Time 15 minutes
Total Time 25 minutes
Servings 4 servings
Calories 177kcal

Equipment

Ingredients

Instructions

  • Heat the oil in a large skillet over medium-high heat
  • Add the bell peppers and onion and saute for 5 minutes
  • Add the beer, orange marmalade, soy sauce and hot sauce.
  • Bring to a boil then reduce to a simmer and continue simmering until the vegetables are softened and the sauce is reduced.
  • Serve over sliced ham or grilled chicken.

Notes

Also great on hot dogs!

Nutrition

Calories: 177kcal | Carbohydrates: 33g | Protein: 1g | Fat: 4g | Saturated Fat: 1g | Trans Fat: 1g | Sodium: 280mg | Potassium: 146mg | Fiber: 1g | Sugar: 27g | Vitamin A: 546IU | Vitamin C: 35mg | Calcium: 29mg | Iron: 1mg

Nutritional values are approximate.

Cauliflower Popcorn

I loved the flavor of this cauliflower popcorn, made using a Nesco Snackmaster Pro dehydrator. The cumin and chili powder add a nice southwestern, earthly flavor. The nutritional yeast (which I’d never used before) made me think of cheddar cheese flavoring. I was pleasantly surprised by it.

Cauliflower Popcorn

Eat ‘Em Quick For The Best Crunch

Now, let’s talk ‘popcorn’. That makes you think crunchy, and if you eat this cauliflower raw that’s just what you’ll get. You can also pop (sorry) them into a dehydrator for 12 or so hours. Right out of the dehydrator they have a nice crunch to them, but I found that that crunch doesn’t last. The seems get a bit soft…. and not popcorn-y. But the flavor was still great!

I’m looking forward to other ways to use nutritional yeast. For us, I’d recommend this cauliflower popcorn, but honestly I’d enjoy them more raw and save the dehydrator time. That’s up to you. I’m a big texture guy, and for me, the texture of the raw cauliflower was better.

I like to load up my dehydrator. To do that I picked up a handful of extra trays. They really add a whole lot more drying space! Since I have to rotate my trays, I write a number on each one on a piece of blue painter’s tape so I can keep track of them.

Also try crispy green beans from the Nesco Snackmaster Pro.

Cauliflower Popcorn
Print Pin
4 from 1 vote

Cauliflower Popcorn

I loved the flavor of this cauliflower ‘popcorn’. The cumin and chili powder add a nice southwestern, earthly flavor. The nutritional yeast (which I’d never used before) made me think of cheddar cheese flavoring. I was pleasantly surprised by it.
Course Appetizer
Cuisine American
Keyword cauliflower, popcorn
Prep Time 5 minutes
Cook Time 12 hours
Total Time 12 hours 5 minutes
Servings 8 servings
Calories 26kcal

Ingredients

Instructions

  • Place the cauliflower into a large bowl.
  • Add the olive oil, yeast, cumin, chili powder and salt and toss to coat.
  • Serve raw, or if desired, place into a dehydrator and dry for 12 hours.

Notes

For best results, serve immediately.

Nutrition

Calories: 26kcal | Carbohydrates: 4g | Protein: 2g | Fat: 1g | Saturated Fat: 1g | Sodium: 46mg | Potassium: 249mg | Fiber: 2g | Sugar: 1g | Vitamin A: 159IU | Vitamin C: 35mg | Calcium: 23mg | Iron: 1mg

Nutritional values are approximate.

Smoked Habanero Flake on the Nesco Snackmaster Pro

Not too long ago I made a fantastic batch of red pepper flake using my dehydrator, a Nesco Snackmaster Pro. I use the spicy flakes on just about everything. But, I thought, nothing wrong with making an even tastier, hotter version. So I grabbed a big bag of red habaneros and proceeded to make smoked habanero flake on the Nesco Snackmaster Pro.

Smoked Habanero Flake on the Nesco Snackmaster Pro

Complex Heat. And Lots Of It.

Smoking the habaneros, though not required, gives the flakes a fantastic slightly-smoky flavor and aroma, much more complex than if you just ground dried habaneros. And oh, yes, these flakes are mighty hot. You have to be careful handling the peppers, and trust me, when you grind them, do NOT put your face over the grinder when you remove the lid. I speak the truth here, it’ll get you! This is the real deal here. Wear rubber gloves if you have issues handling hot peppers. This smoked habanero flake on the Nesco Snackmaster Pro means business!

Grab A Few Extra Trays

I like to load up my dehydrator. To do that I picked up a handful of extra trays. They really add a whole lot more drying space! Since I have to rotate my trays, I write a number on each one on a piece of blue painter’s tape so I can keep track of them.

Also make red pepper flake on your Nesco Snackmaster Pro!

Smoked Habanero Flake on the Nesco Snackmaster Pro
Print Pin
5 from 2 votes

Smoked Habanero Flake on the Nesco Snackmaster Pro

Smoking the habaneros, though not required, gives the flakes a fantastic slightly-smoky flavor and aroma, much more complex than if you just ground dried habaneros. And oh, yes, these flakes are mighty hot.
Course Appetizer
Cuisine American
Keyword dehydrator, nesco snackmaster pro, peppers, smoked
Prep Time 10 minutes
Cook Time 14 hours 30 minutes
Total Time 14 hours 40 minutes
Servings 1 pound
Calories 363kcal
Author Mike

Ingredients

  • 2 pounds habaneros ripe, any color, preferably all roughly the same size

Instructions

  • Fire up your smoker. Add a few chunks of stronger wood, such as hickory. Do not use a fruity wood such as apple, peach, etc.
  • Add the habaneros to the smoker and smoke for 2 hours. You’re not looking to dry them (though you could given plenty of time), just get a nice smoke flavor.
  • Remove the habaneros and transfer to your dehydrator, set to 165 F.
  • Dry the habaneros until crispy, 8-12 hours (or more if they are large, less if they are smaller). Rotate the trays every 2 hours to ensure even drying.
  • Remove the habaneros and let cool slightly.
  • Remove the stems from the peppers.
  • Working in batches, transfer the peppers to a spice grinder with blades (do not use a burr grinder) and grind until the desired sized flakes are achieved.
  • Store in an air-tight container.
  • Note: The flakes will be mighty hot, so use sparingly.

Notes

You’ll need a smoker (wood, charcoal, or electric), a dehydrator, and a spice grinder (I use a blade-style coffee grinder) to make these smoked habanero flakes.

Nutrition

Calories: 363kcal | Carbohydrates: 80g | Protein: 17g | Fat: 4g | Saturated Fat: 1g | Sodium: 82mg | Potassium: 2921mg | Fiber: 14g | Sugar: 48g | Vitamin A: 8636IU | Vitamin C: 1304mg | Calcium: 127mg | Iron: 9mg

Nutritional values are approximate.

Ham and Swiss Po’ Boy

I’m slowly (but surely) perfecting my homemade po’ boy bread. It has the perfect thin, but crunchy, crust, with a warm, soft inside. I just need to work on my dough rolling skills. Even still, that lack of loaf perfection doesn’t stop me from enjoying an absolutely great ham and Swiss po’ boy. The ham has a nice little spicy kick, the cheese just starts to melt. All topped with crunchy fresh lettuce mixed with spicy Creole mustard and fresh chopped tomatoes.

Ham and Swiss Po' Boy

The Right Chips For A Great Sandwich

I always grab a bag (or two) of Zapp’s chips to go with my ham and Swiss po’ boy. They have the best crunch and flavor, plus it’s a tradition to eat Zapp’s with a po’ boy. The last time (sadly, a long time ago) I was in New Orleans I had Zapp’s with my po’ boys, so I do the same at home. Food memories like that are the best, you know?

I almost always use Blue Plate mayonnaise in the dishes I make. I think it is the best around. If you can’t find it locally you can pick it up online for a fair price.

Also try my Oh Boy po boy.

Ham and Swiss Po' Boy
Print Pin
5 from 1 vote

Ham and Swiss Po’ Boy

The ham has a nice little spicy kick, the cheese just starts to melt. All topped with crunchy fresh lettuce mixed with spicy Creole mustard and fresh chopped tomatoes.
Course Main
Cuisine American
Keyword sandwich
Prep Time 15 minutes
Cook Time 10 minutes
Total Time 25 minutes
Servings 1 serving
Calories 652kcal

Ingredients

For the po boy

  • 1 6 inch French bread
  • ¼ pound deli sandwich meat thin sliced ham
  • 1 teaspoon Cajun seasoning
  • 2 slices Swiss cheese divided
  • cup lettuce dressing see below
  • 1 cup tomato chopped

For the lettuce mixture

Instructions

For the po boy

  • Slice bread horizontally.
  • Place sandwich meat in a medium skillet over medium heat.
  • Sprinkle with the Cajun seasoning and warm the meat thoroughly.
  • Transfer to the bottom bread half.
  • Add cheese and top with the lettuce dressing, tomato, and top bread half.
  • Devour immediately.

For the lettuce mixture

  • Place all ingredients in a medium bowl and fold to combine.

Notes

Feel free to add some pickle slices, too!

Nutrition

Calories: 652kcal | Carbohydrates: 13g | Protein: 37g | Fat: 51g | Saturated Fat: 16g | Trans Fat: 1g | Cholesterol: 113mg | Sodium: 1831mg | Potassium: 859mg | Fiber: 4g | Sugar: 6g | Vitamin A: 2782IU | Vitamin C: 24mg | Calcium: 322mg | Iron: 2mg

Nutritional values are approximate.

Bacon Buttermilk Dressing

It was Wedge Salad Day (WSD) here. I love a cold slice of iceberg with my favorite salad go-tos, like boiled eggs, avocado and cherry tomatoes. And bacon. For more bacony flavor goodness I made a bacon buttermilk dressing. Nice and creamy smooth, but with a hint of smokiness and a little crunch.

Bacon Buttermilk Dressing

Packed With Flavor

The Dijon mustard adds a nice contrast to this bacon buttermilk dressing. A little tang. You could leave it out for a more mellow flavor and the dressing would be just as great. I like to consider this dressing ‘drink worthy’, a sign of a great salad dressing.

Check out my new site, Dress My Salad, for more great salad dressing ideas!

Also try my blue cheese vinaigrette. It’s perfect on a wedge salad too!

Bacon Buttermilk Dressing
Print Pin
4 from 1 vote

Bacon Buttermilk Dressing

I love a cold slice of iceberg with my favorite salad go-tos, like boiled eggs, avocado and cherry tomatoes. And bacon. For more bacony flavor goodness I made a bacon buttermilk dressing. 
Course Dressing
Cuisine American
Keyword bacon, buttermilk, homemade salad dressing
Prep Time 5 minutes
Total Time 5 minutes
Servings 1 cup
Calories 274kcal

Equipment

Ingredients

Instructions

  • Place all ingredients into a blender or food processor and blend until smooth.
  • Refrigerate until ready to use.

Notes

Refrigerate any leftover dressing. Stir before serving.

Nutrition

Calories: 274kcal | Carbohydrates: 11g | Protein: 6g | Fat: 24g | Saturated Fat: 13g | Cholesterol: 57mg | Sodium: 1486mg | Potassium: 332mg | Fiber: 1g | Sugar: 9g | Vitamin A: 986IU | Vitamin C: 7mg | Calcium: 237mg | Iron: 1mg

Nutritional values are approximate.