Ham and Egg Sandwiches

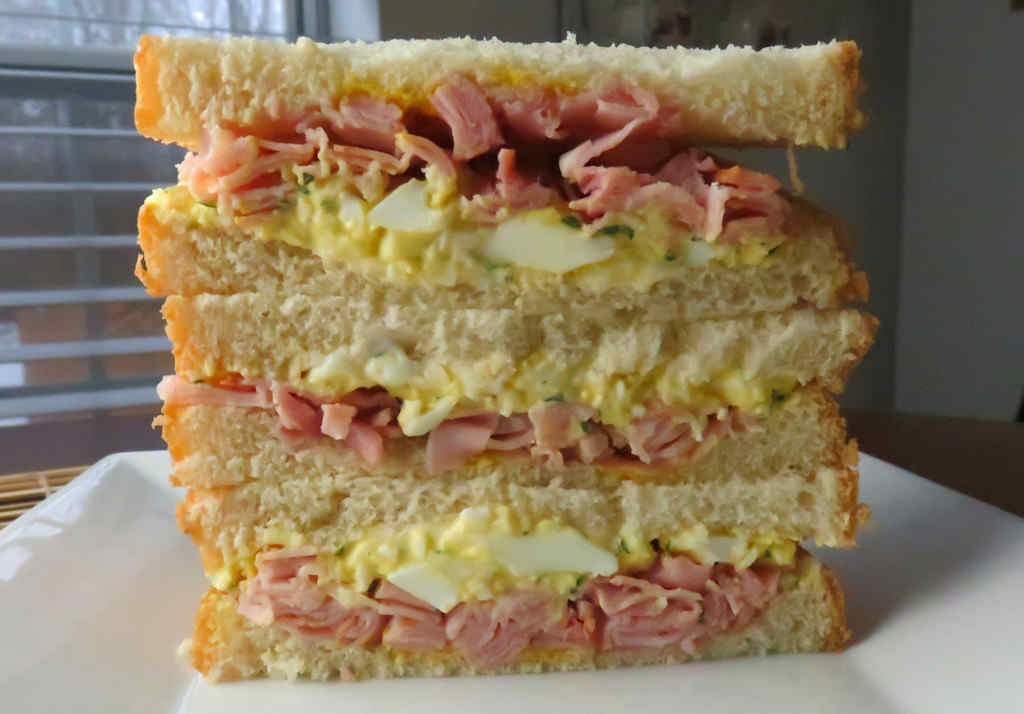
My wife proclaimed this to be the best egg salad she’s had. I’m surely not going to argue with her, either. It’s light, fluffy and tasty, and goes perfectly with thin-sliced ham. Nothing fancy here, just great ham and egg sandwiches. The original recipe was meant to make finger sandwiches, which you could do, but if I’m coming I’d prefer the full-sized version, please!

Ham and Egg Sandwiches

Make It Your Way

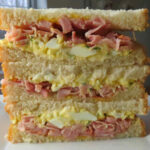
I chopped the ham to give it more of a shaved ham feel, a little lighter than just sliced ham. I think it went better with the airy egg salad. You don’t have to do that, and in fact, you really don’t need the ham at all. No matter how you do it, these ham and egg sandwiches are a delight.

I’m Boiled Egg Challenged

I absolutely stink (best word I could think of) when it comes to making boiled eggs. Hard or soft, doesn’t matter. I am egg challenged. So I picked up a little cheap egg cooker like the one below. This lil baby cranks out 6 eggs in about 15 minutes and they’re perfect each and every time! I don’t even feel bad any more that I just cannot make boiled eggs!

Also try my yummy ham salad sandwiches.

Ham and Egg Sandwiches
Print Pin
5 from 1 vote

Ham and Egg Sandwiches

Nothing fancy here, just great ham and egg sandwiches. 
Course Main
Cuisine American
Keyword eggs, ham, salad, sandwich
Prep Time 10 minutes
Total Time 10 minutes
Servings 6 sandwiches
Calories 464kcal
Author Mike

Equipment

Ingredients

Instructions

  • Place the eggs into a large bowl.
  • Mash with a potato masher.
  • Add the mustard powder, salt and pepper, mayonnaise and parsley and mix well. Add more mayonnaise if the mixture is too thick to spread.
  • Divide the egg mixture between 6 pieces of bread.
  • Divide the ham between the sandwiches.
  • Divide and spread the Dijon onto one side of the remaining bread slices and place on top of the sandwiches.

Notes

I like to serve this on toasted bread, but toasting it is optional!

Nutrition

Calories: 464kcal | Carbohydrates: 26g | Protein: 12g | Fat: 35g | Saturated Fat: 6g | Trans Fat: 1g | Cholesterol: 202mg | Sodium: 612mg | Potassium: 158mg | Fiber: 2g | Sugar: 3g | Vitamin A: 523IU | Vitamin C: 4mg | Calcium: 168mg | Iron: 3mg

Nutritional values are approximate.

Pepperoni Jerky on the Nesco Snackmaster Pro

By golly, this Pepperoni Jerky on the Nesco Snackmaster Pro tastes EXACTLY like pepperoni. I didn’t need a pizza to get that great cured sausage flavor. I just needed my Nesco Snackmaster Pro, some ground beef (I used top round that I ground myself after first trimming off any fat), and a package of seasoning from Hi Mountain.

Pepperoni Jerky on the Nesco Snackmaster Pro

You Need A Jerky Canon

A jerky cannon is absolutely a necessity if you plan on making your jerky into sticks. It’s not expensive. And quite honestly, it’s kinda fun to use too!

Make sure you rotate your trays every 2 hours or so when making Pepperoni Jerky on the Nesco Snackmaster Pro. Or when making any jerky for that matter. The bottom trays will not dry as quickly as those on top. Rotating the trays will give you nice, even drying and perfect jerky on every level.

I like to load up my dehydrator. To do that I picked up a handful of extra trays. They really add a whole lot more drying space! Since I have to rotate my trays, I write a number on each one on a piece of blue painter’s tape so I can keep track of them.

Also try my Hi Mountain cracked pepper ‘n garlic jerky.

Check out my guide to using the Nesco Snackmaster Pro. You will be making fantastic jerky at home in no time at all!

Pepperoni Jerky on the Nesco Snackmaster Pro
Print Pin
5 from 1 vote

Pepperoni Jerky on the Nesco Snackmaster Pro

By golly, this pepperoni jerky tastes EXACTLY like pepperoni.
Course Dehydrator
Cuisine Jerky
Keyword dehydrator, jerky, nesco snackmaster pro, pepperoni
Prep Time 8 hours
Cook Time 6 hours
Total Time 14 hours
Servings 1 pound
Calories 2304kcal
Author Mike

Ingredients

Instructions

  • Place beef in a resealable bag or container.
  • In a small bowl whisk together the seasoning, curing salt and water.
  • Pour over the meat and seal. Shake to coat.
  • Refrigerate the meat for up to 8 hours, shaking or massaging every hour or so to get the marinade distributed and absorbed evenly.
  • Remove meat from the marinade and add to a jerky gun.
  • Squeeze out onto Nesco trays. Do not overlap meat.
  • Add the dehydrator top, set to maximum temperature setting and dehydrate for 5 hours, rotating the trays (bottom to top) every 2 hours or so.
  • To test for doneness remove a piece and let cool slightly. Try to bend the meat. If it gives and starts to tear at the bend it is done. If it bends without tearing return to the dehydrator and let it run another 15 minutes and test again. If the meat is crunchy it is overdone but still good. It’s really a personal preference as to how you like your jerky. Soft, chewy, crunchy. There’s no wrong here.
  • Let cool before storing in an airtight container.

Notes

Add more seasoning for more flavor!

Nutrition

Calories: 2304kcal | Protein: 156g | Fat: 181g | Saturated Fat: 70g | Trans Fat: 11g | Cholesterol: 644mg | Sodium: 614mg | Potassium: 2449mg | Calcium: 167mg | Iron: 18mg

Nutritional values are approximate.

Smoked Italian Meatloaf

Smoked meatloaf ends up on our dinner rotation with some regularity. Our meatloaf usually consists of a mixture of meat, spices, vegetables and some sort of binder to make it all come together. When I saw this idea for a smoked Italian meatloaf I was all over it in a heartbeat. It’s a combination of what I consider a fairly traditional meat mixture infused with Italian flavors, but then comes the tasty cool part. It’s stuffed with prosciutto, arugula, and provolone cheese! Mama mia!

Smoked Italian Meatloaf

The roll…

After you’ve combined the ingredients for the meat mixture, spread it out and topped it, you have a decision to make. Do you roll it up along the long axis, giving you a long loaf that produces a good number of smaller slices, or do you roll it along the short side, giving you a large loaf that produces super-big pieces and more toppings in every bite? Decisions, decisions.

I went with the long loaf and was very happy. But I can see how the short thicker loaf would have the advantage of giving you more toppings since there’ll be more layers. No matter which way you go, this is one fantastic meatloaf packed with Italian-inspired flavors.

Smoked Italian MeatloafSealing…

Make sure you seal up any seams before putting the meatloaf onto your smoker. And be careful moving the loaf to your smoker. To make things easier I transferred the assembled loaf onto a disposable grill topper while still in the kitchen. I just had to roll the loaf off of my cutting board and onto the topper. No risk of the loaf rolling off the smoker or falling apart.

Smoked Italian Meatloaf

For a wonderful topping after you’ve sliced the loaf, try my smoked provolone cheese sauce. Like a little kick to your meatloaf? Smoked habanero meatloaf is the thing for you.

Smoked Italian Meatloaf
Print Pin
5 from 1 vote

Smoked Italian Meatloaf

When I saw this idea for a smoked Italian meatloaf I was all over it in a heartbeat. It’s a combination of what I consider a fairly traditional meat mixture infused with Italian flavors, but then comes the tasty cool part. It’s stuffed with prosciutto, arugula, and provolone cheese! Mama mia!
Course Main
Cuisine American
Keyword meatloaf, smoked
Prep Time 15 minutes
Cook Time 3 hours 15 minutes
Total Time 3 hours 30 minutes
Servings 8 servings
Calories 793kcal

Equipment

Ingredients

For the meat mixture

For the stuffing

  • 2 handfuls arugula rinsed, patted dry
  • 8 slices prosciutto
  • 8 slices provolone cheese

Instructions

  • Fire up your smoker for 275 F. Use a lighter wood such as a fruit wood.

For the meat mixture

  • Place all ingredients into a large bowl and mix well.
  • Line a 9″ x 13″ 1″ deep pan with foil. Make sure the foil extends over the sides of the pan by at least 1″.
  • Add the meat mixture to the pan and flatten it out to fill the pan, making sure the meat is the same thickness throughout. I found just using the palms of my hands to be the easiest way to do this.

For the stuffing

  • Layer the arugula, prosciutto and provolone cheese on top of the meat, leaving a 1" border around the edges.
  • To roll up, start along the long end (or short end if you want a thicker loaf) and start to foll about 1″ of the meat over onto itself. Keep going, back and forth, rolling as you go.
  • Seal the ends and the seam. You don’t want the contents to escape.
  • Transfer to the smoker and smoke for 2 hours or until the internal temperature of the loaf measures 150 F in several places.
  • Combine the glaze ingredients and brush over the top of the loaf.
  • Smoke another 30 minutes.
  • Remove and let rest for 45 minutes. If you don’t let it rest long enough the cheese will ooze out when you slice it.
  • Slice and serve.

Notes

Great served on bread or buns as a sandwich.

Nutrition

Calories: 793kcal | Carbohydrates: 7g | Protein: 47g | Fat: 63g | Saturated Fat: 25g | Trans Fat: 2g | Cholesterol: 207mg | Sodium: 958mg | Potassium: 704mg | Fiber: 1g | Sugar: 1g | Vitamin A: 382IU | Vitamin C: 2mg | Calcium: 285mg | Iron: 5mg

Nutritional values are approximate.

Fiery Chicken Breasts on the Char-Broil Big Easy

Note: This recipe was developed using the Char-Broil Big Easy Oil-Less Fryer. If you are cooking using the Char-Broil Smoker-Roaster Grill you should cook with the lid open and the temperature set to High. You might also need to adjust the cooking time.

Yes! Oh yes! How I do love my chicken with a little kick. I made some fiery chicken breasts on my Char-Broil Big Easy and they had that great spicy hit. Not too much, and not too little. Perfect. The meat was moist, tender and had the perfect flavor. All thanks to a quick marinade in Goya’s Mojo Chipotle marinade!

Fiery Chicken Breasts on the Char-Broil Big Easy

As Mistake-Proof As You Can Get

I’ve cooked literally hundreds of chicken breasts on my Big Easy and I can say it’s pretty much impossible to goof it up. I mean you’d have to work really hard at it. This recipe is a great example. Marinate the chicken, drop it into the Big Easy (ok, put it in the basket first!) and cook until done. Boom. That’s it.

Goya’s Mojo Chipotle marinade has a great southwestern flavor with just a little spicy smokiness. If you’re afraid of heat don’t worry because it won’t overwhelm you at all. It’s just right. If you can’t find it in your local store or don’t want to order it online, try my Kick’N Chicken Legs instead.

Also try my green chile rubbed chicken on the Big Easy.

It’s always a good idea to keep a few spare grease trays on hand for your Char-Broil Big Easy.

Love your Big Easy as much I love mine? Check out my Big Easy Add-Ons page and my free Big Easy eCookbook!

Fiery Chicken Breasts on the Char-Broil Big Easy
Print Pin
5 from 1 vote

Fiery Chicken Breasts on the Char-Broil Big Easy

Yes! Oh yes! How I do love my chicken with a little kick.
Course Main
Cuisine American
Keyword Big Easy, Char-Broil, chicken
Prep Time 4 hours
Cook Time 1 hour 20 minutes
Total Time 5 hours 20 minutes
Servings 4 servings
Calories 258kcal
Author Mike

Ingredients

Instructions

  • Place the chicken into a resealable bag or container.
  • Add marinade to taste. Toss to coat.
  • Seal and refrigerate for at least 4 hours, turning occasionally.
  • Fire up your Big Easy.
  • Transfer the chicken to the Big Easy basket.
  • Cook for approximately 20 minutes per pound or until it reaches 165 F as checked in several places.
  • Remove and let rest 10 minutes before serving.

Notes

You can substitute whatever chicken cuts you prefer.

Nutrition

Calories: 258kcal | Protein: 48g | Fat: 6g | Saturated Fat: 1g | Trans Fat: 1g | Cholesterol: 145mg | Sodium: 262mg | Potassium: 836mg | Vitamin A: 68IU | Vitamin C: 3mg | Calcium: 11mg | Iron: 1mg

Nutritional values are approximate.

Copycat Long John Silver’s Chicken Planks

When I was a kid Long John Silver’s was my favorite place on earth. That’s why I was dying to make this copycat of Long John Silver’s chicken planks. I always got the Fish N’ More meal (with extra crispies… the little pieces of fried batter left floating around in the deep fryer basket). I loved everything in the meal. And I always wanted more!

Copycat Long John Silver's Chicken Planks

Malt Vinegar… On Chicken?

The ‘More’ of the meal was a few hush puppies, sides, and oh yes, chicken planks. Fried in the same great crunchy batter as the fish planks, chicken planks were just as addicting as the fish. And oddly (for me as a kid), just as good with malt vinegar sprinkled on them. I would put an amazing amount of malt vinegar on everything in the basket. Or anything I got at Long John Silver’s. Fries, hush puppies, it didn’t matter.

I get out my big deep fryer when it’s time to fry a large batch of food. It comes to temperature quickly and it maintains that temperature perfectly. It has a built-in oil filter and storage unit so I can re-use the oil several times.

I don’t get my deep fryer out that often but when I do, a copycat of at least one thing from Long John Silver’s, such as these chicken planks, is on my menu. Everything is easy to make, takes almost no time at all, and always gives me an excuse to get out the malt vinegar. Like hush puppies. Yes, I put malt vinegar on my hush puppies.

Copycat Long John Silver's Chicken Planks
Print Pin
4.20 from 5 votes

Copycat Long John Silver’s Chicken Planks

Fried in the same great crunchy batter as the fish planks, chicken planks were just as addicting as the fish. And oddly (for me as a kid), just as good with malt vinegar sprinkled on them.
Course Side
Cuisine American
Keyword chicken, copycat, deep-fried
Prep Time 10 minutes
Cook Time 15 minutes
Total Time 25 minutes
Servings 4 servings
Calories 235kcal
Author Mike

Ingredients

For the chicken

For the batter

Instructions

For the batter

  • Combine all but the water in a large bowl.
  • Whisk in the water until the batter is smooth. If too runny add a bit more flour.

For the chicken

  • Heat a few inches of oil in a deep fryer or Dutch oven to 375 F.
  • Working in batches, dip chicken pieces into the batter and turn to coat completely.
  • Slowly lower the chicken into the hot oil and fry until golden brown, 3 minutes per side.
  • Remove to a rack to cool slightly before serving.

Notes

You can use this same batter to make copycat Long John Silver’s fish. Just substitute cod for the chicken.

Nutrition

Calories: 235kcal | Carbohydrates: 23g | Protein: 27g | Fat: 3g | Saturated Fat: 1g | Trans Fat: 1g | Cholesterol: 73mg | Sodium: 811mg | Potassium: 448mg | Fiber: 1g | Sugar: 1g | Vitamin A: 34IU | Vitamin C: 1mg | Calcium: 26mg | Iron: 2mg

Nutritional values are approximate.

Slow Cooker Bold Ranch Pork Chops

Cold weather can sometimes make me ‘cooking lazy’. That’s when I just want to toss a few out-of-the-pantry and out-of-the-fridge ingredients into a slow cooker, turn it on, and come back half a day later to a done dish. Doesn’t mean it has to be all out of a can, but it doesn’t have to all be from scratch either. But it does still have to be good. And spicy. Gotta have spicy and these slow cooker bold ranch pork chops deliver on that. And they deliver on tasty too. Not too bad for ‘cooking lazy’ if I do say so myself!

Slow Cooker Bold Ranch Pork Chops

The Perfect Meat-And-Potatoes Dinner

I served these slow cooker bold ranch pork chops with warmed leftover mashed potatoes. The gravy from the slow cooker is great over mashed potatoes, but I think it’d be even better over grits, so I’ll give that a whirl next time. They’ll be instant grits, though, to keep with my ‘cooking lazy’ mood.

These chops are also great served over a long-time boxed favorite, Rice-a-Roni. Believe it or not, I make a crazy good copycat of it too. It’s really not that hard to make and box, is it ever delicious!

Also try my slow cooker balsamic pork sliders.

Slow Cooker Bold Ranch Pork Chops
Print Pin
5 from 1 vote

Slow Cooker Bold Ranch Pork Chops

Gotta have spicy and these slow cooker bold ranch pork chops deliver on that.
Course Main
Cuisine American
Keyword crockpot, pork chops, slow cooker
Prep Time 5 minutes
Cook Time 6 hours
Total Time 6 hours 5 minutes
Servings 4 servings
Calories 232kcal

Ingredients

Instructions

  • Turn your slow cooker on low.
  • Whisk together the soup, Ranch dressing mix, and Cajun seasoning in a small bowl.
  • Place the pork chops in the slower cooker.
  • Add the soup mix.
  • Cover and cook for 6 hours.

Notes

Between the soup and Cajun seasonings, this dish can be salty. I recommend a low-salt soup and making your own Cajun seasoning, cutting the amount of salt in half.

Nutrition

Calories: 232kcal | Carbohydrates: 5g | Protein: 29g | Fat: 10g | Saturated Fat: 3g | Trans Fat: 1g | Cholesterol: 90mg | Sodium: 592mg | Potassium: 540mg | Fiber: 1g | Sugar: 1g | Vitamin A: 868IU | Vitamin C: 1mg | Calcium: 13mg | Iron: 1mg

Nutritional values are approximate.

Cherry Sauce Glazed Ham

I used to think it would be wrong to just have ham for dinner. This cherry sauce glazed ham made me think it would actually be ok to just sit down to a plate of ham and get at it. I didn’t, but I could have. The tartness of the cherries and the sweetness of the honey, along with a few spices, make each bite fantastic. Even a cheap ham becomes something decadent after being glazed with the sauce.

Cherry Sauce Glazed Ham

Try Other Things, But Don’t Go Sweet

I think you could try something other than cherry preserves to make the sauce for this cherry sauce glazed ham, if you wanted to. You’d want something that isn’t so sweet, though, such as cranberry or pomegranates.

You’ll want to make my bacon-glazed spiral ham and Sriracha honey ham too! My pepper onion beer sauce makes for a great topping for ham!

Cherry Sauce Glazed Ham
Print Pin
5 from 1 vote

Cherry Sauce Glazed Ham

This cherry sauce glazed ham made me think it would actually be ok to just sit down to a plate of ham and get at it. I didn’t, but I could have. 
Course Sauce
Cuisine American
Keyword ham
Prep Time 15 minutes
Cook Time 2 hours
Total Time 2 hours 15 minutes
Servings 12 servings
Calories 1643kcal

Ingredients

Instructions

  • Preheat oven to 225 F.
  • Remove heat from packaging, discarding the glaze, and place face down in a roasting pan (you’ll want to use one that’s at least 1″ deep because there’ll be accumulating juices).
  • Cover pan with foil and bake for 1 1/2 hours or until internal temperature reaches 135 F.
  • Combine remaining ingredients in a saucepan and bring to a simmer.
  • Brush glaze over the ham and let cook another 5 minutes.
  • Remove ham from oven and let rest at least 15 minutes before slicing.
  • Serve remaining warm glaze on the side for drizzling of the sliced ham.

Notes

Use a hot honey for a gentle kiss of heat.

Nutrition

Calories: 1643kcal | Carbohydrates: 6g | Protein: 144g | Fat: 112g | Saturated Fat: 40g | Cholesterol: 413mg | Sodium: 7963mg | Potassium: 1913mg | Fiber: 1g | Sugar: 6g | Vitamin A: 1IU | Vitamin C: 1mg | Calcium: 48mg | Iron: 6mg

Nutritional values are approximate.

Jalapeno Popper Deviled Eggs

Oh yes! Finally three of my favorite things in a single bite. The kick of jalapeno poppers. The creamy richness of deviled eggs. Crunchy smoky bacon. These jalapeno popper deviled eggs are easy to make, easy to eat and dangerously addicting. These aren’t your grandma’s deviled eggs (which are good, but hey, they need some spice!).

Jalapeno Popper Deviled Eggs

Just The Right Kick

I could eat these all day long. In fact I’m making them again for this year’s Easter get-together. Several will disappear before they get to my sister-in-laws house so I will have to make plenty of extra. I will put up a little sign letting people know that they are spicy just in case. You know that I don’t want to start a big family ruckus over someone accidentally eating these jalapeno popper deviled eggs. Then they’d end up blaming me for not telling them that they have a little kick to them!

I absolutely stink (best word I could think of) when it comes to making boiled eggs. Hard or soft, doesn’t matter. I am egg challenged. So I picked up a little cheap egg cooker like the one below. This lil baby cranks out 6 eggs in about 15 minutes and they’re perfect each and every time! I don’t even feel bad any more that I just cannot make boiled eggs!

Also try my BBQ and no-boil deviled eggs. And for something even more different, and crazy delicious, make my creamed spinach deviled eggs! Grilled jalapeno popper dip is also a great crowd-pleaser. And hey, fried jalapeno popper bites? CRAZY GOOD!

Jalapeno Popper Deviled Eggs
Print Pin
5 from 1 vote

Jalapeno Popper Deviled Eggs

These jalapeno popper deviled eggs are easy to make, easy to eat and dangerously addicting. These aren’t your grandma’s deviled eggs (which are good, but hey, they need some spice!).
Course Appetizer
Cuisine American
Keyword deviled, eggs, jalapeno popper
Prep Time 15 minutes
Cook Time 15 minutes
Total Time 30 minutes
Servings 20 halves
Calories 89kcal

Ingredients

Instructions

  • Cook the bacon in a medium skillet until crunchy.
  • Remove to a paper towel-lined plate.
  • Drain all but 1/2 tablespoon of the grease.
  • Add one of the chopped jalapenos and the garlic.
  • Saute until just starting to soften.
  • Remove from the skillet with a slotted spoon to a paper towel-lined plate.
  • Cut eggs in half and scoop the yolks into a medium bowl.
  • Add the cream cheese, mayonnaise, Dijon, vinegar, salt and cayenne.
  • Mash together to combine. Add more mayonnaise if the mixture is too thick or dry.
  • Stir in the half of the bacon and the sauteed jalapeno and garlic.
  • Spoon or pipe the yolk mixture into the eggs.
  • Garnish with the remaining bacon and the remaining chopped jalapeno and serve.

Notes

Serve at room temperature or chilled.

Nutrition

Calories: 89kcal | Carbohydrates: 1g | Protein: 4g | Fat: 8g | Saturated Fat: 3g | Trans Fat: 1g | Cholesterol: 92mg | Sodium: 105mg | Potassium: 54mg | Fiber: 1g | Sugar: 1g | Vitamin A: 195IU | Vitamin C: 2mg | Calcium: 18mg | Iron: 1mg

Nutritional values are approximate.

Grilled Tuscan Vegetables

You could’ve just knocked me over with a feather. I don’t usually find myself bragging about a vegetable side dish like these grilled Tuscan vegetables. Until now. All of the flavors of the vegetables came together perfectly. Smoky bacon, a little garlic and a combination of tastes and textures cooked in almost no time.

Grilled Tuscan Vegetables

A Great Dish That Welcomes Changes

I’ve made grilled Tuscan vegetables a few times now and sometimes I leave out the Parmesan and sometimes I don’t. Sometimes I add a pinch or two of red pepper flake for a little kick and sometimes I don’t. And if I don’t have spinach leaves? Or zucchini? That’s ok. You can substitute just about any vegetable you have on hand, but I always include the artichoke hearts. Always. They’re the something that makes these vegetables different than pretty much any side dish like it.

I recommend that you use a grill basket when making this dish if you’re not using foil. It makes cooking easier and you don’t have to worry about anything falling through the grates. And cleanup is easier too! I’ve got several and they’ve lasted for years and years.

Also try my fantastic grilled marinated medley and my awesome grilled marinated asparagus!

Grilled Tuscan Vegetables
Print Pin
5 from 1 vote

Grilled Tuscan Vegetables

You could’ve just knocked me over with a feather. I don’t usually find myself bragging about a vegetable side dish like these grilled Tuscan vegetables. Until now. 
Course Side
Cuisine American
Keyword grilled, vegetable
Prep Time 15 minutes
Cook Time 15 minutes
Total Time 30 minutes
Servings 6 servings
Calories 144kcal

Ingredients

  • 1 8 ounce artichoke hearts drained, chopped roughly
  • 3 medium zucchini cut into 1/4″ slices
  • 4 cups baby spinach leaves washed
  • 2 plum tomatoes cut into 1/4″ slices
  • 4 ounces button mushrooms cut into 1/4″ slices
  • 4 cloves garlic chopped
  • 2 tablespoons olive oil
  • 1 teaspoon Kosher salt
  • 6 slices bacon trimmed of excess fat and chopped
  • ¼ cup Parmesan cheese grated

Instructions

  • Fire up your grill for direct cooking over medium heat.
  • Note: You can make these veggies in a grill basket or in foil packets.
  • Combine all ingredients except for the cheese.
  • Divide between large pieces of foil and seal tightly or transfer to a large grill basket.
  • Place over the fire and grill for 15 minutes or until the vegetables are the desired tenderness, tossing or shaking occasionally.
  • Remove from grill. If using packets, open them carefully as they will be full of steam.
  • Serve garnished with the Parmesan cheese.

Notes

Also great with Pecorino-Romano cheese.

Nutrition

Calories: 144kcal | Carbohydrates: 6g | Protein: 7g | Fat: 11g | Saturated Fat: 4g | Trans Fat: 1g | Cholesterol: 17mg | Sodium: 668mg | Potassium: 533mg | Fiber: 2g | Sugar: 4g | Vitamin A: 2295IU | Vitamin C: 27mg | Calcium: 94mg | Iron: 1mg

Nutritional values are approximate.

Loaded Roasted Twinkies on the Char-Broil Big Easy

Note: This recipe was developed using the Char-Broil Big Easy Oil-Less Fryer. If you are cooking using the Char-Broil Smoker-Roaster Grill you should cook with the lid open and the temperature set to High. You might also need to adjust the cooking time.

Oh how I do love cooking Twinkies on my Char-Broil Big Easy. They’re the world’s easiest dessert, topped with darn near anything you have in the pantry, fridge or freezer. The Twinkies take only a few minutes to get a nice little crunch on the outside, while the insides get all oooey gooey. I topped my loaded roasted Twinkies on the Char-Broil Big Easy with Nutella, marshmallows, whipped cream, toffee and for a hint of healthy, some fresh strawberries.

Loaded Roasted Twinkies on the Char-Broil Big Easy

The Big Easy Does Dessert Too!

Spreading a bit of Nutella on the Twinkies first gives the remaining ingredients something to hold onto. They don’t slide off and into the pan. That’s not to say that if they did slide off that it’d be the end of the world. The more toppings the better because loaded roasted Twinkies on the Char-Broil Big Easy are meant to be loaded!

The bunk bed basket lets you double the amount of cooking space you have on your Big Easy. And it’s easy to take in and out of the cooker too!

Also make up a batch of chocolate chip cookies or some bloomin’ apples for dessert. On your Big Easy. Yep, that’s right, on your Big Easy!

It’s always a good idea to keep a few spare grease trays on hand for your Char-Broil Big Easy.

Love your Big Easy as much I love mine? Check out my Big Easy Add-Ons page and my free Big Easy eCookbook!

Loaded Roasted Twinkies on the Char-Broil Big Easy
Print Pin
5 from 1 vote

Loaded Roasted Twinkies on the Char-Broil Big Easy

This is the world’s easiest dessert. And they can be topped with darn near anything you have in the pantry, fridge or freezer. 
Course Dessert
Cuisine American
Keyword Big Easy, Char-Broil, dessert
Prep Time 5 minutes
Cook Time 10 minutes
Total Time 15 minutes
Servings 2 servings
Calories 368kcal
Author Mike

Ingredients

Instructions

  • Fire up your Big Easy.
  • Spread most of the Nutella out on the bottom of the pie pan.
  • Add the Twinkies then top with the remaining Nutella (It gives the marshmallows something to stick to).
  • Place into the Big Easy for 10 minutes or until the Twinkies start to brown and crisp a bit and the marshmallows have melted.
  • Remove and add whipped cream, Toffee and berries.
  • Serve.

Notes

You’ll need a small pie pan or other dish for the Twinkies. Do not roast them directly on the Big Easy rack.

Nutrition

Calories: 368kcal | Carbohydrates: 42g | Protein: 2g | Fat: 21g | Saturated Fat: 17g | Trans Fat: 1g | Cholesterol: 31mg | Sodium: 55mg | Potassium: 168mg | Fiber: 2g | Sugar: 39g | Vitamin A: 342IU | Vitamin C: 1mg | Calcium: 51mg | Iron: 2mg

Nutritional values are approximate.