This is my year-after-year go-to technique for making gravy for turkey. Smoked turkey wings make an absolutely delightful turkey broth that, with just a few more ingredients added, makes a gravy that is perfect for Thanksgiving turkey. Or turkey any time. Making this gravy takes a little effort, but it is very much worth the time.
One Crazy Delicious Gravy
If you want to skip the trouble of making the broth, you can make a gravy using roasted turkey wings instead. In a pinch you can use store-bought turkey broth instead, but it truly won’t be as magical. Using smoked (I use my Weber smoker) turkey to make the broth really adds a tremendous flavor to the gravy. It is something I look forward to all year long.
I like to use my good ole trusty Dutch oven to make this gravy. And pretty much darned near anything like it on my stovetop. It’s nice and big and sturdy. That extra weight helps it maintain and distribute heat perfectly. As an added bonus, it’s actually pretty easy to clean up too!
In a pinch you can use store-bought turkey broth instead, but it truly won’t be as magical. Using smoked turkey to make the broth really adds a tremendous flavor to the gravy. It is something I look forward to all year long.
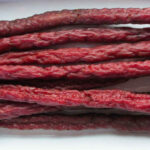
What fun these smoked spiral hot dogs were to make and devour! I’ve made spiral dogs before, but this technique is much better than my old way. The key is inserting a skewer thru the dogs to keep them together after slicing. And of course, the skewer keeps you from slicing in too far. I smoked my spiral dogs, but you could just as easily grill them.
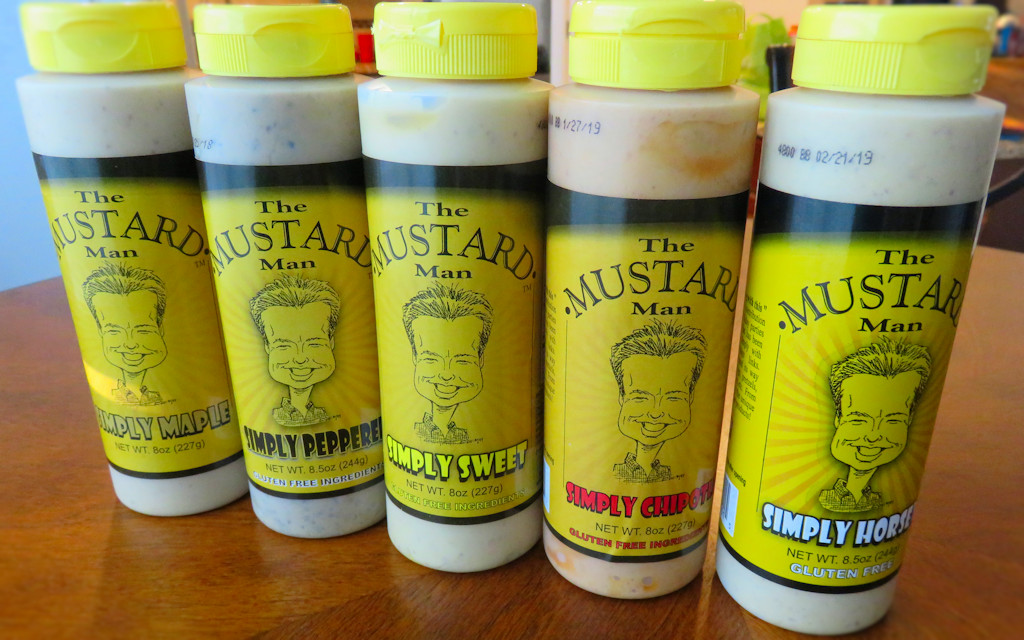
Good Mustard Makes A Good Dog Great
My wife and I recently ran across The Mustard Man at an event at the Jungle Jim’s market in Fairfield, OH. After sampling each of mustard I instantly picked up a bottle of each one. They are truly fantastic. I squeezed a bit of the Simple Pepper and Simply Maple on each of our smoked spiral dogs. The mustard runs down into the spirals, filling each bite with mustardy goodness. We cannot recommend The Mustard Man’s mustard enough!
Fire up your smoker for 225 F. You can also make these hot dogs on a grill
Carefully guide the skewer through the center of the hot dogs. If you get the skewer crooked at it pokes out of the side of the dog just pull it back and try again. I found that laying the hot dogs down on a flat surface and sliding the skewer in from the side, parallel to the counter top, worked best.
Lay the skewered dog down onto a cutting board or flat surface.
Holding a knife at a 45 degree angle, starting at one end of the dog, cut into the dog down to the skewer. Start rolling the hot dog, keeping the knife inserted into the hot dog, making cuts that are about 1/2″ apart. Continue rolling and cutting until you reach the other end of the hot dog.
Gently pull the dog apart, separating the cuts. Be careful, you don’t want to break it.
Sprinkle with your favorite seasoning.
Place dogs onto the smoker and smoke for 2 hours. If grilling grill until done as desired.
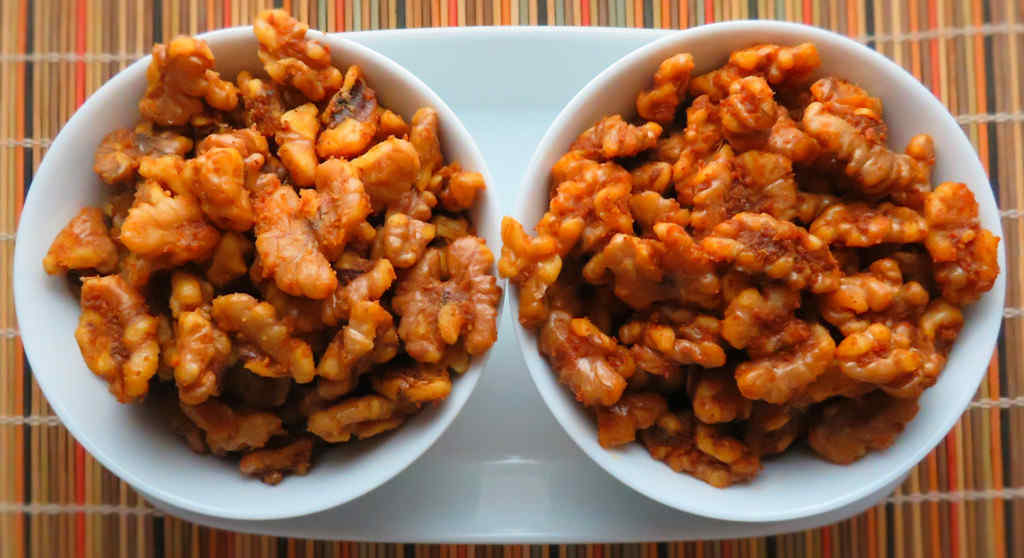
I’m usually a pecan kind of guy, but these cheddar walnuts made a walnut believer out of me with just one nut. Great buttery texture with a sharp cheddar coating, these nuts disappear in no time. I made the nuts two ways: a nice mellow cheddar version, and a spicy fiery cheddar version. My wife took these walnuts to work, and I can tell you I definitely didn’t make enough. They were loved by all!
Go Nuts With It
There’s no reason you couldn’t use the same approach I used to make cheddar walnuts on other nuts. Pecans or peanuts are great. Just keep in mind, smaller nuts will roast quicker, so you might want to cut back on the baking time.
I like spicy foods, so I wouldn’t be afraid to double the hot and spicy ingredients. Nothing wrong with a super-duper double-spicy version. But I would put up a little sign by them if I was serving them to a crowd. No point in hurting someone!
There’s no reason you couldn’t use the same approach I used to make cheddar walnuts on other nuts, such as pecans or peanuts. Just keep in mind, smaller nuts will roast quicker, so you might want to cut back on the baking time.
Note: This recipe was developed using the Char-Broil Big Easy Oil-Less Fryer. If you are cooking using the Char-Broil Smoker-Roaster Grill you should cook with the lid open and the temperature set to High. You might also need to adjust the cooking time.
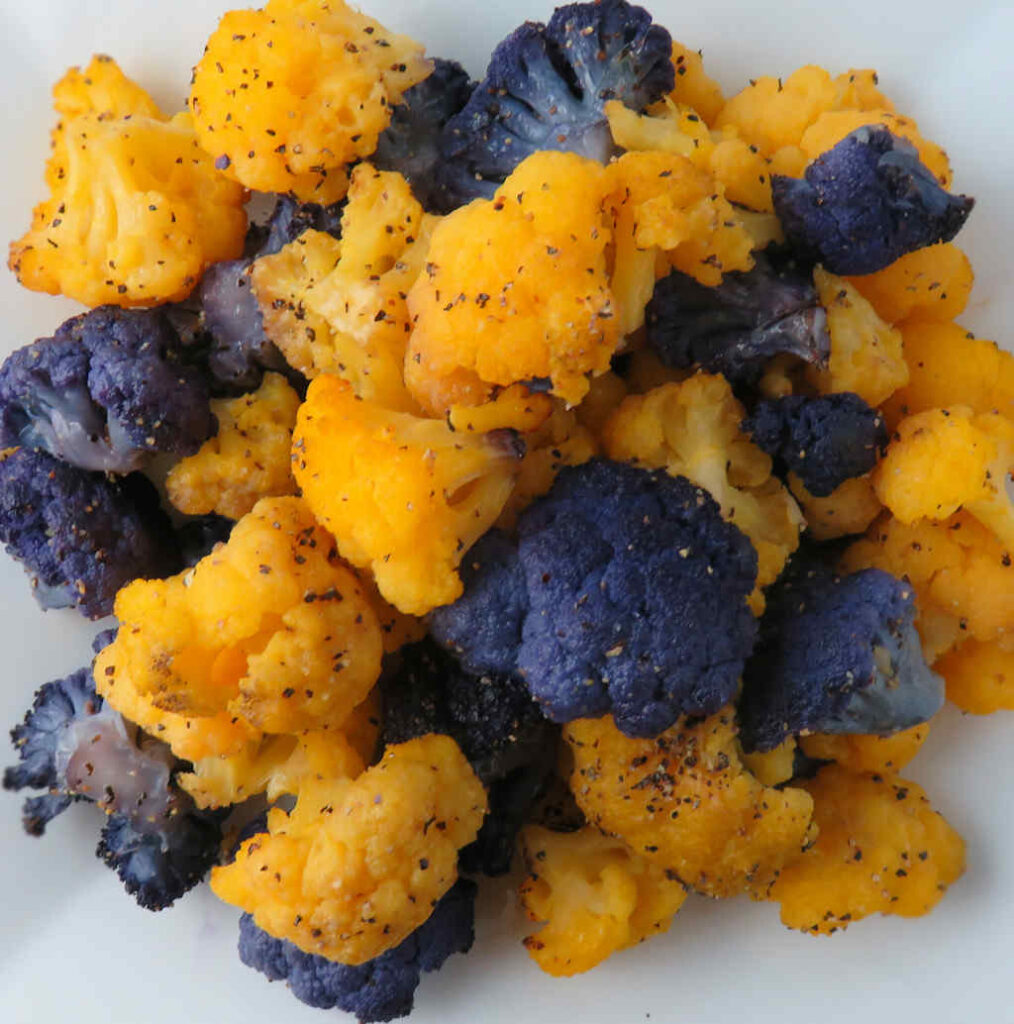
Roasted cauliflower is something we make often on the Char-Broil Big Easy. It takes absolutely no time at all to prepare and always comes out perfect. In the past I’ve roasted entire heads of cauliflower in the Big Easy. The only trick to using a whole head of cauliflower is that you have to make sure you buy one that’ll fit into the Big Easy basket.
Perfectly Tender And Tasty
This time I thought I’d try using florets instead. And for a little color and ‘ahhhhh’ factor, I used a combination of purple and orange cauliflower. Topped with what has become our house-favorite seasoning, Casa Seasoning from AlbuKirky Seasonings, this cauliflower was tender and tasty. Perfect.
To keep the roasted cauliflower florets from failing thru the Char-Broil Big Easy baskets I lined them foil. With the addition of two bunk bed baskets you could easily cook a good-sized head of cauliflower. You can also use this same recipe for making broccoli.
Note: I prefer to remove the florets from the cauliflower and then steam them. You can also boil them, but steaming them isn’t as violent so they tend to stay together. Also, if you are using purple or orange cauliflower boiling tends to remove some of the color.
Fire up your Big Easy.
Lay a single layer of foil inside the basket and/or bunk bed baskets.
Add the cauliflower in a single layer. Try to not over-crowd too much. A little is ok, but stacking them won’t result in even roasting.
Lower the basket into the cooker and cook for 10-20 minutes depending on how done you want your cauliflower.
Remove and let cool slightly before seasoning with your favorite seasoning and serving.
Notes
To cook a medium head of cauliflower all at once I used two bunk bed baskets, both lined with foil. You could get by with a single bunk bed basket and then also line the bottom of the Big Easy basket with foil.
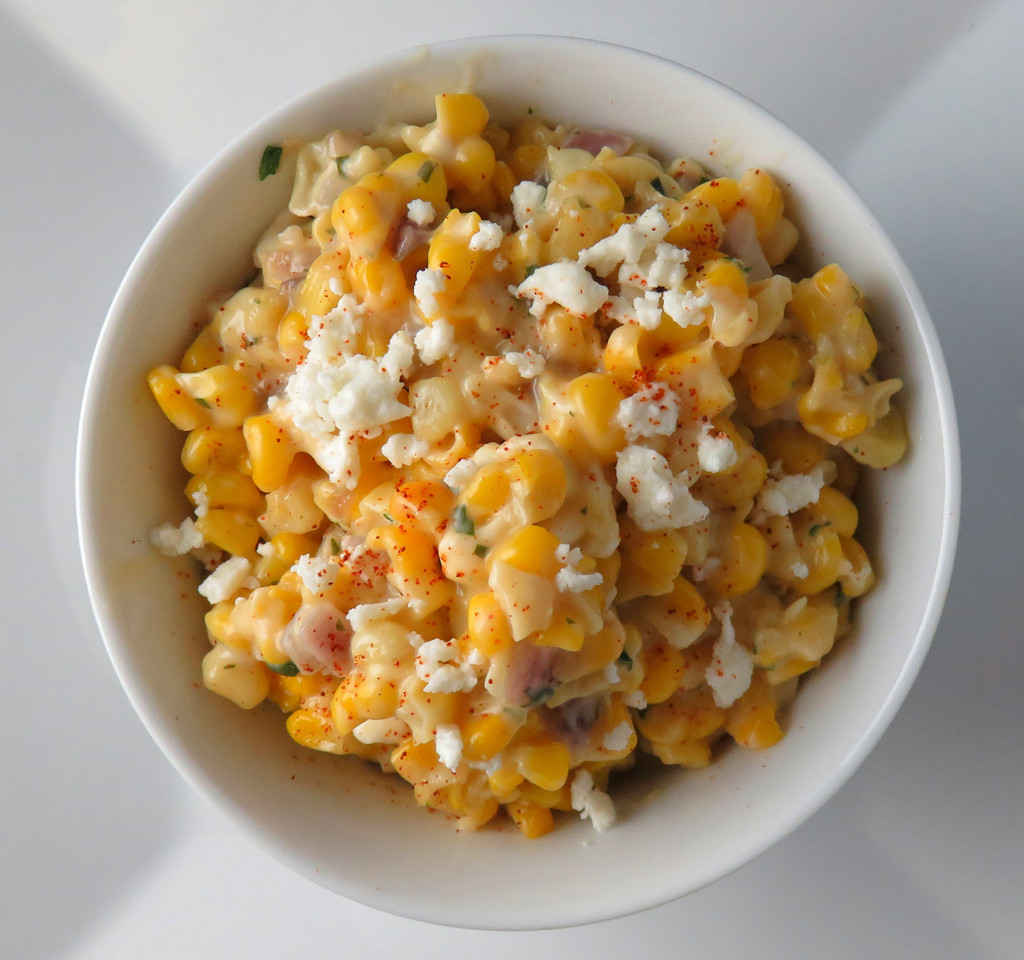
Now, if it was summer I certainly would’ve made this deconstructed Mexican style corn using peeled fresh corn-on-the-cob. But, sadly, it’s not summer. So I had to go with Plan B: use up some of the fantastic sweet corn I put up for winter. I didn’t char the corn, which really is a must to make this authentic street-style, but that’s ok. The dish is absolutely delicious none-the-less. It tastes and feels like summer, thanks mostly to the citrus. And it has just a little kick, which it needs to offset the sweetness of the corn.
Mayonnaise Is A Good Thing
Mayonnaise in corn may seem odd, but it makes the corn wonderfully creamy, but with a little tang that you wouldn’t get with something like cream. Every bite of this deconstructed Mexican style corn has that bit of tang. It’s refreshing and different.
The dish is absolutely delicious. It tastes and feels like summer, thanks mostly to the citrus. And it has just a little kick, which it needs to offset the sweetness of the corn.
If you are using corn-on-the-cob, roast the corn on a grill or under the broiler. Let cool and then cut the kernels from the cobs.
If you are using corn kernels, you can roast them first on a sheet pan under the broiler, but keep an eye on them so they do not burn. Stir occasionally.
Heat the oil in a large skillet over medium-high heat.
Add the onions and saute for 5 minutes.
Add the corn and saute for another 5 minutes.
Reduce heat to low and stir in half of the cheese, the mayonnaise and 1/2 teaspoon of chipotle chile powder. Season with salt to taste.
Serve sprinkled with the remaining cheese and chipotle chile powder, along with the chopped cilantro.
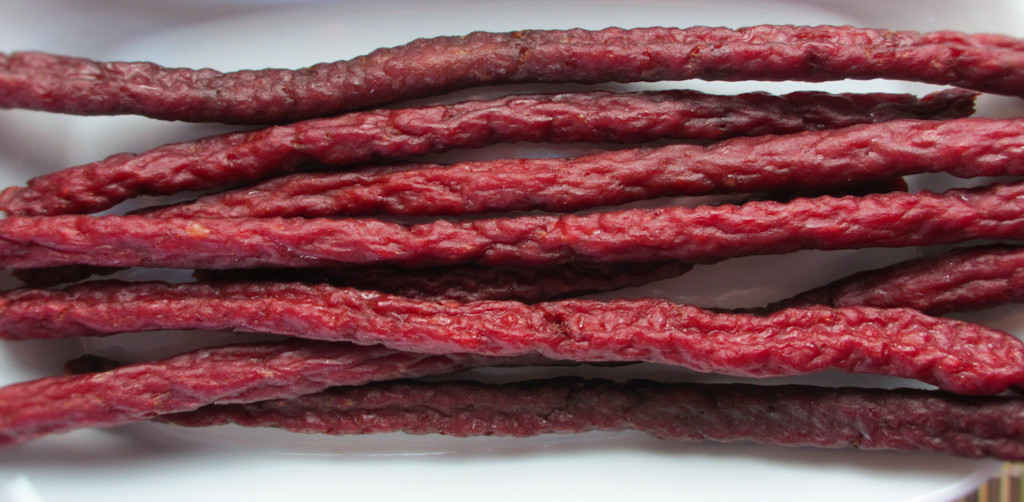
I have been loving making jerky. I’ve been using ground top round for my ground beef jerky, but any lean ground meat will work. This Cajun ground beef jerky made on the Nesco Snackmaster Pro has a nice mellow spicy flavor that is definitely not overwhelming. The meat has the perfect ‘bite’, just a little tug.
The Cajun flavoring from Eastman Outdoors has a bit different flavor than the version from AC Leggs. I love them both. This one has a stronger Cajun flavor, but is less spicy than the one from AC Leggs.
Rotating The Trays Is Important
Make sure you rotate your trays every 2 hours or so when you make Cajun Ground Beef Jerky on the Nesco Snackmaster Pro. The bottom trays will not dry as quickly as those on top. Rotating the trays will give you nice, even drying and perfect jerky on every level.
Get Extra Trays To Make More Jerky
I like to load up my dehydrator. To do that I picked up a handful of extra trays. They really add a whole lot more drying space! Since I have to rotate my trays, I write a number on each one on a piece of blue painter’s tape so I can keep track of them.
Cajun Ground Beef Jerky on the Nesco Snackmaster Pro
This Cajun ground beef jerky made on the Nesco Snackmaster Pro has a nice mellow spicy flavor that is definitely not overwhelming. The meat has the perfect ‘bite’, just a little tug.
Course Dehydrator
Cuisine Jerky
Keyword beef, dehydrator, jerky, nesco snackmaster pro
2teaspoonspink curing saltComes with the seasoning. Optional if you’re going to refrigerate the finished product
½cupswater
Instructions
Place beef in a resealable bag or container.
In a small bowl whisk together the seasoning, curing salt and water. Pour over the meat and seal. Shake to coat.
Refrigerate the meat for up to 8 hours, shaking or massaging every hour or so to get the marinade distributed and absorbed evenly.
Remove meat from the marinade and add to a jerky gun. Squeeze out onto Nesco trays. Do not overlap meat.
Add the dehydrator top, set to maximum temperature setting and dehydrate for 5 hours, rotating the trays (bottom to top) every 2 hours or so.
To test for doneness remove a piece and let cool slightly. Try to bend the meat. If it gives and starts to tear at the bend it is done. If it bends without tearing return to the dehydrator and let it run another 15 minutes and test again. If the meat is crunchy it is overdone but still good. It’s really a personal preference as to how you like your jerky. Soft, chewy, crunchy. There’s no wrong here.
Let cool before storing in an airtight container.
Notes
The package for the Eastman Outdoors jerky seasoning states that it makes up to 5 pounds of jerky. I personally feel that the flavor is too mellow, so I use just about an entire package for 1 pound of jerky. I end up with a little left over seasoning, which I store in a labelled air-tight container. I’ll eventually mix it with more seasoning. I think I can get 3 pounds of well-seasoning jerky out of two packages of Eastman Outdoors mix.This recipe is for starting with 1 pound of meat. You’ll end up with about 1/2 pound in the end. You can easily double/triple/etc this recipe for large quantities of meat, however 5-6 pounds is about all you can fit onto a Nesco Snackmaster Pro fitted with 12 trays (the unit comes with 5).
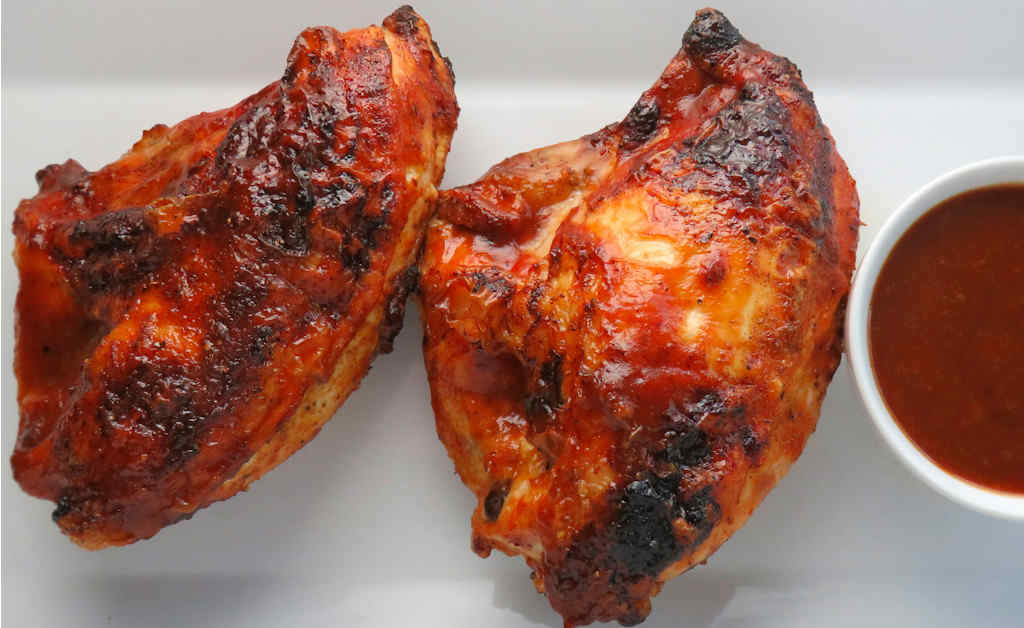
Note: This recipe was developed using the Char-Broil Big Easy Oil-Less Fryer. If you are cooking using the Char-Broil Smoker-Roaster Grill you should cook with the lid open and the temperature set to High. You might also need to adjust the cooking time.
Roasted chicken on the Char-Broil Big Easy is something I could make and eat all day long. I never get tired of it. I usually make split chicken breasts or whole chickens. This time I used a great off-the-shelf rub, Dizzy Pig’s Raging River, and cooked the chicken until done. I then brushed on my fantastic homemade peach BBQ sauce. Wow, what great chicken!
The Perfect Chicken. Every Time.
You can make any chicken using this same technique but substitute your own rub or seasoning and any sauce you want. Just make sure that you don’t put the sauce on until the end (after the chicken is fully cooked) or it will burn. The Big Easy cooks at a high temperature. It won’t take long for it to set the sauce.
Visit my other site, For The Wing, for all things chicken-wing!
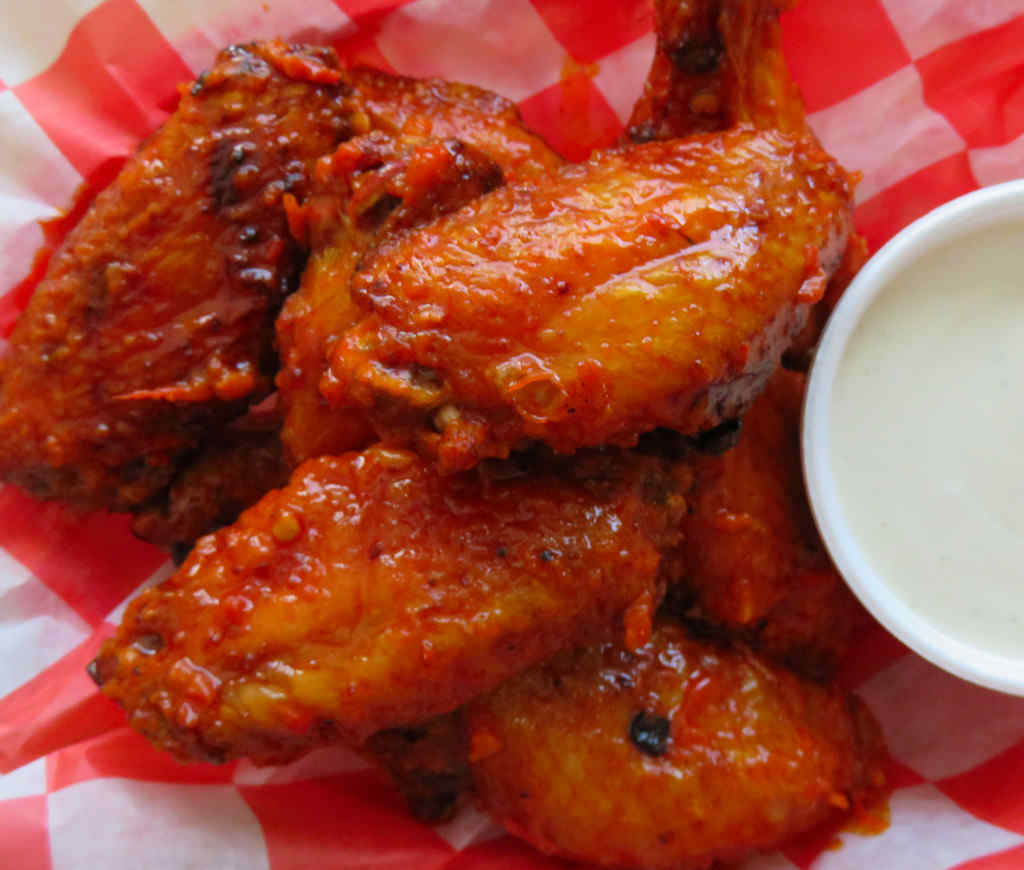
After making roasted harissa cauliflower the other day (my first encounter with harissa) I knew after the first bite that the next thing I was going to make with the spicy red pepper paste would be Harissa chicken wings. There was no doubt in my mind that I was in for a wonderful treat. You get a nice kick, but don’t be afraid. Harissa is not crazy spicy, not at all. It has a wonderful earthy flavor to it. I could eat it all day. On wings I could eat it all week.
The paste for making these harissa chicken wings can be found in the Mediterranean section of your local grocery store. I haven’t tried making it home yet, but I will. The consistency reminds me a bit of hummus, though it’s certainly not hummus. But, oh…. it just hit me… harissa sure would be great in hummus! I’m off to try that now!
I store my homemade sauces in squeeze bottles. If refrigerated, I set them out thirty minutes to an hour before using so they come to room temperature. You don’t want to put cold sauce on hot food!
These have a nice kick, but don’t be afraid. Harissa is not crazy spicy, not at all. It has a wonderful earthy flavor to it. I could eat it all day, On wings I could eat it all week.
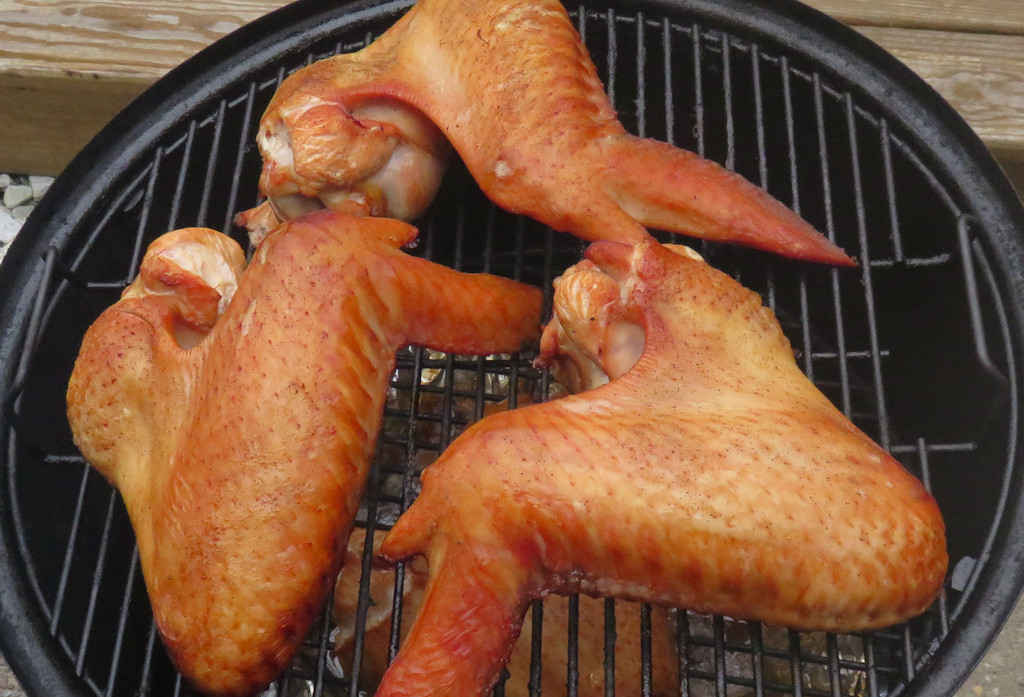
This is my year-after-year go-to technique for making turkey broth. Smoked turkey wings make an absolutely delightful smoked turkey broth that, with just a few more ingredients added, makes a gravy that is perfect for Thanksgiving turkey. It is also a great substitute for chicken broth in soups. The smoked turkey adds the perfect lightly-smoky flavor, all in a very rich broth. You could just eat it out of a bowl by itself.
The Richest Turkey Broth To Be Found
You’ll get about 8 cups of smoked turkey broth when you are done. You can find turkey wings that already smoked in some grocery stores. You can use them instead of smoking your own, but you may want to get more than 4 of them. They tend to be smaller. As you can tell from the picture above I grabbed the largest fresh turkey wings I could find. It’s very easy and well, cool looking.
I prefer to use fruit or nut woods when I smoke unless I want a heavier smoke flavor. Pecan, apple or cherry are my favorites. I used apple to smoke the turkey for this recipe.
This is my year-after-year go-to technique for making turkey broth. Smoked turkey wings make an absolutely delightful smoked turkey broth that, with just a few more ingredients added, makes a gravy that is perfect for Thanksgiving turkey.
Fire up your smoker for cooking at 250 F. Use a wood such as hickory. You’ll want plenty of smoke.
Place the wings onto the smoker. No need to season them.
Smoke for approximately 2 hours or until the internal temperature reaches 165 F.
Remove from the smoker and make the stock.
For the broth
Place all of the ingredients along with the wings into a large stock pot.
Add enough water to just cover everything.
Bring to a boil, then reduce to a simmer and simmer for at least an hour, up to 4 hours, until the turkey meat is falling off the bone. Add more water if needed.
Let cool completely then filter the broth through a sieve.
You can use the broth immediately but I prefer to refrigerate it overnight first. This lets all of the fat coagulate on top, making it easy to remove before using the broth.
Notes
You’ll end up with much more broth than is required to make 3 cups of gravy. Freeze the leftover broth or double or triple the gravy recipe if you desire.
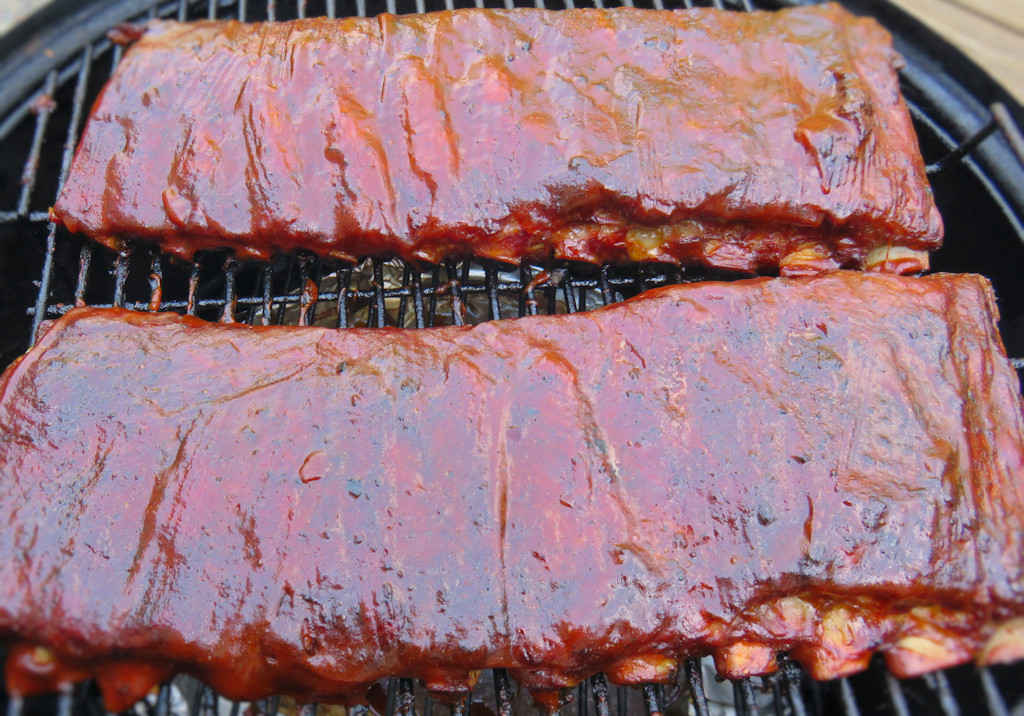
I have a bit of an addiction to buying pre-made BBQ sauces. Mostly the obscure ones that you can’t get in stores. The ones you have to order directly from the BBQ joint that makes them. Well, that’s not the cheapest hobby in the world, so I set out to make my own basic BBQ sauce (based on one from Myron Mixon) and I’m very happy with the results. It’s not a complicated or fancy sauce, but it has the perfect consistency and taste. I can add more hot sauce for a spicy version, or I can add more liquid smoke for a more hickory-flavored sauce.
A Great Basic Sauce
I’m going to call this basic BBQ sauce ‘done’. It’s my go-to basic sauce for everything from pulled pork to ribs to brisket to chicken or my favorite, rib tips. I also slather basic BBQ sauce on my grilled hot dogs and hamburgers. It’s also fantastic on BBQ chicken pizza!
This is not a complicated or fancy sauce, but it has the perfect consistency and taste. I can add more hot sauce for a spicy version, or I can add more liquid smoke for a more hickory-flavored sauce.