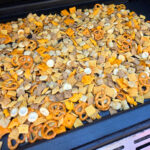
Oh we’ve all had the standard queso dip. I’ve made it many times. I’ve even changed it up a bit now and then. But not like this. Spinach queso dip is just different enough to make you go ‘wow’ while still enjoying what you know and love as the classic: creamy, melted cheese with tomatoes mixed in! This is what that classic cheese dip grows up to be (or wishes it could be!).
Spinach queso dip is also great on a grilled cheese sandwich. Yep. Trust me. Just substitute a healthy spoonful or three of the dip for whatever cheese you normally put on your grilled cheese and toast ‘er up. I made mine on a griddle, making a panini. Just don’t try to squish down on it much, once the dip gets hot and start to melt it’s gonna get to running out the side! It’s going to be ooey-gooey delightful!
This recipe is best made in a small slow cooker. A little 1 1/2 quart-sized one works perfectly. I think you could also use a fondue pot.
You don’t have to have a bunch of fancy equipment (an injector is a must!) or ingredients to make a really, really great dish for Thanksgiving. My easy grilled turkey breast takes less than two hours to make. It comes out delicious, moist, and tender, with the best crunchy skin ever. And other than a little time basting, it’s about as fuss-free as you can get. And pretty much pretty hard to goof up, too!
This recipe for an easy grilled turkey breast starts with a frozen breast that has already been brined. Most frozen turkey comes this way. The brining process means you don’t have to brine it yourself. It also means things are going to be easy.
You can get by without an injector if you don’t have one, though I highly recommend the investment. If you don’t have one, simply (and carefully) separate the skin from the turkey on the front part of the breast. Just go slow, gently sliding your fingers in between the skin and meat and it will come apart. Then, dip your fingers into the butter mixture (after letting it cool slightly!) and rub it on the meat beneath the skin where you separated the two. That’s it. Get plenty up in there (about half of the mix) and you’ll have great results!
You’ll need (and want) a quality injector when you prepare your turkey breast for grilling. This is not the time to skimp and get a flimsy injector. You want strong needles with the right-sized holes for making sure your injection liquid gets in to every nook and cranny of the turkey breast. I use one similar to the injector below and love it!
Rinse the breast and pat dry. Trim off any excess fat.
Melt the butter in a small saucepan over medium heat. Stir in the seasoning
Fill an injector with half of the butter mixture (working in batches if necessary) and inject throughout the turkey. Get the needle deep into the meat of the thighs and breast.
Blot the turkey breast dry.
Place the turkey breast on a rimmed baking sheet and let sit out at room temperature for 1 hour.
Place the breast over the aluminum pan. Close the lid and cook for 1 to 1 1/2 hours, basting with the remaining butter mixture every 20 minutes.
After 1 1/2 hours, and once the breast has started to turn golden brown, keep cooking and basting until the internal temperature reaches 165 F. Make sure to measure the temperature in several locations, and do not let the thermometer touch the bone when testing.
Remove turkey and let rest for 15-20 minutes before slicing. and serving.
Notes
Use a BBQ seasoning that will dissolve easily in the butter. You don’t want big chunks of ‘stuff’ that might clog the injection needle. If you have to, strain the butter mixture before injecting.
I am a smoked rib tip kind of guy. Usually. But I had some tips leftover from a few racks of St Louis-style ribs and I was just not feeling the fire-up-the-smoker love. I just wasn’t in the mood. I was in the mood to drop them in a slow cooker for a few hours, though. Served with some air-fryer tater tots (aka Tots and Tips!) these slow cooker rib tips were really, really good. Sticky sweet, lightly smoky, and oh so tender and juicy I really enjoyed them. Will they replace my low-and-slow smoked tips? No, but I’ll definitely make them again.
If you’re not a fan of liquid smoke, or you don’t have any on idea, don’t worry! Just use a BBQ sauce that has smoky flavor instead, it’ll make these slow cooker rib tips just as tasty. Any good mesquite or hickory BBQ sauce will do. As for the rub, I used a rub with a bit of a kick to it. Some spiciness to offset the sweetness from the BBQ sauce. You can keep it all sweet if you want and use a brown sugar-based rub.
This hot broccoli dip fit into my plans perfectly. I needed a dip for a family get-together, and I needed a big batch of it to boot. But, I figured if I had leftovers I had better make a dip that I could use for other than a dip. This dip is more than a dip. It’s also absolutely fantastic (maybe, just maybe, more fantastic than when used as a dip) on baked potatoes.
This hot broccoli dip was a big hit at our get-together. I’d make it again, and make a little extra for baked potatoes. If you’re serving it as a dip, serve with celery, carrots, crackers or thick chips, such as Fritos Scoops. Wimpy chips need not apply!
Cook bacon in a skillet until crispy. Remove to a paper towel-lined plate to drain. Crumble or chop fine.
Bring a large pot of salted water to a boil. Cut the broccoli florets off the head. Add to the boiling water and let boil for 1 1/2 minutes. Drain and rinse with cold water. Chop into small pieces.
Combine all ingredients in a large bowl.
Spray a 9″ x 9″ baking dish with non-stick spray. Add the dip mixture and spread out evenly. Cover and bake for 20 minutes, or until hot and bubbly,
I’m not sure exactly what word is above ‘incredible’ but that’s what these honey hot fried shrimp were. Beyond incredible. Easily some of the best shrimp I’ve ever had and definitely the best I’ve made. The shrimp are battered and deep-fried. The batter is amazing, producing the perfectly crunch coating that is flavored with one of my favorite seasonings, Old Bay. Then the shrimp get a light drizzle of a wonderful sauce. The sauce is a tasty combination of honey, hot sauce and sesame oil. It’s decidedly different.
You don’t drown these honey hot fried shrimp in sauce. The sauce is packed with flavor so not much of it is required. You don’t want to bury the tasty shrimp either. So go lightly with it and you’ll love the end result. And you’ll definitely want to make this dish again and again.
If I’m cooking for a crowd, I’ll break out my big deep fryer. But, if it’s just the two of us, I’ll fire up my Fry Daddy fryer. It’s the perfect size for both of us. It fries everything perfectly. And as an added bonus, it doesn’t use a lot of oil, which saves me money.
This slow cooker ham and bean soup was incredible. My wife proclaimed it to be the closest we have ever come to duplicating her mom’s recipe. That’s high praise indeed. Every bite is packed with wonderful ham and bean flavor. The broth is nice and thick, perfect on a cool fall day. The ham is tender and delicious. The beans are cooked perfectly. All you need is some hot-out-of-the-oven cornbread and you’re in for one fantastic meal.
This was the first time I’ve cooked using ham base. It really made this slow cooker ham and bean soup amazing. Like its beef counterparts, beef and chicken base, it adds a depth of flavor you just can’t get on your own. At least, not easily.
I made this soup in my slow cooker but you could make it on the stove-top also. Just bring the soup to a boil, then reduce the heat to a slow simmer and continue simmering until the beans are tender, 2-4 hours. Stir them occasionally. Like the slow cooker version, you might find that the soup is even better the next day.
Place beans in a large pan or bowl. Cover with water and let stand overnight. Check the water at least twice to make sure the beans stay covered, adding more water if needed.
Lightly spray a slow cooker with non-stick spray.
Drain the beans and place in the slow cooker.
Add the onions, garlic, ham, water, apple and ham base. Stir.
Cover and cook on low 8-10 hours or until beans are tender, stirring occasionally.
Remove apple pieces and serve.
Notes
We think this dish is really best (and thicker) the next day. After it has cooked for 8-10 hours and the beans are done, we let it cool then place in the fridge overnight. We reheat the soup on the stovetop and serve.
Grits. If I had to choose only one food to keep on a deserted island, it’d be grits. Ok, I’d need a few extra things to make them, but that’s it. Top of my list? Buttermilk grits made in my slow cooker. Just like Gilligan’s Island, my deserted island would have electricity. Not only for my slow cooker but keeping my buttermilk, cheese and butter refrigerated. Then I could sit on the beach and enjoy this crazy good, crazy creamy dish. It has that nice buttermilk tang to it, for sure. It’s different than your usual grits, and oh so good.
Make sure you lightly grease your slow cooker before adding everything to make these buttermilk grits. Although the fat in the buttermilk and the butter should keep it from sticking, better safe than sorry.
This slow cooker New England clam chowder was much. much better than I ever expected. We both loved it, in fact. So much that I am already ready to make it again. Not only is it packed with clam flavor in a wonderfully creamy broth, it’s easy to make to boot! The perfect bowl of warm happiness on a dreary fall day! Until I can get up northeast for the real deal, this will have to do!
You’ll need 2 cups of clam juice from the canned clams. If you don’t quite get that much juice add a bit of water or better, grab a bottle of clam juice while you’re at the store picking up the clams. You’ll want that clam flavor to be as pronounced as possible.
I used a smoky bacon in this slow cooker New England clam chowder. It adds a nice complexity, complimenting the cream and clams perfectly. It makes me wonder what a clam chowder made with smoked clams would be like! I do suggest that you make sure and not over-cook the bacon. You don’t want it hard and crispy. You want to be able to bite thru it easily.
oyster crackersfor serving. I like to roast my crackers in a 200 F oven for 20 minutes to get them nice and toasty first!
Instructions
Drain the clams into a sieve over a bowl. Keep the juice. Transfer the clams to a bowl, cover, and place in the fridge.
Heat a large skillet or Dutch oven over medium-high heat. Add the bacon. Cook until just turning golden brown, but not crispy. Transfer bacon using a slotted spoon to a a slow cooker.
Transfer 2 cups of the clam juice (discard the rest) and the remaining ingredients except for the half-and-half and reserved clams to a slow cooker.
Cook on high for 4 hours.
Pour the half-and-half into a large bowl. Slowly ladle some of the hot liquid from the slow cooker into the bowl, stirring. Don’t add it too quickly or it will curdle the cream. Once the cream is warmed pour it into the slow cooker.
Add the clams, stir, and cook for 1 more hour.
Notes
I added 2 more cans of clams (minus the juice), 2 more potatoes and a few extra strips of bacon.
I make a lot of quick fix potato chips. They’re easy like the name implies. Just heat up some chips to get the oils out, and season. Because I usually have a ton of wing and BBQ seasonings on hand, they are my usual go-to for chips. That’s where these quick fix garlic ginger teriyaki potato chips came from. These are decidedly different than anything you’ll find at the store. They’re the Asian-inspired chips you wish you could find on the aisles, but fortunately, they’re easy enough to make at home.
The seasoning for my quick fix garlic ginger teriyaki potato chips comes from Croix Valley Foods. It’s a quality, flavor packed mix that is great on pretty much anything. It has just the right amount of ginger flavor. With a hint of garlic. And a good dose (the right amount too!) of teriyaki flavor. For something different, you can’t beat these chips! I certainly couldn’t stop eating them!
So how much seasoning should you put on your chips? Well, it’s up to you of course. I like to start with 1/2 tablespoon. I get the chips coated and take a taste. It’s easy to add more seasoning. But, it’s rather hard to take it away.
I really don’t know what came over me. I took one bite of a one of these open-faced garlic toast Sloppy Joes and just smiled. I’ve always been a huge Sloppy Joe fan. I have several recipes for them here at Life’s A Tomato. And I love garlic toast, be it out-of-a-box or my favorite totally-loaded homemade version. Now I can enjoy both great things in bite-after-bite of downright yummy comfort food goodness. Nope, there’s nothing fancy going on here, but oh, does it ever hit the spot!
One of the really nice things about this recipe for open-faced garlic toast Sloppy Joes is that you can really change it without creating a lot of fuss. There are a ton of different spaghetti sauces on your local grocery store. Try a mushroom sauce. Or maybe vegetable. Substitute Italian sausage for the ground beef and really amp up the Italian-inspired flavors. Kick it up with shredded pepper jack cheese instead!
I highly recommend that you shred or grate your own cheese at home. Don’t buy the pre-shredded or pre-grated stuff. It has stuff added to it to keep it from sticking together. That ‘stuff’ affects how the cheese melts. Shred it yourself and use the good stuff.
Preheat oven according to the garlic toast package instructions.
Meanwhile, crumble the ground beef into a medium skillet over medium-high heat. Season with salt and pepper. Stir and cook until done. Remove any excess fat.
Stir in the spaghetti sauce and Italian seasoning, to taste. Bring to a simmer then reduce the heat to medium-low. Simmer another 5-10 minutes until sauce has thickened, stirring often.
Bake the garlic toast per the package instructions.
Spoon meat mixture over bread slices and top with cheese. Return to the oven and turn on the broiler. Broil 1-2 minutes to melt the cheese.