Spiralized Roasted Pickled Beets

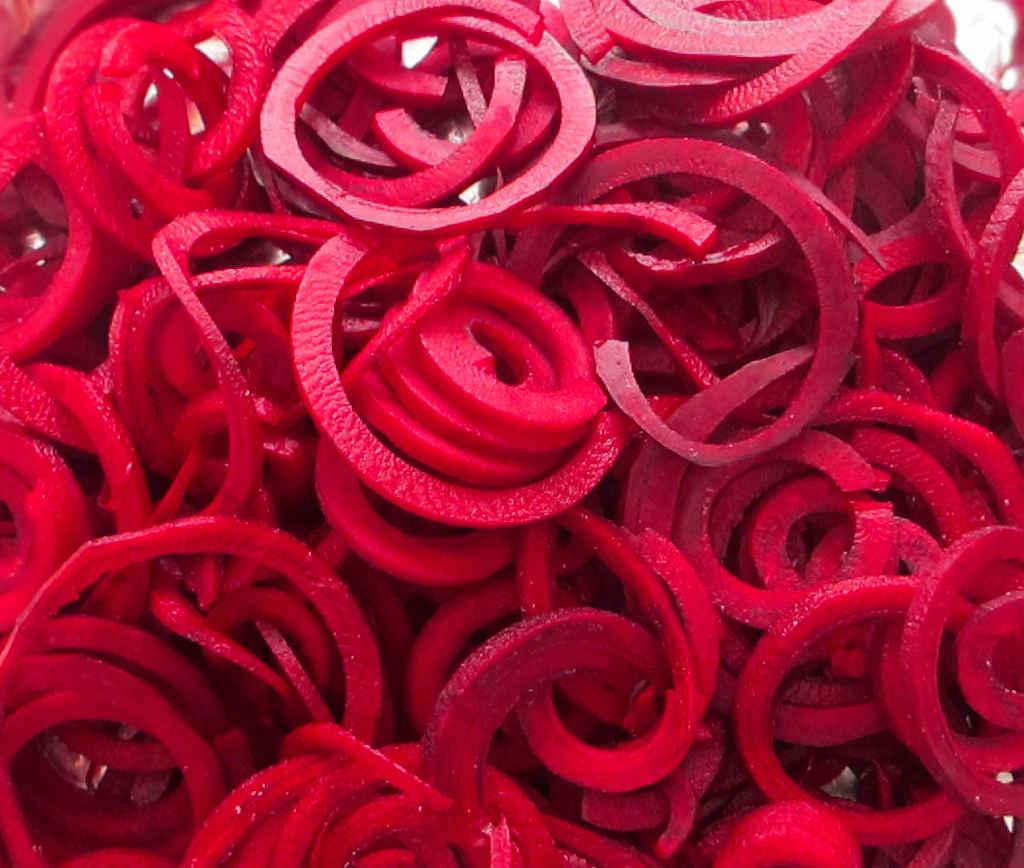
If you would’ve put beets in front of me when I was a kid I would’ve said “Ewwwww”. Then I would’ve pushed them away. And I’d make a face. Now, I find that I really like them, especially when roasted. Or pickled. Or even better, spiralized, roasted, and pickled! The aroma as the beets roast is fantastic. Spiralized roasted pickled beets are amazing. These are not the beets my mom tried to serve me when I was a kid. Sorry, Mom. These are way, way better!

Spiralized Roasted Pickled Beets

Different And Very Delicious

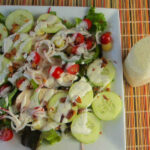
The shallots and rosemary combine with the beets for something really special. They then go into jars with a brine, but not a normal pickling brine. The addition of red onions and tarragon add so much to the beets. Even beet haters will love them!

Make sure you wear kitchen gloves when handling the beets, and clean your spiralizer (and cutting board) immediately after using them. Roasted spiralized pickled beets can be messy.

I also learned quickly that you want to use beets with a little ‘give’ to them – not too hard. A few that I grabbed were hard to spiralize, and I ended up turning them by hand instead of using the crank. No worries, they still came out fantastic! Lesson learned!

Also try some of my long-time favorites, pineapple baby beets and roasted beet salad.

Spiralized Roasted Pickled Beets
Print Pin
5 from 1 vote

Spiralized Roasted Pickled Beets

If you would’ve put beets in front of me when I was a kid I would’ve said “Ewwwww” and pushed them away. Now, I find that I really like them, specially when roasted. Or pickled. Or even better, spiralized, roasted, and pickled! The aroma as the beets roast is fantastic. Spiralized roasted pickled beets are amazing.
Course Side
Cuisine American
Keyword beets, roasted
Prep Time 15 minutes
Cook Time 3 days 2 hours
Total Time 3 days 2 hours 15 minutes
Servings 1 quart
Calories 981kcal

Ingredients

For the roasted beets

  • 6 medium beets cleaned, peeled. Try to select beets that are slightly soft. Tougher beets will be difficult to spiralize.
  • 2 large shallots peeled, sliced thin
  • 2 sprigs rosemary or 1 teaspoon dried rosemary, crushed
  • 2 teaspoons olive oil

For the picking brine

Instructions

For the roasted beets

  • Preheat oven to 400 F.
  • Note: I like to cut a small slit down the sides of the beets. This produces a single half moon spiral.
  • Spiralize the beets. Tougher beets can be difficult to spiralize. Make sure you put the root side into the spiralizer first and have the stem side towards the crank.
  • Wash your spiralizer to keep it from staining.
  • Place beets onto a large piece of foil.
  • Top with the shallots, sprinkle with rosemary, and drizzle with oil.
  • Seal the foil tightly and place into the oven for 30-40 minutes or until tender but not mushy. Be careful opening the packet as the steam will be hot.
  • Let cool completely before pickling.

For the picking brine

  • Bring vinegar, tarragon, salt, sugar and water to a boil in a medium saucepan.
  • Stir until the sugar is dissolved.
  • Remove from heat and let cool completely.
  • Alternative beets and onions in jars.
  • Pour in the brine.
  • Add more water if necessary to completely cover the beets.
  • Seal and store in the refrigerator for at least 3 days before serving.

Notes

Serve cold.

Nutrition

Calories: 981kcal | Carbohydrates: 219g | Protein: 20g | Fat: 4g | Saturated Fat: 1g | Sodium: 4469mg | Potassium: 3805mg | Fiber: 33g | Sugar: 177g | Vitamin A: 593IU | Vitamin C: 65mg | Calcium: 296mg | Iron: 11mg

Nutritional values are approximate.

Jalapeno Popper Cheesy Garlic Bread

I love jalapeno poppers. Jalapenos stuffed with cream cheese are a great thing. The peppers mellow a bit. The creamy cheese cools the heat a bit. So, why not put those same great tastes together and make a jalapeno popper cheesy garlic bread? Yes, why not! Because we’re all tired of the standard garlic cheese bread. I mean hey, it’s good, but it needs some kick!

Jalapeno Popper Cheesy Garlic Bread

More Jalapenos. Or Less.

I made two ‘versions’ of this Jalapeno Popper Cheesy Garlic Bread. The top one was a little lighter on the jalapenos in case they would scare people off. The bottom one was loaded and loaded good. They were both fantastic and disappeared in no time at all.

Substitute Asiago or Swiss cheese for the mozzarella for a totally different taste. No matter what you use, you’re going to end up enjoying some great cheesy hot (and I do mean spicy hot) bread. This isn’t some fru-fru French restaurant bread.

I highly recommend that you shred or grate your own cheese at home. Don’t buy the pre-shredded or pre-grated stuff. It has stuff added to it to keep it from sticking together. That ‘stuff’ affects how the cheese melts. Shred it yourself and use the good stuff.

Also try my olive cheese bread.

Jalapeno Popper Cheesy Garlic Bread
Print Pin
4 from 1 vote

Jalapeno Popper Cheesy Garlic Bread

I love jalapeno poppers. Jalapenos stuffed with cream cheese are a great thing. The peppers mellow a bit. The creamy cheese cools the heat. So, why not put those same great tastes together and make a jalapeno popper cheesy garlic bread? Yes, why not!
Course Bread
Cuisine American
Keyword cheesy, garlic bread, jalapeno popper, spicy
Prep Time 5 minutes
Cook Time 15 minutes
Total Time 20 minutes
Servings 8
Calories 561kcal

Ingredients

Instructions

  • Preheat your oven to 400 F.
  • Cut bread in half lengthwise.
  • Brush the insides with the melted butter and sprinkle with the garlic powder.
  • Bake for 5 minutes to get the bread a little crispy.
  • Meanwhile, combine the cream cheese, sour cream, chopped jalapenos, salt and pepper.
  • When the bread has cooked spread both sides with the cream cheese mixture.
  • Sprinkle with cheese and add the jalapeno slices.
  • Bake for another 4-5 minutes or until the cheese has melted.
  • Slice and serve.

Notes

You can substitute pepper jack for the mozzarella for even more spicy greatness!

Nutrition

Calories: 561kcal | Carbohydrates: 32g | Protein: 11g | Fat: 44g | Saturated Fat: 25g | Trans Fat: 1g | Cholesterol: 70mg | Sodium: 474mg | Potassium: 205mg | Fiber: 2g | Sugar: 19g | Vitamin A: 837IU | Vitamin C: 7mg | Calcium: 141mg | Iron: 1mg

Nutritional values are approximate.

Hickory Ground Beef Jerky on the Nesco Snackmaster Pro

I love making jerky on my dehydrator. I’ve been using ground top round for my ground beef jerky, but any lean ground meat will work. This hickory ground beef jerky on the Nesco Snackmaster Pro has a nice mellow smoky hickory flavor that is definitely not overwhelming. The meat has the perfect ‘bite’, just a little tug.

Hickory Ground Beef Jerky on the Nesco Snackmaster Pro

Rotate Your Trays…

Make sure you rotate your trays every 2 hours or so when you make hickory ground beef jerky on the Nesco Snackmaster Pro. The bottom trays will not dry as quickly as those on top. Rotating the trays will give you nice, even drying and perfect jerky on every level.

… And Have Extra Trays

I like to load up my dehydrator. To do that I picked up a handful of extra trays. They really add a whole lot more drying space! Since I have to rotate my trays, I write a number on each one on a piece of blue painter’s tape so I can keep track of them.

Try these other great jerky flavors from Eastman Outdoors: spicy jalapenoCajunwhiskey peppermesquite and sweet habanero.

Check out my guide to using the Nesco Snackmaster Pro. You will be making fantastic jerky at home in no time at all!

Hickory Ground Beef Jerky on the Nesco Snackmaster Pro
Print Pin
5 from 1 vote

Hickory Ground Beef Jerky on the Nesco Snackmaster Pro

This hickory ground beef jerky has a nice mellow smoky hickory flavor that is definitely not overwhelming. The meat has the perfect ‘bite’, just a little tug.
Course Dehydrator
Cuisine Jerky
Keyword BBQ, beef, dehydrator, jerky, nesco snackmaster pro, sweet
Prep Time 8 hours
Cook Time 6 hours
Total Time 14 hours
Servings 1 pound
Calories 1243kcal
Author Mike

Ingredients

Instructions

  • NOTE: The package for the Eastman Outdoors jerky seasoning states that it makes up to 5 pounds of jerky. I personally feel that the flavor is too mellow, so I use just about an entire package for 1 pound of jerky. I end up with a little left over seasoning, which I store in a labelled air-tight container. I’ll eventually mix it with more seasoning. I think I can get 3 pounds of well-seasoning jerky out of two packages of Eastman Outdoors mix.
  • Place beef in a resealable bag or container.
  • In a small bowl whisk together the seasoning, curing salt and water.
  • Pour over the meat and seal.
  • Shake to coat.
  • Refrigerate the meat for up to 8 hours, shaking or massaging every hour or so to get the marinade distributed and absorbed evenly.
  • Remove meat from the marinade and add to a jerky gun.
  • Squeeze out onto Nesco trays. Do not overlap meat.
  • Add the dehydrator top, set to maximum temperature setting and dehydrate for 5 hours, rotating the trays (bottom to top) every 2 hours or so.
  • To test for doneness remove a piece and let cool slightly. Try to bend the meat. If it gives and starts to tear at the bend it is done. If it bends without tearing return to the dehydrator and let it run another 15 minutes and test again. If the meat is crunchy it is overdone but still good. It’s really personal preference as to how you like your jerky. Soft, chewy, crunchy. There’s no wrong here.
  • Let cool before storing in an airtight container.

Notes

This recipe is for starting with 1 pound of meat. You’ll end up with about 1/2 pound in the end. You can easily double/triple/etc this recipe for large quantities of meat, however 5-6 pounds is about all you can fit onto a Nesco Snackmaster Pro fitted with 12 trays (the unit comes with 5).

Nutrition

Calories: 1243kcal | Protein: 194g | Fat: 45g | Saturated Fat: 20g | Trans Fat: 3g | Cholesterol: 562mg | Sodium: 605mg | Potassium: 3139mg | Calcium: 85mg | Iron: 22mg

Nutritional values are approximate.

Jumbo Dogs on the Char-Broil Big Easy

Note: This recipe was developed using the Char-Broil Big Easy Oil-Less Fryer. If you are cooking using the Char-Broil Smoker-Roaster Grill you should cook with the lid open and the temperature set to High. You might also need to adjust the cooking time.

I love cooking on my Char-Broil Big Easy. So much that I even put together a free eCookbook containing some of my favorite Big Easy recipes. Like most people, I bought my Big Easy for cooking turkey at Thanksgiving. I quickly realized that I can cook just about anything in it. Even jumbo hot dogs! Yep! Jumbo dogs on the Char-Broil Big Easy are crazy easy, and crazy good. The dogs get a great crispy crunchy casing that just pops in your mouth. The meat is tasty, moist and perfect!

Jumbo Dogs on the Char-Broil Big Easy

Big Dogs For Big Flavor

Don’t be shy with your Jumbo Dogs on the Char-Broil Big Easy. Add some sweet onions and peppers along with the jumbo dogs and let them roast along with the dogs. Chop and add them to buns to make a great dog even better. You can also cook up a big batch of regular-sized hot dogs in your Big Easy, enough for a crowd!

It’s always a good idea to keep a few spare grease trays on hand for your Char-Broil Big Easy.

Love your Big Easy as much I love mine? Check out my Big Easy Add-Ons page and my free Big Easy eCookbook!

Jumbo Dogs on the Char-Broil Big Easy
Print Pin
5 from 1 vote

Jumbo Dogs on the Char-Broil Big Easy

Jumbo dogs are crazy easy, and crazy good. The dogs get a great crispy crunchy casing that just pops in your mouth. The meat is tasty, moist and perfect!
Course Main
Cuisine American
Keyword Big Easy, Char-Broil, hot dogs
Prep Time 30 minutes
Cook Time 15 minutes
Total Time 45 minutes
Servings 4
Calories 445kcal
Author Mike

Ingredients

Instructions

  • Place the dogs into a baggie or resealable container.
  • Add the marinade and let marinate for 30 minutes.
  • Fire up the Char-Broil Big Easy.
  • Place dogs onto kabobs and lower into the cooker.
  • Cook for 10-15 minutes or until the dogs are nice and toasty hot!

Notes

You can also just lay the dogs horizontally in the basket.

Nutrition

Calories: 445kcal | Carbohydrates: 33g | Protein: 19g | Fat: 27g | Saturated Fat: 9g | Cholesterol: 81mg | Sodium: 1231mg | Potassium: 263mg | Vitamin C: 1mg | Calcium: 43mg | Iron: 4mg

Nutritional values are approximate.

Roasted Vegetable Stuffed Mushrooms

These roasted vegetable stuffed mushrooms may be one of my favorite summertime grilling ideas. It doesn’t really matter what vegetables you use, either. Just grab whatever vegetables are in season at the store, roast them on the grill, then spoon them into large mushroom caps. Add a bit of seasoning, a little cheese, place onto a cedar plank over a hot fire, and in no time at all you’ll have a great side dish.

Roasted Vegetable Stuffed Mushrooms

That Great Cedar Aroma

Grilling (I usually use my Weber grill) on cedar planks can be a sensitive subject. Some folks really don’t care for it, others, like me, love it. I like the light flavor the planks can add. Specially to dishes like these roasted vegetable stuffed mushrooms. And it looks cool. And it makes the deck area smell great.

I have to admit that I’m cheap, so I re-use planks as much as I can. As long as you don’t burn them too much on one side, you can get a few uses from them. Don’t buy any el cheapo cedar planks for this or any other dish. Get the good stuff and you won’t ever look back. Cheap planks split, warm and have splinters. Good planks are thicker, stay flat and have smoother edges.

Also try my roasted beet and dill cucumber salad.

Roasted Vegetable Stuffed Mushrooms
Print Pin
4 from 1 vote

Roasted Vegetable Stuffed Mushrooms

These roasted vegetable stuffed mushrooms may be one of my favorite summertime grilling ideas. It doesn’t really matter what vegetables you use, either. Just grab whatever vegetables are in season.
Course Side
Cuisine American
Keyword mushroom, roasted, stuffed, vegetable
Prep Time 5 minutes
Cook Time 1 hour 20 minutes
Total Time 1 hour 25 minutes
Servings 4
Calories 40kcal
Author Mike

Ingredients

Instructions

  • Soak the cedar plank in water, if using.
  • Fire up your grill for high-heat cooking.
  • Lightly brush the peppers (I used whole peppers and saved the rest for later use) and corn with oil.
  • Place over high heat and roast, turning often, until lightly charred and just tender.
  • Remove from heat, let cool slightly, then chop the peppers and cut kernels from the ear of corn.
  • Place vegetables into a bowl and season with oregano (if desired) and salt and pepper, to taste.
  • Add the cedar plank and let it get hot and smoky, about 20 minutes.
  • Reduce grill heat to medium.
  • Using a spoon, gently scrape out the gills from the mushrooms.
  • Lightly brush both sides of the mushrooms with oil.
  • Place mushrooms on grill cap side up and grill 3 minutes. The mushrooms will start to sweat, but do not overcook them.
  • Remove from heat and place onto the cedar plank.
  • Spoon the vegetable mix into the mushrooms and place onto the grill.
  • Grill for 20 minutes or until the mushroom is almost tender, watching to make sure the plank doesn’t catch on fire. If it does, spray it with water from a spray bottle.
  • Add cheese and cook another 3-4 minutes until melted.
  • Remove from heat, garnish with chopped cilantro, and serve.

Notes

Use pepper jack cheese instead for a little spiciness.

Nutrition

Calories: 40kcal | Carbohydrates: 8g | Protein: 2g | Fat: 1g | Saturated Fat: 1g | Trans Fat: 1g | Sodium: 5mg | Potassium: 264mg | Fiber: 2g | Sugar: 3g | Vitamin A: 990IU | Vitamin C: 39mg | Calcium: 4mg | Iron: 1mg

Nutritional values are approximate.

Copycat Schlotsky’s The Original

My wife and I were driving to Nashville, TN, when we passed a sign on the interstate for a Schlotsky’s. I instantly flashed back to the days when we had a Schlotsky’s near where I worked in Indianapolis. It was my favorite lunch spot. I so loved their bread. Sadly, it was early in the morning so the Schlotsky’s was closed. At that moment I went on a journey to recreate my favorite sandwich, Schlotsky’s The Original. This copycat is a fantastic copycat of the classic great sandwich, from the bread to the meats to the garlic dressing.

Copycat Schlotsky's The Original

You’ll Be Rewarded In The End

It may look like it takes a lot of work and ingredients to make a copycat of the Schlotsky’s The Original, but it’s actually quite simple and the end result will more than reward your efforts. The key is the sourdough bread, which comes out light, airy, and full of air bubbles. It holds up perfectly to the ingredients, including my favorite, the garlic mayonnaise. I made a big squeeze bottle of the dressing and also find myself using it on burgers and wraps.

I almost always use Blue Plate mayonnaise in the dishes I make. I think it is the best around. If you can’t find it locally you can pick it up online for a fair price.

Also try my copycat Denny’s Club Sandwich.

Copycat Schlotsky's The Original
Print Pin
5 from 2 votes

Copycat Schlotsky’s The Original

This copycat is a fantastic copycat of the classic great sandwich, from the bread to the meats to the garlic dressing.
Course Main
Cuisine American
Keyword copycat, sandwich
Prep Time 12 hours
Cook Time 30 minutes
Total Time 12 hours 30 minutes
Servings 8 slices
Calories 519kcal

Ingredients

For the sourdough bread starter

For the bread

For the creamy garlic dressing

For the sandwich

  • Parmesan cheese grated
  • 1 cup Mozzarella cheese shredded
  • 1 cup sharp cheddar cheese shredded
  • 8 Cotto salami thin slices
  • 8 Genoa salami thin slices
  • 8 ham sandwich meat thin slices
  • prepared yellow mustard
  • red onion sliced thin
  • tomatoes sliced thin
  • lettuce shredded or chopped
  • black olives sliced

Instructions

For the sourdough bread starter

  • Add the water to a medium bowl.
  • Stir in the yeast and sugar and let sit for 5 minutes until foamy.
  • Stir in the flour.
  • Cover loosely and place in a warm place 8-12 hours.

For the bread

  • Add the warmed milk to a large bowl. Stir in the starter.
  • Stir in the sugar, salt and baking soda until the dry ingredients are dissolved.
  • Add the flour 1/2 cup at a time, stirring to combine until smooth. The dough will end up sticky and thick.
  • Spray two 8″ (or three 6″) pie pans with non-stick spray.
  • Sprinkle the bottoms of the pans with the corn meal.
  • Divide the dough between the pans. Just plop into the centers of the pans. Don’t worry about it being pretty, it’ll spread out as it rises.
  • Lightly spray the tops of the dough with non-stick spray.
  • Loosely cover the pans and let rise for 1 hour in a warm spot. I recommend covering the dough with something that won’t stick to it, such as upside down pie pans.
  • After the dough has risen, preheat your oven to 375 F.
  • Spray the tops of the dough again with non-stick spray and bake for 20 minutes until golden brown. Remove to racks to cool.

For the creamy garlic dressing

  • Whisk together all ingredients. Store in a squirt bottle for easy dispensing.

For the sandwich

  • Cut the bread in half, horizontally.
  • Squirt the bread with the garlic dressing and yellow mustard.
  • Add the remaining sandwich ingredients.
  • Slice into quarters and serve.

Notes

I like to have my cheese melted a bit, so I wrap the assembled sandwiches in foil and insert them into a preheated 350 F oven for 5-10 minutes.

Nutrition

Calories: 519kcal | Carbohydrates: 38g | Protein: 15g | Fat: 33g | Saturated Fat: 10g | Trans Fat: 1g | Cholesterol: 47mg | Sodium: 894mg | Potassium: 155mg | Fiber: 1g | Sugar: 4g | Vitamin A: 379IU | Vitamin C: 1mg | Calcium: 213mg | Iron: 1mg

Nutritional values are approximate.

Grilled Rib Roast with Gravy

This grilled rib roast with gravy is exactly why you’re not supposed to say “This is the best thing I ever ate.” Not long ago I made a fire-eater reverse-sear prime rib on my grill, and “best thing I ever ate” is exactly what I was thinking. Then I made this grilled rib roast with gravy. The verdict? Both versions are crazy good. This rib roast has a great garlicky flavor. I loved cooking it in a cast iron skillet over charcoal. Not only did the meat take on the great charcoal flavor, I was able to make a crazy good gravy out of the drippings.

Grilled Rib Roast with Gravy

Crazy Good. A Total Win.

I could eat this grilled rib roast all day long. I had a few leftover slices. They were screaming ‘make me into a prime rib sandwich’. I will and boy, will it ever be good too!

Cooking in cast iron over charcoal is a wonderful thing. But it comes with its dangers, too. That last thing you want to do is to burn yourself grabbing a hot skillet handle. I turn it away from me so I don’t accidentally put my hand on it.

For a spicier rib roast, try my fire-eater reverse seared prime rib.

Grilled Rib Roast with Gravy
Print Pin
5 from 1 vote

Grilled Rib Roast with Gravy

This rib roast has a great garlicky flavor. I loved cooking it in a cast iron skillet over charcoal. Not only did the meat take on the great charcoal flavor, I was able to make a crazy good gravy out of the drippings.
Course Main
Cuisine American
Keyword beef, gravy, grilled
Prep Time 15 minutes
Cook Time 2 hours
Total Time 2 hours 15 minutes
Servings 4 servings
Calories 930kcal

Equipment

Ingredients

For the rib roast

For the gravy

Instructions

For the rib roast

  • Fire up your charcoal grill. You’ll want it to be between 400-450 F to start out with.
  • Take a long thin sharp knife and cut holes into the roast ever inch or so.
  • Shove the garlic slivers down into the holes.
  • Rub the softened butter all over the roast.
  • Combine the salt, garlic and onion powders and pepper.
  • Rub the mixture over all sides of the roast.
  • Transfer the roast to a cast iron skillet.
  • Add 1 cup of beef broth or enough to be 1″ deep in the skillet.
  • Place skillet on the grill. Cover and grill for 15 minutes.
  • Reduce the grill to cook at 325 F (just partially close the air vents) and cook until the roast reaches 130 F internally. You will want to check it every 20-30 minutes to see if more beef broth needs to be added.
  • Remove the roast and cover it in foil and let it rest for 30 minutes.
  • Meanwhile, make the gravy with the drippings in the pan.
  • Serve roast sliced topped with gravy.

For the gravy

  • Add the butter to the skillet and melt.
  • Add 1 1/2 cups of broth.
  • Bring to a boil.
  • Dissolve the flour in a cup with 1 tablespoon of water.
  • Whisk into the gravy mixture.
  • Continue stirring until gravy is desired thickness.
  • If it's too thick add more broth.

Notes

You’ll need a cast iron skillet that is large enough to hold the rib roast. Throughout the cooking process make sure that you NEVER grab the skillet with your bare hands.

Nutrition

Calories: 930kcal | Carbohydrates: 5g | Protein: 129g | Fat: 40g | Saturated Fat: 17g | Trans Fat: 1g | Cholesterol: 382mg | Sodium: 6335mg | Potassium: 2103mg | Fiber: 1g | Sugar: 1g | Vitamin A: 356IU | Vitamin C: 1mg | Calcium: 141mg | Iron: 12mg

Nutritional values are approximate.

Creamy Poppy Seed Dressing

Sure, I’ve made homemade salad dressings before. But I admit, I get lazy and find myself reverting back to the store-bought versions. I’ve vowed to end my purchases of bottled dressings. Well, or at least jazz them up by adding a few fresh ingredients. I’m starting with this incredible creamy poppy seed dressing. My wife proclaimed it her instant favorite, which is a great way to start on my homemade dressing journey!

Creamy Poppy Seed Dressing

Nice-n-Smooth

This dressing has the perfect combination of sweet and tangy, with just the right consistency so that it does run off your salad and form a lake at the bottom of your plate. Nor does it sit there, stuck to your salad like well.. gum.
Grated onion really adds a lot of flavor to this creamy poppy seed dressing. Use a fine grater, such as a microplane, to get the onion as finely grated as you can. You can also mince the onion then, using the flat side of the knife, squish the onion into a paste.

Check out my new site, Dress My Salad, for more great salad dressing ideas!

Also try my creamy Italian dressing and Aunt Trish’s delicious dressing.

This recipe is based on a recipe from Deep South Dish.

Creamy Poppyseed Dressing
Print Pin
5 from 1 vote

Creamy Poppy Seed Dressing

I’ve vowed to end my purchases of bottled dressings (or at least jazz them up by adding a few fresh ingredients), starting with this incredible creamy poppy seed dressing.
Course Dressing
Cuisine American
Keyword creamy, homemade salad dressing
Prep Time 5 minutes
Total Time 5 minutes
Servings 1 cup
Calories 1299kcal

Ingredients

  • cup sugar sugar substitute works just fine
  • 3 tablespoons white vinegar
  • cup mayonnaise
  • 2 teaspoons onion grated, with juice (if you don't have any, you can just add onion powder to taste)
  • 1 teaspoons poppy seeds or a bit more, as preferred

Instructions

  • Whisk together all ingredients.

Notes

Stir before serving.

Nutrition

Calories: 1299kcal | Carbohydrates: 69g | Protein: 2g | Fat: 113g | Saturated Fat: 18g | Trans Fat: 1g | Cholesterol: 63mg | Sodium: 951mg | Potassium: 60mg | Fiber: 1g | Sugar: 70g | Vitamin A: 97IU | Vitamin C: 1mg | Calcium: 60mg | Iron: 1mg

Nutritional values are approximate.

Ground Turkey Jerky on the Nesco Snackmaster Pro

I have been enjoying great success with my new Nesco Snackmaster Pro. Of course the most popular items have been the various jerky flavors that I’ve made. And so far, I’ve just made jerky using beef. Not everyone can handle beef, so I decided to try my hand at making jerky using ground turkey. I have to say, I was pretty pessimistic going in. I’m not always a big fan of ground turkey (I think it’s a textural thing), but boy, were my fears unfounded! Ground turkey jerky (say it 10 times fast, it’s fun!) is absolutely fantastic! It’s tender, and oh so flavorful. Heck, my wife likes it better than my beef jerky.

Ground Turkey Jerky on the Nesco Snackmaster Pro

Kinda Like A Slim Jim

You just can’t go wrong with ground turkey jerky. I can’t wait to make this again. I started using a standard almost-Slim Jim-like flavoring. Nice and neutral, without any heat, so it could be enjoyed by anyone. I’ll soon try other flavors with more kick, but there’s definitely nothing but good about this jerky.

Do not skip the final step of placing the dried jerky in the oven for 30 minutes. Better safe than sorry with poultry!

I like to load up my dehydrator. To do that I picked up a handful of extra trays. They really add a whole lot more drying space! Since I have to rotate my trays, I write a number on each one on a piece of blue painter’s tape so I can keep track of them.

Check out my guide to using the Nesco Snackmaster Pro. You will be making fantastic jerky at home in no time at all!

Also try my Cajun ground beef jerky, made using the Nesco Snackmaster Pro.

Ground Turkey Jerky on the Nesco Snackmaster Pro
Print Pin
5 from 1 vote

Ground Turkey Jerky on the Nesco Snackmaster Pro

Ground turkey jerky (say it 10 times fast, it’s fun!) is absolutely fantastic! It’s tender, and oh so flavorful. 
Course Snack
Cuisine American
Keyword dehydrator, jerky, nesco snackmaster pro, turkey
Prep Time 8 hours
Cook Time 6 hours
Total Time 14 hours
Servings 8
Calories 64kcal
Author Mike

Ingredients

Instructions

  • Place turkey in a large bowl.
  • Whisk together the remaining ingredients and add to the turkey.
  • Combine well.
  • Transfer to a resealable container or baggie and refrigerate overnight.
  • Preheat oven to 165 F.
  • Load the meat into a jerky gun and squeeze out onto baking sheets lined with parchment paper. Do not let the meat touch or overlap.
  • Transfer trays to oven and cook until internal temperature reaches 165 F.
  • Transfer jerky to the Snackmaster Pro set on the highest temperature (see note below!) and dry for 6 hours. Test for doneness every hour by bending the jerky. If it bends without tearing it is not dry enough. If it gives and starts to tear at the bend it is done.
  • Let cool and store in an airtight container in the fridge.

Notes

It is important that your dehydrator reach a safe temperature of at least 165 F. If yours cannot attain and sustain that temperature, first place the jerky in a 175 F oven until the meat reaches 165 F.
This recipe scales up very easily. You can make about 1 pound of jerky per every 2 trays. You’ll also need a jerky gun (see below).

Nutrition

Calories: 64kcal | Protein: 13g | Fat: 1g | Saturated Fat: 1g | Trans Fat: 1g | Cholesterol: 31mg | Sodium: 29mg | Potassium: 167mg | Vitamin A: 14IU | Calcium: 2mg | Iron: 1mg

Nutritional values are approximate.

No Carb Sherbet Pops

These no carb sherbet (er, sherbert as I was raised to call it) pops are proof that going low carb does not mean getting no flavor. Packed with your favorite gelatin flavor (in our case yummy raspberry), it’s the perfect treat for a hot day. Or cool day, as was the case here. I made pops, but you can also just pour the sherbet mixture into single-serve cups and freeze them.

The original recipe for no carb sherbet pops calls for using a small 4-serving box of gelatin, which is perfect. For double the flavor use the bigger 0.6 ounce box.

No Carb Sherbet Pops

Make Some For The Adults, Too

For an adult version, substitute wine or champagne for the club soda. If you don’t mind a few carbs add in some fruit before or after you puree the mixture.

I admit that any time I get to break out my popsicle molds I get all giddy. I know that fun times and good flavors are coming!

For another no-carb summer treat, try my sno-cones and my cherry Slurpee, which can also be made low-carb. My orange dreamsicle is fantastic, but sadly, not low-carb.

No Carb Sherbet Pops
Print Pin
5 from 1 vote

No Carb Sherbet Pops

These no carb sherbet (er, sherbert as I was raised to call it) pops are proof that going low carb does not mean getting no flavor. Packed with your favorite gelatin flavor (in our case yummy raspberry), it’s the perfect treat for a hot day. 
Course Dessert
Cuisine American
Keyword dessert
Prep Time 5 minutes
Cook Time 10 minutes
Total Time 15 minutes
Servings 6 pops
Calories 10kcal
Author Mike

Ingredients

  • 1 0.3 ounce flavored gelatin sugar-free. Use your favorite flavor. For extra flavor, use a 0.6 ounce box.
  • cup water boiling
  • 1 tablespoon heavy whipping cream
  • ½ teaspoon vanilla extract
  • cup club soda cold, plus more
  • 1 ½ cup ice crushed

Instructions

  • Place Jello-O into a medium-sized bowl.
  • Add the boiling water and stir until the Jell-O is dissolved.
  • Whisk in the heavy whipping cream, vanilla and 1/3 cup of soda water.
  • Place the ice into a blender.
  • Add the Jell-O mixture and puree until smooth. If the mixture is too thick add more club soda, a bit at a time.
  • Pour into popsicle molds and freeze until set.

Notes

You can substitute whole milk for the cream.

Nutrition

Calories: 10kcal | Carbohydrates: 1g | Protein: 1g | Fat: 1g | Saturated Fat: 1g | Cholesterol: 3mg | Sodium: 7mg | Potassium: 3mg | Sugar: 1g | Vitamin A: 37IU | Vitamin C: 1mg | Calcium: 4mg | Iron: 1mg

Nutritional values are approximate.