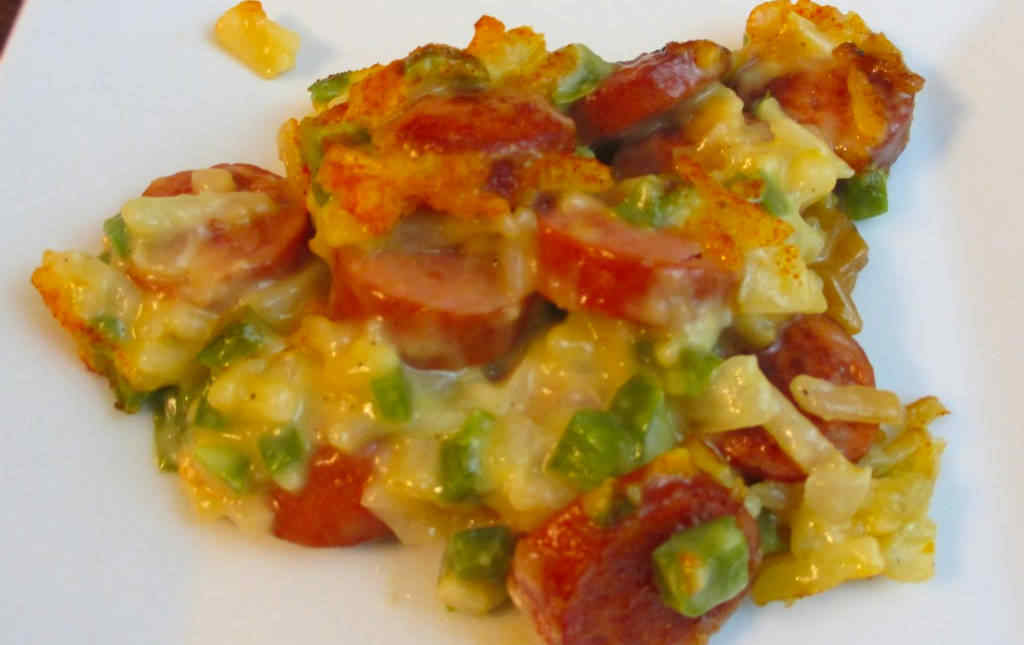
Smoked BBQ Baked Beans

Let’s get the obvious out of the way first. Double this recipe. And if you have a lot of leftover smoked pulled pork (or brisket) laying around, quadruple the recipe. Because these smoked BBQ baked beans are fantastic you’ll want to make as much as will fit on your smoker at one time. I got this fantastic (and easy) recipe and many others from Brother Jimmy’s BBQ: More than 100 Recipes. If you’re a fan of smoking and grilling, you need Brother Jimmy’s now.

Smoked BBQ Baked Beans

Any Smoked Meat Will Work Here

Just about any smoked meat will work just fine in these smoked BBQ baked beans. I prefer brisket or pulled pork, but chicken and turkey are good too. This is an excellent way to use up leftover (or not leftover) meats. They really add a lot of flavor.

I usually smoke my sides (and many of my meats) over lighter woods. I prefer fruit woods such as apple or cherry.

Also try my peach BBQ beans.

Smoked BBQ Baked Beans
Print Pin
5 from 1 vote

Smoked BBQ Baked Beans

Let’s get the obvious out of the way first. Double this recipe. And if you have a lot of leftover smoked pulled pork (or brisket) laying around, quadruple the recipe.
Course Side
Cuisine American
Keyword baked beans, smoked
Prep Time 10 minutes
Cook Time 1 hour
Total Time 1 hour 10 minutes
Servings 6 servings
Calories 311kcal

Equipment

Ingredients

Instructions

  • Fire up your smoker for smoking at 225 F.
  • Heat the oil in a medium saucepan. Add the onion and saute for 5 minutes.
  • Combine the onion and remaining ingredients in a medium disposable aluminum pan.
  • Transfer to your smoker and smoke for 45 minutes-1 hour or until hot and bubbly, stirring occasionally.

Notes

You can make this dish in the oven. Just bake at 350 F for 20 minutes or until hot and bubbly. I recommend that you use a smoky BBQ sauce if making in the oven.

Nutrition

Calories: 311kcal | Carbohydrates: 51g | Protein: 13g | Fat: 8g | Saturated Fat: 4g | Cholesterol: 28mg | Sodium: 1108mg | Potassium: 598mg | Fiber: 9g | Sugar: 17g | Vitamin A: 113IU | Vitamin C: 5mg | Calcium: 119mg | Iron: 3mg

Nutritional values are approximate.

Smoked Bacon Mac-and-Cheese

Oh my goodness. I’ve had my share of mac-and-cheese and then some. I’ve even grilled it. But nothing has ever come close to this smoked bacon mac-and-cheese. Yeah, it’s creamy ooey gooey cheesy like any proper mac-and-cheese should be. And it has bacon, glorious bacon. And it’s smoked (on my Weber smoker). Yes, smoked. Not a lot of smokiness, not too much to overwhelm, but the exact perfect amount. This is just crazy good eats.

Smoked Bacon Mac-and-Cheese

Add Some Pulled Pork

If you’re in the mood to make this smoked bacon mac-and-cheese even more over-the-top, add a few good handfuls of leftover smoked pulled pork. It’s a fantastic way to use up pulled pork if by chance you have some on hand. Me, I’d already eaten all of my smoked pork. I was very, very happy with this dish without it.

I highly recommend that you shred or grate your own cheese at home. Don’t buy the pre-shredded or pre-grated stuff. It has stuff added to it to keep it from sticking together. That ‘stuff’ affects how the cheese melts. Get the real stuff.

For a another great ‘made outdoors’ take on mac-and-cheese, try my grilled Buffalo version.

Smoked Bacon Mac-and-Cheese
Print Pin
5 from 1 vote

Smoked Bacon Mac-and-Cheese

Oh my goodness. I’ve had my share of mac-and-cheese and then some. I’ve even grilled it. But nothing has ever come close to this smoked bacon mac-and-cheese.
Course Side
Cuisine American
Keyword mac and cheese, macaroni and cheese, smoked
Prep Time 1 hour
Cook Time 3 hours
Total Time 4 hours
Servings 14 servings
Calories 551kcal

Ingredients

Instructions

  • Preheat oven to 350 F.
  • Fire up your smoker for 225 F. Use whatever wood you like, but I would recommend a lighter fruit wood such as cherry or peach.
  • Line a large baking sheet with foil. You might need two baking sheets if they aren’t large enough to hold all of the bacon.
  • Add bacon to baking sheet and sprinkle with the BBQ rub.
  • Bake for 20 minutes, flip, sprinkle with more rub and return to the oven for another 10 minutes until cooked but not overly crispy. Remove from oven and transfer bacon to a paper-towel lined plate. Crumble the bacon once cooled.
  • Meanwhile, bring a large pot of salted water to a boil and add the pasta. Cook 8-9 minutes until al dente. Drain and rinse with cold water. Transfer to a large bowl.
  • Add butter to a medium saucepan over medium eat. Once melted whisk in the flour, mustard, salt, paprika and black pepper. Whisk for 2 minutes.
  • Slowly whisk in the half and half. Keep whisking for about 10 minutes until the sauce thickens.
  • Remove from heat and stir in the 4 cups of cheddar cheese. Pour over the noodles and stir gently to combine.
  • Place half of the noodle and cheese mixture into the aluminum pan.
  • Sprinkle with 1 1/2 cups of the cheese mix and more of the rub.
  • Add remaining noodles and sprinkle with the remaining cheese mix.
  • Add more rub and all of the crumbled bacon.
  • Place on the smoker and smoke for 2-3 hours depending on how smoky you want it.
  • Remove and let rest at least 30 minutes (good luck with waiting that long!) before slicing and serving.

Notes

You’ll need a 9″ x 13″ deep (3″) disposable aluminum pan.

Nutrition

Calories: 551kcal | Carbohydrates: 8g | Protein: 21g | Fat: 48g | Saturated Fat: 27g | Trans Fat: 1g | Cholesterol: 130mg | Sodium: 768mg | Potassium: 241mg | Fiber: 1g | Sugar: 1g | Vitamin A: 1092IU | Vitamin C: 1mg | Calcium: 503mg | Iron: 1mg

Nutritional values are approximate.

Slow Cooker Spicy Kielbasa Cabbage Soup

It was one of those days. Too much to do, and just not enough time to put together a complicated meal. And worse, it was mighty cold out. Crazy bad cold And snowing. Crazy bad snowing. The best solution to my problems? This slow cooker spicy kielbasa cabbage soup. Yes, three ingredients. That’s it. Great Campbell’s spicy V8 flavor (you could substitute any V8 flavor that you love!), with yummy kielbasa sausage. Oh, and cabbage. It’s deceptively good, actually, and not what you might expect from something so easy. It’s perfect for a busy day.

Slow Cooker Spicy Kielbasa Cabbage Soup

Oh, That Delicious Broth!

I prefer to brown most meats before adding them to the slow cooker. It adds a bit of texture and color and better flavor, in my opinion. But you don’t have to brown the kielbasa for this slow cooker spicy kielbasa cabbage soup first. No matter how you do the sausage, the broth is going to make it taste great.

Don’t let the ‘spicy’ part of the recipe name scare you. For us, at least, this soup did not come out overly spicy at all. The flavors mellow a bit as the soup cooks throughout the day. But one man’s mellow might be another man’s spicy.

Also try my slow cooker tortellini soup and you’ll love my slow cooker French onion soup.

Slow Cooker Spicy Kielbasa Cabbage Soup
Print Pin
5 from 1 vote

Slow Cooker Spicy Kielbasa Cabbage Soup

Don’t let the ‘spicy’ part scare you. For us, at least, this soup did not come out overly spicy at all. The flavors mellow a bit as the soup cooks throughout the day.
Course Main
Cuisine American
Keyword cabbage, crockpot, kielbasa, slow cooker, soup
Prep Time 10 minutes
Cook Time 8 hours
Total Time 8 hours 10 minutes
Servings 8 -10 servings
Calories 15kcal
Author Mike

Equipment

Ingredients

  • ½ head green cabbage shredded
  • 1 64 ounce spicy V-8 vegetable juice
  • 2 14 ounce Kielbasa sausages cut into 1/2" rounds (lightly browned in a skillet with a splash of oil, if desired)

Instructions

  • Add cabbage to bottom of slow cooker.
  • Add juice, followed by the sausage.
  • Cook on low for 8 hours, stirring every hour or so.

Notes

Nutritional values do not include the V-8.

Nutrition

Calories: 15kcal | Carbohydrates: 3g | Protein: 1g | Fat: 1g | Saturated Fat: 1g | Cholesterol: 1mg | Sodium: 12mg | Potassium: 97mg | Fiber: 1g | Sugar: 2g | Vitamin A: 56IU | Vitamin C: 21mg | Calcium: 23mg | Iron: 1mg

Nutritional values are approximate.

Slow Cooker Rib Tips

I am a smoked rib tip kind of guy. Usually. But I had some tips leftover from a few racks of St Louis-style ribs and I was just not feeling the fire-up-the-smoker love. I just wasn’t in the mood. I was in the mood to drop them in a slow cooker for a few hours, though. Served with some air-fryer tater tots (aka Tots and Tips!) these slow cooker rib tips were really, really good. Sticky sweet, lightly smoky, and oh so tender and juicy I really enjoyed them. Will they replace my low-and-slow smoked tips? No, but I’ll definitely make them again.

Slow Cooker Rib Tips

Smoky Spicy Deliciousness

If you’re not a fan of liquid smoke, or you don’t have any on idea, don’t worry! Just use a BBQ sauce that has smoky flavor instead, it’ll make these slow cooker rib tips just as tasty. Any good mesquite or hickory BBQ sauce will do. As for the rub, I used a rub with a bit of a kick to it. Some spiciness to offset the sweetness from the BBQ sauce. You can keep it all sweet if you want and use a brown sugar-based rub.

Slow Cooker Rib Tips
Print Pin
5 from 1 vote

Slow Cooker Rib Tips

These slow cooker rib tips were really, really good. Sticky sweet, lightly smoky, and oh so tender and juicy I really enjoyed them. 
Course Appetizer
Cuisine American
Keyword crockpot, ribs, slow cooker
Prep Time 15 minutes
Cook Time 6 hours 15 minutes
Servings 4
Calories 220kcal

Equipment

Ingredients

Instructions

  • Coat the ribs tips in rub. Don't be shy with it. You want it on all sides of the rib tips.
  • Let rest 10 minutes.
  • Combine all of the BBQ sauce with the liquid smoke, to taste.
  • Transfer rib tips to the slow cooker. Add half of the sauce mixture and stir to coat.
  • Cook on low 4-6 hours or until the rib tips are tender. Stir every so often.
  • Transfer rib tips to a baking sheet lined with foil
  • Baste with the remaining sauce and place under the broiler.
  • Broil for 5 minutes or until the sauce is set and the ribs start to get a little char on them.

Notes

Nutritional values don’t include rub and sauce.

Nutrition

Calories: 220kcal | Protein: 12g | Fat: 19g | Saturated Fat: 6g | Trans Fat: 1g | Cholesterol: 64mg | Sodium: 73mg | Potassium: 192mg | Calcium: 12mg | Iron: 1mg

Nutritional values are approximate.

Slow Cooker New England Clam Chowder

This slow cooker New England clam chowder was much. much better than I ever expected. We both loved it, in fact. So much that I am already ready to make it again. Not only is it packed with clam flavor in a wonderfully creamy broth, it’s easy to make to boot! The perfect bowl of warm happiness on a dreary fall day! Until I can get up northeast for the real deal, this will have to do!

Slow Cooker New England Clam Chowder

Better Than I Ever Imagined

You’ll need 2 cups of clam juice from the canned clams. If you don’t quite get that much juice add a bit of water or better, grab a bottle of clam juice while you’re at the store picking up the clams. You’ll want that clam flavor to be as pronounced as possible.

I used a smoky bacon in this slow cooker New England clam chowder. It adds a nice complexity, complimenting the cream and clams perfectly. It makes me wonder what a clam chowder made with smoked clams would be like! I do suggest that you make sure and not over-cook the bacon. You don’t want it hard and crispy. You want to be able to bite thru it easily.

Also try my slow cooker French onion soup and my ham and bean soup.

Slow Cooker New England Clam Chowder
Print Pin
5 from 1 vote

Slow Cooker New England Clam Chowder

This slow cooker New England clam chowder was much. much better than I ever expected. 
Course Main
Cuisine American
Keyword clam chowder, crockpot, slow cooker
Prep Time 15 minutes
Cook Time 5 hours
Total Time 5 hours 15 minutes
Servings 8
Calories 331kcal
Author Inspired by a recipe from Epicurious

Equipment

Ingredients

Instructions

  • Drain the clams into a sieve over a bowl. Keep the juice. Transfer the clams to a bowl, cover, and place in the fridge.
  • Heat a large skillet or Dutch oven over medium-high heat. Add the bacon. Cook until just turning golden brown, but not crispy. Transfer bacon using a slotted spoon to a a slow cooker.
  • Transfer 2 cups of the clam juice (discard the rest) and the remaining ingredients except for the half-and-half and reserved clams to a slow cooker.
  • Cook on high for 4 hours.
  • Pour the half-and-half into a large bowl. Slowly ladle some of the hot liquid from the slow cooker into the bowl, stirring. Don’t add it too quickly or it will curdle the cream. Once the cream is warmed pour it into the slow cooker.
  • Add the clams, stir, and cook for 1 more hour.

Notes

I added 2 more cans of clams (minus the juice), 2 more potatoes and a few extra strips of bacon.

Nutrition

Calories: 331kcal | Carbohydrates: 26g | Protein: 9g | Fat: 22g | Saturated Fat: 10g | Trans Fat: 1g | Cholesterol: 53mg | Sodium: 245mg | Potassium: 678mg | Fiber: 2g | Sugar: 2g | Vitamin A: 391IU | Vitamin C: 9mg | Calcium: 128mg | Iron: 2mg

Nutritional values are approximate.

Slow Cooker Ham and Bean Soup

This slow cooker ham and bean soup was incredible. My wife proclaimed it to be the closest we have ever come to duplicating her mom’s recipe. That’s high praise indeed. Every bite is packed with wonderful ham and bean flavor. The broth is nice and thick, perfect on a cool fall day. The ham is tender and delicious. The beans are cooked perfectly. All you need is some hot-out-of-the-oven cornbread and you’re in for one fantastic meal.

Slow Cooker Ham and Bean Soup

The Ultimate Comfort Food

This was the first time I’ve cooked using ham base. It really made this slow cooker ham and bean soup amazing. Like its beef counterparts, beef and chicken base, it adds a depth of flavor you just can’t get on your own. At least, not easily.

I made this soup in my slow cooker but you could make it on the stove-top also. Just bring the soup to a boil, then reduce the heat to a slow simmer and continue simmering until the beans are tender, 2-4 hours. Stir them occasionally. Like the slow cooker version, you might find that the soup is even better the next day.

This recipe was inspired by a recipe from Crazy for Cookies and More.

Also try my fantastic vegetable soup and my delicious New England clam chowder.

Slow Cooker Ham and Bean Soup
Print Pin
5 from 1 vote

Slow Cooker Ham and Bean Soup

Incredibly delicious comfort food!
Course Main Dish
Cuisine American
Keyword slow cooker, soup
Prep Time 12 hours
Cook Time 8 hours
Servings 6
Calories 206kcal

Equipment

Ingredients

Instructions

  • Place beans in a large pan or bowl. Cover with water and let stand overnight. Check the water at least twice to make sure the beans stay covered, adding more water if needed.
  • Lightly spray a slow cooker with non-stick spray.
  • Drain the beans and place in the slow cooker.
  • Add the onions, garlic, ham, water, apple and ham base. Stir.
  • Cover and cook on low 8-10 hours or until beans are tender, stirring occasionally.
  • Remove apple pieces and serve.

Notes

We think this dish is really best (and thicker) the next day. After it has cooked for 8-10 hours and the beans are done, we let it cool then place in the fridge overnight. We reheat the soup on the stovetop and serve. 

Nutrition

Calories: 206kcal | Carbohydrates: 6g | Protein: 17g | Fat: 13g | Saturated Fat: 5g | Polyunsaturated Fat: 1g | Monounsaturated Fat: 6g | Cholesterol: 47mg | Sodium: 910mg | Potassium: 270mg | Fiber: 1g | Sugar: 4g | Vitamin A: 17IU | Vitamin C: 3mg | Calcium: 18mg | Iron: 1mg

Nutritional values are approximate.

Seasoned Steak Fries using the Vortex

I use a Vortex insert on several of my charcoal grills (love my Webers!). Usually I use them for making chicken of some variation or another. This time I thought I’d try something new. I wanted to see if I could make steak fries just as easily and just as tasty. I could not have been happier with the results from these Seasoned Steak Fries using the Vortex. Tasty, creamy, seasoned perfectly, with a slight crunch. Perfect fries to go with my ‘fried’ chicken.

Seasoned Steak Fries using the Vortex

Sacrificing Fries To The Grill Gods

Seasoned steak fries using the Vortex are as easy to make as fries out of a bag from the freezer, really. The only thing you have to watch for is letting the fries slip thru your grill grates. I call those ‘sacrifices’. They happen.

On my smaller grills it’s not a problem since the grates are pretty narrow. The grate on my Weber Performer is a bit bigger, though, so I keep the fries at an angle to the grates so they don’t slip on through.

These steak fries are a great side dish for my Louisiana crispy fried chicken also made using the Vortex.

Seasoned Skinny Fries using the Vortex
Print Pin
5 from 1 vote

Seasoned Steak Fries using the Vortex

I could not have been happier with the results. 
Course Side
Cuisine American
Keyword fries, Vortex
Prep Time 15 minutes
Cook Time 1 hour
Total Time 1 hour 15 minutes
Servings 2 servings
Calories 303kcal
Author Mike

Equipment

Ingredients

Fry seasoning mix (makes enough for 6 potatoes)

Instructions

  • Fire up your charcoal grill with the Vortex insert.
  • Rinse the potatoes and pat dry.
  • Cut potatoes in half, then half again, and finally in half one more time. If your potatoes are exceptionally large you may want to halve them one more time but don’t make the fries too small.
  • Place fries in a large bowl. Add cold water and let sit for 5 minutes.
  • Drain the water and add fresh cold water. Let sit for 5 more minutes.
  • Drain the water and transfer the potatoes to a large towel. Pat dry.
  • Wipe the bowl dry and return the potatoes.
  • Add a splash of oil and toss to coat.
  • Add the seasoning mix and toss to coat.
  • Transfer fries to the grill. Place them at an angle to the grates so they don’t fall through.
  • Close the grill and cook for 1 hour, rotating the lid 90 degrees every 15 minutes. You can add other foods, such as wings or chicken pieces and cook them at the same time.
  • Start checking for doneness after 45 minutes. Mine took the full hour.
  • Remove from the grill and season with more salt before serving.

Notes

Note: I cooked my fries on a 22″ Performer. The fries were placed along the edges of the grill as far away from the Vortex as possible.

Nutrition

Calories: 303kcal | Carbohydrates: 69g | Protein: 8g | Fat: 1g | Saturated Fat: 1g | Sodium: 1198mg | Potassium: 1603mg | Fiber: 6g | Sugar: 3g | Vitamin A: 489IU | Vitamin C: 27mg | Calcium: 93mg | Iron: 4mg

Nutritional values are approximate.

Sausage Breakfast Sandwich using the Cuisinart Griddler

Ever have a sausage breakfast sandwich from your local fast food joint and end up feeling disappointed? Barely any sausage. Funny looking eggs. Tiny little English muffin. Well, folks, now’s the time to fire up your Cuisinart Griddler and make a proper sausage breakfast sandwich. In no time at all. Tons of sausage. Melty cheese. Perfect egg. And a fresh, toasted muffin. This is the way to start out the day! (Although I admit, I have made these for dinner on more than one occasion!)

Feel free to substitute bagels for the English muffins if you want. Yum.

Sausage Breakfast Sandwich using the Cuisinart Griddler

Load Up Your Griddler

I wrote the recipe below for sausage breakfast sandwich using the Cuisinart Griddler for 2 sandwiches. You can actually make 4 at a time on the Griddler. It might be a bit crowded, but it’s possible. You can also save time by toasting the muffins in a toaster or in an oven instead of using the Griddler. And you can save more time by making the eggs in a skillet while the sausage is cooking. But don’t cook the sausage anywhere but on the Griddler. The patties get yummy crispy edges. You want that slightly crunchy edge. They come out great!

Also try my farmhouse breakfast potatoes.

Sausage Breakfast Sandwich using the Cuisinart Griddler
Print Pin
5 from 1 vote

Sausage Breakfast Sandwich using the Cuisinart Griddler

Well, folks, now’s the time to fire up your Cuisinart Griddler and make a proper sausage breakfast sandwich. In no time at all. Tons of sausage. Melty cheese. Perfect egg. And a fresh, toasted muffin.
Course Breakfast
Cuisine American
Keyword breakfast, Cuisinart, Griddler, sandwich, sausage
Prep Time 5 minutes
Cook Time 30 minutes
Servings 2
Calories 628kcal

Ingredients

  • ½ pound breakfast sausage
  • 2 English muffins split
  • 2 large eggs
  • 2 slices American cheese or any good melting cheese
  • butter

Instructions

  • Heat up your Griddler using the griddle plates. Set the Griddle dial to 425 F and the Selector to Griddle. Open the Griddler with the plates flat, side-by-side.
  • Open the tube of breakfast sausage. Cut the sausage into 2 1/4 pound pieces (I cut the log in half, then each half into half and use 2 slices. I save the other 2 for more sandwiches at a later time). Place the pieces into a resealable bag or on cutting board covered with a piece of wax paper. Use a meat mallet to flatten the sausage into large thin patties. You want them to be big enough to cover the muffins.
  • Transfer the sausage patties to the lower Griddler plate. Close the lid to cook them and keep them flat.
  • You want to cook the patties until done, when they reach 165 F. I like a little crunchy edges on mine. Remove and place in a warm oven or cover to keep warm.
  • Spread a little butter on each muffin half. Transfer to the Griddler butter side down and toast until nice and brown and golden. Remove and place in a warm oven or cover to keep warm.
  • Spread a little butter out onto the lower griddle and crack the eggs onto the plates. Cook until done, flipping once. Make sure that the yolk is set or close to it.
  • Assemble the sandwiches by placing the sausage patties onto the muffin bottoms. Add the cheese, egg and muffin top and serve.

Notes

You can actually make 4 of these sandwiches at once on the Griddler. It’ll get a big crowded, but you can do it. Read my post for more info.

Nutrition

Calories: 628kcal | Carbohydrates: 27g | Protein: 32g | Fat: 43g | Saturated Fat: 15g | Trans Fat: 1g | Cholesterol: 289mg | Sodium: 1408mg | Potassium: 453mg | Fiber: 2g | Sugar: 1g | Vitamin A: 554IU | Vitamin C: 1mg | Calcium: 287mg | Iron: 3mg

Nutritional values are approximate.

Rouladen and Knödel

I’m very, very biased when it comes to rouladen and knödel. I’m quite sure that my mom’s are the best. I tried to duplicate hers as best I could, and boy, where they ever fantastic, but they still aren’t mom’s. I’m ok with that. Fantastic tender beef stuffed with a mixture of pickles, mustard, bacon and onion. Cooked and then served with a fantastic pan gravy made from the yum-yums left in the pan. The knödel are spatzle-like. Cold mashed potatoes formed into bowls, stuffed with crunchy croutons, simmered in water. Served with more of the gravy from rouladen. Delicious!

Rouladen and Knödel

Thinner Is Better

I used a top round that was already sliced. I pounded it thinner using my trusty meat pounder. Next time I’ll probably opt to pick up a whole top round and slice it myself. That’ll give me a bit more control over how the meat comes out. Even still, the rouladen were sooooo tasty good. For only my second time making rouladen and knödel, I was very happy!

Be Gentle With The Knödels

This was my first time making knödels from scratch. You can find packets of mix in the grocery store that make the process much easier and still come out fantastic. I decided to give making them myself a shot. They are actually very easy to make. My only advice is to be very, very careful removing them from the pot after they’ve simmered. They really, really want to fall apart. Be gentle and slow and they’ll come out great.

Also try my delicious German classic, warm potato salad.

Rouladen and Knödel
Print Pin
5 from 1 vote

Rouladen and Knödel

I’m very, very biased when it comes to rouladen and knödels. I’m quite sure that my mom’s are the best.
Course Main
Cuisine German
Keyword knodel, rouladen
Prep Time 1 day
Cook Time 2 hours 15 minutes
Total Time 1 day 2 hours 15 minutes
Servings 4 servings
Calories 621kcal
Author Mike

Ingredients

For the Rouladen

For the Knödel

Instructions

For the Rouladen

  • Cook the bacon in a large skillet until done but not crispy. Remove and let drain and cool on paper towel.
  • Lay the beef slices out on a flat surface and season well with salt and pepper on both sides.
  • Squirt one side of the meat with the yellow mustard. Don’t be shy with it. Spread out evenly.
  • Divide the onion, pickles and cooked bacon between the meat slices.
  • Roll meat up, securing with toothpicks.
  • Melt butter in a large skillet over medium-high heat.
  • Add the rouladen and brown on all sides. Remove to a plate.
  • Add 2 cups of water to the skillet and stir.
  • Bring to a boil then reduce to a simmer.
  • Add the rouladen back to the skillet. Cover and continue simmering for 1 1/2 hours.
  • Mix together 2 tablespoons of water and the cornstarch until smooth.
  • Remove rouladen.
  • Whisk in the cornstarch mixture until thickened.
  • Whisk in the sour cream until smooth.
  • Return the rouladen to the pan. Carefully remove the toothpicks, coat with the gravy and serve.

For the Knödel

  • Place potatoes in a large pot of boiling salted water.
  • Cook until tender, about 30 minutes.
  • Remove from water and let cool completely then refrigerate overnight.
  • Rice or mash the potatoes and transfer to a large bowl.
  • Add 1 cup of the flour, a pinch or two of salt and the eggs.
  • Mix well and press to form 2″ balls. If the potatoes don’t hold together add a bit more flour.
  • Place 2-3 croutons in the middle of the potato balls and lower into a pot of simmering, salted water. Simmer for 20 minutes.
  • Carefully remove from water using a slotted spoon and serve immediately.

Notes

The potatoes need to be cooked the day before you are preparing the meal so that they set up and get cold.

Nutrition

Calories: 621kcal | Carbohydrates: 85g | Protein: 18g | Fat: 24g | Saturated Fat: 10g | Trans Fat: 1g | Cholesterol: 134mg | Sodium: 759mg | Potassium: 1198mg | Fiber: 5g | Sugar: 4g | Vitamin A: 452IU | Vitamin C: 15mg | Calcium: 96mg | Iron: 5mg

Nutritional values are approximate.

Roasted Spiral Potatoes

My oh my oh my these roasted spiral potatoes were good. And kinda pretty, too. But definitely delicious. The potatoes get cooked up perfectly, mixed with smoky bacon, garlic and seasonings. As the potatoes near their journey to doneness they are then topped with butter and cheese. Oh yeah! Garnished with sour cream and green onions, this is one mighty fine side dish.

Roasted Spiral Potatoes

Fancy, But Easy.

Assembling the potatoes in the pan is the key to having them cook perfectly (and look cool). It’s easier than it looks. Just cut all of your potatoes the same thickness (it’s up to you if you want to leave the skin on or not). Then for each circular layer select pieces that are roughly the same size. You then just lay them into a lightly oiled cast iron skillet at a slight angle, overlapping by about half. You’ll need one hand to hold them in place and one hand to add potatoes. Once you’ve made the full circle they’ll stay in place.

Roasted Spiral Potatoes

The Aroma Is Amazing

When the roasted spiral potatoes come out of the oven they are tender, covered in ooey gooey melted cheese. They look and smell out of this world. You’ll never want to cook potatoes any other way.

Make sure you add a good bit of paprika to the spice mixture. It adds great color.

Roasted Spiral Potatoes

This dish is best prepared in a cast iron skillet. Nothing conducts heat better!

These potatoes go great with a grilled steak. The perfect meat-and-potatoes dinner! Also try my melt-in-your mouth melting potatoes.

Roasted Spiral Potatoes
Print Pin
5 from 1 vote

Roasted Spiral Potatoes

My oh my oh my these roasted spiral potatoes were good. And kinda pretty, too. But definitely delicious.
Course Side
Cuisine American
Keyword roasted potatoes
Prep Time 15 minutes
Cook Time 1 hour 5 minutes
Total Time 1 hour 20 minutes
Servings 8 servings
Calories 159kcal

Ingredients

Instructions

  • Preheat oven to 400 F.
  • Lightly oil your skillet.
  • Lightly toss the potatoes with 1 tablespoon oil and the minced garlic
  • Layer potatoes around the edge of the skillet. You’ll want to select pieces that are roughly the same size. Over lap the potatoes by about half, using one hand to add potatoes while the other hand keeps the potatoes in place. You’ll want them to be at about a 60 degree angle, slightly angled back, following the contour of the skillet.
  • Once your first layer is done, add two more, each inside of the other. You might need four total layers depending on the size of your skillet and potatoes.
  • When you get to the end you’ll have a little round ‘hole’ in the middle. Place a potato end (point-side up) in that spot to complete the arrangement.
  • Combine the seasonings and sprinkle over the tops of the potatoes. Don’t be shy.
  • Sprinkle the bacon pieces over the top and place in the oven for 45 minutes.
  • Drizzle with the butter, raise the temperature to 425 F, and cook another 15 minutes.
  • Sprinkle with the cheese and return to the oven for 5 minutes to melt the cheese.
  • Serve garnished with sour cream and green onions.

Notes

You’ll need a cast iron skillet to make these roasted spiral potatoes. The larger the skillet, the more potatoes you will need. I used a 10″ Lodge.

Nutrition

Calories: 159kcal | Carbohydrates: 25g | Protein: 4g | Fat: 5g | Saturated Fat: 3g | Trans Fat: 1g | Cholesterol: 5mg | Sodium: 62mg | Potassium: 584mg | Fiber: 2g | Sugar: 1g | Vitamin A: 5IU | Vitamin C: 9mg | Calcium: 23mg | Iron: 1mg

Nutritional values are approximate.