Smoked Sausage with Sriracha Mustard Sauce

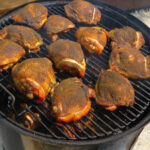
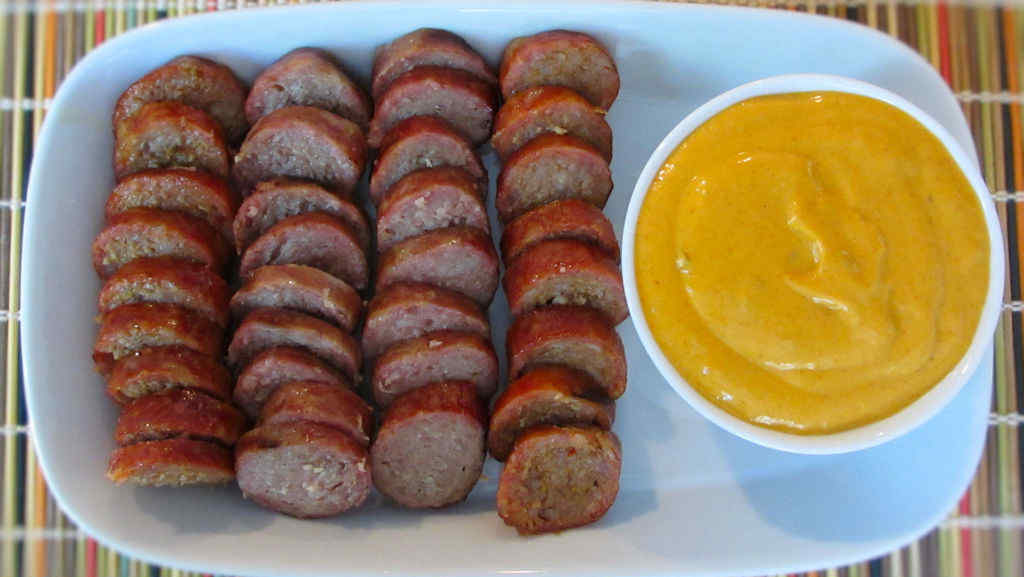
I just wrapped up a smoke session on my Weber Smokey Mountain, and since the fire was still burning hot, I decided to toss a few fresh sausages onto the smoker. While they were cooking I stirred up a very quick, but definitely spicy, mustard dipping sauce that is loaded with Sriracha goodness. Smoked sausage with Sriracha mustard sauce…. you know it was yummy.

Smoked Sausage with Sriracha Mustard Sauce

Mix It Up A Bit

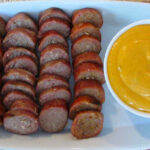
I used Italian sausage, bratwurst and andouille sausages when I made smoked sausage with Sriracha mustard sauce. My wife’s favorite were the Italian sausages. They had a nice spicy taste to them. My favorite? Andouille, of course. I could eat andouille all day. The spicier the better and andouille always packs that nice little kick that I really enjoy.

The Sauce Is Great

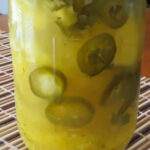
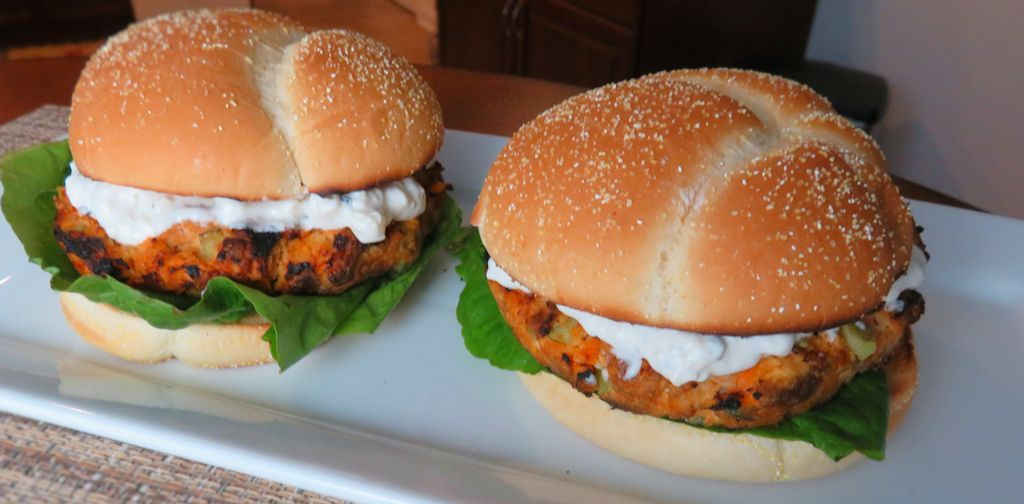
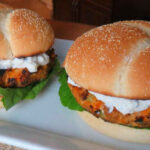
The Sriracha mustard sauce definitely isn’t just for dipping sausages. It’s great on sandwiches, subs, hot dogs, and hamburgers. It is creamy smooth, with a real kick to it thanks to the Sriracha and smoked jalapenos (chipotles), which also add a bit of smoky flavor. I think you could definitely use this same sauce for dipping chicken nuggets or chicken tenders. It’s different than those usual dipping sauces that are, frankly, boring!

Also try making my delicious beef summer sausage.

Smoked Sausage with Sriracha Mustard Sauce
Print Pin
5 from 1 vote

Smoked Sausage with Sriracha Mustard Sauce

Smoked sausage with Sriracha mustard sauce…. you know it was yummy.
Course Appetizer
Cuisine American
Keyword mustard, sausage, smoked
Cook Time 2 hours
Total Time 2 hours
Servings 4
Calories 563kcal
Author Mike

Ingredients

  • 4 sausages kielbasa, etc
  • Sriracha mustard sauce from below

For the Sriracha mustard sauce

Instructions

  • Fire up your smoker for cooking at 225-250 F.
  • Add your favorite wood (I used cherry).
  • Add the meats once the smoker is ready and cook until the internal temperatures reach 155 F. Start testing a single sausage after 1 hour (no need in poking them all and letting all of the juicy goodness drain out). Cooking time should be 1-2 hours total.
  • Remove from smoker and cover in foil until ready to use.
  • Serve with Sriracha mustard sauce, for dipping.

For the Sriracha mustard sauce

  • Whisk together all ingredients.

Notes

Use a combination of sausages for a better experience.

Nutrition

Calories: 563kcal | Carbohydrates: 2g | Protein: 14g | Fat: 55g | Saturated Fat: 12g | Trans Fat: 1g | Cholesterol: 79mg | Sodium: 1610mg | Potassium: 278mg | Fiber: 1g | Sugar: 1g | Vitamin A: 264IU | Vitamin C: 16mg | Calcium: 26mg | Iron: 2mg

Nutritional values are approximate.

Louisiana Crispy Fried Chicken using the Vortex

Any day that includes firing up my Weber charcoal grill outfitted with a Vortex insert and cooking ‘fried’ chicken is a good day. Actually, it’s a fantastic day. I’m willing to bet that in a blind taste test you could not tell the difference between this Louisiana crispy fried chicken using the Vortex and chicken fried in oil. And you’ll never go back to that deep-fried stuff either. This way is easier, tastier and just flat-out better.

Louisiana Crispy Fried Chicken using the Vortex

Super Crispy. Super Delicious.

This is seriously crispy chicken. Seasoned perfectly. Moist and tender meat. Make extra because you’ll need it. And don’t expect any leftovers either.

If you want a little extra crunchy skin, brush the tops of the chicken with just a little bit of vegetable oil 5 minutes before removing them from the grill. That’s all it takes.

I’ve made fried chicken using the Vortex many, many times. Sometimes I make my own batter or coating, sometimes I just use store-bought, like the Louisiana Seasoned Crispy Fried Chicken batter I used this time. No matter what I use, it’s always fantastic. You can’t wrong with this Louisiana crispy fried chicken using the Vortex. It’ll amaze you and your guests.

Also try my spicy BBQ fried chicken if you want a little more kick to your ‘fried’ chicken.

Louisiana Crispy Fried Chicken using the Vortex
Print Pin
5 from 1 vote

Louisiana Crispy Fried Chicken using the Vortex

This is seriously crispy chicken. Seasoned perfectly. Moist and tender meat. Make extra because you’ll need it. And don’t expect any leftovers either.
Course Main
Cuisine American
Keyword fried chicken, Vortex
Prep Time 5 minutes
Cook Time 45 minutes
Total Time 50 minutes
Servings 4
Calories 495kcal
Author Mike

Equipment

Ingredients

Instructions

  • Fire up your Vortex, filling it all the way with charcoal. Let the coals get good and hot, keeping both the top and bottom grill vents wide open.
  • Rinse the chicken pieces and pat dry.
  • Working in batches, place a little of the fry batter into a resealable bag or container and add a few pieces of chicken.
  • Seal and toss gently to coat.
  • Transfer chicken to the grill around the Vortex.
  • Cook for 45 minutes or until the chicken reaches 165 F as measured in several locations. I have not found it necessary to rotate the grill lid, but if you want to, rotate it 45 degrees every 15 minutes.

Notes

I prefer to cook ‘fried’ chicken on a 22″ grill using the Vortex. You can cook them on an 18″ grill too, but sometimes the edges nearest the Vortex get a little over-cooked.
You can substitute your favorite chicken cuts.

Nutrition

Calories: 495kcal | Carbohydrates: 1g | Protein: 37g | Fat: 38g | Saturated Fat: 10g | Trans Fat: 1g | Cholesterol: 221mg | Sodium: 174mg | Potassium: 463mg | Vitamin A: 176IU | Calcium: 18mg | Iron: 2mg

Nutritional values are approximate.

Brazilian Pineapple on the Char-Broil Big Easy

Note: This recipe was developed using the Char-Broil Big Easy Oil-Less Fryer. If you are cooking using the Char-Broil Smoker-Roaster Grill you should cook with the lid open and the temperature set to High. You might also need to adjust the cooking time.

Just finished off that great Caribbean jerk chicken you cooked on your Big Easy? Well, it’s time for dessert! Time to make Brazilian pineapple on the Char-Broil Big Easy! And man, oh man, what a delightful treat it is, too! Deliciously sweet pineapple, brushed with coconut milk and sprinkled with cinnamon-infused sugar. Roasted to perfection.

Brazilian Pineapple on the Char-Broil Big Easy

Brazilian pineapple on the Char-Broil Big Easy can be sliced and eaten as-is. Nothing else is required. But it’s even better topped with some cooling whipped cream or a scoop of ice cream. This dessert is so good that we made it twice in one week!

Cutting the Pineapple

You start by cutting the ends and rind off of a pineapple. Do not remove the core! Then you remove the eyes in a spiral pattern. I never realized that the eyes grow at about a 45 degree angle on the sides of the pineapple. Just remove them using a sharp knife, creating a nice little ‘canyon’ to hold the coconut milk and cinnamon sugar.

Brazilian Pineapple on the Char-Broil Big Easy

Prep your Big Easy and Get to Cookin’!

I lined a bunk-bed basket with foil to make cleanup easier. Lowered it into the Big Easy and let it go until it started to brown, about 30 minutes. Your time may vary, and you may want your pineapple to be a bit more caramelized. Use your own judgement. I don’t think you can go wrong no matter what!

Brazilian Pineapple on the Char-Broil Big Easy

Rest and Serve!

I let the pineapple rest a bit before I sliced it. It’s pretty darned hot right out of the Big Easy! And if you don’t have a Big Easy (and really, you should have at least one!) you can also make this recipe using a gas or charcoal grill with a rotisserie.

You’ll love serving this pineapple with my Huli-Huli chicken. Also try my Bloomin’ apples, also made on the Big Easy!

It’s always a good idea to keep a few spare grease trays on hand for your Char-Broil Big Easy.

Love your Big Easy as much I love mine? Check out my Big Easy Add-Ons page and my free Big Easy eCookbook!

Brazilian Pineapple on the Char-Broil Big Easy
Print Pin
5 from 1 vote

Brazilian Pineapple on the Char-Broil Big Easy

Deliciously sweet pineapple, brushed with coconut milk and sprinkled with cinnamon-infused sugar. Roasted to perfection. Brazilian pineapple on the Char-Broil Big Easy is a win.
Course Dessert
Cuisine American
Keyword Big Easy, Char-Broil, pineapple
Prep Time 10 minutes
Cook Time 30 minutes
Resting Time 15 minutes
Servings 6 servings
Calories 314kcal

Ingredients

Instructions

  • Twist off the crown of the pineapple and cut off the ends. Cut down the sides to remove the rind. Then, using a sharp knife, cut spiral cuts up the sides of the pineapple to remove the eyes.
  • Place the sugar, cinnamon, and cloves in a bowl and stir to mix.
  • Fire up your Big Easy.
  • Brush the pineapple with the coconut milk. Dust heavily with the cinnamon sugar mix. Transfer to the Big Easy basket.
  • Transfer basket to the Big Easy and roast until the pineapple starts to turn golden brown.
  • Remove and let cool 10-15 minutes before slicing.
  • Serve with whipped cream.

Notes

Depending on the size of your pineapple and how heavy handed you are with the spices, you might have enough of the cinnamon sugar mix to make 2 pineapples.

Nutrition

Calories: 314kcal | Carbohydrates: 73g | Protein: 1g | Fat: 4g | Saturated Fat: 4g | Sodium: 6mg | Potassium: 217mg | Fiber: 4g | Sugar: 65g | Vitamin A: 90IU | Vitamin C: 72.3mg | Calcium: 52mg | Iron: 1.3mg

Nutritional values are approximate.

Spicy Pickled Pineapple

Wow, this spicy pickled pineapple was totally different. Delightfully good, with a spicy hit at the start, vinegar tartness in the middle, and finishing with pineapple sweetness in the end. I cannot recall ever eating anything like them. These are great right out of the jar, or equally fantastic chopped and then used to top hot dogs or tacos. Or even add them to a bowl of cottage cheese. Yep.

Spicy Pickled Pineapple

Fresh Is Best

I used a fresh pineapple, but I think you could get away with using canned slices or even chunks. You might want to cut back on the amount of sugar if you do, though. Or use canned pineapple that is in water and not a sweet juice. Although spicy pickled pineapple is already sweet, you don’t want it to be overly sweet.

I used my snazzy new little pineapple corer to cut my fresh pineapple into rings. It’s a fun little gadget!

Also try my quick pickled jalapeno rings.

Spicy Pickled Pineapple
Print Pin
5 from 1 vote

Spicy Pickled Pineapple

This spicy pickled pineapple is delightfully good, with a spicy hit at the start, vinegar tartness in the middle, and finishing with sweetness in the end.
Course Salad
Cuisine American
Keyword pickled, pineapple
Prep Time 15 minutes
Cook Time 1 day
Total Time 1 day 15 minutes
Servings 12 servings
Calories 55kcal

Equipment

Ingredients

  • 1 pineapple core removed and cut into rings
  • ¼ cup cilantro chopped
  • 2 cups seasoned rice vinegar
  • 2 tablespoons sugar
  • 2 large jalapenos cut into rings
  • 1 tablespoon kosher salt
  • ¼ cup fresh lime juice from 2 limes

Instructions

  • Place the pineapple rings and the cilantro into a quart jar.
  • Place vinegar, sugar, jalapeno, salt and lime juice into a small saucepan.
  • Bring to a simmer and stir until the sugar dissolves.
  • Remove from heat and let cool.
  • Add vinegar mixture to pineapple. The liquid should just cover the top of the pineapple. If not, add a bit more vinegar.
  • Seal and refrigerate for at least 1 day before serving.

Notes

The pineapple will keep for up to 2 weeks in the fridge.

Nutrition

Calories: 55kcal | Carbohydrates: 13g | Protein: 1g | Fat: 1g | Saturated Fat: 1g | Sodium: 583mg | Potassium: 94mg | Fiber: 1g | Sugar: 10g | Vitamin A: 90IU | Vitamin C: 40.4mg | Calcium: 12mg | Iron: 0.2mg

Nutritional values are approximate.

Buffalo Chicken Burgers

One sign that you absolutely love a dish? You make it three days in a row. Like these Buffalo chicken burgers, that I made… you guessed it… three days in a row! The burgers are so tender, so juicy, and they have just the right amount of spiciness. The heat is there, but I’d say it’s somewhere around medium spicy. Packed with celery and carrots, and topped with a wonderful blue cheese sauce, each bite really is like a fantastic chicken wing. But on a bun.

Buffalo Chicken Burgers

These Are Some Great Burgers

I so enjoyed making and devouring these Buffalo chicken burgers. They have found their way to the top of my gotta-make-regularly list. Not only are they very easy to make, they look and taste absolutely fantastic. I cannot wait to enjoy them again, and soon. You can skip the blue cheese sauce if you want, and just dress the burgers plainly, using mayonnaise if you want. The blue cheese adds more of a Buffalo wing experience.

I like to use a burger press when I make burgers. It, in combination with some patty papers, enables me to crank out a whole bunch of equally-sized burger patties in no time at all with little cleanup.

Also try my Buffalo chicken subs.

Buffalo Chicken Burgers
Print Pin
5 from 1 vote

Buffalo Chicken Burgers

These Buffalo chicken burgers are so tender, so juicy, and have just the right amount of spiciness. Each bite is like a fantastic chicken wing. On a bun.
Course Main
Cuisine American
Keyword Buffalo, burgers, chicken
Prep Time 45 minutes
Cook Time 15 minutes
Total Time 1 hour
Servings 4 servings
Calories 646kcal

Ingredients

Creamy Blue Cheese Sauce

Instructions

  • Place the chicken hot sauce, carrots, celery, garlic powder, onion powder, parsley, chives and bread crumbs into a large bowl.
  • Gently combine but do not overmix.
  • Cover and place in the fridge for 30 minutes.
  • Fire up your grill for direct cooking over medium-high heat.
  • Divide the meat mixture into 4 equally-sized balls and form into patties.
  • Lightly brush both sides with oil and transfer to the grill over direct heat.
  • Cook 4-5 minutes.
  • Turn and continue cooking another 4-5 minutes or until the internal temperature has reached 165 F. Remove.
  • Serve the burgers on the Kaiser rolls, with a few pieces of lettuce and plenty of the creamy blue cheese sauce.

Creamy Blue Cheese Sauce

  • Place the blue cheese crumbles into a small bowl.
  • Use a fork to smash or break up into small pieces.
  • Add the remaining ingredients and stir.

Notes

I also like to drizzle these burgers with a little Buffalo wing or hot sauce!

Nutrition

Calories: 646kcal | Carbohydrates: 32g | Protein: 32g | Fat: 43g | Saturated Fat: 15g | Cholesterol: 145mg | Sodium: 1486mg | Potassium: 844mg | Fiber: 2g | Sugar: 6g | Vitamin A: 3185IU | Vitamin C: 4mg | Calcium: 286mg | Iron: 3.1mg

Nutritional values are approximate.

Butter Pecan Ice Cream

When I picked up a big ole back of fresh-roasted pecans at the Jack and Jill Nut Shop in downtown Nashville, Indiana, I knew exactly where they’d end up: in my butter pecan ice cream. Well, minus the many nuts I ate between the store and home, that is. Roasted pecans and creamy, delicious homemade ice cream is a dangerous combination so make a much bigger batch than you think you’ll need.

Butter Pecan Ice Cream

Ice Cream Magic

I’ve made other ice cream recipes that I’ve found on the internet. Ones that don’t use cream, or steer towards lighter ingredients. And I’ve made them and they were ok. Just ok. This right here is the real deal. You want light you shouldn’t read on. This is the kind of ice cream you enjoy and love. If you need to, go for a walk after eating a bowl. But trust me, while you’re on that walk you’ll be thinking about this butter pecan ice cream.

Also try my chocolate peanut butter ice cream.

Butter Pecan Ice Cream
Print Pin
5 from 1 vote

Butter Pecan Ice Cream

Roasted pecans and creamy, delicious homemade ice cream is a dangerous combination so make a much bigger batch than you think you’ll need.
Course Dessert
Cuisine American
Keyword butter, homemade ice cream, pecans
Prep Time 5 minutes
Cook Time 30 minutes
Total Time 35 minutes
Servings 16 servings
Calories 137kcal

Ingredients

Instructions

  • Note: The day before making the ice cream place the maker bowl in your freezer to get it completely frozen.
  • Place the pecans and butter in a small skillet over medium heat. Stirring constantly, cook until the nuts are just browned. Remove from heat.
  • Place the eggs into a large bowl and whisk.
  • In a small saucepan combine the brown sugar and half-and-half. Stir and bring to a boil over medium-high heat. Remove from heat.
  • Gradually pour mixture into the eggs while whisking constantly.
  • Pour mixture back into the saucepan over medium heat. Stirring often, cook until the mixture thickens, coating the back of a spoon.
  • Remove from heat and stir in the heavy cream, vanilla and toasted pecans.
  • Let cool slightly then pour into your ice cream maker and process according to the maker’s instructions.

Notes

For best results, use full-fat half-and-half and cream.

Nutrition

Calories: 137kcal | Carbohydrates: 15g | Protein: 2g | Fat: 8g | Saturated Fat: 4g | Trans Fat: 1g | Cholesterol: 41mg | Sodium: 24mg | Potassium: 70mg | Fiber: 1g | Sugar: 14g | Vitamin A: 242IU | Vitamin C: 1mg | Calcium: 45mg | Iron: 1mg

Nutritional values are approximate.

Awesome Smoked Chicken Thighs

I have to say that I have become quite addicted to smoking bone-in, skin-on chicken thighs on my Weber Smokey Mountain smoker. They’re crazy easy and a lot more forgiving than say brisket or pork butt. And when they’re on sale they’re a tremendous bargain. I can fill my freezer with delicious pulled, chopped or shredded smoked chicken for darned near nothing. This right here is my go-to method for awesome smoked chicken thighs. You can use boneless and/or skinless but the bones and skin keep them moist and add tons of flavor. I pull the meat away and just chop it for whatever I want, be it sandwiches, nachos, backed potatoes…

Awesome Smoked Chicken Thighs

Perfect Thighs with Tons of Flavor

I do not sauce my thighs while I’m smoking them. Since I’m not sure exactly how I’ll use the meat I keep it ‘dry’. You can always add sauce later, but you can’t un-sauce it. Well, not easily that’s for sure!

I prefer to use fruit or nut woods when I smoke unless I want a heavier smoke flavor. Pecan, apple or cherry are my favorites.

If you prefer your chicken thighs cooked over charcoal, try my grilled sweet-n-spicy chicken thighs. Or go big and make my whole smoked turkey on a WSM (or any smoker for that matter).

Awesome Smoked Chicken Thighs
Print Pin
5 from 1 vote

Awesome Smoked Chicken Thighs

This right here is my go-to method for awesome smoked chicken thighs.
Course Main
Cuisine American
Keyword chicken thighs, smoked
Prep Time 12 hours
Cook Time 2 hours 30 minutes
Total Time 14 hours 30 minutes
Servings 8
Calories 5235kcal

Ingredients

For the brine

Instructions

  • Place chicken into a large resealable container.
  • Whisk together the brine ingredients until the salt has dissolved. Pour over the chicken.
  • Cover and refrigerate overnight.
  • Fire up your smoker for 225 F cooking. Use whichever wood you prefer (I went with apple).
  • Remove chicken from the brine and rinse with cold water.
  • Pat dry then sprinkle liberally with the rub on both sides.
  • Tuck the skin underneath of the thighs and transfer to the smoker.
  • Smoke for 2 hours or more until the internal temperature has reached 165 F.
  • If you wish to sauce your thighs do so in the last 15 minutes of cooking.

Notes

Smoked skin-on thighs will not have a crispy skin because of the low cooking temperature. I prefer to remove the skin, pull the meat away from the bones and chop for sandwiches.

Nutrition

Calories: 5235kcal | Carbohydrates: 73g | Protein: 370g | Fat: 377g | Saturated Fat: 102g | Trans Fat: 2g | Cholesterol: 2223mg | Sodium: 58390mg | Potassium: 4995mg | Fiber: 2g | Sugar: 59g | Vitamin A: 1804IU | Vitamin C: 2mg | Calcium: 277mg | Iron: 17mg

Nutritional values are approximate.

Classic Brat Burgers

I’ve toyed with various bratwurst burgers over the years, and nothing really ever wowed me. I’ve even bought the pre-made brat patties. Nothing wrong with them, but I always felt like I needed something else… something more. And this right here is it. A very simple, very tasty, very juicy brat patty, topped with deliciously crunchy cabbage and onion, with a nice sweet but vinegary dressing to bring it all together. Every great taste in a single bite. These are my go-to classic brat burgers.

Classic Brat Burgers

A Wonderful Taste Combination

I feel like a little sweetness is necessary when it comes to a brat burger. It’s ok to tame it with a little onion and vinegar, but that sweetness still needs to be there. It’s what made these classic brat burgers my favorite. Oh, and my wife loves them too!

I like to use a burger press when I make burgers. It, in combination with some patty papers, enables me to crank out a whole bunch of equally-sized burger patties in no time at all with little cleanup.

Also try my more traditional grilled bratwurst.

Classic Brat Burgers
Print Pin
5 from 1 vote

Classic Brat Burgers

I’ve toyed with various bratwurst burgers over the years, and nothing really ever wowed me. I’ve even bought the pre-made brat patties. Nothing wrong with them, but I always felt like I needed something else… something more. And this right here is it.
Course Main
Cuisine American
Keyword bratwurst, burgers, sausage
Prep Time 10 minutes
Cook Time 15 minutes
Total Time 25 minutes
Servings 6 servings
Calories 1254kcal

Ingredients

For the burgers

  • 3 pounds bratwurst removed from casings
  • 6 onion hamburger buns

For the spread

For the topping

  • 2 cups Napa cabbage thinly sliced
  • 1 cup onion thinly sliced

Instructions

For the burgers

  • Divide the bratwurst into 6 1/2 pound balls and form into patties.
  • Fire up your grill and cook until done about 5 minutes per side until internal temperature reaches 165 F.
  • Remove and toast the buns as desired.
  • Serve patties on buns heaped with plenty of the topping and drizzled with lots of the spread.

For the spread

  • Combine all ingredients. Stir again just before serving.

For the topping

  • Combine all ingredients.

Notes

You can skip the topping ingredients and use pre-made slaw if you want!

Nutrition

Calories: 1254kcal | Carbohydrates: 78g | Protein: 36g | Fat: 89g | Saturated Fat: 26g | Trans Fat: 1g | Cholesterol: 180mg | Sodium: 3480mg | Potassium: 988mg | Fiber: 2g | Sugar: 51g | Vitamin A: 115IU | Vitamin C: 10mg | Calcium: 172mg | Iron: 3mg

Nutritional values are approximate.

Texas Chipotle Burgers

Sure, the patties on these Texas chipotle burgers were packed with flavor, and would be great by themselves. But, it’s the fire-roasted tomato sauce that really, really makes them fantastic. The sauce is what I would call kicked-up ketchup. It compliments the smoky jalapeno kick you get from the chipotle in the burgers just perfectly.

Texas Chipotle Burgers

Like It Spicier?

For a little smokier and a bit spicier topping, add a chipotle or two and some of the adobo sauce into the tomatoes as they cook. You can double the tomato sauce recipe and keep it in the fridge. It’s great for topping not only Texas chipotle burgers, but also hot dogs!

I like to use a burger press when I make burgers. It, in combination with some patty papers, enables me to crank out a whole bunch of equally-sized burger patties in no time at all with little cleanup.

I used some of my homemade chipotles in adobo. They’re actually quite easy to make and are soooo deliciously smoky!

Texas Chipotle Burgers
Print Pin
4 from 1 vote

Texas Chipotle Burgers

Sure, the patties on these Texas chipotle burgers were packed with flavor, and would be great by themselves. But, it’s the fire-roasted tomato sauce that really, really makes them fantastic. 
Course Main
Cuisine American
Keyword burgers, spicy
Prep Time 30 minutes
Cook Time 20 minutes
Total Time 50 minutes
Servings 6 burgers
Calories 616kcal

Ingredients

For the fire-roasted tomato sauce

Instructions

  • Place the meat in a large bowl.
  • Grate half of the onion into the meat. Chop the remaining half and reserve for topping the burgers.
  • Add the Worcestershire sauce, chipotles and adobo, and steak seasoning.
  • Add a splash of oil. Mix well then divide into 4 patties.
  • Fire up your grill.
  • Cook the burgers and toast the buns, as desired.
  • Serve the burgers topped with cheese, the tomato sauce, and chopped onion.

For the fire-roasted tomato sauce

  • Heat a tablespoon of oil in a medium sauce pan.
  • Add the garlic and cook 2-3 minutes.
  • Add the sugar and vinegar. Cook for 2 minutes.
  • Stir in the tomatoes.
  • Season with salt and pepper and let simmer 5-6 minutes.

Notes

Serve with plenty of napkins.

Nutrition

Calories: 616kcal | Carbohydrates: 28g | Protein: 34g | Fat: 40g | Saturated Fat: 16g | Trans Fat: 2g | Cholesterol: 127mg | Sodium: 487mg | Potassium: 601mg | Fiber: 2g | Sugar: 11g | Vitamin A: 478IU | Vitamin C: 4mg | Calcium: 250mg | Iron: 5mg

Nutritional values are approximate.

Crispy Green Beans on the Nesco Snackmaster Pro

These crispy green beans on the Nesco Snackmaster Pro are super packed with green bean flavors. It’s like if you put all of the flavors of 10 beans into each single bean. They do stay crispy for a while, but you’ll want to eat them fairly soon after removing them from your dehydrator to still enjoy that crispiness. If you do have any beans leftover store them in an air-tight container.

Crispy Green Beans on the Nesco Snackmaster Pro

Crispy. Not Soggy.

Don’t be shy with the salt when you remove the beans from the dehydrator. It helps make sure the beans stay dry and crunchy. You want crispy green beans on the Nesco Snackmaster Pro, not soggy ones.

Fresh Beans Only

I don’t think you can use this same technique with frozen or canned beans. Green beans, fresh from the garden or farm are best. This is a great way to use up a batch of beans when you have extras.

I like to load up my dehydrator. To do that I picked up a handful of extra trays. They really add a whole lot more drying space! Since I have to rotate my trays, I write a number on each one on a piece of blue painter’s tape so I can keep track of them.

Also try making raisins using your dehydrator! They’re outstanding!

Crispy Green Beans on the Nesco Snackmaster Pro
Print Pin
4 from 1 vote

Crispy Green Beans on the Nesco Snackmaster Pro

These crispy green beans are super packed with green bean flavors. It’s like if you put all of the flavors of 10 beans into each single bean.
Course Side
Cuisine American
Keyword crispy, dehydrator, green beans, nesco snackmaster pro
Prep Time 10 minutes
Cook Time 12 hours
Total Time 12 hours 10 minutes
Servings 8
Calories 111kcal

Ingredients

Instructions

  • Combine beans and oil in a large bowl and toss to coat.
  • Sprinkle with salt and stir.
  • Transfer beans to dryer racks.
  • Dry at 125 F for 12 hours or until dry and crispy.

Notes

Serve immediately.

Nutrition

Calories: 111kcal | Carbohydrates: 12g | Protein: 3g | Fat: 7g | Saturated Fat: 6g | Sodium: 882mg | Potassium: 359mg | Fiber: 5g | Sugar: 6g | Vitamin A: 1174IU | Vitamin C: 21mg | Calcium: 63mg | Iron: 2mg

Nutritional values are approximate.