Slow Cooker Chopped Corned Beef Reuben

I’m a sliced-corned beef Reuben kind of guy. Or I was. We recently ate at a little restaurant where a Reuben was on the menu. I’m a big fan of Reuben sandwiches, and I think they are a good test of the quality of the food a restaurant turns out. Tough corned beef? I’m not coming back. Well, to my surprise the Reuben at the restaurant had chopped corned beef mixed in with kraut. Slow cooker chopped corned beef Reuben??? I thought…. hmmmm… I’m not sure about this… but I took a bite and loved it! So I went home and made a big batch for the week’s lunches!

Slow Cooker Chopped Corned Beef Reuben

It’s Not Fancy But Oh Is It Ever Good

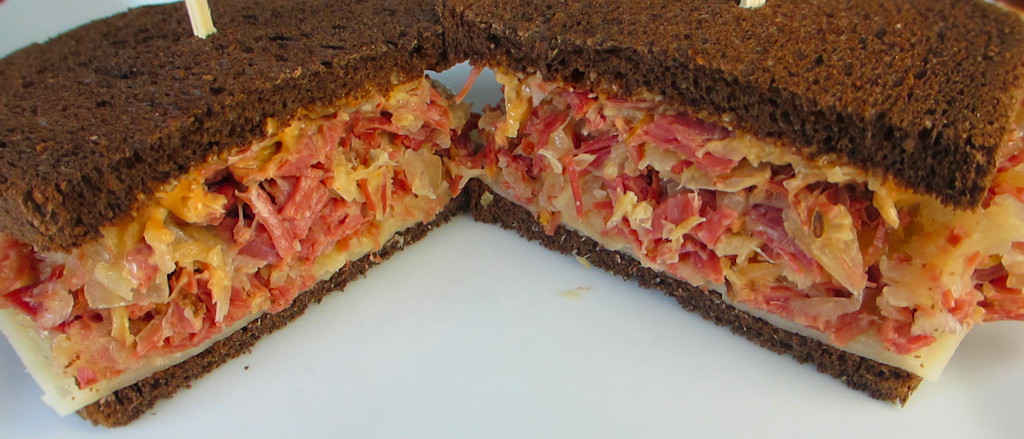
There’s nothing fancy about this slow cooker chopped corned beef Reuben. It’s your standard fare. Slow-cooked corned beef, tender, and then chopped. Mixed in with well-rinsed and drained kraut. Easy dressing, cheese, and rye. Done. Eat! For a fantastic twist, my spicy slow cooker corned beef really kicks up a Reuben sandwich. My sous vide version is also fantastic.

Also try my southern Reuben sandwich and my slow cooker shredded Mexican beef. And my slow cooker Guinness corned beef is amazing also!

Slow Cooker Chopped Corned Beef Reuben
Print Pin
3.67 from 3 votes

Slow Cooker Chopped Corned Beef Reuben

There’s nothing fancy about this Reuben. It’s your standard fare. Slow-cooked corned beef, tender, and then chopped. Mixed in with well-rinsed and drained kraut. Easy dressing, cheese, and rye. Done.
Course Main
Cuisine American
Keyword corned beef, crockpot, sandwich, slow cooker
Prep Time 15 minutes
Cook Time 12 hours
Total Time 12 hours 15 minutes
Servings 8 servings
Calories 556kcal
Author Mike

Equipment

Ingredients

Instructions

  • Place kraut in slow cooker.
  • Add corned beef brisket and the spice packet that came with it.
  • Add lid and cook on low for 12 until the corned beef is about to fall apart.
  • Remove the corned beef and chop. Yes, you can slice it if you prefer. Return the beef to the slow cooker and stir to combine.
  • At this point you can add the Thousand Island to the slow cooker and stir, if you desire, or simply slather it onto the bread slices.
  • Spoon kraut and beef mixture onto the bread. Note: I like to transfer the mixture to a strainer first. I press down on it lightly to remove as much moisture as I can. This prevents me from having a soggy (bleh!) Reuben.
  • Add cheese to sandwich and serve.

Notes

Also great served on thick rye bread.

Nutrition

Calories: 556kcal | Carbohydrates: 35g | Protein: 27g | Fat: 34g | Saturated Fat: 10g | Cholesterol: 85mg | Sodium: 2742mg | Potassium: 684mg | Fiber: 7g | Sugar: 7g | Vitamin A: 227IU | Vitamin C: 47mg | Calcium: 217mg | Iron: 5mg

Nutritional values are approximate.

Fig Newtons on the Nesco Snackmaster Pro

Oh my goodness! It worked! Fig newtons on the Nesco Snackmaster Pro came out absolutely fantastically! Moist, tender, and packed with fig flavor. I could not have been happier. I haven’t had a fig newton in what seems like a hundred years. Now I can make them at home, and easily.

Fig Newtons on the Nesco Snackmaster Pro

Your Efforts Will Be Rewarded

The steps for making your own fig newtons using your Nesco Snackmaster Pro are pretty straightforward. You form a dough, first, and then roll it out so that’s 6″ deep and it-doesn’t-matter how long.

fig-newtons-on-the-nesco-snackmaster-pro-1

Then you form a paste of the figs and just a bit of water using your food processor. Spread the paste down the center 2″ of the dough rectangle. Try not to eat all of the figs while you’re doing this.

fig-newtons-on-the-nesco-snackmaster-pro-2

Fold the sides over to form a big log of figgy goodness. Cut into 2″ (or so) sections and transfer to the dehydrator. Dry at 115 F for about 48 hours then devour!

fig-newtons-on-the-nesco-snackmaster-pro-3

Get Extra Trays For More Room

I like to load up my dehydrator. To do that I picked up a handful of extra trays. They really add a whole lot more drying space! Since I have to rotate my trays, I write a number on each one on a piece of blue painter’s tape so I can keep track of them.

You can also dehydrate grapes to make delicious raisins!

Fig Newtons on the Nesco Snackmaster Pro
Print Pin
5 from 1 vote

Fig Newtons on the Nesco Snackmaster Pro

Oh my goodness! It worked! These fig newtons came out absolutely fantastica! Moist, tender, and packed with figgy flavor. I could not have been happier.
Course Dessert
Cuisine American
Keyword dehydrator, nesco snackmaster pro, snacks
Prep Time 20 minutes
Cook Time 2 days
Total Time 2 days 20 minutes
Servings 24 servings
Calories 114kcal

Ingredients

Instructions

  • Place the flour, milk and vanilla extract in a large bowl. Mix with your hands until it forms a dough. The dough will be slightly dry but will still hold its form when pressed.
  • Place the figs into a food process.
  • Add 1/4 cup of water and pulse a few times. If the figs form a paste you are done. If not, add a bit more water and pulse again. Continue until you get a firm paste, but do not add too much water that it becomes runny.
  • Roll the dough out on a flat surface. Form a rectangle that is 6″ deep and about 1/4″ thick. Don’t worry about the width of the dough.
  • Spread the fig paste down the center 2″ of the dough, leaving 2″ above and below to the edges of the dough.
  • Fold the edges over the fig filling. The dough might split a bit along the edges. Use your fingers to pinch it back together.
  • Use a pastry or pizza cutter or sharp knife to cut the dough into 2″ pieces.
  • Transfer cookies to the Nesco Snackmaster Pro trays.
  • Set the temperature to 115 F and dry for up to 48 hours or until the dough is soft but dry.

Notes

Our fig newtons were pretty thick so they did like to stick to the tray above them. Don’t fret that, they’ll come out fine. I do recommend that you do not place any cookies on the top rack, the one closest to the dehydrator motor as they may stick to it.

Nutrition

Calories: 114kcal | Carbohydrates: 6g | Protein: 4g | Fat: 9g | Saturated Fat: 1g | Sodium: 7mg | Potassium: 22mg | Fiber: 2g | Sugar: 2g | Vitamin A: 13IU | Vitamin C: 1mg | Calcium: 49mg | Iron: 1mg

Nutritional values are approximate.

Purdue Boilermaker Hot Dog

The Big 10 basketball tournament was here in Indianapolis a few years ago. As part of the event, the Levy restaurant group in Chicago produced unique hot dogs that highlight each of the Big 10 teams. I came across a copy of the list of the dogs recently, and just had to make each of them. Smoky black bean salsa, melted cheddar, and mustard top the Purdue Boilermaker hot dog. The mustard and salsa were great. So was the salsa.

Purdue Boilermaker Hot Dog

This Is A Great Hot Dog

The Purdue Boilermaker hot dog was a big hit. And very easy to make. A real crowd-pleaser! Sure, everyone kind of expects mustard on a hot dog. Demands it, even. But black bean salsa? Yeah, that’s different!

For a full list of all of the Big 10 team hot dogs, click here and enjoy!

Purdue Boilermaker Hot Dog
Print Pin
5 from 1 vote

Purdue Boilermaker Hot Dog

Smoky black bean salsa, melted cheddar, and mustard top the Purdue Boilermaker hot dog. The mustard and salsa were great. So was the salsa.
Course Main
Cuisine American
Keyword hot dogs
Prep Time 5 minutes
Cook Time 15 minutes
Total Time 20 minutes
Servings 4
Calories 343kcal

Ingredients

  • 4 hot dogs
  • 4 hot dog buns
  • 1 cup Smoky black bean salsa if you can't find any mix a few drops of liquid smoke with black bean salsa
  • 1 cup cheddar cheese shredded
  • Spicy brown mustard

Instructions

  • Grill or cook the the dogs as desired.
  • Toast your buns if you like (I always do).
  • Place dogs on buns and top with plenty of salsa.
  • Top with plenty of cheese.
  • If you want your cheese melted place under the broiler for a minute.
  • Add mustard and serve.

Notes

Cut a long narrow slit in your dogs before cooking to give the toppings a great place to go!

Nutrition

Calories: 343kcal | Carbohydrates: 30g | Protein: 16g | Fat: 18g | Saturated Fat: 9g | Cholesterol: 50mg | Sodium: 696mg | Potassium: 147mg | Fiber: 1g | Sugar: 3g | Vitamin A: 283IU | Vitamin C: 1mg | Calcium: 288mg | Iron: 3mg

Nutritional values are approximate.

Spicy Broccoli Cheese Wonton Cups

My wife flat-out loved these spicy broccoli cheese wonton cups. I have to admit, they are definitely a non-boring way to serve vegetables. It always seems like you have to do more and more every day to keep from serving boring sides! Well, a nice kick from habanero Jack cheese and fried jalapenos really makes up for what would’ve been ‘just’ broccoli. Oh, and love that crunch from the wonton cups, too. You need that difference. These cups are quite tasty and well, kinda cool looking too! Heck, I think you could serve them as appetizers!

Spicy Broccoli Cheese Wonton Cups

Un-Spicy Them

If you don’t like spicier foods like we do, substitute shredded mozzarella or provolone for the habanero Jack cheese and French fried onions for the crispy jalapenos. Spicy broccoli cheese wonton cups are great without the spicy. I think blanched carrots or cauliflower would work just fine. Or heck, use them all and make mixed vegetable cups.

I highly recommend that you shred or grate your own cheese at home. Don’t buy the pre-shredded cheese. It has stuff added to it to keep it from sticking together. That ‘stuff’ affects how the cheese melts. Shred it yourself and use the good stuff.

Also try my jalapeno popper wonton cups.

Spicy Broccoli Cheese Wonton Cups
Print Pin
4 from 2 votes

Spicy Broccoli Cheese Wonton Cups

A nice kick from habanero Jack cheese and fried jalapenos really makes up for what would’ve been ‘just’ broccoli. Oh, and love that crunch from the wonton cups, too. You need that contrast.
Course Side
Cuisine American
Keyword broccoli, spicy, wontons
Prep Time 5 minutes
Cook Time 40 minutes
Total Time 45 minutes
Servings 12 cups
Calories 116kcal

Ingredients

Instructions

  • Preheat your oven to 375 F.
  • Prepare an ice bath by filing a large bowl halfway with ice then add water. Note: You can skip the ice bath and rinse the cooked broccoli under cold water, but I find that you lose some of the broccoli doing it that way, so I prefer to use an ice bath.
  • Bring a large pot of lightly salted water to a boil.
  • Add the broccoli and boil for 1 1/2 minutes.
  • Drain the broccoli and place into the ice bath to stop the cooking.
  • Chop the cooked broccoli and transfer to a bowl.
  • Add the cheese, jalapenos, egg and salt and pepper and stir gently to combine.
  • Spray a muffin pan with non-stick spray.
  • Press 2 wonton wrappers into each pan cup. I like to add one wrapper then place another on top, rotated 45 degrees from the bottom one to better fill the cup.
  • Divide the broccoli mixture between the cups.
  • Bake for 25 minutes or until golden brown.

Notes

Serve immediately.

Nutrition

Calories: 116kcal | Carbohydrates: 13g | Protein: 6g | Fat: 5g | Saturated Fat: 2g | Trans Fat: 1g | Cholesterol: 23mg | Sodium: 178mg | Potassium: 185mg | Fiber: 2g | Sugar: 1g | Vitamin A: 410IU | Vitamin C: 45mg | Calcium: 103mg | Iron: 1mg

Nutritional values are approximate.

Root Beer Can Chicken on the Char-Broil Big Easy

Note: This recipe was developed using the Char-Broil Big Easy Oil-Less Fryer. If you are cooking using the Char-Broil Smoker-Roaster Grill you should cook with the lid open and the temperature set to High. You might also need to adjust the cooking time.

The Char-Broil Big Easy does a phenomenal job cooking poultry. You don’t even have to get all fancy with it, but sometimes I like to do a little extra and make a beer (or soda) can version of my favorite whole roasted chickens. This root beer can chicken came out fantastic. I used a slightly spicy but simple rub, and a good canned root beer. Moist and tender meat with great flavor. I couldn’t have been happier.

Root Beer Can Chicken on the Char-Broil Big Easy

Easy. Different. And Delicious.

The flavor from the root beer is subtle, but there. Use a quality root beer. If you can’t find one in a can, just empty (er… drink) a can of soda or beer and add the good root beer in.

There’s nothing complicated about cooking a whole chicken on the Big Easy. You can pretty much count on it taking 15 minutes per pound unless it’s really windy out. Of course you’ll still want to poke it with an instant-read thermometer to make sure it gets about 165 F, but I’ve cooked probably 50 chickens on my Big Easy and counting on 15 minutes per pound has never failed me.

My Apple Ale beer can chicken, made on the Big Easy, is also crazy good.

For something different, try my beer can cabbage on the Big Easy. It’s different for sure!

It’s always a good idea to keep a few spare grease trays on hand for your Char-Broil Big Easy.

Love your Big Easy as much I love mine? Check out my Big Easy Add-Ons page and my free Big Easy eCookbook!

Root Beer Can Chicken on the Char-Broil Big Easy
Print Pin
5 from 1 vote

Root Beer Can Chicken on the Char-Broil Big Easy

This root beer can chicken came out fantastic. I used a slightly spicy but simple rub, and a good canned root beer. Moist and tender meat with great flavor. I couldn’t have been happier.
Course Main
Cuisine American
Keyword Big Easy, Char-Broil, chicken
Prep Time 5 minutes
Cook Time 1 hour 45 minutes
Total Time 1 hour 50 minutes
Servings 1 chicken
Calories 1854kcal
Author Mike

Ingredients

Instructions

  • Fire up your Big Easy.
  • Rinse the chicken and pat dry.
  • Lightly brush the chicken with oil.
  • Combine the remaining ingredients except for the root beer. Reserve 1 teaspoon of the mixture. Sprinkle the remaining seasoning onto the chicken.
  • Add reserved spice mixture to the root beer and insert into the chicken.
  • Place chicken into the basket and insert into the Big Easy.
  • Cook for 15 minutes per pound or until the chicken has hit 165 F as measured in several locations.
  • Let rest 15 minutes before removing the soda can and carving.

Notes

I use the Char-Broil folding chicken roaster to hold the beer or soda cans securely. If the beer you’re using is only available in a bottle, just empty the contents into an empty beer or soda can.

Nutrition

Calories: 1854kcal | Carbohydrates: 53g | Protein: 145g | Fat: 116g | Saturated Fat: 33g | Trans Fat: 1g | Cholesterol: 571mg | Sodium: 5825mg | Potassium: 1739mg | Fiber: 4g | Sugar: 40g | Vitamin A: 3507IU | Vitamin C: 15mg | Calcium: 170mg | Iron: 10mg

Nutritional values are approximate.

Poutine

My wife and I recently grabbed lunch at one of my favorite Indianapolis food trucks, Scratch Truck. For a side, we opted for the poutine, a first for both of us. I’ve seen poutine hundreds of times on TV food shows, but never had the opportunity to try it until then, and boy, did we ever absolutely love it. French fried potatoes, topped with cheese curds (oh my!) and gravy. Really, what could be better? Poutine always looked decadent on TV. It’s even more decadent in person!

Poutine

Drowning In Deliciousness

The gravy is the real start of this dish. Though let’s face it, cheese curds are pretty much wondrous on their own. After quite a bit of research, I settled on a gravy that is a mix of beef and chicken gravies. It’s crazy smooth and packed with flavor. The gravy wasn’t just great, it was fantastic. It would also be stellar on a chicken-fried steak. So you know what that means. Yep, I’ll be making chicken-fried steak soon.

If you don’t have cheese curds where you live, you can substitute block (not shredded) mozzarella. Just tear or chop it into small pieces.

Got leftover cheese curds? Make my copycat of Culver’s cheese curds. Man, are they ever delicious!

Print Pin
5 from 1 vote

Poutine

French fried potatoes, topped with cheese curds (oh my!) and gravy. Really, what could be better?
Course Side Dish or Appetizer
Cuisine American
Keyword fries, gravy
Prep Time 5 minutes
Cook Time 15 minutes
Total Time 20 minutes
Servings 1
Calories 3648kcal

Equipment

Ingredients

For the poutine

  • 2 pounds French fries deep-fried and drained (if frozen, cooked per package instructions)
  • 1 cup cheese curds or more
  • garnishes optional. I used sliced green onions, but chopped parsley, fresh sage, thyme, etc are also great.

For the gravy

Instructions

For the poutine

  • Layer fries on a serving platter.
  • Sprinkle fries with the curds (you may have to separate the curds first).
  • Add lots of gravy and garnish as desired.

For the gravy

  • Dissolve the cornstarch in the water in a small bowl or glass.
  • Melt the butter in a large sauce pan.
  • Whisk in the flour and continue cooking, whisking often, for 5 minutes or until the flour has turned golden brown.
  • Add the garlic, stir and cook another 30 seconds.
  • Whisk in the beef and chicken broths (careful when first starting to add the broths as the mixture will steam a bit. Keep your hands and face back.)
  • Bring mixture to a boil then reduce to a simmer and continue simmering, whisking constantly, for 5 minutes or until the gravy is thickened.
  • Add pepper to taste and stir and serve.

Notes

Best served immediately.

Nutrition

Calories: 3648kcal | Carbohydrates: 316g | Protein: 67g | Fat: 242g | Saturated Fat: 105g | Polyunsaturated Fat: 13g | Monounsaturated Fat: 97g | Trans Fat: 3g | Cholesterol: 307mg | Sodium: 8507mg | Potassium: 4356mg | Fiber: 42g | Sugar: 1g | Vitamin A: 2106IU | Vitamin C: 59mg | Calcium: 973mg | Iron: 15mg

Nutritional values are approximate.

Mesquite Ground Beef Jerky on the Nesco Snackmaster Pro

I have been loving making jerky like this mesquite ground beef jerky on the Nesco Snackmaster Pro. I’ve been using ground top round for my ground beef jerky, but any lean ground meat will work. This mesquite ground beef jerky has a really great smoky flavor to it, but it’s not overwhelming. The flavor is a bit stronger than the hickory-flavored seasoning that Eastman Outdoors sells. Not strong bad but strong good! The meat has the perfect ‘bite’, just a little tug.

Mesquite Ground Beef Jerky on the Nesco Snackmaster Pro

Rotate Your Trays

Make sure you rotate your trays every 2 hours or so when you make mesquite ground beef jerky on your Nesco Snackmaster Pro. The bottom trays will not dry as quickly as those on top. Rotating the trays will give you nice, even drying and perfect jerky on every level.

Get Extra Trays

I like to load up my dehydrator. To do that I picked up a handful of extra trays. They really add a whole lot more drying space! Since I have to rotate my trays, I write a number on each one on a piece of blue painter’s tape so I can keep track of them.

Try these other great jerky flavors from Eastman Outdoors: spicy jalapenoCajunwhiskey peppersweet habanero, and hickory.

Check out my guide to using the Nesco Snackmaster Pro. You will be making fantastic jerky at home in no time at all!

Mesquite Ground Beef Jerky on the Nesco Snackmaster Pro
Print Pin
5 from 1 vote

Mesquite Ground Beef Jerky on the Nesco Snackmaster Pro

 This mesquite ground beef jerky has a really great smoky flavor to it, but it’s not overwhelming. 
Course Dehydrator
Cuisine Jerky
Keyword BBQ, beef, dehydrator, jerky, nesco snackmaster pro, sweet
Prep Time 8 hours
Cook Time 6 hours
Total Time 14 hours
Servings 1 pound
Calories 1243kcal
Author Mike

Ingredients

Instructions

  • Place beef in a resealable bag or container.
  • In a small bowl whisk together the seasoning, curing salt and water.
  • Pour over the meat and seal. Shake to coat.
  • Refrigerate the meat for up to 8 hours, shaking or massaging every hour or so to get the marinade distributed and absorbed evenly.
  • Remove meat from the marinade and add to a jerky gun.
  • Squeeze out onto Nesco trays. Do not overlap meat.
  • Add the dehydrator top, set to maximum temperature setting and dehydrate for 5 hours, rotating the trays (bottom to top) every 2 hours or so.
  • To test for doneness remove a piece and let cool slightly. Try to bend the meat. If it gives and starts to tear at the bend it is done. If it bends without tearing return to the dehydrator and let it run another 15 minutes and test again. If the meat is crunchy it is overdone but still good. It’s really personal preference as to how you like your jerky. Soft, chewy, crunchy. There’s no wrong here.
  • Let cool before storing in an airtight container.

Notes

The package for the Eastman Outdoors jerky seasoning states that it makes up to 5 pounds of jerky. I personally feel that the flavor is too mellow, so I use just about an entire package for 1 pound of jerky. I end up with a little left over seasoning, which I store in a labelled air-tight container. I’ll eventually mix it with more seasoning. I think I can get 3 pounds of well-seasoning jerky out of two packages of Eastman Outdoors mix.
This recipe is for starting with 2 pounds of meat. You’ll end up with about 1 pound in the end. You can easily double/triple/etc this recipe for large quantities of meat, however 5-6 pounds is about all you can fit onto a Nesco Snackmaster Pro fitted with 12 trays (the unit comes with 5).

Nutrition

Calories: 1243kcal | Protein: 194g | Fat: 45g | Saturated Fat: 20g | Trans Fat: 3g | Cholesterol: 562mg | Sodium: 605mg | Potassium: 3139mg | Calcium: 85mg | Iron: 22mg

Nutritional values are approximate.

Oklahoma Fried Onion Burgers

The tastiest burgers are cooked on a flat-top griddle or in a hot skillet. Unlike a grill, the fat doesn’t drip down into the fire below. Instead, it stays on the burger, keeping it moist. And the added plus of a griddle is that you get that wonderful char. These Oklahoma fried onion burgers would be your standard fantastic griddle burgers, but they have a very tasty twist: onions that are griddled into the patties. The result is divine.

Oklahoma Fried Onion Burgers

Griddled Burgers Are Divine

I use a griddle insert from Weber that fits into my charcoal and gas grills to griddle burgers like these Oklahoma fried onion burgers. It not only gets super hot, it gets hot consistently across the entire griddle. This ensures that I get nice evenly cooked burgers no matter how many I am cooking at once. I absolutely love making burgers on my griddles. They don’t get that great live-fire flavor but they make up for it with that wonderful burger crust.

Also try my super-cheesy queso burgers.

Oklahoma Fried Onion Burgers
Print Pin
5 from 1 vote

Oklahoma Fried Onion Burgers

These Oklahoma fried onion burgers would be your standard fantastic griddle burgers, but they have a very tasty twist: onions that are griddled into the patties. The result is divine.
Course Main
Cuisine American
Keyword burgers
Prep Time 40 minutes
Cook Time 15 minutes
Total Time 55 minutes
Servings 4 servings
Calories 610kcal

Ingredients

Instructions

  • Place the onion slices in a large bowl.
  • Toss with 1 teaspoon of salt and let rest for 30 minutes to extract as much liquid out of the onions as possible.
  • Transfer the onions to a towel or a few sheets of paper towels, roll up tightly and squeeze to remove as much liquid as you can.
  • Divide the onion slices into 4 equal piles on a cutting board or flat surface.
  • Divide the beef into 4 patties and form into balls.
  • Place beef on top of the onions and, using the palm of your hand or the bottom of a small skillet, flatten the beef into patties. The onions will stick to the bottom of the patties. That’s what you want.
  • Season patties with salt and pepper.
  • Heat up a griddle or cast iron skillet on your stove top or grill over medium-high heat.
  • Add the butter and swirl it around to coat the griddle or skillet.
  • Add the patties, onion side down, and cook for 6-8 minutes. You’ll see the onions starting to turn golden brown and get crispy around the sides.
  • Flip and continue cooking until the burgers are done, about 2 more minutes.
  • Top with cheese and remove.
  • Toast the buns, if desired.
  • Add the patties, mayonnaise, mustard, and pickles.

Notes

The key is to dry the onions so they get crispy, not sauté.

Nutrition

Calories: 610kcal | Carbohydrates: 27g | Protein: 28g | Fat: 43g | Saturated Fat: 18g | Trans Fat: 2g | Cholesterol: 112mg | Sodium: 896mg | Potassium: 469mg | Fiber: 2g | Sugar: 5g | Vitamin A: 323IU | Vitamin C: 4mg | Calcium: 335mg | Iron: 4mg

Nutritional values are approximate.

Illinois Fighting Illini Cheddar Hot Dog

Indianapolis recently hosted the Big 10 basketball tournament. As part of the event the Levy restaurant group in Chicago produced a line of unique hot dogs. Each dog highlighted each of the teams in the tournament. I recently came across a copy of the list of the hot dogs, and I just had to make each and every one of them. Topped with tons of tasty yumminess the Illinois Fighting Illini cheddar hot dog is a dog to remember. Because things like melted cheese, crispy tortilla strips and Dijon mustard are great together and they’re even better on top of a steaming hot hot dog!

Illinois Fighting Illini Cheddar Hot Dog

One Unique Hot Dog!

Easy to make and great tasting, the Illinois Fighting Illini cheddar hot dog is a winner! I wouldn’t be shy with any of the toppings. There’s really no such thing as having too much of any of them. Yeah, things might fall off when you pick them up. That’s part of the fun of eating them!

And for a full list of all of the Big 10 team hot dogs, click here and enjoy! Make them all!

Illinois Fighting Illini Cheddar Hot Dog
Print Pin
5 from 1 vote

Fighting Illini Cheddar Hot Dog

Topped with tons of tasty yumminess the Illinois Fighting Illini cheddar hot dog is a dog to remember. Because things like melted cheese, crispy tortilla strips and Dijon mustard are great.
Course Main
Cuisine American
Keyword hot dogs
Prep Time 5 minutes
Cook Time 15 minutes
Total Time 20 minutes
Servings 4
Calories 343kcal

Ingredients

Instructions

  • Cook or grill the dogs as desired.
  • Toast the buns, if desired (I always do).
  • Add dogs to buns.
  • Top with cheese.
  • Put under the broiler for a minute if you want your cheese melted.
  • Squeeze on some mustard and top with tortilla strips.

Notes

To prevent your toppings from sliding off cut a thin slit down the lengths of the dogs before cooking. The dogs will open up almost like a bun, giving the toppings a place to sit.

Nutrition

Calories: 343kcal | Carbohydrates: 30g | Protein: 16g | Fat: 18g | Saturated Fat: 9g | Cholesterol: 50mg | Sodium: 696mg | Potassium: 147mg | Fiber: 1g | Sugar: 3g | Vitamin A: 283IU | Vitamin C: 1mg | Calcium: 288mg | Iron: 3mg

Nutritional values are approximate.

Smoked Chex Mix

There are some things where self-control just doesn’t happen for me. This smoked Chex mix is one of them. Put a big bowl of it in front of me and it’ll be gone soon. I can’t help myself and no matter what I do to control myself, I fail. Especially the bagel chips. There’s something about the bagel chips in Chex mix after they’ve been smoked. The smoke flavor is not overwhelming, but it’s there, and it’s different in a wonderful way. The smoke compliments traditional flavors perfectly. I make this often, and in big batches because it is the perfect snack to take to a family get-together. Everyone loves it.

Smoked Chex Mix

For Best Results, Use Less Smoke

The cereal in this smoked Chex definitely soaks up the smoke, so do not go crazy with the wood in your smoker. Use a very small chunk, smaller than would fit in your palm, and use only a lighter wood. No mesquite or hickory here, go for something like a fruit or nut wood instead. Remember, you want that hint of smoke, and nothing overpowering.

I used a variety of Chex cereals in my mix, but you can do whatever works for you1

For another great snack idea, try my smoked olives and smoked Cheetos.

Smoked Chex Mix
Print Pin
5 from 1 vote

Smoked Chex Mix

Put a big bowl of it in front of me and it’ll be gone soon. Especially the bagel chips after they’ve been smoked. 
Course Appetizer
Cuisine American
Keyword Chex mix, smoked
Prep Time 10 minutes
Cook Time 1 hour
Total Time 1 hour 10 minutes
Servings 12 cups
Calories 351kcal

Ingredients

Homemade seasoned salt (makes more than you’ll need for the Chex mix)

Instructions

  • Fire up your smoker for cooking at 250 F. Add only one small piece of light wood, such as apple or peach. If you are using a smoker that has a water pan, such as the Weber Smokey Mountain, do not fill the pan with water.
  • Combine the cereals, pretzels, nuts and bagel chips in a large bowl.
  • Melt the butter in a small saucepan. Add the Worcestershire sauce and stir.
  • Combine the seasoned salt, garlic powder and onion powder and slowly whisk into the melted butter.
  • Drizzle the butter mixture over the cereal and gently toss to coat.
  • Place into a disposable 9″ x 13″ deep aluminum pan and place on the top rack of the smoker.
  • Smoke for 1 hour or until the mixture turns golden brown, stirring every 15 minutes.
  • Remove and let cool completely before serving, or store for up to 2 weeks.

Homemade seasoned salt

  • Combine all ingredients. Store in an air-tight container.

Notes

For a slightly spicier version, add a few teaspoons of your favorite hot sauce to the melted butter and Worcestershire sauce mixture. Don’t go crazy with it or the mix will take longer to get crispy.

Nutrition

Calories: 351kcal | Carbohydrates: 48g | Protein: 8g | Fat: 16g | Saturated Fat: 5g | Trans Fat: 1g | Cholesterol: 15mg | Sodium: 5547mg | Potassium: 198mg | Fiber: 5g | Sugar: 5g | Vitamin A: 733IU | Vitamin C: 7mg | Calcium: 103mg | Iron: 11mg

Nutritional values are approximate.