Copycat Royal Red Robin Burger

I’ve been in a sort of burger ‘rut’ lately, making your standard griddle burgers. Now, they are great, and I will keep making them, but I decided I’d better up my game a bit. So I made a copycat of the Royal Red Robin burger, which I’ve had a few times at Red Robin and have always enjoyed. This copycat is spot-on. It’s a pretty standard burger, but topped with a fried egg. A fried egg can make all the difference in the world to a burger. As does mayonnaise. I wish I’d known that a long, long time ago.

Copycat Royal Red Robin Burger

The Perfect Burger?

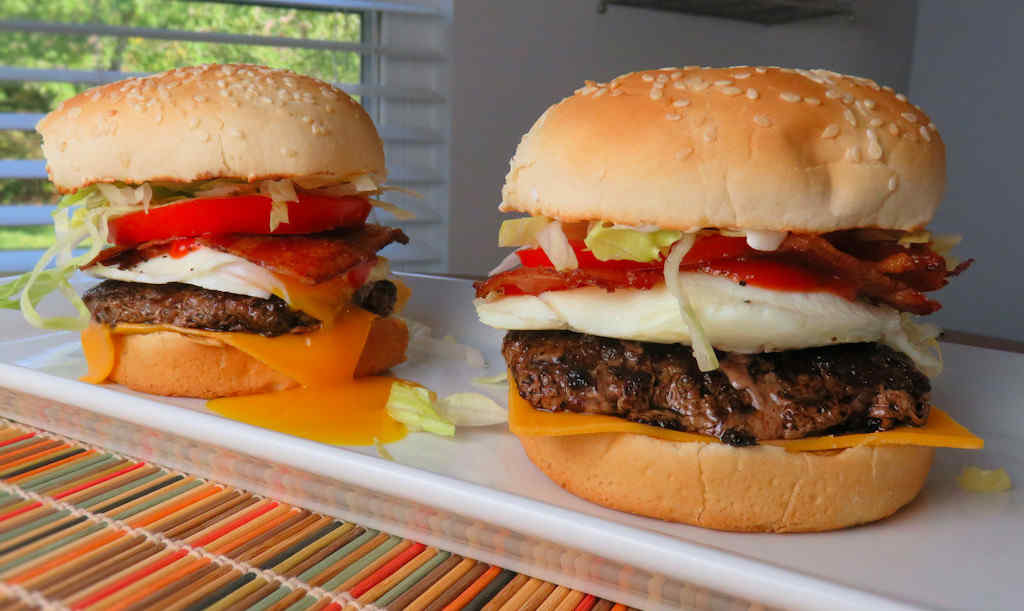
Red Robin has a lot of great burgers. For a limited time, years ago, they offered the Mount Vesuvius Burger, which is crazy good and crazy big.  But for a simple, flavor-packed burger, the Royal Red Robin burger is the way to go. Just try to not bust your egg like I did when I made my copycat Royal Red Robin Burger! Practice, practice, practice!

For something totally different, top your Royal Red Robin Burger with ketchup leather instead of just a few squirts of the red stuff from a bottle.

Also try my copycat of Red Robin’s Haystack burger.

Copycat Royal Red Robin Burger
Print Pin
5 from 1 vote

Copycat Royal Red Robin Burger

I’ve been in a sort of burger ‘rut’ lately, making your standard griddle burgers. Now, they are great, and I will keep making them, but I decided I’d better up my game a bit.
Course Main
Cuisine American
Keyword burgers, copycat
Prep Time 10 minutes
Cook Time 10 minutes
Total Time 20 minutes
Servings 4 servings
Calories 801kcal

Ingredients

Instructions

  • Divide beef into 4 equally sized patties. Season with salt and pepper and cook as desired. I prefer mine cooked over high heat on a griddle so they get a bit of a crust to them.
  • Place cheese on bun bottoms.
  • Add the burger, egg, ketchup, bacon halves, tomato, and lettuce.
  • Slather top bun with mayonnaise and serve.

Notes

Serve with plenty of napkins!

Nutrition

Calories: 801kcal | Carbohydrates: 28g | Protein: 48g | Fat: 54g | Saturated Fat: 23g | Trans Fat: 3g | Cholesterol: 327mg | Sodium: 1101mg | Potassium: 922mg | Fiber: 2g | Sugar: 7g | Vitamin A: 1660IU | Vitamin C: 17mg | Calcium: 581mg | Iron: 6mg

Nutritional values are approximate.

Buffalo Chicken Alfredo

Mmmmmmm. Buffalo chicken. That’s all I need to hear. I love that great spicy, vinegary flavor, with a little something for a cool-down. For my Buffalo wings that means some sort of dipping sauce. This Buffalo chicken Alfredo has that same great Buffalo flavor, with a built-in cool-down sauce. Creamy. Spicy. Cool. This really was a fantastic dish.

Buffalo Chicken Alfredo

Any Buffalo Chicken Will Do

I used some leftover Buffalo chicken that I made in the slow cooker, but you can also use my outstanding Buffalo chicken made on a Char-Broil Big Easy, the best cooker for all-things poultry.

If you aren’t a big fan of Buffalo chicken (you should be because it’s also awesome on a sub sandwich!), the Alfredo sauce over pasta is definitely great by itself. Or add some chopped rotisserie chicken.

I highly recommend that you shred or grate your own cheese at home. Don’t buy the pre-shredded or pre-grated stuff. It has stuff added to it to keep it from sticking together. That ‘stuff’ affects how the cheese melts. Shred it yourself and use the good stuff.

Also try my mushroom Asiago chicken.

Buffalo Chicken Alfredo
Print Pin
4 from 1 vote

Buffalo Chicken Alfredo

Mmmmmmm. Buffalo chicken. That’s all I need to hear. I love that great spicy, vinegary flavor, with a little something for a cool-down. 
Course Main
Cuisine American
Keyword Buffalo, chicken, pasta
Prep Time 10 minutes
Cook Time 20 minutes
Total Time 30 minutes
Servings 4 servings
Calories 607kcal
Author Mike

Ingredients

For the Buffalo chicken Alfredo

For the Alfredo sauce

  • 3 tablespoons unsalted butter
  • 2 tablespoons olive oil
  • 2 cloves garlic minced
  • 2 cups heavy cream
  • ¼ teaspoon ground white pepper
  • ½ cup Parmesan cheese grated
  • ¾ cup Mozzarella cheese shredded

Instructions

For the Buffalo chicken Alfredo

  • Warm the chicken.
  • Cook the pasta per package instructions. Drain well.
  • Add pasta to the Alfredo sauce and stir to coat.
  • Divide the pasta between 4 plates.
  • Top pasta with the warmed Buffalo chicken.
  • Garnish with chopped fresh cilantro and serve.

For the Alfredo sauce

  • Add butter and olive oil to a medium saucepan over medium heat. Stir until the butter is melted.
  • Add the garlic, cream, and white pepper.
  • Bring mixture to a simmer, stirring often.
  • Add the Parmesan cheese.
  • Simmer for 10 minutes stirring often, until the sauce is thickened.
  • Add the mozzarella and stir until melted.

Notes

Sprinkle with a little crumbled blue cheese for a nice ‘funky’ twist.

Nutrition

Calories: 607kcal | Carbohydrates: 5g | Protein: 12g | Fat: 61g | Saturated Fat: 38g | Trans Fat: 1g | Cholesterol: 211mg | Sodium: 4120mg | Potassium: 128mg | Fiber: 1g | Sugar: 1g | Vitamin A: 2267IU | Vitamin C: 1mg | Calcium: 339mg | Iron: 1mg

Nutritional values are approximate.

Toasted Italian Sandwich

I love my Cuisinart Griddler. It’s the perfect kitchen appliance. I use it to make paninis, hashbrowns, waffles, burgers, eggs… just about anything. My favorite use for it has to be making sandwiches, like this toasted Italian sandwich. The bread gets nice and toasted on the outside, giving me that perfect crunchy bite. The mozzarella cheese gets nice and melted. Top that off with great Italian cold cuts, homemade sun-dried tomatoes and pesto, and I’ve got the perfect lunch. This is a great sandwich.

Toasted Italian Sandwich

The Perfect Sandwich

My favorite bread for these toasted Italian sandwiches is hands-down, ciabatta. It has those great airy pockets in it (it reminds me a bit of English muffins, my other favorite bread). It gets fantastically crunchy while still being soft in the middle, like the perfect pizza crust. I like to serve my sandwiches with my quick-fix Italian salad (made without adding meat).

The Griddler is the master of making sandwiches. Also try my sweet-and-savory turkey panini.

Toasted Italian Sandwich
Print Pin
5 from 1 vote

Toasted Italian Sandwich

I love my Cuisinart Griddler. It’s the perfect kitchen appliance. I use it to make paninis, hashbrowns, waffles, burgers, eggs… just about anything. My favorite use for it has to be making sandwiches, like this toasted Italian sandwich.
Course Main
Cuisine American
Keyword Italian, sandwich
Prep Time 15 minutes
Total Time 15 minutes
Servings 1 sandwich
Calories 555kcal

Equipment

Ingredients

  • 1 ciabatta roll sliced horizontally
  • 1 tablespoon pesto
  • 1 tablespoon sun-dried tomatoes chopped
  • 2 slices Mozzarella cheese
  • 3 slices Prosciutto
  • 1 slice salami
  • 1 slice sandwich pepperoni
  • 1 slice Capicola
  • 1 slice Sopressata

Instructions

  • Heat a large skillet, cast iron skillet or Griddler.
  • Place the ciabatta into the skillet cut-side down and toast for a few minutes until the bread starts to get crunchy and brown.
  • Spread the top of the roll with pesto and sun-dried tomatoes.
  • Add the cheese and meats to the bottom slice.
  • Return to the skillet to melt the cheese.
  • Add the top bun, slice and serve.

Notes

You can also use French or Italian bread.

Nutrition

Calories: 555kcal | Carbohydrates: 32g | Protein: 27g | Fat: 35g | Saturated Fat: 14g | Trans Fat: 1g | Cholesterol: 79mg | Sodium: 1404mg | Potassium: 336mg | Fiber: 1g | Sugar: 3g | Vitamin A: 738IU | Vitamin C: 2mg | Calcium: 320mg | Iron: 1mg

Nutritional values are approximate.

Basic BBQ Rub

When I make a batch of this basic BBQ rub I don’t just make a little ole container full. No, I make a bunch of it. A whole lot. That’s because I use it on just about every piece of meat that I throw onto my trusty old smoker. It shines best on beef and pork, adding a bit of sweetness and a bit of heat. And though it contains coffee and lemon pepper the flavors from those two ingredients don’t jump out and scream at your taste buds. They’re there though, working perfectly with the rest of the flavors. This is truly a great all-around rub.

Basic BBQ Rub

Ray Lampe Knows BBQ

The idea for this basic BBQ rub came from Ray Lampe’s book, Slow Fire: The Beginner’s Guide to Lip Smacking Barbecue. The book is full of great recipes and stories and ideas, just like this one. This rub can be used as-is or as a great jumping-off point for making your own rub. Play with the ratios to suit your tastes. For example, don’t use regular paprika just use only smoked paprika for a much stronger smoke flavor. Smoked paprika is perfect for seasoning foods cooked in doors where you won’t get a strong wood flavor. Or add more heat. Or leave out the heat. It’s a very versatile rub.

Also try my basic BBQ sauce. Like this rub, it’s great as is or use it as a base for your own flavors.

Basic BBQ Rub
Print Pin
5 from 1 vote

Basic BBQ Rub

When I make a batch of this basic BBQ rub I don’t just make a little ole container full. No, I make a bunch of it. A whole lot. 
Course Spice Rub
Cuisine American
Keyword BBQ, rub
Prep Time 5 minutes
Total Time 5 minutes
Servings 12 ounces
Calories 42kcal

Ingredients

Instructions

  • Combine all ingredients.
  • Store in an airtight container for up to 6 months.

Notes

Add more cayenne for more heat.

Nutrition

Calories: 42kcal | Carbohydrates: 10g | Protein: 1g | Fat: 1g | Saturated Fat: 1g | Sodium: 4749mg | Potassium: 61mg | Fiber: 1g | Sugar: 9g | Vitamin A: 818IU | Vitamin C: 3mg | Calcium: 13mg | Iron: 1mg

Nutritional values are approximate.

Dilly Dilly Grilled Mushrooms

Here lately I’ve been bound and determined to up my grilled side dish game. It’s been lacking, I admit. Nothing could possibly be easier than these dilly dilly grilled mushrooms. And very few things could be as addictingly tasty. I love mushrooms to begin with, and I’ve always been a fan of dill. Now, I get all that plus buttery goodness and a bit of salty garlic flavors. I like the butter mixture so much that I usually double it, making sure that I get plenty of it down into the gills of the mushrooms as they cook over an open fire.

Dilly Dilly Grilled Mushrooms

Try Other Herbs And Spices

You could actually substitute your favorite herb or spice for the dill for something different when you make some dilly dilly grilled mushrooms. Red pepper flakes are an awesome change. Same goes for oregano, basil or, believe it or not, smoked paprika.

I recommend that you use a grill basket when making this dish. It makes cooking easier and you don’t have to worry about anything falling through the grates. And cleanup is easier too!

You’ll never eat boring mushrooms again, but if you prefer something with a bit of a kick, try my spicy grilled mushrooms too! And my version of Michael Chiarello’s best button mushrooms is out of this world also!

Dilly Dilly Grilled Mushrooms
Print Pin
5 from 1 vote

Dilly Dilly Grilled Mushrooms

Nothing could possibly be easier than these dilly dilly grilled mushrooms. And very few things could be as addictingly tasty.
Course Side
Cuisine American
Keyword grilled, mushroom
Prep Time 5 minutes
Cook Time 15 minutes
Total Time 20 minutes
Servings 4 servings
Calories 22kcal

Ingredients

  • ½ pound fresh mushrooms medium sized, stems removed if desired
  • ¼ cup butter melted
  • ½ teaspoon dill weed dried is fine, but you’ll want to use more
  • ½ teaspoon garlic salt

Instructions

  • Fire up your grill for medium-high cooking.
  • Place mushrooms into a grill basket or thread onto skewers. (If using bamboo skewers, soak them for 30 minutes in water before using).
  • Combine the butter, dill and garlic salt.
  • Brush 1/3rd of the mixture over the mushrooms.
  • Transfer to the grill and grill for 10-15 minutes or until just tender, rotating occasionally and brushing with the remaining dill mixture a few more times.

Notes

Note: I like to double the amount of dill weed and garlic salt.

Nutrition

Calories: 22kcal | Carbohydrates: 3g | Protein: 2g | Fat: 1g | Saturated Fat: 1g | Cholesterol: 2mg | Sodium: 309mg | Potassium: 201mg | Fiber: 1g | Sugar: 2g | Vitamin A: 26IU | Vitamin C: 1mg | Calcium: 19mg | Iron: 1mg

Nutritional values are approximate.

Fowl Play Chicken on the Char-Broil Big Easy

Note: This recipe was developed using the Char-Broil Big Easy Oil-Less Fryer. If you are cooking using the Char-Broil Smoker-Roaster Grill you should cook with the lid open and the temperature set to High. You might also need to adjust the cooking time.

Fowl Play marinade by The Shed BBQ adds tremendous flavor to any cut of chicken. As soon as I opened it I knew that I was in for nothing but goodness. I detected soy sauce. Apple juice. Citrus. It’s tangy with a slight hint of vinegar. Fowl Play Chicken cooked on the Char-Broil Big Easy comes out incredibly flavorful all the way through.

Fowl Play Chicken on the Char-Broil Big Easy

This Is The Big Easy At Its Best.

I used split bone-in chicken breasts, marinating them for 4 hours before placing them into the Big Easy. The skin doesn’t get crispy because of all that time in the marinade, but the meat… oh my goodness. So tender and juicy and good! Incredible. If you’re looking for a quick, painless way to make masterful chicken on the Big Easy this is it.

I was a bit worried that maybe some of the spices in Fowl Play might burn from the high heat in the Big Easy but they did not. You have to watch for that if you’re using anything with large chunks of things like minced garlic.

I’m a big fan of store-bought marinated chicken like this Fowl Play chicken or Chiavetta’s chicken cooked on the Big Easy. It’s as simple as it gets.

It’s always a good idea to keep a few spare grease trays on hand for your Char-Broil Big Easy.

Love your Big Easy as much I love mine? Check out my Big Easy Add-Ons page and my free Big Easy eCookbook!

Fowl Play Chicken on the Char-Broil Big Easy
Print Pin
5 from 1 vote

Fowl Play Chicken on the Char-Broil Big Easy

Fowl Play marinade by The Shed BBQ adds tremendous flavor to any cut of chicken. As soon as I opened it I knew that I was in for nothing but goodness. 
Course Main
Cuisine American
Keyword Big Easy, Char-Broil, chicken
Prep Time 4 hours
Cook Time 1 hour 20 minutes
Total Time 5 hours 20 minutes
Servings 4 servings
Calories 258kcal
Author Mike

Ingredients

Instructions

  • Place the chicken into a resealable bag or container.
  • Add marinade to taste. Toss to coat.
  • Seal and refrigerate for at least 4 hours, turning occasionally.
  • Fire up your Big Easy.
  • Transfer the chicken to the Big Easy basket.
  • Cook for approximately 20 minutes per pound or until it reaches 165 F as checked in several places.
  • Remove and let rest 10 minutes before serving.

Notes

You can substitute your favorite cuts of chicken.

Nutrition

Calories: 258kcal | Protein: 48g | Fat: 6g | Saturated Fat: 1g | Trans Fat: 1g | Cholesterol: 145mg | Sodium: 262mg | Potassium: 836mg | Vitamin A: 68IU | Vitamin C: 3mg | Calcium: 11mg | Iron: 1mg

Nutritional values are approximate.

Spiralized Curly Fries

It’s over. Done. My quest for an absolutely perfect spiralized curly fries recipe is over. I have reached the end, and the end is good. Perfectly curly. Perfectly seasoned. And perfectly crunchy. I could’ve just skipped whatever else it was I was having for dinner that night. In fact, I don’t even remember what else I had. I just remember these curly fries.

Spiralized Curly Fries

The Best Curly Fries

I used the smallest blade on my spiral slicer to make these spiralized curly fries. You could use the bigger one, but of course cook times will go up. I think the small blade is the perfect size.

The batter gives the fries their fantastic flavor. I plan on using the same batter on a whole lot of other fried foods. It’s a thin batter, not thick. Perfect for something like fish fillets or even non-curly fries.

If I’m cooking for a crowd, I’ll break out my big deep fryer. But, if it’s just the two of us, I’ll fire up my Fry Daddy fryer. It’s the perfect size for both of us. It fries everything perfectly. And as an added bonus, it doesn’t use a lot of oil, which saves me money.

I get out my big deep fryer when it’s time to fry a large batch of food. It comes to temperature quickly and it maintains that temperature perfectly. It has a built-in oil filter and storage unit so I can re-use the oil several times.

I also love making a copycat of McDonald’s fries. They aren’t spiraled, but boy, they’re good! But then, Arby’s fries are spiral….

Spiralized Curly Fries
Print Pin
5 from 1 vote

Spiralized Curly Fries

It’s over. Done. My quest for an absolutely perfect spiralized curly fries recipe is over. I have reached the end, and the end is good. 
Course Side
Cuisine American
Keyword fries, spiral
Prep Time 1 hour 15 minutes
Cook Time 45 minutes
Total Time 2 hours
Servings 4 servings
Calories 204kcal

Ingredients

For the potatoes

For the batter

Instructions

For the potatoes

  • Fill a resealable container with cold water.
  • Spiralize the potatoes (I used the smallest blade) and place into the water.
  • Transfer to the refrigerator for 1 hour.

For the batter

  • Place all of the batter ingredients into a large bowl or container and whisk until smooth.
  • Heat 3″ of oil in a deep fryer or Dutch oven to 365 F.
  • Drain the potatoes and pat dry.
  • Place potatoes in the batter and coat well.
  • Working in batches, fry the potatoes until golden brown, turning once.
  • Transfer cooked potatoes to a wire rack or pan lined with paper towels and sprinkle liberally with salt.

Notes

Serve immediately.

Nutrition

Calories: 204kcal | Carbohydrates: 46g | Protein: 6g | Fat: 1g | Saturated Fat: 1g | Sodium: 594mg | Potassium: 796mg | Fiber: 3g | Sugar: 1g | Vitamin A: 183IU | Vitamin C: 14mg | Calcium: 29mg | Iron: 2mg

Nutritional values are approximate.

Cheeseburger Gnocchi

Cheeseburger gnocchi reminds me of a childhood canned favorite, RavioliOs, but taken to a whole new level. Making this dish wasn’t a whole lot harder than just opening a can either. Grab a big bowl on a cold day and you’ll definitely forget the weather. Creamy, cheesy, tomato-y beefy stick-to-your-ribs total goodness.

Cheeseburger Gnocchi

The Perfect Cold Weather Dish

I can’t say I’d change much about this recipe for cheeseburger gnocchi. It really hit the spot after shoveling snow from the driveway. I might substitute spicy bulk Italian sausage for the beef for a little kick and Italian-inspired flavor.

This cheeseburger gnocchi has me jonesin’ for some cheeseburger soup now.

Cheeseburger Gnocchi
Print Pin
5 from 1 vote

Cheeseburger Gnocchi

Cheeseburger gnocchi reminds me of a childhood canned favorite, RavioliOs, but taken to a whole new level. 
Course Main
Cuisine American
Keyword burgers, cheese, potatoes
Prep Time 5 minutes
Cook Time 20 minutes
Total Time 25 minutes
Servings 6 servings
Calories 313kcal

Equipment

Ingredients

Instructions

  • Heat oil in a large skillet over medium heat.
  • Add the onion. Season with salt and pepper and saute until just soft.
  • Add garlic and saute another minute.
  • Crumble in the ground beef and cook until no longer pink, about 5 minutes.
  • Drain any excess fat.
  • Stir in the mustard, diced and crushed tomatoes and the beef broth.
  • Season with more salt and pepper as desired.
  • Bring to a simmer.
  • Stir in the gnocchi and cover.
  • Continue simmering about 5 minutes or until the gnocchi is tender.
  • Add the heavy cream and cheese and stir until the cheese is melted.
  • Serve garnished with the green onions.

Notes

Serve with garlic bread for soppin’.

Nutrition

Calories: 313kcal | Carbohydrates: 2g | Protein: 19g | Fat: 25g | Saturated Fat: 12g | Trans Fat: 1g | Cholesterol: 87mg | Sodium: 353mg | Potassium: 280mg | Fiber: 1g | Sugar: 1g | Vitamin A: 381IU | Vitamin C: 2mg | Calcium: 165mg | Iron: 2mg

Nutritional values are approximate.

Bread Machine Garlic Herb Pepperoni Bread

Bread, glorious bread! You may not be excited, but any time I get homemade bread to turn out as great as this I am one happy guy! It helped a lot that the dough for this bread machine garlic herb pepperoni bread was about as foolproof as you can get. I need foolproof when it comes to bread. I need a bread machine to make sure I don’t make a big mess of it. My attempts at from-scratch bread are something to behold. Or hide. That’s why I have a bread machine.

Bread Machine Garlic Herb Pepperoni Bread

That Wonderful Aroma… And Flavor

The house filled with a wonderful aroma as the bread baked. I love the smell of fresh-baked bread. And pepperoni.

The right combination of Italian flavors, bread machine garlic herb pepperoni bread also has the perfect texture, color, crust, flavor… you name it. I thought about adding more chopped pepperoni, but I think I was right in not doing that. You want every bite to be filled with all of the flavors and not overpowered by just one.

I’d make this again in a heartbeat! Also try my bread machine jalapeno cheese bread and my Italian herb bread.

Bread Machine Garlic Herb Pepperoni Bread
Print Pin
5 from 1 vote

Bread Machine Garlic Herb Pepperoni Bread

Bread, glorious bread! You may not be excited but any time I get homemade bread to turn out as great as this I am one happy guy!
Course Bread
Cuisine American
Keyword bread, bread machine, pepperoni
Prep Time 10 minutes
Cook Time 3 hours
Total Time 3 hours 10 minutes
Servings 1 loaf
Calories 2339kcal

Ingredients

Instructions

  • Place ingredients into your bread machine in the order listed.
  • Select the dough cycle and let the machine do its job.
  • Lightly flour a work surface and add the dough. Punch down to flatten.
  • Use a rolling pin to shape the dough into a rectangle the width of your bread pan. Lightly oil the bread pan.
  • Roll the dough up into a tight log. Seal the seam and ends tightly and transfer to your bread pan.
  • Cover loosely with plastic wrap and place in a warm place to rise, doubling in size, about one hour.
  • Preheat oven to 350 F.
  • Bake bread for 30 minutes or until the bread has a nice crust on it.
  • Remove to a wire rack to cook slightly before slicing and serving.

Notes

You’ll need a bread pan for baking the bread. You can use the bread machine to bake the bread if you like but you’ll get a better crust and loaf if you transfer the dough to a pan and bake it instead.

Nutrition

Calories: 2339kcal | Carbohydrates: 302g | Protein: 80g | Fat: 89g | Saturated Fat: 22g | Trans Fat: 1g | Cholesterol: 74mg | Sodium: 3557mg | Potassium: 879mg | Fiber: 17g | Sugar: 16g | Vitamin A: 465IU | Vitamin C: 4mg | Calcium: 645mg | Iron: 6mg

Nutritional values are approximate.

Char-Broil The Big Easy Better Basket

This is a preliminary look at the new Char-Broil The Big Easy Better Basket. I have three Big Easy oil-less fryers (NOT the Smoker Roaster & Grill!) and many of the rigid baskets. I was looking forward to this basket if nothing else because it folds up to a smaller size.

Whoa! It’s Cool!

Ok, so first out of the box. It’s flat. Cool! You just pick up on the handle and BOOM a basket!

Char-Broil The Big Easy Better Basket

It’s Like Magic

The Char-Broil Bigger Better Basket unfolds easily and becomes a big basket, bigger than the standard basket. It’s a little taller and a little wider (at the top). Better for bigger birds, for sure! It is made of stainless steel. The base is the same size as a standard basket. The rings are connected by stainless steel wires that are on swivels so they can rotate as you unfold the basket. With the wires being non-rigid I think inserting/removing a turkey or large chicken will be easier with this basket.

Char-Broil The Big Easy Better Basket

Easy Clean Up

Here’s a close-up of how the wires connect. I’m guessing that they might be a little challenging to clean. The basket is dishwasher safe. I admit that I usually just toss my other Big Easy baskets into the dishwasher after I use them. First, I knock off any easy-to-remove remnants of whatever I was cooking. I don’t worry so much about them looking like I just bought them.

Char-Broil The Big Easy Better Basket

Let It Open Completely

There’s a handle, just like on the regular basket. It’s easy to pick up.
The basket slid into my Big Easy with no problem.The basket is smaller at the bottom than the top (that’s how it collapses on itself). Just something to keep in mind when you pick a bird for cooking. The bottom of the basket is the same size of the standard basket, 9″ across.When you unfold the basket you have to rotate your hand a bit, allowing for the basket to twist. If you don’t the rings and wires and swivels can get caught up on themselves.

Char-Broil The Big Easy Better Basket

Big Enough For A Big Turkey

It’s an easy thing to untangle, and not anything to complain about. Once you realize you need a soft touch on the handle it’s easy to unfold the basket time-and-time again. Unlike the standard basket, there’s no way you’ll get a bunk bed basket into the Better Basket, at least not on the lower level. It does fit, but it leaves you with only about a 1″ gap below the bottom rack.

Add A Bunk Bed Basket Too!

You can, however, put a bunk bed basket at the top. This will give you two cooking levels which is usually crucial when cooking something other than full birds. The bunk bed would be near the top of the Big Easy, higher than if you put it into a standard basket, so foods there will cook at a different rate.

I’ll pick up a whole chicken or turkey soon and give my Better Basket a whirl. I’ll let you know how it goes. Until then, happy cooking!