Shrimpin’ Dippin’ Broth

Wow. My wife and I both agree, shrimpin’ dippin broth is one of the best dishes we’ve ever made. Of course the shrimp are great by themselves. But it’s the dipping broth that is beyond fantastic. You could just drink it by itself, but it’s best sopped up with a warm baguette or poured over rice. This reminds me of a shrimp boil but it is oh so much better.

Shrimpin’ Dippin’ Broth

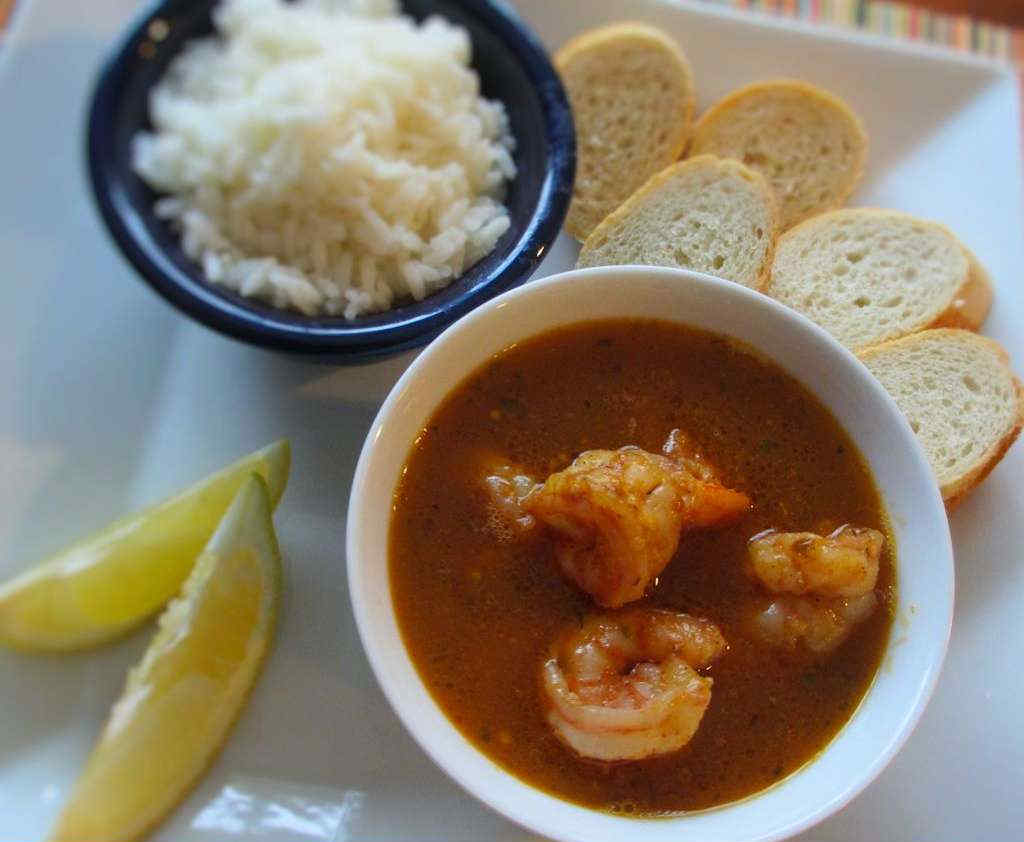
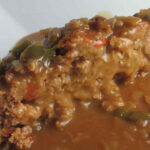
A Bowl Of Total Greatness

The rich combination of Worcestershire sauce, bouillon and clam juice are great. A light squeeze of lemon adds a fresh citrus kick. Shrimpin’ dippin’ broth is a meal you’ll make over and over. And it’s easy to throw together too!

I like to use my good ole trusty Dutch oven to make this dish and pretty much darned near anything like it on my stovetop. It’s nice and big and sturdy. That extra weight helps it maintain and distribute heat perfectly. As an added bonus, it’s actually pretty easy to clean up too!

Also try my restaurant-style peel-and-eat shrimp.

Shrimpin’ Dippin’ Broth
Print Pin
5 from 1 vote

Shrimpin’ Dippin’ Broth

Shrimpin’ dippin broth is one of the best dishes we’ve ever made.
Course Main
Cuisine American
Keyword dipping sauce, shrimp
Prep Time 10 minutes
Cook Time 20 minutes
Total Time 30 minutes
Servings 2 servings
Calories 795kcal

Equipment

Ingredients

For the broth

For the shrimp

Instructions

For the broth

  • Melt the butter in a small saucepan over medium heat.
  • Add the pepper, Cajun seasoning and garlic.
  • Stir and let cook for 5 minutes.
  • Add the remaining ingredients.
  • Bring to a boil then reduce heat to keep warm until you are ready to serve.

For the shrimp

  • Melt the butter in a large saucepan over medium-high heat.
  • Add the Worcestershire sauce, pepper, Cajun seasoning, garlic, and shrimp.
  • Stir and cook shrimp until pink and done, 2-3 minutes.
  • Serve shrimp with broth in bowls with rice, bread and lemon wedges on the side. You’ll find that you might want to just add the rice to the broth and shrimp mixture, or eat everything separately while dipping the bread into the broth. Whatever works for you!

Notes

The broth is delicious. You can serve the shrimp with the broth and bread for soppin’ and skip the rice.

Nutrition

Calories: 795kcal | Carbohydrates: 81g | Protein: 59g | Fat: 22g | Saturated Fat: 11g | Trans Fat: 1g | Cholesterol: 609mg | Sodium: 3019mg | Potassium: 589mg | Fiber: 5g | Sugar: 7g | Vitamin A: 1606IU | Vitamin C: 17mg | Calcium: 471mg | Iron: 10mg

Nutritional values are approximate.

Mushroom Grilled Cheese

I’m going to have a hard time ever eating any other kind of grilled cheese sandwich after devouring these mushroom grilled cheese sandwiches. They are incredible. Creamy, gooey cheese. And the best part, sautéed, earthy mushrooms. Absolutely fantastic. Of course, you need a little something to counter all that creamy stuff. That’s where the nicely-toasted, just-a-bit-crunchy bread comes in. It’s the texture contrast this sandwich needed to make it to perfection.

Mushroom Grilled Cheese

Time Well Spent

It takes a bit of time to make these sandwiches. You can’t rush it since you want the onions to be soft and golden. Remember that you want the cheese to be melted and you just can’t rush that. And definitely don’t rush the bread. You want that buttery goodness to get nicely golden brown with a light crunch. Your efforts will be rewarded.

I like to cook these mushroom grilled cheese sandwiches on my Cuisinart Griddler. It does sandwiches like nobody’s business.

Also try my grilled grilled cheese and my crab grilled cheese sandwiches..

Mushroom Grilled Cheese
Print Pin
5 from 1 vote

Mushroom Grilled Cheese

I’m going to have a hard time ever eating any other kind of grilled cheese sandwich after devouring these mushroom grilled cheese sandwiches. They are incredible.
Course Main
Cuisine American
Keyword grilled cheese, mushroom, sandwich
Prep Time 5 minutes
Cook Time 45 minutes
Total Time 50 minutes
Servings 2 sandwiches
Calories 646kcal
Author Mike

Equipment

Ingredients

  • 1 tablespoon unsalted butter
  • 1 tablespoon olive oil
  • 1 small sweet onion sliced thin
  • 8 ounces cremini mushrooms sliced
  • 2 cloves garlic minced
  • ½ teaspoon dried thyme
  • ¼ cup white wine or chicken broth
  • Kosher salt to taste
  • ground black pepper
  • 1 tablespoon parsley chopped
  • 1 cup gruyere cheese shredded (shredded mozzarella or provolone are also great!)
  • ¼ cup Parmigiano Reggiano cheese grated
  • 4 slices bread
  • 2 tablespoon butter softened

Instructions

  • Add the 1 tablespoon of butter and the oil to a large skillet over medium heat and heat until the butter has melted.
  • Add the onion and saute until tender.
  • Add the garlic and thyme and saute 1 minute.
  • Add the mushrooms and saute until they start to caramelized and turn golden brown in color, 10-15 minutes.
  • Add the wine or broth and deglaze the pan.
  • Stir and cook until most of the liquid has evaporated.
  • Add salt and pepper, to taste.
  • Remove from heat and stir in the parsley.
  • Let cool slightly then stir in the cheeses.
  • Heat another large skillet over medium-high heat.
  • Butter one side of each slice of bread with the remaining butter and place two slices butter side down in the pan.
  • Divide mushroom mixture between the two slices of bread and add remaining slice butter side up.
  • Cook until bread is golden brown, then flip and cook on other side until golden brown and cheese mixture is nice and gooey.
  • Remove and let cool slightly before slicing then serve.

Notes

Thicker bread will hold up better to the mushroom mixture.

Nutrition

Calories: 646kcal | Carbohydrates: 49g | Protein: 35g | Fat: 34g | Saturated Fat: 19g | Trans Fat: 1g | Cholesterol: 98mg | Sodium: 815mg | Potassium: 942mg | Fiber: 5g | Sugar: 15g | Vitamin A: 1120IU | Vitamin C: 12mg | Calcium: 983mg | Iron: 4mg

Nutritional values are approximate.

Roasted Beet Salad

As simple as this roasted beet salad is, it is packed full of great flavors. The roasted beets have such a wonderful sweetness to them. The balsamic vinegar and oil dressing really quiets all that sweetness. Last, the tang of Feta cheese finishes it all off perfectly. As soon as I took my first bite I grabbed my phone and added this recipe to my Thanksgiving meal to-do list. Of course, you can make this salad any time of the year. But I can definitely see it quickly becoming a holiday favorite.

Roasted Beet Salad

The Perfect Thanksgiving Side Dish

I keep a spreadsheet on Google docs for any menu ideas that hit me. That way, no matter where I am at, I can make a note about a recipe that might be good to make in the future. Like this roasted beet salad, which I just added to my Thanksgiving menu!

Make sure that you whisk the vinegar and oil mixture well before pouring it over the beets.

For something a little different, try smoked beets. Wow, are they also great smoked! Also make my spiralized roasted pickled beets.

Roasted Beet Salad
Print Pin
5 from 1 vote

Roasted Beet Salad

As simple as this roasted beet salad is, it is packed full of great flavors. The roasted beets have such a wonderful sweetness to them. The balsamic vinegar and oil dressing really quiets all that sweetness. Last, the tang of Feta cheese finishes it all off perfectly.
Course Side
Cuisine American
Keyword beets, roasted, salad
Prep Time 5 minutes
Cook Time 1 hour 20 minutes
Total Time 1 hour 25 minutes
Servings 6
Calories 118kcal

Ingredients

Instructions

  • Preheat oven to 400 F.
  • Trim the stem ends of the beets so they can sit flat on a pan.
  • Rub beets in 2 tablespoons of olive oil and sprinkle with salt and pepper.
  • Place on a baking sheet in the oven for 1 hour or until just getting tender.
  • Remove from oven and let cool enough to handle.
  • Peel the beets then slice thin.
  • Line a serving platter with the lettuce.
  • Add beet slices.
  • Crumble cheese over the beets.
  • In a small bowl, whisk together the balsamic vinegar and 1/4 cup of olive oil and drizzle over the beets.
  • Sprinkle with salt and pepper and serve.

Notes

Also great with crumbled blue cheese.

Nutrition

Calories: 118kcal | Carbohydrates: 13g | Protein: 5g | Fat: 5g | Saturated Fat: 3g | Cholesterol: 17mg | Sodium: 430mg | Potassium: 392mg | Fiber: 3g | Sugar: 10g | Vitamin A: 150IU | Vitamin C: 6mg | Calcium: 118mg | Iron: 1mg

Nutritional values are approximate.

Creamy Cucumber Salad

I grew up on my mom’s creamy cucumber salad. I ate so much it’s a wonder that my hair isn’t green. My favorite part? The creamy dressing that’s left in the bottom of the bowl after you finish off the cucumbers. I’d drink that stuff right up. I still love my mom’s salad. I recently bought a spiralizer, so I figured that was a great opportunity to give it a whirl. In just seconds you get these different-looking cucumber noodles… or coodles… Hey, they’re fun! This is a wonderful variation on my favorite.

Creamy Cucumber Salad

It’s Dill-icious

Although this creamy cucumber salad is best with fresh dill, I usually use dry unless I can pick some fresh from our garden. I rarely get fresh dill from our garden because our garden stinks. Sorry, there’s just no other way to say it. I also add a bit more dill than the recipe calls for since I really like the combination of dill and mayonnaise. It’s very similar to Ranch dressing in flavor. I also make a version of this salad without the ‘creamy’.

Also try my creamy dill broccoli slaw!

Creamy Cucumber Salad
Print Pin
5 from 1 vote

Creamy Cucumber Salad

I grew up on my mom’s creamy cucumber salad. I ate so much it’s a wonder that my hair isn’t green.
Course Salad
Cuisine American
Keyword creamy, cucumber, salad
Prep Time 1 hour
Total Time 1 hour
Servings 6
Calories 305kcal
Author Mike

Ingredients

Instructions

  • In a large bowl, combine the mayonnaise, sugar, vinegar, dill and salt.
  • Mix well.
  • Add the cucumbers and onions.
  • Toss.
  • Cover and chill at least one hour before serving.

Notes

Stir again before serving. You might want to add a bit more salt too.

Nutrition

Calories: 305kcal | Carbohydrates: 12g | Protein: 1g | Fat: 28g | Saturated Fat: 4g | Trans Fat: 1g | Cholesterol: 16mg | Sodium: 435mg | Potassium: 207mg | Fiber: 1g | Sugar: 11g | Vitamin A: 181IU | Vitamin C: 5mg | Calcium: 26mg | Iron: 1mg

Nutritional values are approximate.

Bourbon Street Pulled Pork Sandwiches

There’s nothing I love more than pulled pork, made on my Weber Smokey Mountain Smoker, mixed with a fantastic homemade sauce. My favorite sauce, for everything from chicken wings to pulled pork to burgers is my Bourbon Street sauce. For topping the perfect pulled pork sandwich I add either coleslaw or sliced onion and dill pickle. Either one gives the Bourbon Street pulled pork sandwiches a great crunchy, and the vinegar helps tone down a bit of the sweetness in the sauce. Every bite is perfect.

Bourbon Street Pulled Pork Sandwiches

Sauce It Now Or Later

You can sauce the pork before mounding it high on the buns for these Bourbon Street pulled pork sandwiches. Or you can add the pork first, then pour the sauce over the top. Or heck, don’t put any sauce on, serve it on the side and dip your sandwich in it! When I am eating out I prefer to add the sauce myself. I order it ‘dry’, and ask for the sauce on the side. That way I can add as little or as much as I want. I’d rather be the one that makes the decision instead of someone in the kitchen. No offense to the fine folks in the kitchen! It’s a personal preference thing.

Also try my shredded pork sandwich.

Bourbon Street Pulled Pork Sandwiches
Print Pin
5 from 1 vote

Bourbon Street Pulled Pork Sandwiches

If you prefer your sauce on the Bourbon Street pulled pork sandwiches to be on top and not mixed in, I say go for it! 
Course Main
Cuisine American
Keyword pulled pork, sandwich
Prep Time 10 minutes
Total Time 10 minutes
Servings 4
Calories 396kcal
Author Mike

Ingredients

Instructions

  • Mix the pork with the sauce.
  • Add onion slices to the buns, top with the pork and sauce mixture.
  • Add a few dill pickle slices and the top of the bun.

Notes

These sandwiches are also great topped with cold coleslaw!

Nutrition

Calories: 396kcal | Carbohydrates: 56g | Protein: 22g | Fat: 11g | Saturated Fat: 3g | Cholesterol: 49mg | Sodium: 4961mg | Potassium: 523mg | Fiber: 6g | Sugar: 27g | Vitamin A: 1022IU | Vitamin C: 8mg | Calcium: 333mg | Iron: 4mg

Nutritional values are approximate.

Twinkies on the Char-Broil Big Easy

Note: This recipe was developed using the Char-Broil Big Easy Oil-Less Fryer. If you are cooking using the Char-Broil Smoker-Roaster Grill you should cook with the lid open and the temperature set to High. You might also need to adjust the cooking time.

I grilled Twinkies not long ago, and I thought, “Hey, these are good!”. Then, yesterday I tossed some Twinkies into my Char-Broil Big Easy for just a few minutes, and I thought, “Wow, these are absolutely INCREDIBLE!”. The Twinkies get a fantastic crust on them, while the insides get all ooey gooey, marshmallowy yummy! I mean, these little treats are beyond addicting!

Twinkies on the Char-Broil Big Easy

Crazy Easy And Oh So Good

I drizzled a bit of strawberry syrup over the Twinkies on the Char-Broil Big Easy to make them extra-special. Chocolate syrup. Roasted nuts. Whipped cream. Anything can be added, but they are also beyond fantastic by themselves. You can fit a lot of Twinkies on the Big Easy at once, especially if you have the Bunk Bed basket or a Wingin’ator 3000, making them the perfect dessert for a crowd. So grab a few boxes and get to cooking!

It’s always a good idea to keep a few spare grease trays on hand for your Char-Broil Big Easy.

Love your Big Easy as much I love mine? Check out my Big Easy Add-Ons page and my free Big Easy eCookbook!

Twinkies on the Char-Broil Big Easy
Print Pin
5 from 1 vote

Twinkies on the Char-Broil Big Easy

The Twinkies get a fantastic crust on them, while the insides get all ooey gooey, marshmallowy yummy! I mean, these little treats are beyond addicting!
Course Dessert
Cuisine American
Keyword Big Easy, Char-Broil, dessert
Prep Time 1 minute
Cook Time 5 minutes
Total Time 6 minutes
Servings 4
Calories 65kcal
Author Mike

Ingredients

  • 4 Twinkies
  • Your favorite toppings syrup, fruit, roasted nuts, whipped cream, ice cream, you name it!

Instructions

  • Fire up your Char-Broil Big Easy.
  • Remove the Twinkies from the wrapping and place in the Big Easy basket.
  • Lower basket into the cooker and cook for 5 minutes or until hot and starting to get toasty crunchy on the outside.
  • Remove and let cool slightly before serving.

Notes

I like to roast my Twinkies until they get a little dark, with a slight crunch to them.

Nutrition

Calories: 65kcal | Carbohydrates: 11g | Protein: 1g | Fat: 2g

Nutritional values are approximate.

Cajun Meatloaf

Meatloaf is one of our favorite dishes. Although we make a traditional meatloaf in the oven, using a meatloaf pan, we really love meatloaf that is smoked on the smoker. The addition of a light smoky flavor really makes meatloaf something special. You can make this meatloaf either way, in the oven or on the smoker. This Cajun meatloaf is unbelievably tender and tasty. The vegetable mixture is amazing, keeping the meatloaf moist and adding some crunchy to boot.

Cajun Meatloaf

Good Gravy, It’s Great Meatloaf!

I served this meatloaf with our Cajun brown gravy, which is also incredibly rich and flavorful. You can find the recipe for the gravy in our post on brisket with Cajun brown gravy. For a simpler but still fantastic gravy, make our fast Cajun gravy.

Also try my easy Creole meatloaf.

Cajun Meatloaf
Print Pin
5 from 1 vote

Cajun Meatloaf

This Cajun meatloaf is unbelievably tender and tasty. The vegetable mixture is amazing, keeping the meatloaf moist and adding some crunchy to boot.
Course Main
Cuisine American
Keyword Cajun, meatloaf
Prep Time 20 minutes
Cook Time 2 hours 20 minutes
Total Time 2 hours 40 minutes
Servings 12 servings
Calories 621kcal
Author Mike

Ingredients

Instructions

  • Preheat oven to 325 F or fire up a smoker for high-heat smoking.
  • Melt the butter in large skillet over medium-high heat.
  • Add the onions, celery, and bell pepper. Cook until almost tender.
  • Add the garlic and cook another 2 minutes.
  • Add the ketchup and cream. Stir and simmer for 5 minutes.
  • Remove from heat and let cool completely.
  • Add remaining ingredients to a large bowl. Add in the cooled vegetable mix.
  • Using your hands, mix well.
  • Transfer to a large disposable aluminum pan or baking dish and cook or smoke for two hours or until internal temperature reaches 160 F.
  • Remove and let rest for 10 minutes then drain the grease.
  • Let rest another 20 minutes then drain grease. Slice and serve.

Notes

It’s a little work and a good number of ingredients, but it’s worth it!

Nutrition

Calories: 621kcal | Carbohydrates: 23g | Protein: 31g | Fat: 44g | Saturated Fat: 19g | Trans Fat: 2g | Cholesterol: 199mg | Sodium: 892mg | Potassium: 661mg | Fiber: 2g | Sugar: 8g | Vitamin A: 768IU | Vitamin C: 16mg | Calcium: 100mg | Iron: 4mg

Nutritional values are approximate.

Black Pepper Bacon

After my first time making homemade bacon (a very successful first time, I must say), I decided I’d up my game and try different flavors beyond maple. The maple bacon was a little sweet, as you’d expect, so this time I went a more savory route by making this black pepper bacon. The end result was absolutely fantastic. My goodness, what great bacon. A great pepper flavor, but not overwhelming. Not only great for breakfast, but this bacon easily made for the best BLT sandwich I’ve ever had.

A Good Butcher Makes For Good Bacon

Some of the credit for the success of this black pepper bacon goes to my butcher, Moody’s Butcher shop. The folks at Moody’s got me the most fantastic pork sides ever. They were absolutely perfect for making bacon. I mean, look at that slab. That’s just gorgeous bacon!

Black Pepper Bacon

It’s Easier Than You Think

Making bacon at home is actually really easy, much easier than I had ever expected. I love making it and eating it. And don’t worry about slicing it, just get your knife really sharp (I sharpened my Wusthof knives with the sharpener below) and you can cut bacon thick or thin, like it’s butter!

Also try making my Sriracha bacon and my chipotle bacon.

Black Pepper Bacon
Print Pin
5 from 1 vote

Black Pepper Bacon

Making bacon at home is really easy, much easier than I ever expected. I love making it and eating it. And don’t worry about slicing it, just get your knife really sharp and you can cut bacon thick or thin, like it’s butter!
Course Side
Cuisine American
Keyword bacon, homemade
Prep Time 7 days
Cook Time 2 hours
Total Time 7 days 2 hours
Servings 2 pounds
Calories 3967kcal

Equipment

Ingredients

Instructions

  • Rinse the pork belly and pat dry. Place into a large resealable container or baggie.
  • Combine the remaining ingredients and rub over all sides of the pork.
  • Seal container and place in fridge for 7-10 days.
  • Rinse the belly well to remove any remaining cure. If you want you can sprinkle it with additional freshly ground black pepper.
  • To smoke, fire up your smoker for cooking at 225 F. Use whatever wood your prefer. I used apple.
  • Smoke the bacon for 1 1/2 – 2 hours or until the internal temperature reaches 150 F.
  • Store smoked bacon in a plastic bag or container in the fridge for up to 2 weeks.
  • Remove belly from smoker and let cool slightly before placing in the fridge for an hour.
  • Slice bacon as desired. Bake, pan fry, or use however you wish!

Notes

Bacon can be frozen for later use. Just store in an airtight container.

Nutrition

Calories: 3967kcal | Carbohydrates: 114g | Protein: 65g | Fat: 361g | Saturated Fat: 132g | Cholesterol: 490mg | Sodium: 14398mg | Potassium: 1518mg | Fiber: 2g | Sugar: 107g | Vitamin A: 112IU | Vitamin C: 2mg | Calcium: 171mg | Iron: 5mg

Nutritional values are approximate.

Roasted Beet and Dill Cucumber Salad

You could’ve just knocked me over with a feather. Silly me, having low expectations for a salad with roasted beets, dill and cucumber. I couldn’t have been more wrong about what was coming. This salad is absolutely fantastic. It’s almost exactly like my favorite, my mom’s creamy cucumber salad, with the addition of roasted beets. And those beets are what take this from being a good salad to being a truly amazing one.

Roasted Beet and Dill Cucumber Salad

A Fantastic Taste Combination

This roasted beet and dill cucumber salad is a great fall dish and is perfect with a Thanksgiving turkey. I love the creaminess of the dressing with the cool crisp cucumbers, followed by that great earthy beet flavor, with a hint of sweetness and smoke from roasting them. I roasted them over a grill, but you could roast them in an oven as well.

Get a good set of grill tools for these beets and anything else you grill. You won’t regret the extra few bucks they cost over the cheap ones that you’re going to have to replace in a few years. I have had several sets of Weber tools for decades and have yet to replace a single one.

Also try my roasted vegetable stuffed mushrooms.

Roasted Beet and Dill Cucumber Salad
Print Pin
5 from 1 vote

Roasted Beet and Dill Cucumber Salad

You could’ve just knocked me over with a feather. Silly me, having low expectations for a salad with roasted beets, dill and cucumber. I couldn’t have been more wrong.
Course Side
Cuisine American
Keyword beets, cucumber, dill, salad
Prep Time 10 minutes
Cook Time 1 hour
Total Time 1 hour 10 minutes
Servings 8
Calories 75kcal
Author Mike

Equipment

Ingredients

  • 2 pounds beets trimmed Try and get beets that are roughly all the same size. Smaller beets will cook faster.
  • ½ cup ice
  • 1 tablespoon vegetable oil
  • 1 tablespoon white vinegar plus 2 teaspoons
  • kosher salt
  • ground black pepper
  • 1 cucumber sliced thin
  • 2 tablespoons sour cream
  • 1 tablespoon dill fresh, chopped

Instructions

  • Fire up your grill for high-heat direct cooking. You want to get your grill to 450 F or higher. Alternatively, you can roast the beets in the oven set to 450 F.
  • Place the beets on a large piece of aluminum foil.
  • Add the ice and seal the foil tightly.
  • Place over direct heat and cook for 45 minutes or until the beets are fairly tender when poked with a knife or skewer.
  • Remove beets from grill and carefully open the foil.
  • Let cool slightly then remove the skin from the beets and slice.
  • Place beets in a medium bowl with the oil, 1 tablespoon of the vinegar, and salt and pepper to taste. Stir gently to combine.
  • In another bowl, gently combine the cucumber, remaining 2 teaspoons of vinegar, sour cream, dill, and salt and pepper to taste.
  • Serve by placing beets on a dish, then add the cucumbers on top.

Notes

You can substitute 2 teaspoons dried dill for the fresh.

Nutrition

Calories: 75kcal | Carbohydrates: 12g | Protein: 2g | Fat: 3g | Saturated Fat: 2g | Cholesterol: 2mg | Sodium: 92mg | Potassium: 424mg | Fiber: 3g | Sugar: 8g | Vitamin A: 87IU | Vitamin C: 7mg | Calcium: 27mg | Iron: 1mg

Nutritional values are approximate.

St. Louis Ribs on the Char-Broil Big Easy

I could not have been happier with how great these St. Louis-style ribs on the Char-Broil Big Easy came out. They were cooked high-and-fast on my Char-Broil Big Easy. The Big Easy is a great cooker for a whole lot of things. Although I’ve cooked baby back ribs on my Big Easy, my favorite rib is the spare rib because of the additional fat (flavor). When you cut them St. Louis-style you end up with a beautiful piece of pig meat, perfect for the Big Easy.

A little prep…

Making ribs on the Big Easy couldn’t get much easier. I rubbed down the ribs the night before with my no-burn rib rub. The next day I fired up my Big Easy. I decided to coil my ribs so they fit in the bottom of the cooker. If I’d had put in the Big Easy bunk bed basket I think I could’ve cooked two full racks at once. You could also cut the rack in half and hang it in the cooker using the Big Easy rib hooks.

Cooking right along…

It took about ninety minutes until the meat was starting to pull back from the bones. I slathered some of my Bourbon Street BBQ sauce onto the ribs and let them cook just a bit longer. This gave them a bit of a crunchy outer layer.

St. Louis Ribs on the Char-Broil Big Easy

Let ’em rest

When the ribs were done I removed them from the cooker, uncoiled them, and let them rest for about 15 minutes. Then I sliced them and proceeded to enjoy some of the best ribs I’ve had. Not fall-off-the-bone ribs, those are overdone. You want a little tug, a little bite, to your ribs. These have that. And they’re juicy, oh so juicy, just like everything else I’ve cooked on the Big Easy. These are great ribs.

The Char-Broil Big Easy 22-piece turkey fryer accessory kit has everything you need to make ribs, chicken legs, kabobs and just about anything else!

Also check out my Tony Roma’s baby back ribs made on the Big Easy.

You can also make delicious St Louis-style ribs on a smoker or gas grill!

It’s always a good idea to keep a few spare grease trays on hand for your Char-Broil Big Easy.

Love your Big Easy as much I love mine? Check out my Big Easy Add-Ons page and my free Big Easy eCookbook!

St. Louis Ribs on the Char-Broil Big Easy
Print Pin
5 from 1 vote

St. Louis Ribs on the Char-Broil Big Easy

I could not have been happier with how great these St. Louis-style ribs on the Char-Broil Big Easy came out. 
Course Main
Cuisine American
Keyword Big Easy, Char-Broil, ribs
Prep Time 12 hours
Cook Time 2 hours
Total Time 14 hours
Servings 4
Calories 630kcal
Author Mike

Ingredients

Instructions

  • Place the ribs on a large piece of foil and sprinkle rub on both sides.
  • Rub in slightly then seal.
  • Refrigerate for up to 12 hours.
  • Fire up your Big Easy.
  • Cook the ribs for 90 minutes. You should see the meat pulling back from the bone 1/2" – 1". If not, let them cook a bit longer.
  • Slather the ribs with sauce, if desired. Note that if you use a sauce that contains a lot of sugar you will really need to keep an eye on the ribs or the sauce may burn. Return ribs to cooker for 15-30 minutes or until they have a nice crust on them.
  • Remove, let rest for 10-15 minutes, then slice and serve. If desired, have additional warmed BBQ sauce on the side for dipping.

Notes

To fit the ribs into the cooker you’ll either need to coil them as I did (I found this to be easier to do with the Big Easy kabob insert as a kind of holder) or cut them if they are too long and use the Big Easy rib hooks to hang them.

Nutrition

Calories: 630kcal | Protein: 35g | Fat: 53g | Saturated Fat: 17g | Trans Fat: 1g | Cholesterol: 182mg | Sodium: 184mg | Potassium: 551mg | Calcium: 34mg | Iron: 2mg

Nutritional values are approximate.