Citrus Herb Marinated Chicken on the Char-Broil Big Easy

Note: This recipe was developed using the Char-Broil Big Easy Oil-Less Fryer. If you are cooking using the Char-Broil Smoker-Roaster Grill you should cook with the lid open and the temperature set to High. You might also need to adjust the cooking time.

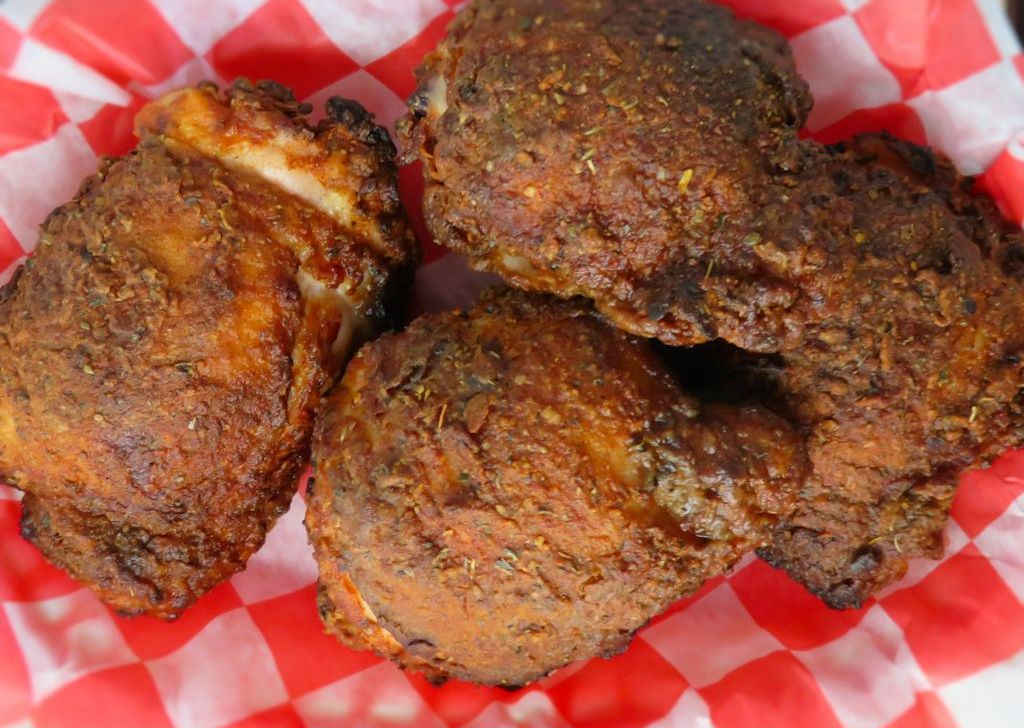
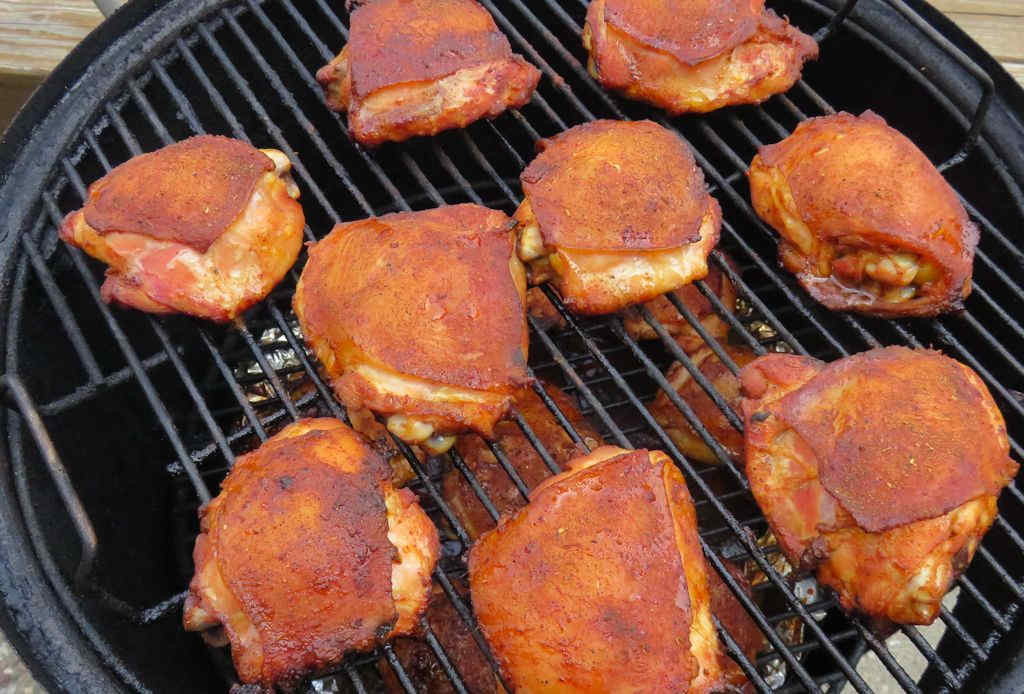
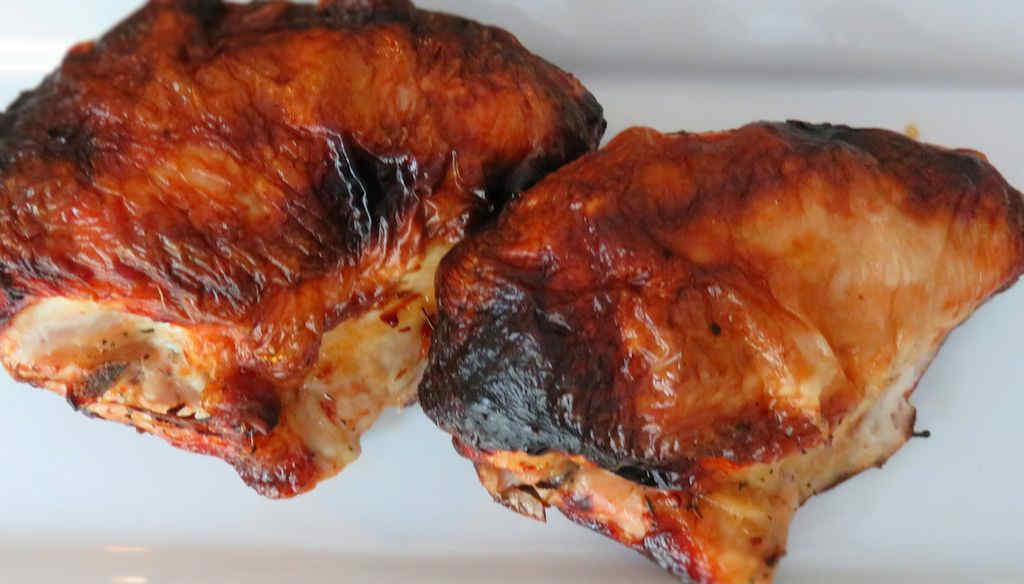
Weber has a line of marinade mixes that you add juice to that are really, really good. They’re perfect for flavoring chicken, like this citrus herb marinated chicken on the Char-Broil Big Easy. I picked up a package of each and used them to marinate my favorite, split chicken breasts. The Citrus Herb marinade is mixed with orange juice to produce wonderfully seasoned chicken. A hint of garlic and herbs and a hint of sweetness, it’s a nice, light refreshing marinade.

Citrus Herb Marinated Chicken on the Char-Broil Big Easy

A Little Char Is A Good Thing

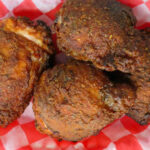
Since it cooks at a high temperature you do have to watch that your citrus herb marinated chicken on the Char-Broil Big Easy doesn’t char. One way to help prevent that is to not use marinades containing substances that might burn, like sugar or honey.

The other option is to rinse the chicken before cooking. Now, you’re going to lose a bit of flavor doing that, but if like me you’re going to remove the skin before eating, it really doesn’t make that big of a difference.

The bunk bed basket lets you double the amount of cooking space you have on your Big Easy. And it’s easy to take in and out of the cooker too!

Love your Big Easy as much I love mine? Check out my Big Easy Add-Ons page and my free Big Easy eCookbook!

Weber Marinades

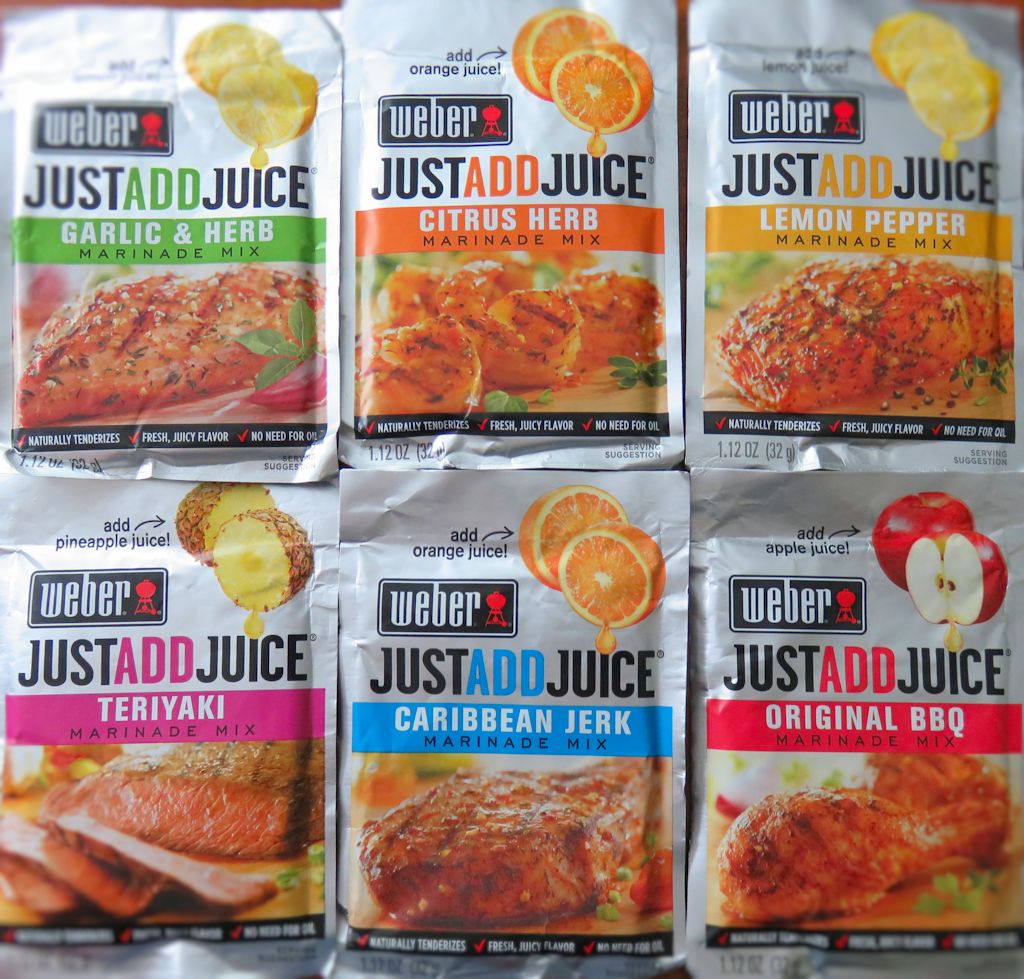
Weber makes all sorts of great flavored Just Add Juice marinades. Check out chicken marinaded in their garlic and herb marinade!

It’s always a good idea to keep a few spare grease trays on hand for your Char-Broil Big Easy.

Citrus Herb Marinaded Chicken on the Char-Broil Big Easy
Print Pin
5 from 1 vote

Citrus Herb Marinated Chicken on the Char-Broil Big Easy

Delicious, moist chicken ready in no time!
Course Main
Cuisine American
Keyword Big Easy, Char-Broil, chicken
Prep Time 4 hours
Cook Time 1 hour 20 minutes
Total Time 5 hours 20 minutes
Servings 2 Servings
Calories 286kcal
Author Mike

Ingredients

Instructions

  • Place the chicken into a resealable bag or container.
  • Add marinade to taste. Toss to coat.
  • Seal and refrigerate for at least 4 hours, turning occasionally.
  • Fire up your Big Easy.
  • Transfer the chicken to the Big Easy basket.
  • Cook for approximately 20 minutes per pound or until it reaches 165 F as checked in several places.
  • Remove and let rest 10 minutes before serving.

Notes

I prefer to rinse the marinade off the outside of the chicken since it will tend to burn. The meat has already absorbed the flavors of the marinade.

Nutrition

Calories: 286kcal | Carbohydrates: 6g | Protein: 48g | Fat: 6g | Saturated Fat: 1g | Trans Fat: 1g | Cholesterol: 145mg | Sodium: 263mg | Potassium: 960mg | Fiber: 1g | Sugar: 5g | Vitamin A: 192IU | Vitamin C: 34mg | Calcium: 18mg | Iron: 1mg

Nutritional values are approximate.

Bread Machine Jalapeno Cheese Bread

I’ve been inspired lately by my bread making expertise. Ok, not really. But I have been really happy with how great my last few loaves have turned out, like this bread machine jalapeno cheese bread. I make the dough in my bread machine, then roll it out, shape it, and let it rise again. Finally, into the oven and done! I’ve proven to myself too many times before that I should not make dough by hand. I let the bread machine do it. Like this jalapeno cheese bread. Not too spicy, and not too cheesy, but just right and the perfect texture for sandwiches.

Bread Machine Jalapeno Cheese Bread

Try Some Delicious Substitutions

I think you could substitute just about anything for the jalapenos and the cheese in your bread machine jalapeno cheddar bread. Chopped roasted poblanos and pepper jack cheese would make for a great combination. As would diced green chiles (drained very well first) and Monterey jack cheese. The options are pretty much endless. Just don’t use any ingredients that are extremely moist.

Also try my bread machine garlic herb pepperoni bread and my Italian herb bread.

Bread Machine Jalapeno Cheese Bread
Print Pin
4.50 from 2 votes

Bread Machine Jalapeno Cheese Bread

I’ve been inspired lately by my bread making expertise. Ok, not really. But I have been really happy with how great my last few loaves have turned out, like this bread machine jalapeno cheese bread. 
Course Bread
Cuisine American
Keyword bread, homemade, spicy
Prep Time 10 minutes
Cook Time 3 hours
Total Time 3 hours 10 minutes
Servings 1 loaf
Calories 1693kcal
Author Mike

Ingredients

Instructions

  • Place ingredients into your bread machine in the order listed.
  • Select the dough cycle and let the machine do its job.
  • Lightly flour a work surface and add the dough. Punch down to flatten.
  • Use a rolling pin to shape the dough into a rectangle the width of your bread pan. Lightly oil the bread pan.
  • Roll the dough up into a tight log. Seal the seam and ends tightly and transfer to your bread pan.
  • Cover loosely with plastic wrap and place in a warm place to rise, doubling in size, about one hour.
  • Preheat oven to 350 F.
  • Bake bread for 30 minutes or until the bread has a nice crust on it.
  • Remove to a wire rack to cook slightly before slicing and serving.

Notes

You can use your favorite cheese.

Nutrition

Calories: 1693kcal | Carbohydrates: 300g | Protein: 60g | Fat: 25g | Saturated Fat: 13g | Cholesterol: 59mg | Sodium: 2686mg | Potassium: 555mg | Fiber: 11g | Sugar: 27g | Vitamin A: 1026IU | Vitamin C: 50mg | Calcium: 471mg | Iron: 4mg

Nutritional values are approximate.

Proper Pub Fried Chicken using the Vortex

Tom Kerridge is a Michelin-starred pub chef in England. Yes, pub chef. That’s why I knew that his recipe for proper pub fried chicken using the Vortex would be something special, something incredible. And, oh me, was it ever. This is some of most fantastically-flavored chicken I’ve ever had.

Proper Pub Fried Chicken using the Vortex

Just Amazing Chicken. Amazing.

The seasonings give every single bite the most fantastic flavor. Tender, moist. And crunchy skin? Oh yes. You could deep fry it, but I cooked this chicken over charcoal using the Vortex and no oil. Yep, no oil (except for like a tablespoon to help crisp up the skin at the very end).

I have to admit something. I made a change to Chef Kerridge’s original recipe when I made this proper pub fried chicken using the Vortex. Please don’t hate me, but I added hot sauce to the buttermilk brine. I could not help myself. I ALWAYS add hot sauce to my buttermilk when using it for chicken. Not a whole lot, just a little bit to add a slight kick and offset the sourness. You don’t have to do it, and you don’t have to tell anyone if you do.

Also try my copycat of Church’s fried chicken, also made using the Vortex.

Proper Pub Fried Chicken using the Vortex
Print Pin
5 from 1 vote

Proper Pub Fried Chicken using the Vortex

The seasonings give every single bite the most fantastic flavor. Tender, moist. And crunchy skin? Oh yes. 
Course Main
Cuisine American
Keyword fried chicken, Vortex
Prep Time 12 hours
Cook Time 45 minutes
Total Time 12 hours 45 minutes
Servings 4 servings
Calories 259kcal

Equipment

Ingredients

Instructions

  • Place chicken into a large resealable container.
  • Add enough buttermilk to cover the chicken. Add hot sauce, if using.
  • Seal and shake gently to coat the chicken and combine the hot sauce.
  • Refrigerate overnight.
  • Fire up your Vortex. Fill completely with coals. You’ll need at least a 22″ charcoal grill.
  • Combine all dry ingredients and pour into a pie pan or alternatively, place in a large resealable bag.
  • Working in batches, remove chicken from the buttermilk. Shake off excess and roll in the coating. Alternatively, add the chicken to the bag, seal and shake to coat.
  • Place chicken around the edges of your grill.
  • Cover and cook 30-45 minutes or until the chicken has reached 160 F as measured in several locations.
  • Lightly brush the chicken with the oil and cook another 5 minutes or until the chicken reaches 165 F as measured in several locations.

Notes

You can use your favorite chicken cuts.

Nutrition

Calories: 259kcal | Carbohydrates: 43g | Protein: 9g | Fat: 6g | Saturated Fat: 3g | Trans Fat: 1g | Cholesterol: 16mg | Sodium: 2491mg | Potassium: 372mg | Fiber: 3g | Sugar: 7g | Vitamin A: 2399IU | Vitamin C: 7mg | Calcium: 193mg | Iron: 3mg

Nutritional values are approximate.

Delta Slaw

This Delta slaw is by far my favorite go-to slaw. Although I sometimes eat it as a side, it most often finds it’s way onto pulled pork or Sloppy Joe sandwiches, or on hot dogs. Despite being a vinegar-based slaw it has a nice sweetness to it. It also contains celery seed (and a good bit of it too), which is also one of my favorite flavors. I love everything about this slaw.

Delta Slaw

Don’t Add The Dressing Until Later

Depending on how I’m serving my Delta slaw (as in, how quickly I’m going to devour it), I often keep the slaw ingredients separate from the dressing until just before serving. That was the slaw doesn’t get too soggy, which will happen after three or more days in the fridge. Keeping the parts separate means I can easily get a full work week’s worth of slaw out of a batch!

Also try my BBQ shack slaw.

Delta Slaw
Print Pin
5 from 1 vote

Delta Slaw

This Delta slaw is by far my favorite go-to slaw. Although I sometimes eat it as a side, it most often finds its way onto pulled pork or Sloppy Joe sandwiches, or on hot dogs.
Course Side
Cuisine American
Keyword cole slaw, coleslaw, slaw
Prep Time 1 hour 10 minutes
Cook Time 2 hours
Total Time 3 hours 10 minutes
Servings 8 servings
Calories 236kcal

Ingredients

Instructions

  • Combine the slaw mix, bell pepper and onion in a large resealable container.
  • Toss with the salt and pepper.
  • Cover and refrigerate for 1 hour.
  • Meanwhile, combine the vinegar, sugar, mustard powder, and celery seeds in a small saucepan and bring to a boil.
  • Stir until the sugar is dissolved and remove from the heat and let cool until the cabbage mixture has been in the fridge for 1 hour.
  • Remove cabbage from fridge and pour sauce over it.
  • Add the oil, green onions, and parsley and toss to combine.
  • Cover and return to refrigerator for 2-3 hours before serving.

Notes

Stir again before serving.

Nutrition

Calories: 236kcal | Carbohydrates: 28g | Protein: 1g | Fat: 14g | Saturated Fat: 11g | Sodium: 586mg | Potassium: 97mg | Fiber: 1g | Sugar: 26g | Vitamin A: 582IU | Vitamin C: 22mg | Calcium: 21mg | Iron: 1mg

Nutritional values are approximate.

Hawaiian Pork Burger

This Hawaiian pork burger is exactly why we all should be eating more pork burgers. Packed with flavor and finished with great toppings, every bite was a treat. I could’ve opted to grill the pineapple, but I love the taste of fresh pineapple just as it is. That sweet flavor along with the tangy BBQ sauce really went along well with the slightly herby patties. These were a very welcomed change from my usual beef burgers.

Hawaiian Pork Burgers

The BBQ Sauce Makes A Difference

I’d happily make these Hawaiian pork burgers again. And again. I do recommend using a BBQ sauce with a slight smoky flavor. And a little spiciness wouldn’t hurt either since you’ve got that wonderfully sweet pineapple slice to contrast it.

I like to use a burger press when I make burgers. It, in combination with some patty papers, enables me to crank out a whole bunch of equally-sized burger patties in no time at all with little cleanup.

Also try my super-crazy-good pork burgers.

Hawaiian Pork Burgers
Print Pin
4 from 1 vote

Hawaiian Pork Burger

This Hawaiian pork burger is exactly why we should be eating more pork burgers. Packed with flavor and finished with great toppings, every bite was a treat.
Course Main
Cuisine American
Keyword burgers, pineapple, pork
Prep Time 2 hours
Cook Time 20 minutes
Total Time 2 hours 20 minutes
Servings 4 servings
Calories 540kcal

Equipment

Ingredients

Instructions

  • In a large bowl combine the pork, green onion, ginger, allspice, and pepper.
  • Form into 4 equally-sized patties.
  • Place on wax paper and refrigerate for up 2 hours.
  • Fire up your grill. Clean the grates well.
  • Lightly oil the outsides of the patties. Not much, just a bit so they don’t stick.
  • Grill the patties on one side for 5 minutes.
  • Flip and continue cooking until done, reaching at least 145 F internally. I took mine to 160 F because some folks still aren’t used to pink pork even though it’s fine to consume.
  • Optionally, brush the patties with BBQ sauce and grill the pineapple rings. I find grilled pineapple rings to be prone to falling apart unless cooked on a griddle, so I usually skip grilling them.
  • Remove the patties and let rest for 5 minutes.
  • Meanwhile, toast your buns if desired.
  • Assemble the burgers by brushing BBQ sauce on the inside of the buns.
  • Top the bottom bun with the ham, followed by the lettuce and pineapple.
  • Add the pork burger and serve.

Notes

I like to use a slightly smoky BBQ that isn’t on the sweet side.

Nutrition

Calories: 540kcal | Carbohydrates: 49g | Protein: 29g | Fat: 26g | Saturated Fat: 9g | Cholesterol: 82mg | Sodium: 565mg | Potassium: 1213mg | Fiber: 7g | Sugar: 20g | Vitamin A: 26798IU | Vitamin C: 41mg | Calcium: 241mg | Iron: 6mg

Nutritional values are approximate.

Ramen-Seasoned Wings with Peanut Dipping Sauce

Visit my other site, For The Wing, for all things chicken-wing!

I’ve come across recipes for Ramen-crusted chicken wings on the internet, but never really got into the idea. But I did get into the idea of dusting some mighty fine cooked wings with Ramen seasoning and serving them with an out-of-this-world peanut dipping sauce. And I didn’t leave off the noodles, nope! A quick fry in a pan with a little oil, and boom! Crunchy wing topping! These Ramen-seasoned wings with peanut dipping sauce disappeared in no time!

Ramen-Seasoned Wings with Peanut Dipping Sauce

If you really love Ramen seasoning don’t be afraid to double the amount of seasoning used. I always have Ramen seasoning on hand because I like to crunch up the noodles and fry them for topping salads or in my Oriental Ramen broccoli coleslaw. More is better on these Ramen-seasoned wings with peanut dipping sauce.

I store my homemade sauces in squeeze bottles. If refrigerated, I set them out thirty minutes to an hour before using so they come to room temperature. You don’t want to put cold sauce on hot food!

Serve your wings with some quick fix Ramen-seasoned chips.

Ramen-Seasoned Wings with Peanut Dipping Sauce
Print Pin
5 from 1 vote

Ramen-Seasoned Wings with Peanut Dipping Sauce

If you really love Ramen seasoning don’t be afraid to double the amount of seasoning used. More is better on these Ramen-seasoned wings with peanut dipping sauce.
Course Appetizer
Cuisine American
Keyword Asian wings
Prep Time 1 hour
Cook Time 45 minutes
Total Time 1 hour 45 minutes
Servings 6 servings
Calories 517kcal
Author Mike

Equipment

Ingredients

For the wings

For the sauce

Instructions

For the wings

For the sauce

  • Heat oil in a medium saucepan over medium heat.
  • Add the garlic and saute for 2 minutes.
  • Whisk in the remaining ingredients and stir until the brown sugar is dissolved.
  • Reduce heat and keep warm until ready to use.

Notes

No dipping sauce needed!

Nutrition

Calories: 517kcal | Carbohydrates: 12g | Protein: 29g | Fat: 40g | Saturated Fat: 15g | Trans Fat: 1g | Cholesterol: 95mg | Sodium: 867mg | Potassium: 373mg | Fiber: 2g | Sugar: 7g | Vitamin A: 187IU | Vitamin C: 2mg | Calcium: 37mg | Iron: 2mg

Nutritional values are approximate.

Smoked Chicken Thighs

I have been smoking all sorts of meats for years. But for some reason, chicken thighs never made it onto my list of things to smoke. I was jonesin’ for a BBQ chicken sandwich.

Now normally, I’d smoke a boneless chicken breast that I had brined (to keep it moist and tender) and shred or chop it. But since I’ve been on a chicken thigh kick lately, and had a freezer full of thighs from the last time they went on sale, I decided on smoked chicken thighs. And boy I could not have been happier.

Smoked Chicken Thighs

Perfect Juicy Tender Chicken

After just a few hours on my Weber smoker, these smoked chicken thighs were done. Super juicy and tender, I knew I was in for a treat. It didn’t take long to remove the skin and separate the meat from the bones. Smoked thigh meat is perfect on BBQ sandwiches or nachos or pizzas.

I prefer to use fruit or nut woods when I smoke unless I want a heavier smoke flavor. Pecan, apple or cherry are my favorites.

Smoked Chicken Thighs
Print Pin
5 from 1 vote

Smoked Chicken Thighs

I’ve been on a chicken thigh kick lately, so I decided to smoke a big batch. And boy I could not have been happier.
Course Main
Cuisine American
Keyword chicken thighs, smoked
Prep Time 3 hours 15 minutes
Cook Time 2 hours
Total Time 5 hours 15 minutes
Servings 3 pounds
Calories 2128kcal
Author Mike

Ingredients

  • 6 pounds chicken thighs bone in, skin on

For the brine

Instructions

  • Trim any excess fat from the thighs. Place them in a large (large enough to hold the chicken and brine) resealable container.
  • Add the brine. Stir gently to make sure the chicken is all exposed to the brine.
  • Seal and refrigerate for 3 hours.
  • Remove the chicken from the brine (discard) and rinse with cold water.
  • Return the chicken to the (now dry) container.
  • Squirt the thighs with the mustard, turning to get all sides. Rub the mustard around and cover the chicken.
  • Sprinkle the chicken with the rub, making sure you get it on all sides.
  • Fire up your smoker for cooking at 230 F. Use a nice fruit wood such as apple. For a stronger smoke flavor use hickory.
  • Add the chicken to the smoker and smoke until the internal temperature reaches 170 F, 2 to 2 1/12 hours.
  • Remove the chicken.
  • Discard the skin.
  • Pull the meat from the bones and chop or shred as desired.

For the brine

  • Combine all ingredients. Stir until the salt and sugar are dissolved.

Notes

You can use this same approach for smoking other bone-in cuts of chicken.

Nutrition

Calories: 2128kcal | Carbohydrates: 39g | Protein: 147g | Fat: 151g | Saturated Fat: 41g | Trans Fat: 1g | Cholesterol: 889mg | Sodium: 20131mg | Potassium: 1941mg | Fiber: 1g | Sugar: 36g | Vitamin A: 740IU | Vitamin C: 15mg | Calcium: 135mg | Iron: 7mg

Nutritional values are approximate.

Ketchup Leather

“Don’t mess with my ketchup” is what my wife told me. And yeah, usually I do listen. But not this time. I was going to make ketchup leather no matter what. And you know what? When we’d finished off our hot-off-the-grill burgers topped with ketchup leather my wife said “Ok, you can mess with my ketchup anytime.”

Ketchup Leather

Differently Better

Ketchup leather makes ketchup on burgers an even better thing. Tastes like ketchup. Looks like a Fruit Roll-Up. But here’s the cool part (besides the wow factor). It doesn’t leak out of your burger. If you’re like me, you’re not shy when squeezing ketchup onto your burger. But the more toppings and the more ketchup, the more that squeezes out. Dripping all over the place and eventually leading to a burger disaster. Not with ketchup leather. Everything stays right where it belongs.

Make a big batch and keep them in the fridge for the next time you make burgers. I really enjoyed it on our copycat of Red Robin’s Royal Red Robin burger.

Ketchup Leather
Print Pin
3 from 3 votes

Ketchup Leather

When we’d finished off our hot-off-the-grill burgers topped with ketchup leather my wife said “Ok, you can mess with my ketchup anytime.”
Course Sauce
Cuisine American
Keyword dehydrator, ketchup
Prep Time 5 minutes
Cook Time 3 hours
Total Time 3 hours 5 minutes
Servings 1 cup
Calories 538kcal

Equipment

Ingredients

  • 2 cups ketchup
  • Your favorite seasoning cracked black pepper is my favorite

Instructions

  • Preheat your oven to 170 F.
  • Line a baking sheet with parchment paper.
  • Spray the paper with non-stick spray.
  • Squeeze the ketchup out onto the parchment paper.
  • Using a spatula or the back of a spoon, spread it out evenly. You don't want it too thick, but you don't want it too thin either.
  • Place in the oven for 3 hours.
  • Let cool completely before cutting into squares or circles for use on burgers.

Notes

Store any leftover in the fridge.

Nutrition

Calories: 538kcal | Carbohydrates: 126g | Protein: 6g | Fat: 1g | Saturated Fat: 1g | Sodium: 4354mg | Potassium: 1512mg | Fiber: 1g | Sugar: 104g | Vitamin A: 2462IU | Vitamin C: 20mg | Calcium: 77mg | Iron: 2mg

Nutritional values are approximate.

Grilled Bacon-Wrapped Jalapeno-Stuffed Olives

I’ve found the replacement for eating popcorn while watching a movie. No more of that. Grilled bacon-wrapped jalapeno-stuffed olives are much, much better. Yeah, there’s definitely a spicy kick to them. And a little smokiness from the bacon. A bit salty. Just give me a bowl of these little bites and a little cool ranch or blue cheese dressing (gotta cool off!) and I’m happy!

Grilled Bacon-Wrapped Jalapeno-Stuffed Olives

Really Great With Any Stuffed Olives

You don’t have to go the spicy route when you make grilled bacon-wrapped jalapeno-stuffed olives if you don’t want to. Any stuffed olives will work just fine for this recipe. Try Gouda-stuffed olives, they’re fantastic too! Just make sure you get big olives, big enough to wrap the bacon around. Those lil ole pimento-stuffed olives that are barely bigger than peanuts just won’t do. And since you’ve got the grill going, might as well add a few bacon-wrapped meatballs!

I recommend that you use a grill basket when making this dish. It makes cooking easier and you don’t have to worry about anything falling through the grates. And cleanup is easier too!

Also try my grilled bacon and cheese stuffed mushrooms.

Grilled Bacon-Wrapped Jalapeno-Stuffed Olives
Print Pin
5 from 1 vote

Grilled Bacon-Wrapped Jalapeno-Stuffed Olives

I’ve found the replacement for eating popcorn while watching a movie. No more of that. Grilled bacon-wrapped jalapeno-stuffed olives are much, much better. 
Course Appetizer
Cuisine American
Keyword grilled, olives
Prep Time 10 minutes
Cook Time 30 minutes
Total Time 40 minutes
Servings 15 bites
Calories 36kcal
Author Mike

Ingredients

  • 15 jalapeno-stuffed green olives
  • 5 slices bacon thin-sliced, cut into thirds
  • Your favorite seasoning
  • Ranch dressing or blue cheese, for serving

Instructions

  • Fire up your grill for indirect cooking.
  • Wrap each olive in a piece of bacon. I didn’t need a toothpick to secure the bacon, but you might.
  • Sprinkle your rub out on a plate and roll the bacon-wrapped olives in it to coat.
  • Grill 20-30 minutes or until the bacon is cooked.
  • Serve hot.

Notes

Serve with ranch or blue cheese dressing for dipping.

Nutrition

Calories: 36kcal | Carbohydrates: 1g | Protein: 1g | Fat: 4g | Saturated Fat: 1g | Trans Fat: 1g | Cholesterol: 5mg | Sodium: 111mg | Potassium: 16mg | Fiber: 1g | Sugar: 1g | Vitamin A: 18IU | Calcium: 2mg | Iron: 1mg

Nutritional values are approximate.

Grilled Yellow Squash

Simple yet delicious. You don’t always have to struggle to come up with a grill-able side dish idea, and you definitely don’t have to spend hours or even many minutes putting one together. Grilled yellow squash actually made me love squash, and let me tell you, that’s not an easy thing to do. The key for me was the onions. And that means Vidalia onions when I can get them. Always. And boy how the onions make a difference to well, boring squash. I won’t look at squash with a frown any more. I promise.

Grilled Yellow Squash

Season ‘Em Fancy Or Don’t

I also like adding my favorite seasonings to the foil packet instead of ‘just’ salt and pepper. These grilled yellow squash can take on a variety of flavors. One we truly enjoy is the Casa Seasoning from Albukirky Seasonings. It’s the perfect blend of salt, pepper, garlic and lemon, among other things. But these are still great with salt and pepper for sure.

Also try my grilled marinated medley, everything great in a single dish.

Grilled Yellow Squash
Print Pin
5 from 1 vote

Grilled Yellow Squash

Simple yet delicious. You don’t always have to struggle to come up with a grill-able side dish idea, and you definitely don’t have to spend hours or even many minutes putting one together. 
Course Side
Cuisine American
Keyword grilled, squash
Prep Time 5 minutes
Cook Time 25 minutes
Total Time 30 minutes
Servings 6 servings
Calories 117kcal

Ingredients

Instructions

  • Fire up your grill for indirect cooking at 350 F. Alternatively, you can make this in an oven preheated to 350 instead.
  • Place all ingredients on a large piece of aluminum foil.
  • Seal tightly.
  • Transfer to the grill or oven and cook 20-25 minutes or until crisp-tender.

Notes

Be careful when first opening the sealed packets as hot steam will escape.

Nutrition

Calories: 117kcal | Carbohydrates: 11g | Protein: 3g | Fat: 8g | Saturated Fat: 5g | Trans Fat: 1g | Cholesterol: 20mg | Sodium: 9mg | Potassium: 581mg | Fiber: 3g | Sugar: 7g | Vitamin A: 629IU | Vitamin C: 36mg | Calcium: 43mg | Iron: 1mg

Nutritional values are approximate.