No-Boil Deviled Eggs

I’ve made my share of deviled eggs. Pretty pastel ones. Awesome Jell-O ones. And ya know, shelling all those eggs can be a job. So when I ran across a way of making no-boil deviled eggs, I immediately decided to give them a shot. What you end up with is that same great deviled egg flavor, but with a lot less trouble. This approach solves a whole lot of problems, especially if you’re setting out to make a big huge batch of eggs for a family get-together or picnic.

No-Boil Deviled Eggs

Great Results. And Easier.

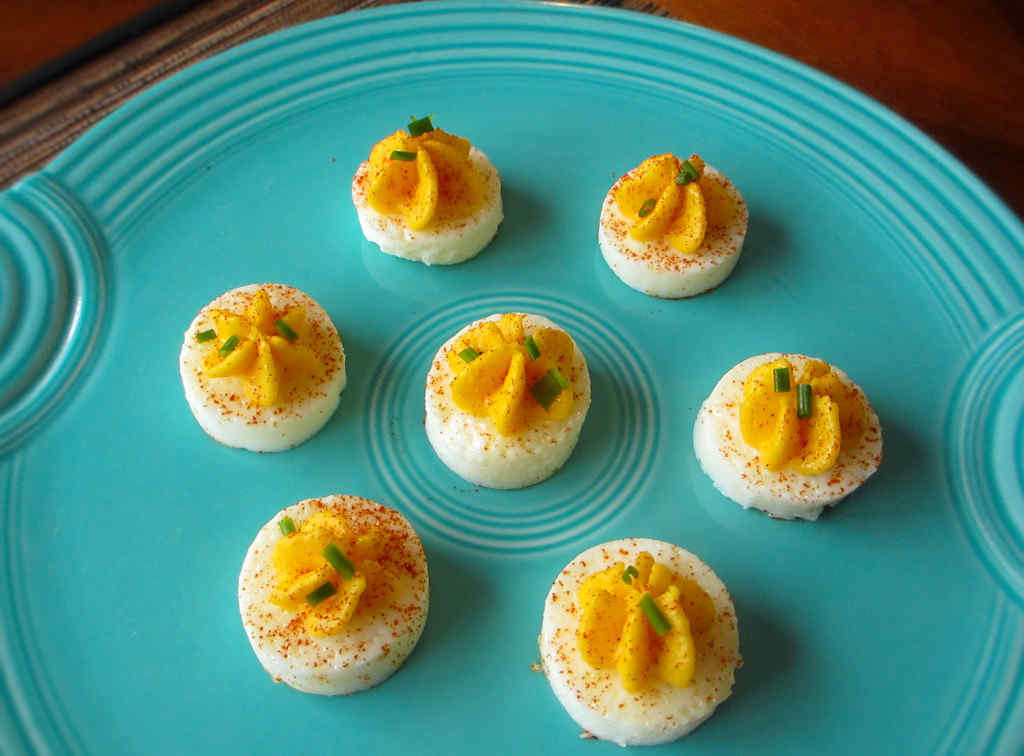
The original recipe for no-boil deviled eggs called for cutting the cooked eggs into squares, which would’ve maximized the amount of finished eggs you would get. But, I thought that round ones would be more attractive. Plus, I’m not sure I’d be that great at cutting that many squares that would come out looking similar. I prefer a much easier way. Using a cooking cutter made it easy. And a bit fun, actually.

I almost always use Blue Plate mayonnaise in the dishes I make. I think it is the best around. If you can’t find it locally you can pick it up online for a fair price.

Also try my jalapeno popper and BBQ deviled eggs.

No-Boil Deviled Eggs
Print Pin
5 from 2 votes

No-Boil Deviled Eggs

When I ran across a way of making no-boil deviled eggs, I immediately decided to give them a shot. What you end up with is that same great deviled egg flavor, but with a lot less trouble.
Course Appetizer
Cuisine American
Keyword deviled, eggs
Prep Time 5 minutes
Cook Time 45 minutes
Total Time 50 minutes
Servings 3 dozen
Calories 458kcal

Ingredients

Instructions

  • Preheat your oven to 350 F.
  • Spray an 8″ x 8″ baking dish with non-stick spray.
  • Separate the egg whites and yokes into two bowls.
  • Whisk the whites until they just get foamy. Do not whisk until they foam completely. Less is more in this case.
  • Pour the egg whites into the dish and cover with foil.
  • Bake for 20 minutes or a few minutes more until the eggs have set.
  • Remove from the oven and let cool.
  • Whisk the yokes until smooth.
  • Spray a skillet with non-stick spray and add the yolks. Scramble until cooked.
  • Transfer the yolks to a food processor.
  • Add the mayonnaise, vinegar, mustard, and a pinch of salt and pepper and process until very smooth.
  • Transfer to a pastry bag with a round tip or dessert decorator.
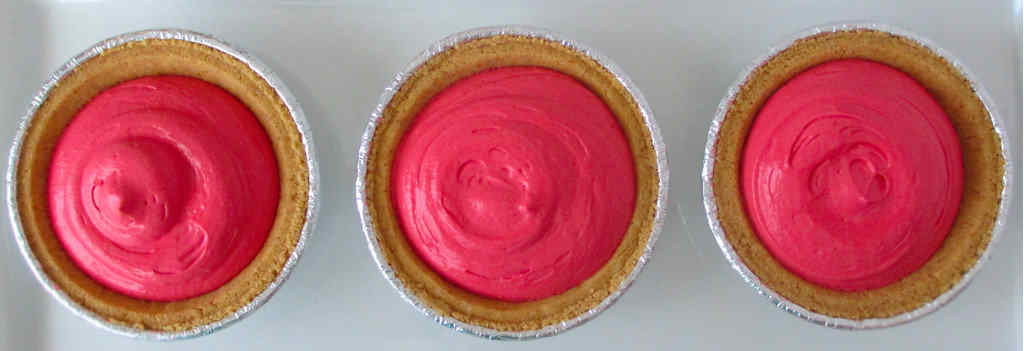
  • Remove the cooked eggs whites from the baking dish and cut into squares, or use a small cookie cutter to cut into circles.
  • Pipe the egg yolk mixture onto each egg white.
  • Sprinkle with paprika and chives.

Notes

The number of deviled eggs you will get will of course depend on how you cut them. I used a large round cookie cutter so I only got about 2 dozen.

Nutrition

Calories: 458kcal | Carbohydrates: 2g | Protein: 26g | Fat: 38g | Saturated Fat: 9g | Trans Fat: 1g | Cholesterol: 754mg | Sodium: 480mg | Potassium: 286mg | Fiber: 1g | Sugar: 1g | Vitamin A: 1099IU | Vitamin C: 1mg | Calcium: 116mg | Iron: 4mg

Nutritional values are approximate.

18000 Island Dressing

You could put boring ketchup on your hamburger. Or maybe some mayonnaise. You could slather on some Thousand Island dressing. Or, you could just skip all that and go with big flavor instead. Bold flavor. And kick. 18000 Island Dressing is truly 18 times more flavorful than the classic. There’s nothing boring about it, thanks to a healthy dose of chopped jalapenos. Anywhere you used the ‘boring’ stuff, use some of this instead.

18000 Island Dressing

A Great Sauce For Everything

18000 Island Dressing isn’t just for burgers either. It’s great on sandwiches or our favorite, wraps. And hot dogs (if you haven’t tried mayonnaise-based sauces on your hot dogs you should, it’s a very welcome change from just using mustard). Anywhere you want bold flavor, it brings it.

These little sauce dipping cups are great for serving salad dressings. They keep me from over-dressing my salads, which is something I’m prone to do since I’m a dressing-aholic. They’re easy to clean up, too. And they’re also great for dipping nuggets, tenders or even chicken wings.

Check out some of my other great burger sauces, like Nancy’s, a copycat of Smashburger’s sauce,  and of course, a copycat of the sauce on the McDonald’s Big Mac.

Also try my more traditional dressing.

18000 Island Dressing
Print Pin
5 from 1 vote

18000 Island Dressing

18000 Island Dressing is truly 18 times more flavorful than Thousand Island dressing. There’s nothing boring about it, thanks to a healthy dose of chopped jalapenos.
Course Sauce
Cuisine American
Keyword homemade salad dressing
Prep Time 5 minutes
Total Time 5 minutes
Servings 1 cup
Calories 1602kcal

Equipment

Ingredients

Instructions

  • Place all ingredients into a blender.
  • Process until smooth.
  • Refrigerate until ready to use.

Notes

This dressing is crazy good on grilled burgers, chicken sandwiches, sub sandwiches and even hot dogs!

Nutrition

Calories: 1602kcal | Carbohydrates: 19g | Protein: 3g | Fat: 168g | Saturated Fat: 26g | Trans Fat: 1g | Cholesterol: 94mg | Sodium: 2358mg | Potassium: 288mg | Fiber: 1g | Sugar: 18g | Vitamin A: 797IU | Vitamin C: 5mg | Calcium: 36mg | Iron: 1mg

Nutritional values are approximate.

Andean Popcorn

I love Andean popcorn. It’s somewhat similar to the popcorn we enjoy here in the states in that it has a fantastic flavor, even a hint of butter. The kernels, though, are different. They do not explode and puff up like popcorn has been grown to do here. Instead, they kinda… just go… pop. No big explosion. No fluffy white insides. The kernel is thin, and very crunchy. You just pop (no pun intended) the entire thing into your mouth and enjoy.

Andean Popcorn

A Peruvian Favorite

I recall street vendors up in the mountains of Peru, in the city of Huancayo, selling bags of Andean popcorn along the street on market day. I think a bag was 10 soles which then was less than a US nickel. Well worth the price! They were fried in screaming hot oil then salted. That’s it. You did (and do) have to be careful of the kernels when they first come out of the fryer, though. They are very, very hot. So let them cool a bit before diving in!

I popped the cancha in the same popper I use for ‘regular’ popcorn. It takes a bit longer as the heat needs to get really good and hot, but it’s well worth the wait. If you can’t find cancha in a South American market near you you can order it using the Amazon link at the bottom of this post. It’s great stuff!

Another favorite Peruvian-inspired appetizer of mine is aji amarillo chicken wings.

Andean Popcorn
Print Pin
5 from 1 vote

Andean Popcorn

I love Andean popcorn. It’s somewhat similar to the popcorn we enjoy here in the states in that it has a fantastic flavor, even a hint of a butter. 
Course Appetizer
Cuisine Peruvian
Keyword Peruvian, popcorn
Cook Time 10 minutes
Total Time 10 minutes
Servings 6 servings
Calories 163kcal
Author Mike

Ingredients

Instructions

  • Add the corn and oil to your popcorn popper and let pop until completely done.
  • Remove and immediately add salt. Do not be shy with the salt.
  • Let cool slightly before serving. The kernels will be very hot directly out of the popper.

Notes

This popcorn is best eaten right after you make it (after letting it cool slightly).

Nutrition

Calories: 163kcal | Carbohydrates: 20g | Protein: 3g | Fat: 8g | Saturated Fat: 6g | Sodium: 2mg | Potassium: 75mg | Fiber: 3g | Sugar: 1g | Calcium: 1mg | Iron: 1mg

Nutritional values are approximate.

Mini Classic Cheesecakes on the Char-Broil Big Easy

Note: This recipe was developed using the Char-Broil Big Easy Oil-Less Fryer. If you are cooking using the Char-Broil Smoker-Roaster Grill you should cook with the lid open and the temperature set to High. You might also need to adjust the cooking time.

I made mini pumpkin cheesecakes for Thanksgiving. They were a big hit. That got me jonesin’ for a more traditional cheesecake. So, that’s what I made! I love making mini classic cheesecakes on my Char-Broil Big Easy. It can’t get much easier.

Mini Classic Cheesecakes on the Char-Broil Big Easy

Don’t Overcook Them

The Big Easy does cook at a high temperature, so you do have to make sure you don’t overcook the cheesecakes, but it’s still easy. You’ll be rewarded with smooth creamy cheesecake with that light vanilla flavor. Perfect. And all in a single-serve size, so you’re not quite as tempted (maybe) to have more than one.

I am not a baker. Not even close. However, I found these mini classic cheesecakes on the Char-Broil Big Easy to be very easy to make. I did learn a few things along the way. You really need to make sure you don’t overcook them. Furthermore, do not let them go over 150 F. And, they may crack a bit no matter how hard you try. That’s ok, the cracks add character.

It’s always a good idea to keep a few spare grease trays on hand for your Char-Broil Big Easy.

Love your Big Easy as much I love mine? Check out my Big Easy Add-Ons page and my free Big Easy eCookbook!

Mini Classic Cheesecakes on the Char-Broil Big Easy
Print Pin
5 from 1 vote

Mini Classic Cheesecakes on the Char-Broil Big Easy

The Big Easy does cook at a high temperature, so you do have to make sure you don’t overcook the cheesecakes, but it’s still easy. You’ll be rewarded with smooth creamy cheesecake with that light vanilla flavor.
Course Dessert
Cuisine American
Keyword Big Easy, Char-Broil, cheesecake
Prep Time 15 minutes
Cook Time 45 minutes
Total Time 1 hour
Servings 18 pies
Calories 394kcal
Author Mike

Ingredients

Instructions

  • Place the cream cheese, sugar, and vanilla into a mixer and beat until blended.
  • With the mixer still running on low speed, add the eggs one-at-a-time until blended.
  • Divide mixture between the crusts. Depending on how full you fill them you might not need all 18 crusts.
  • Fire up your Big Easy.
  • Working in batches, add pies to the basket and bunk bed basket and lower into the Big Easy.
  • Cook for 10-15 minutes or until internal temperature reaches 145-150 F. Use an instant-read thermometer to test the temperature. Do not overcook. The cheesecakes will continue cooking just a bit after being removed from the Big Easy.
  • Remove and let cool.

Notes

You’ll need the Char-Broil Big Easy Bunk Bed basket to double the number of cheesecakes that you can cook at once.

Nutrition

Calories: 394kcal | Carbohydrates: 47g | Protein: 6g | Fat: 20g | Saturated Fat: 6g | Trans Fat: 1g | Cholesterol: 37mg | Sodium: 315mg | Potassium: 85mg | Fiber: 2g | Sugar: 11g | Vitamin A: 57IU | Calcium: 20mg | Iron: 2mg

Nutritional values are approximate.

Slow Cooker Tortellini Soup

I thought this slow cooker tortellini soup was absolutely fantastic. The sauce was perfect. Nice and tomato-y. But the big hit for me was the tortellini. It absorbed some of the great sauce and became great little scrumptious bites. I used fresh tortellini, but frozen would work just as well. So would ravioli.

Slow Cooker Tortellini Soup

It’ll Warm You To The Bone

Sprinkled with a bit of freshly grated Parmesan, this slow cooker tortellini soup was the ideal dish on a cool day.

Fennel can be a little too strong (that licorice flavor can drown out everything!), so use as much or as little as you like. Or not. And don’t be afraid to add a few splashes of hot sauce or a good amount of dried red pepper flake for some kick.

Also try my slow cooker spicy kielbasa cabbage soup. Perfect on a cool day.

Slow Cooker Tortellini Soup
Print Pin
5 from 1 vote

Slow Cooker Tortellini Soup

I thought this slow cooker tortellini soup was absolutely fantastic. The sauce was perfect. Nice and tomato-y
Course Main
Cuisine American
Keyword crockpot, slow cooker, soup, tortellini
30 minutes
Total Time 7 hours
Servings 6
Calories 448kcal

Ingredients

Instructions

  • Brown the ground beef in a large skillet over medium heat, breaking it up as it cooks.
  • Add the onion and garlic and cook another 2 minutes.
  • Add the crushed tomatoes, diced tomatoes, tomato paste and tomato soup to your slow cooker.
  • Stir in the sugar and all of the seasonings.
  • Add the beef mixture and beef broth. Stir.
  • Cover the slow cooker and cook on high for 3-4 hours or on low for 5-7 hours.
  • Twenty minutes before serving, add the frozen tortellini to the slow cooker. If you were cooking on low, set it to 'high'.
  • Cook another 20 minutes.
  • Serve garnished with parsley, Parmesan and ricotta cheese.

Notes

Serve with a slice of hot garlic bread.

Nutrition

Calories: 448kcal | Carbohydrates: 36g | Protein: 26g | Fat: 22g | Saturated Fat: 8g | Trans Fat: 1g | Cholesterol: 82mg | Sodium: 1412mg | Potassium: 326mg | Fiber: 4g | Sugar: 3g | Vitamin A: 237IU | Vitamin C: 5mg | Calcium: 150mg | Iron: 4mg

Nutritional values are approximate.

No Bake Red Velvet Cheesecake

I cannot bake. I’m okay admitting it, too. So when my wife said the other day that she was jonesin’ for a red velvet cupcake, I came up with the next-best-thing: no bake red velvet cheesecake. I opted to make the cheesecake in miniature pre-baked (like I said, I don’t bake, and that includes baking pie crusts!). I like the little crusts because they have built-in portion control. You put a big ole cheesecake in front of me and I might have trouble keeping myself under control. Put a mini cheesecake in front of me and I can manage.

No Bake Red Velvet Cheesecake

So Easy. So Yummy.

You can’t get much easier than this no bake red velvet cheesecake. Just mix a few ingredients together and into the pre-made pie crusts it goes! Great vanilla and cocoa flavor with a perfect creamy texture. Very, very addicting little bites, that’s for sure.

Also try my black forest cheesecake.

No Bake Red Velvet Cheesecake
Print Pin
5 from 1 vote

No Bake Red Velvet Cheesecake

You put a big ole cheesecake in front of me and I might have trouble keeping myself under control. Put a mini cheesecake in front of me and I can manage.
Course Dessert
Cuisine American
Keyword cheesecake
Prep Time 15 minutes
Cook Time 4 hours
Total Time 4 hours 15 minutes
Servings 8
Calories 268kcal

Equipment

Ingredients

Instructions

  • Place the cream cheese into a mixer bowl and beat until smooth.
  • Add the sour cream, sugar, food coloring, cocoa powder and vanilla extract.
  • Beat until smooth.
  • Gently fold in the whipped topping. Do not over mix.
  • Pour, spoon or pipe the filling into the crust(s).
  • Refrigerate for 4 hours before serving.
  • Top with additional whipped cream if desired.

Notes

Store pies in the fridge until ready to use.

Nutrition

Calories: 268kcal | Carbohydrates: 21g | Protein: 3g | Fat: 19g | Saturated Fat: 12g | Cholesterol: 47mg | Sodium: 135mg | Potassium: 114mg | Fiber: 1g | Sugar: 21g | Vitamin A: 581IU | Vitamin C: 1mg | Calcium: 80mg | Iron: 1mg

Nutritional values are approximate.

Cedar-Planked Hot Dogs

Oh my goodness. I was just about as happy as a kid on Christmas morning as I cooked these cedar-planked hot dogs. I knew I was going to enjoy a truly tasty fantastic dog, topped with onion and crispy bacon that also had just a hint of cedar to them. The dogs cooked up super plump and moist. No overpowering sense of cedar. Just enough, there in the background. Perfect. After the onion and bacon got some cedar ‘happiness’ they went into a cast iron skillet on the grill to get cooked up the rest of the way.

Cedar-Planked Hot Dogs

The Hot Dogs Of Dreams

Just thinking about these great cedar-planked hot dogs has my stomach growling. What great tastes in each and every bite. One of my favorites of all time, that’s for sure.

Cooking on cedar planks (I use my Weber grills!) can really change the ordinary into something special, which is why I do it often. Check out my other cedar plank recipes: creamy mashed potatoes, Cajun mashed potatoes, Twinkies, beef sliders, chorizo portabellos, sausage sandwiches, shrimp and grits and spicy grilled shrimp.

Cedar-Planked Hot Dogs
Print Pin
5 from 1 vote

Cedar-Planked Hot Dogs

Oh my goodness. I was just about as happy as a kid on Christmas morning as I cooked these cedar-planked hot dogs.
Course Main
Cuisine American
Keyword cedar plank, hot dogs
Prep Time 30 minutes
Cook Time 45 minutes
Total Time 1 hour 15 minutes
Servings 2 servings
Calories 348kcal
Author Mike

Ingredients

  • 2 hot dogs
  • ½ medium sweet onion sliced
  • 2 pieces bacon chopped into 1/4″ pieces
  • 2 hot dog buns
  • Your favorite hot dog toppings

Instructions

  • Soak the cedar plank in water for 30 minutes.
  • Fire up your grill for direct and indirect cooking.
  • Place the plank rough-side down over high direct heat. Let the plank get nice and hot, smoke and even get a bit charred. Move to indirect heat.
  • Add the hot dogs, onions, and bacon to the plank. Close the grill and let the ingredients cook for 15 minutes. Make sure you have the heat high enough to make the plank smoke but don’t let it catch on fire. I keep a spray bottle full of water nearby just in case…
  • Remove the hot dogs to a plate.
  • Transfer the onions and bacon to a skillet on the stovetop over medium-high heat or use a small cast iron skillet on your grill since it’s already nice and hot.
  • Cook the onions and bacon until the bacon is crisped and the onions are done.
  • Meanwhile toast the buns as desired.
  • Serve dogs on buns topped with the bacon and onions and your favorite condiments.

Notes

I like to make a small shallow cut down the lengths of my hot dogs before cooking. They open up to hold toppings and also absorb more cedar flavor.

Nutrition

Calories: 348kcal | Carbohydrates: 36g | Protein: 12g | Fat: 17g | Saturated Fat: 6g | Trans Fat: 1g | Cholesterol: 35mg | Sodium: 673mg | Potassium: 262mg | Fiber: 2g | Sugar: 7g | Vitamin A: 9IU | Vitamin C: 5mg | Calcium: 102mg | Iron: 3mg

Nutritional values are approximate.

Slow Cooker Pizza Casserole

All the flavors of pizza in a casserole, made in a slow cooker. There’s plenty of cheese and pepperoni so you can overlook the lack of a crunchy crust. The perfect one-pot meal on a rainy, cool late winter evening. You can make it more ‘your way’ by adding Canadian bacon, mushrooms, different cheeses… whatever you prefer.

Slow Cooker Pizza Casserole

Beware Sad Pasta

Be careful to not overcook the pasta. Pasta is not the most slow cooker-friendly item in the world. If you over cook the pasta it will become mushy. Not happy mushy either. So error on the side of caution and serve this slow cooker pizza casserole as soon as the pasta is cooked. It’s sorta like my pizza pasta bake, but with a twist.

Also check out my slow cooker ravioli lasagna. It has all the flavors of lasagna in a simple slow cooker dish.

Slow Cooker Pizza Casserole
Print Pin
4 from 1 vote

Slow Cooker Pizza Casserole

All the flavors of pizza in a casserole, made in a slow cooker. There’s plenty of cheese and pepperoni so you can overlook the lack of a crunchy crust. 
Course Main
Cuisine American
Keyword casserole, crockpot, pizza, slow cooker
Prep Time 15 minutes
Cook Time 5 hours 30 minutes
Total Time 5 hours 45 minutes
Servings 8
Calories 376kcal

Ingredients

  • 1 pound Italian sausage
  • ½ medium sweet onion chopped
  • 2 cloves garlic minced
  • 1 28 ounce crushed tomatoes
  • 1 cup water
  • 4 ounces pepperoni sliced, divided
  • 1 small green bell pepper. chopped
  • 2 teaspoon dried oregano
  • 2 teaspoon Kosher salt
  • 1 teaspoon ground black pepper
  • 2 cups Mozzarella cheese shredded, divided (plus more for garnish if desired)
  • 2 cups farfalle or your favorite pasta
  • parsley chopped, for garnish
  • Parmesan freshly grated, for garnish

Instructions

  • Heat a large skillet over medium-high heat.
  • Crumble in the sausage and cook until almost done.
  • Add the onion and cook until the meat is completely done.
  • Add the garlic and cook for one more minute.
  • Transfer meat to a slow cooker set to low.
  • Stir in the tomatoes, water, all but 12 slices of the pepperoni, the oregano, salt, pepper, and 1 cup of the cheese. Mix well.
  • Add the pasta and stir.
  • Top with the remaining pepperoni and cheese and cover.
  • Cook for 5 hours and serve garnished with parsley, Parmesan and more mozzarella cheese.

Notes

You can also add mushrooms in when cooking the onions.

Nutrition

Calories: 376kcal | Carbohydrates: 7g | Protein: 19g | Fat: 30g | Saturated Fat: 12g | Trans Fat: 1g | Cholesterol: 80mg | Sodium: 1746mg | Potassium: 461mg | Fiber: 2g | Sugar: 4g | Vitamin A: 499IU | Vitamin C: 14mg | Calcium: 179mg | Iron: 2mg

Nutritional values are approximate.

Slow Cooker Ravioli Lasagna

As much as I prefer cooking outdoors, I still love cooking dishes inside in a slow cooker, specially on days when the weather is a bit questionable. Preparation is almost always simple, even though the final results can be quite fantastic. I went into making this slow cooker ravioli lasagna thinking it’d be ‘ok’. I came out thinking ‘wow, that was excellent’.

Slow Cooker Ravioli Lasagna

The Easiest Lasagna Recipe Ever

All the flavors of a great lasagna, but done so easily with very little effort. The sauce was nice and tasty, the ravioli cooked up perfectly, and of course, there was ooey-gooey cheese.

You can substitute frozen raviolis if you like. Nothing beats the taste of fresh ravioli in this slow cooker ravioli lasagna. Even though this is a quick not-much-from-scratch dish, there’s no reason to not add some fresh ingredients. Fresh ravioli can be found in a tiny fridge in the pasta aisle in our local grocery store.

It’s possible that I added a few pinches of red pepper flake to this lasagna because, well, I like a little kick in everything I make. I left it out of the recipe below.

Also try my slow cooker spaghetti and meatballs and also my slow cooker pizza casserole. They’re yummy too!

Slow Cooker Ravioli Lasagna
Print Pin
5 from 1 vote

Slow Cooker Ravioli Lasagna

All the flavors of a great lasagna, but done so easily with very little effort. The sauce was nice and tasty, the ravioli cooked up perfectly, and of course, there was ooey-gooey cheese.
Course Main
Cuisine American
Keyword crockpot, lasagna, ravioli, slow cooker
Prep Time 15 minutes
Cook Time 5 hours 15 minutes
Total Time 5 hours 30 minutes
Servings 8
Calories 285kcal

Ingredients

Instructions

  • Heat a large skillet over medium-high heat.
  • Crumble in the sausage and cook until almost done.
  • Add the garlic, garlic powder, salt and pepper and cook another minute.
  • Add in the pasta sauce, Italian seasoning, basil and oregano.
  • Add a layer of the meat mixture to a slow cooker.
  • Top with some of the ravioli.
  • Add another layer of meat followed by more ravioli. Continue until all of the meat and ravioli are used.
  • Cook for 4 hours on low.
  • Top with cheese and cook 1 more hour until the cheese is melted.

Notes

You can use frozen ravioli. Just cook first package instructions and drain well.

Nutrition

Calories: 285kcal | Carbohydrates: 2g | Protein: 15g | Fat: 24g | Saturated Fat: 10g | Cholesterol: 65mg | Sodium: 884mg | Potassium: 184mg | Fiber: 1g | Sugar: 1g | Vitamin A: 201IU | Vitamin C: 1mg | Calcium: 165mg | Iron: 1mg

Nutritional values are approximate.

Mexican Bean Dip on the Char-Broil Big Easy

Note: This recipe was developed using the Char-Broil Big Easy Oil-Less Fryer. If you are cooking using the Char-Broil Smoker-Roaster Grill you should cook with the lid open and the temperature set to High. You might also need to adjust the cooking time.

I love a spicy bean dip. Served up with a big ole bowl of warmed tortilla chips. Melted cheese, refried beans, spicy sausage, and lots of heat. I made this Mexican bean dip on the Char-Broil Big Easy in no time at all. You can make it in your oven too, just as easily. But making it outdoors is so much more fun!

This dip is not shy on heat. You can tone it back by using regular chorizo instead of hot (or substitute ground beef or sausage) and skipping the jalapenos.

Mexican Bean Dip on the Char-Broil Big Easy

Easy Clean-Up

Disposable mini meatloaf pans are great for cooking up dishes like this Mexican Bean Dip on the Char-Broil Big Easy. You can fit 4 of them on the cooker at once if you use the Big Easy Bunk Bed basket. That’s enough to feed a small crowd for sure.

It’s always a good idea to keep a few spare grease trays on hand for your Char-Broil Big Easy.

Love your Big Easy as much I love mine? Check out my Big Easy Add-Ons page and my free Big Easy eCookbook!

Mexican Bean Dip on the Char-Broil Big Easy
Print Pin
5 from 1 vote

Mexican Bean Dip on the Char-Broil Big Easy

I made this Mexican bean dip in no time at all. You can make it in your oven too, just as easily.
Course Appetizer
Cuisine American
Keyword Big Easy, Char-Broil, dip
Prep Time 10 minutes
Cook Time 30 minutes
Total Time 40 minutes
Servings 12
Calories 122kcal
Author Mike

Ingredients

Instructions

  • Crumble the sausage into a large skillet over medium-high heat.
  • Cook until almost done.
  • Add the onion and garlic and continue cooking until the meat is done.
  • Stir in the beans, cumin and oregano.
  • Remove from heat.
  • Fire up your Big Easy (or preheat your oven to 350 F if cooking in the oven).
  • Divide the meat mixture between the pans.
  • Divide the hot jalapenos and taco sauce between the pans.
  • Place into the Big Easy or oven and cook for 10 minutes.
  • Add cheese to the tops of the dips and cook for another 10-15 minutes or until hot and bubbly.
  • Top with olives and green onion and serve with warm tortilla chips.

Notes

If cooking in the oven use a 9″ x 9″ baking dish instead of the aluminum pans.

Nutrition

Calories: 122kcal | Carbohydrates: 1g | Protein: 8g | Fat: 9g | Saturated Fat: 6g | Cholesterol: 42mg | Sodium: 808mg | Potassium: 40mg | Fiber: 1g | Sugar: 1g | Vitamin A: 366IU | Vitamin C: 15mg | Calcium: 107mg | Iron: 1mg

Nutritional values are approximate.