Peach BBQ Sauce

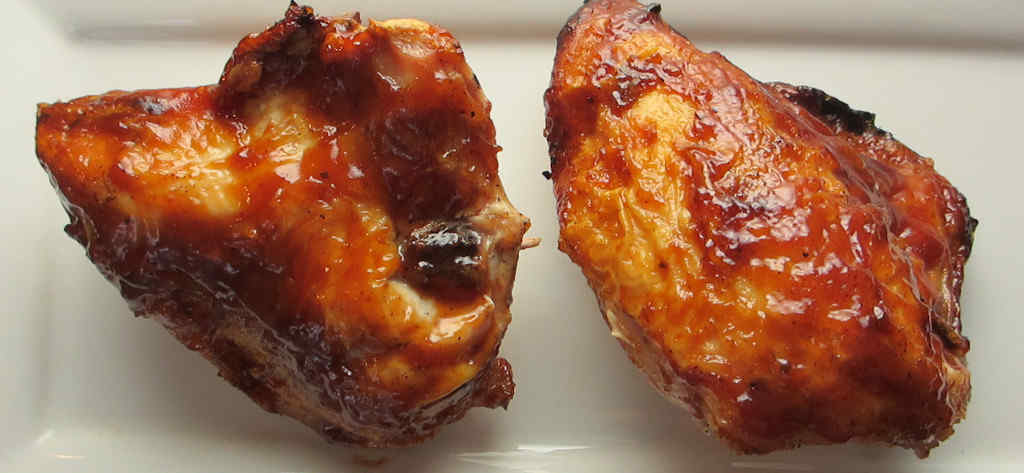
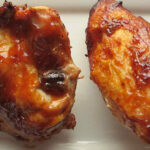
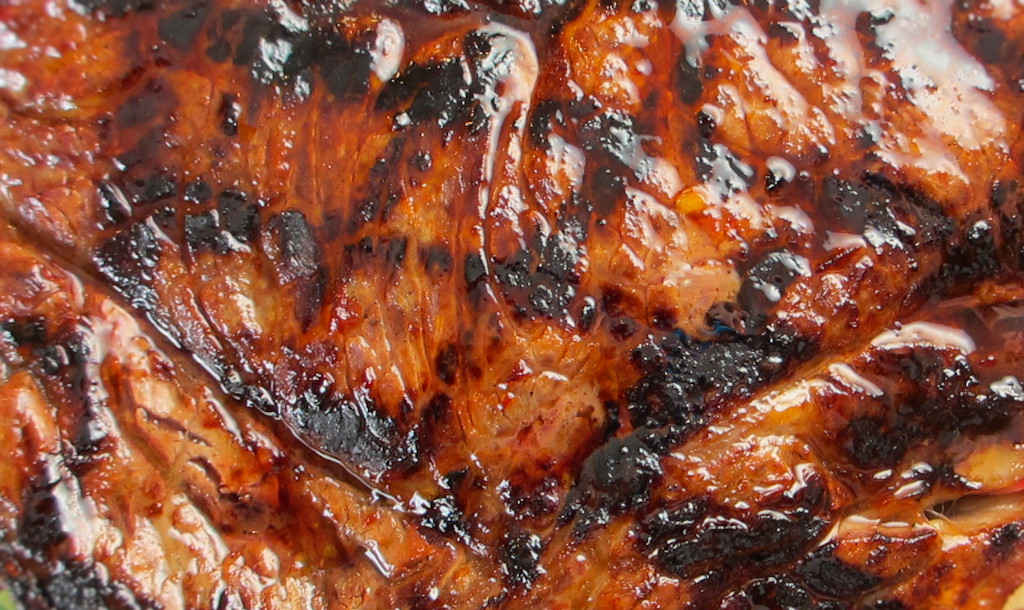
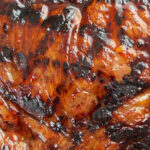
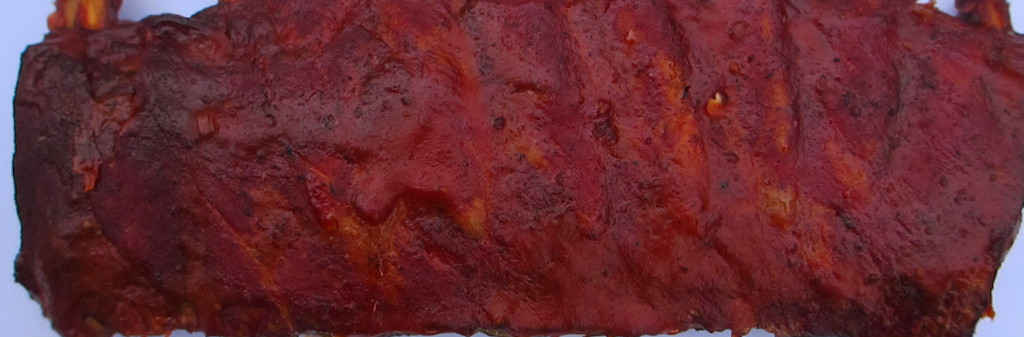
I was wandering around the produce section at the grocery store when I came across a really nice basket of fresh-picked ripe peaches. I knew exactly what I was going to make with them. Peach BBQ sauce, the perfect sauce for a rack of St. Louis-style smoked ribs. Although I’d be partial to using this tasty sauce on anything, it really complements anything pork the best. Pulled pork of course would be another great way to use this delicious sauce.

Peach BBQ Sauce

Just The Right Amount Of Peachiness

This sauce isn’t too ‘peachy’. You can taste the fresh peaches, sure, but they don’t over-power the sauce. The peaches add a nice sweetness too. For me, this is the ideal fruit-based sauce. You really don’t want it to be too over-powering, but you want to taste that fruity flavor no matter what fruit you are using. It’s still a barbecue sauce in the end and not a peach sauce!

I like to store my sauces in squeeze bottles. Then I can squirt it onto whatever I’m serving. I admit, the kid comes out of me and I get a little crazy with it. Patterns, designs, you name it. I get ‘artsy’ with it.

For a smokier sauce, check out my deluxe peach BBQ sauce.

Peach BBQ Sauce
Print Pin
5 from 1 vote

Peach BBQ Sauce

Peach BBQ sauce, the perfect sauce for a rack of St. Louis-style smoked ribs. Although I’d be partial to using this tasty sauce on anything, it really complements anything pork the best.
Course Sauce
Cuisine American
Keyword barbecue, BBQ, peach, sauce
Prep Time 15 minutes
Cook Time 45 minutes
Total Time 1 hour
Servings 4 cups
Calories 281kcal
Author Mike

Ingredients

For the sauce

For the peach nectar (may make more than you need for the sauce)

  • 4-6 peaches ripe (you need to end up with about 2 cups of sliced peaches in the end)
  • Water

Instructions

For the peach nectar

  • Bring a pot with enough water in it to cover the peaches to a boil.
  • Add the peaches and boil just 2-3 minutes until the skin is softened.
  • Remove peaches and place in an ice bath to cool.
  • Peel the peaches. Remove the pit and slice.
  • Place 2 cups of peaches along with 1 cup of water into a blender or food processor.
  • Liquefy until smooth.
  • Store any unused nectar in the fridge.

For the sauce

  • Melt the butter in a large saucepan.
  • Add garlic and shallot and saute for 3 minutes.
  • Add salt, pepper and rub. Stir.
  • Stir in the ketchup, peach nectar, vinegar, mustard, Worcestershire sauce and lemon juice.
  • Bring to a boil then reduce heat to a simmer and let simmer until thick, about 30 minutes.

Notes

Shake or stir the sauce before using. Store leftover sauce in the fridge.

Nutrition

Calories: 281kcal | Carbohydrates: 67g | Protein: 4g | Fat: 1g | Saturated Fat: 1g | Cholesterol: 1mg | Sodium: 1187mg | Potassium: 808mg | Fiber: 4g | Sugar: 57g | Vitamin A: 1441IU | Vitamin C: 30mg | Calcium: 55mg | Iron: 2mg

Nutritional values are approximate.

Bell Pepper Powder on the Nesco Snackmaster Pro

Although I truly do love making jerky on my dehydrator, it’s actually not the main reason I bought it. I got it to dry herbs and vegetables to make my own spice mixes. This bell pepper powder made on my Nesco Snackmaster Pro dehydrator was my first attempt, and boy, is it ever amazing.

Bell Pepper Powder on the Nesco Snackmaster Pro

Great Pepper Flavor

I cannot wait to use this bell pepper powder on the Nesco Snackmaster Pro in everything from omelets to chili. It has a great peppery sweetness to it. You could easily substitute it for black pepper in a lot of cases.

Grind Until Perfect

After drying the chopped peppers for 24 hours I ground them using a blade coffee grinder (not the burr grinder). Not all of the peppers would go thru the grinder (they were still a bit moist) so I returned them to the dehydrator for just a bit.

Storing Your Pepper Powder

The final product went into Mason jars with lids and then vacuum-sealed using a jar attachment for a vacuum sealer. You just have to remember that after you open the jar to remove some of the powder you’ll need to re-seal it. No big deal and well worth the effort.

Also try making poblano pepper powder and onion powder on your Nesco Snackmaster Pro. They’re as easy as easy gets!

Bell Pepper Powder on the Nesco Snackmaster Pro
Print Pin
5 from 1 vote

Bell Pepper Powder on the Nesco Snackmaster Pro

This bell pepper powder was my first attempt, and boy, is it ever amazing.
Course Seasoning
Cuisine American
Keyword bell pepper, dehydrator, nesco snackmaster pro
Prep Time 15 minutes
Cook Time 1 day
Total Time 1 day 15 minutes
Servings 1 cup
Calories 148kcal

Ingredients

  • 4 bell peppers I was able to fit approximately 2 peppers per Nesco Snackmaster Pro tray

Instructions

  • Set your dehydrator to 135 F.
  • Rinse the peppers. Remove the stems and seeds and cut into chunks. If you are not using screen trays you’ll want to cut fairly large pieces so they do not fall between the trays.
  • Dehydrate for 18-24 hours. Rotate the trays every 2 hours if possible.
  • Once all the peppers are dry and a bit crisp remove and let cool.
  • Process the peppers in the grinder until they form a fine powder. If some pieces of pepper do not grind return them to the dehydrator for another hour or so until crisp.
  • Keep the powder in an airtight container. I place mine in a Mason jar, cover it, then use a vacuum-sealer attachment specifically for jars to remove all of the air.

Notes

You’ll need the following. A dehydrator with screen trays (I use a Nesco Snackmaster Pro), a blade coffee grinder (not a burr grinder) air-right containers or vacuum-sealed jars (I use a canning jar attachment on my vacuum sealer) additional trays, if required (my Nesco Snackmaster Pro came with 5, I purchased more so I can have 8 or more trays going at once).

Nutrition

Calories: 148kcal | Carbohydrates: 29g | Protein: 5g | Fat: 1g | Saturated Fat: 1g | Sodium: 19mg | Potassium: 1004mg | Fiber: 10g | Sugar: 20g | Vitamin A: 14904IU | Vitamin C: 608mg | Calcium: 33mg | Iron: 2mg

Nutritional values are approximate.

Wiz Hot Dogs

I have a habit of copying recipes from restaurants or food trucks I hear about or see on TV. Here lately I’ve been on a major campaign to copy some of the crazy great dogs from Duke’s Gourmet Dogs in Minster, Ohio, which closed recently. Sadly. Warm chili. Crunchy potato straws (an ingredient I haven’t had in years). And my favorite, ooey gooey cheese sauce. Lots and lots of cheese sauce. Wiz hot dogs are crazy good.

Like I’ve said before, if it’s going to be messy to eat, it’s going to taste great and Wiz dogs are definitely messy and therefore, great to eat!

Wiz Hot Dogs

Crazy Good. And Kinda Fun.

I was tempted to add a few chopped jalapenos to these Wiz hot dogs. I like some kick to my dogs but I went another route and used spicy cheese sauce instead. Nothing beats cheese on a hot dog. Except for maybe macaroni-and-cheese. Yes, on a hot dog.

Try my Charlie Mac dog too.

Wiz Dogs
Print Pin
5 from 1 vote

Wiz Hot Dogs

Like I’ve said before, if it’s going to be messy to eat, it’s going to taste great and Wiz dogs are definitely messy and great!
Course Main
Cuisine American
Keyword hot dogs
Prep Time 5 minutes
Cook Time 15 minutes
Total Time 20 minutes
Servings 4
Calories 360kcal
Author Based on a menu item from Duke’s Gourmet Hot Dogs

Ingredients

Instructions

  • Fire up your grill and cook the dogs and warm the buns.
  • Assemble hot dogs by adding wieners to the buns. Top with plenty of chili, potato straws and plenty of cheese sauce.
  • Top with jalapeno slices, if desired.
  • Serve with plenty of paper towels.

Notes

Cut a long narrow slit in your dogs before cooking to give the toppings a great place to go!

Nutrition

Calories: 360kcal | Carbohydrates: 37g | Protein: 12g | Fat: 19g | Saturated Fat: 5g | Cholesterol: 26mg | Sodium: 1009mg | Potassium: 240mg | Fiber: 1g | Sugar: 7g | Vitamin A: 674IU | Vitamin C: 54mg | Calcium: 132mg | Iron: 3mg

Nutritional values are approximate.

Smoked Scotch Eggs

Smoked Scotch eggs have been on my bucket list for a while. I finally had a little room on my Weber smoker so I jumped at the opportunity. As easy as they are to make, Scotch eggs are really amazing. It’s like breakfast in a bite. Perfectly hard-boiled eggs, smoked breakfast sausage, and a bit of BBQ sauce for dipping. They look great and they taste great. Awesome appetizers for your next cookout.

Smoked Scotch Eggs

Want Some Heat? You Got It.

If you want a bit of kick to your smoked Scotch eggs add a bit of cayenne pepper or your favorite spicy rub to the bread crumbs. Not a lot, just enough to bring a little spiciness.

I prefer to use fruit or nut woods when I smoke unless I want a heavier smoke flavor. Pecan, apple or cherry are my favorites. I smoked these eggs using apple wood chunks.

Also try my Dragon eggs and ‘normal’ smoked eggs. My pig shots are great too!

Smoked Scotch Eggs
Print Pin
5 from 1 vote

Smoked Scotch Eggs

Smoked Scotch eggs have been on my bucket list for a while. I finally had a little room on my smoker so I jumped at the opportunity. As easy as they are to make, Scotch eggs are really amazing. 
Course Appetizer
Cuisine American
Keyword eggs, sausage, smoked
Prep Time 15 minutes
Cook Time 2 hours 45 minutes
Total Time 3 hours
Servings 12 eggs
Calories 451kcal
Author Mike

Ingredients

Instructions

  • Fire up your smoker for cooking at 225 F.
  • Hard-boil 12 of the eggs and remove the shells.
  • Combine the sausage and minced onion. Season with salt and pepper. Divide the mixture into 12 equally-sized balls and flatten.
  • Place an egg in the middle of each flattened sausage patty and wrap the meat around the egg. The egg should be completely covered by the sausage.
  • Place the flour in a shallow bowl.
  • Beat the remaining 2 eggs in another shallow bowl.
  • Place breadcrumbs into another shallow bowl.
  • Roll sausage-covered eggs in the flour. Shake off excess.
  • Roll sausage-covered eggs in the egg. Shake off excess.
  • Roll sausage-covered eggs in the breadcrumbs. Shake off excess.
  • Smoke for 2 1/2 hours
  • Slice eggs lengthwise and serve with warmed BBQ sauce for dunking.

Notes

Best when served immediately.

Nutrition

Calories: 451kcal | Carbohydrates: 28g | Protein: 23g | Fat: 26g | Saturated Fat: 9g | Trans Fat: 1g | Cholesterol: 245mg | Sodium: 752mg | Potassium: 336mg | Fiber: 2g | Sugar: 2g | Vitamin A: 334IU | Vitamin C: 1mg | Calcium: 89mg | Iron: 4mg

Nutritional values are approximate.

Old School BBQ Chicken on the Char-Broil Big Easy

Note: This recipe was developed using the Char-Broil Big Easy Oil-Less Fryer. If you are cooking using the Char-Broil Smoker-Roaster Grill you should cook with the lid open and the temperature set to High. You might also need to adjust the cooking time.

I’ve been wanting to make this old school BBQ chicken on the Char-Broil Big Easy for some time now. I flashed back to the mid-1970s, to my earliest memory of a cookout, and chicken. Chicken legs, then. Grilled and sauced with off-the-shelf Kraft BBQ sauce. That’s it. Done. Well, this is my take on the classic I remember from 40 years ago. I used split chicken breasts because that’s what we prefer, but any cut of chicken would work just fine. Just chicken and BBQ sauce. Summer.

Old School BBQ Chicken on the Char-Broil Big Easy

Not Fancy. Just Delicious.

I didn’t do anything fancy to this old school BBQ chicken on the Char-Broil Big Easy. A little oil, salt and pepper and that’s it. No brine, no fru-fru spices. Just simple flavors. With your Big Easy (and specially if you add a Bunk Bed basket) you can cook up a big batch of chicken ahead of time for a picnic or family get-together.

It’s always a good idea to keep a few spare grease trays on hand for your Char-Broil Big Easy.

Love your Big Easy as much I love mine? Check out my Big Easy Add-Ons page and my free Big Easy eCookbook!

Old School BBQ Chicken on the Char-Broil Big Easy
Print Pin
5 from 1 vote

Old School BBQ Chicken on the Char-Broil Big Easy

I’ve been wanting to make this old school BBQ chicken on my Char-Broil Big Easy for some time now. I flashed back to the mid-1970s, to my earliest memory of a cookout, and chicken.
Course Main
Cuisine American
Keyword BBQ, Big Easy, Char-Broil, chicken
Prep Time 5 minutes
Cook Time 45 minutes
Total Time 50 minutes
Servings 5
Calories 199kcal
Author Mike

Ingredients

Instructions

  • Fire up your Big Easy.
  • Very lightly oil the chicken. Just a splash and rub it around the chicken.
  • Salt and pepper the chicken and place in the Big Easy basket.
  • Place the basket into the Big Easy and cook until done. For my split breasts cook time was about 30 minutes.
  • Brush the chicken with the BBQ sauce and return to the Big Easy for a few minutes to ‘set’ the sauce.
  • Remove and rest for 5 minutes before devouring.

Notes

You can use this recipe for your favorite chicken cuts or even a whole chicken.

Nutrition

Calories: 199kcal | Protein: 17g | Fat: 14g | Saturated Fat: 4g | Trans Fat: 1g | Cholesterol: 69mg | Sodium: 65mg | Potassium: 175mg | Vitamin A: 129IU | Vitamin C: 1mg | Calcium: 10mg | Iron: 1mg

Nutritional values are approximate.

Asian Steak Marinade

Our local grocery store had cheap steak on sale even cheaper, so I picked up one for lunch. Working from home has its advantages, and one is being able to toss a steak onto the charcoal grill during the day. As much as I love just good ole salt and pepper on a steak, sometimes I want something a little different. I had Asian-inspired flavors on the brain, so well, you can probably guess what happened next. An Asian steak marinade combining salty soy with a little sweetness and a little heat. Each and every bite was packed with tons of flavor. I enjoyed my cheap steak big time!

Asian Steak Marinade

Great Flavor In Every Bite

I loved the combination of heat and sweet in the Asian steak marinade. I would not be afraid to add more chili paste, though. That’s just me. I like a bit of spicy in all of my dishes.

Sear ‘Em First

You do want to be careful cooking the steaks over high heat. Too long and they’ll char. Sear them quickly and then move them to indirect heat to let them finish cooking.

Also try my molasses chili steak marinade.

Asian Steak Marinade
Print Pin
5 from 1 vote

Asian Steak Marinade

I had Asian flavors on the brain, so well, you can guess what happened next. An Asian steak marinade combining salty soy with a little sweetness and a little heat.
Course Marinade
Cuisine American
Keyword Asian, marinade, steak
Prep Time 30 minutes
Cook Time 15 minutes
Total Time 45 minutes
Servings 2 servings
Calories 92kcal

Ingredients

Instructions

  • Place the steak into a resealable bag or container.
  • In a small bowl whisk together the remaining ingredients.
  • Pour over the steak and flip to coat both sides.
  • Cover and refrigerate for 30 minutes.
  • Fire up your grill for direct and indirect cooking.
  • Discard marinade.
  • Sear the steak on both sides, quickly. The honey in the marinade can tend to caramelize over high heat, so you don’t want to leave it there for long.
  • Transfer to indirect heat and continue cooking until done.

Notes

This marinade is also great on chicken and pork.

Nutrition

Calories: 92kcal | Carbohydrates: 21g | Protein: 4g | Fat: 1g | Saturated Fat: 1g | Cholesterol: 1mg | Sodium: 1623mg | Potassium: 105mg | Fiber: 1g | Sugar: 18g | Vitamin A: 16IU | Vitamin C: 1mg | Calcium: 9mg | Iron: 1mg

Nutritional values are approximate.

Mexican Charred Corn Hot Dog

Wow, I just had no idea how much we would both love this Mexican charred corn hot dog. It has such a wonderful combination of tastes, from the bite of the onion, to that great sweetness you get from roasted corn, fantastic citrus lime mayonnaise, all served over a grilled all-beef hot dog. Topped with crumbled Cotija cheese! These dogs were an absolute treat!

Mexican Charred Corn Hot Dog

Different. And Delicious.

Mexican charred corn hot dogs are light and refreshing, the perfect dogs for a sunny day. If fresh corn-on-the-cob is no longer available in your area, you can use canned or frozen corn kernels. Drain them first and pat dry so that they roast well. Pour the kernels out onto a baking sheet and place under the broiler just long enough for them to start to char. It won’t take long, so don’t walk away and ignore them. Give them a stir or two as they roast to make sure they are charred evenly.

I almost always use Blue Plate mayonnaise in the dishes I make. I think it is the best around. If you can’t find it locally you can pick it up online for a fair price.

You’ll want to also try my loaded Mexican hot dogs.

Mexican Charred Corn Hot Dog
Print Pin
4 from 1 vote

Mexican Charred Corn Hot Dog

Wow, I just had no idea how much we would both love this Mexican charred corn hot dog. It has such a wonderful combination of tastes.
Course Main
Cuisine American
Keyword hot dogs, Mexican
Prep Time 5 minutes
Cook Time 30 minutes
Total Time 35 minutes
Servings 4 servings
Calories 298kcal

Equipment

Ingredients

Instructions

  • Fire up your grill.
  • Brush the corn with the oil and place over direct heat.
  • Cook until charred on all sides, about 20 minutes.
  • Remove from heat and let cool slightly.
  • Meanwhile, cook the dogs and toast the buns as desired.
  • Cut the kernels from the corn.
  • Place in a bowl and stir in the green onions.
  • Combine the mayonnaise and lime juice.
  • Season with salt and pepper.
  • Slather hot dog buns with the mayonnaise.
  • Top with the dogs.
  • Add the corn and green onion mixture.
  • Sprinkle with Cotija cheese and chili powder, if using.

Notes

Cut a long narrow slit in your dogs before cooking to give the toppings a great place to go!

Nutrition

Calories: 298kcal | Carbohydrates: 30g | Protein: 9g | Fat: 16g | Saturated Fat: 5g | Trans Fat: 1g | Cholesterol: 23mg | Sodium: 566mg | Potassium: 143mg | Fiber: 1g | Sugar: 3g | Vitamin A: 69IU | Vitamin C: 3mg | Calcium: 90mg | Iron: 3mg

Nutritional values are approximate.

Dehydrated Mushrooms on the Nesco Snackmaster Pro

I’ve really been enjoying my dehydrator. I’m always looking for more things to dry, taking advantage of anything in season or fresh. I recently grabbed a few pounds of oyster and shiitake mushrooms with the goal of drying them for later use in stir-fries or soups. I found that drying them is incredibly easy. Rinse, dry, slice (if you want) and dry. Done. Dehydrated mushrooms on the Nesco Snackmaster Pro are amazing.

Dehydrated Mushrooms on the Nesco Snackmaster Pro

Storing The Results

I store the dehydrated mushrooms on the Nesco Snackmaster Pro in resealable baggies or Mason jars. Whenever I need them I just grab them and toss them into the dish. If the recipe I’m using them in doesn’t contain a lot of liquid that can be used to re-hydrate the mushrooms I’ll first toss them into some warm water for a few minutes.

Don’t Slice Them Too Small

If you decide to slice your mushrooms don’t cut them too small. They shrink a lot as they dry, and if you cut them too small they will crumble too easily and can fall thru the holes in the trays on the Nesco Snackmaster Pro. I prefer to keep the mushrooms as whole as possible since you never know how you might use the mushrooms in the end. You can always cut the larger pieces later, but you can’t make the smaller pieces bigger!

I like to load up my dehydrator. To do that I picked up a handful of extra trays. They really add a whole lot more drying space! Since I have to rotate my trays, I write a number on each one on a piece of blue painter’s tape so I can keep track of them.

You can dehydrate darn near anything on a Nesco Snackmaster Pro. Even marshmallows.

Dehydrated Mushrooms on the Nesco Snackmaster Pro
Print Pin
5 from 1 vote

Dehydrated Mushrooms on the Nesco Snackmaster Pro

I recently grabbed a few pounds of oyster and shiitake mushrooms with the goal of drying them for later use in stir-fries or soups. I found that drying them is incredibly easy. 
Course Side
Cuisine American
Keyword dehydrator, mushroom, nesco snackmaster pro
Prep Time 15 minutes
Cook Time 8 hours
Total Time 8 hours 15 minutes
Servings 1 pound
Calories 200kcal
Author Mike

Ingredients

  • 2 pounds mushrooms

Instructions

  • Rinse the mushrooms.
  • Trim any hard stems and slice if desired.
  • Pat mushrooms dry and place on screens on the Nesco trays. Do not overlap.
  • Set the dehydrator to 100 F and dry for 8 hours, checking on the mushrooms after 6 hours. Thinner smaller mushrooms will dry sooner.
  • Remove when mushrooms are as dry as you want.

Notes

Store in an air-tight container, such as a Mason jar with a lid.

Nutrition

Calories: 200kcal | Carbohydrates: 30g | Protein: 28g | Fat: 3g | Saturated Fat: 1g | Sodium: 45mg | Potassium: 2885mg | Fiber: 9g | Sugar: 18g | Vitamin C: 19mg | Calcium: 27mg | Iron: 5mg

Nutritional values are approximate.

Buffalo Chicken Dip

My wife and I recently visited Scotty’s Brewhouse, in West Lafayette, Indiana (which sadly, is now closed). Before dinner we decided to try an appetizer, the 7 Tidals Buffalo chicken dip. One bite in and we both agreed that I had to make the same dip at home. My version is close, very close. And it’s crazy good. Not terribly hot or spicy, just right actually.

Buffalo Chicken Dip

Blue Cheese. Or Not.

To match Scotty’s Buffalo chicken dip you’ll want to also add a few small crumbles of blue cheese to the cream cheese mixture. We found the dip to be fantastic without it. You can also substitute a blue cheese dressing for the Ranch for more blue cheese flavor. And for extra kick, add a few drops (ok, more than a few drops) of hot sauce to the Frank’s wing sauce.

Also try my Buffalo wing hummus, Buffalo queso dip (oh yes!) and my beef enchilada dip (yum!).

Buffalo Chicken Dip
Print Pin
4 from 1 vote

Buffalo Chicken Dip

Crazy good. Not terribly hot or spicy, just right actually.
Course Appetiser
Cuisine American
Keyword Buffalo, chicken, dip
Prep Time 5 minutes
Cook Time 1 hour
Total Time 1 hour 5 minutes
Servings 12 servings
Calories 246kcal

Ingredients

  • 1 ½ pounds chicken breasts boneless skinless, 1 very large breast or 2 medium
  • 12 ounce Frank’s RedHot Sauce
  • 8 ounces cream cheese softened
  • 1 cup Ranch dressing the better the dressing the better the dip will be
  • ½ cup celery chopped
  • ½ cup extra sharp cheddar cheese shredded
  • Tortilla chips celery sticks, carrots, for serving

Instructions

  • Preheat your oven to 375.
  • Spray a 9″ x 9″ baking dish with non-stick spray.
  • Bring a large saucepan of water to a boil. Add the chicken and poach until cooked, 10-15 minutes depending on how thick the chicken is.
  • Remove and let cool slightly then shred with a fork.
  • Transfer chicken to a large bowl and add the entire bottle of wing sauce. Stir to combine well.
  • Pour the chicken into the baking dish and spread out evenly.
  • Add the cream cheese and Ranch dressing to a medium saucepan over medium heat. Stir until the cheese is melted, then whisk until smooth.
  • Pour the cheese mixture over the chicken and spread out evenly.
  • Sprinkle top with the celery.
  • Bake for 15 minutes.
  • Sprinkle top with cheese and bake another 10 minutes until hot and bubbly.
  • Remove and let rest for 10 minutes before serving.

Notes

Substitute pepper jack or habanero jack for an even spicier version.

Nutrition

Calories: 246kcal | Carbohydrates: 2g | Protein: 15g | Fat: 20g | Saturated Fat: 7g | Trans Fat: 1g | Cholesterol: 69mg | Sodium: 380mg | Potassium: 264mg | Fiber: 1g | Sugar: 1g | Vitamin A: 345IU | Vitamin C: 1mg | Calcium: 63mg | Iron: 1mg

Nutritional values are approximate.

Fiesta Tortilla Wrap Bites

A few times a year my wife and I take a drive down to the Exit 76 Antique Mall in Edinburgh, Indiana. About 30 minutes or so south of Indianapolis, the mall is stuffed with tons and tons of antiques, collectibles, arts, crafts, toys… just about anything you can imagine. To maximize our browsing time I like to pack quick and easy lunches, like these Fiesta tortilla wrap bites. They’re easy to make but full of flavor. And they travel well.

Fiesta Tortilla Wrap Bites

Perfect Meal For That Day Trip

The antique mall has a little sitting area. They have tables that are perfect for grabbing a bite to eat before antiquing. The area used to be a Subway, years ago.

The filling used in these wraps can be used for other treats too. Like for topping cut cucumbers, or as a dip. It’d also be great as the filling for a grilled cheese sandwich. Or on top of hot dogs. It’s great stuff.

I highly recommend that you shred or grate your own cheese at home. Don’t buy the pre-shredded or pre-grated stuff. It has stuff added to it to keep it from sticking together. That ‘stuff’ affects how the cheese melts. Shred it yourself and use the good stuff.

Also try my grilled chicken wrap with southwestern dipping sauce.

Fiesta Tortilla Wrap Bites
Print Pin
4 from 1 vote

Fiesta Tortilla Wrap Bites

Easy to make but full of flavor. And they travel well.
Course Appetizer
Cuisine American
Keyword southwestern, wraps
Prep Time 15 minutes
Cook Time 2 hours
Total Time 2 hours 15 minutes
Servings 30 bites
Calories 80kcal
Author Mike

Equipment

Ingredients

Instructions

  • Place all ingredients except for the tortillas in a large bowl and mix well.
  • Divide mixture between the tortillas.
  • Tightly roll the tortillas and wrap in plastic wrap.
  • Refrigerate for 2-8 hours to let the wraps set up then slice as desired.

Notes

Add a little minced jalapeno for a nice kick.

Nutrition

Calories: 80kcal | Carbohydrates: 5g | Protein: 2g | Fat: 6g | Saturated Fat: 3g | Cholesterol: 14mg | Sodium: 177mg | Potassium: 55mg | Fiber: 1g | Sugar: 1g | Vitamin A: 249IU | Vitamin C: 5mg | Calcium: 51mg | Iron: 1mg

Nutritional values are approximate.