Pesto Stuffed Mushrooms on the Char-Broil Big Easy

Note: This recipe was developed using the Char-Broil Big Easy Oil-Less Fryer. If you are cooking using the Char-Broil Smoker-Roaster Grill you should cook with the lid open and the temperature set to High. You might also need to adjust the cooking time.

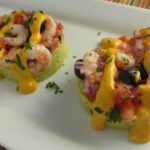
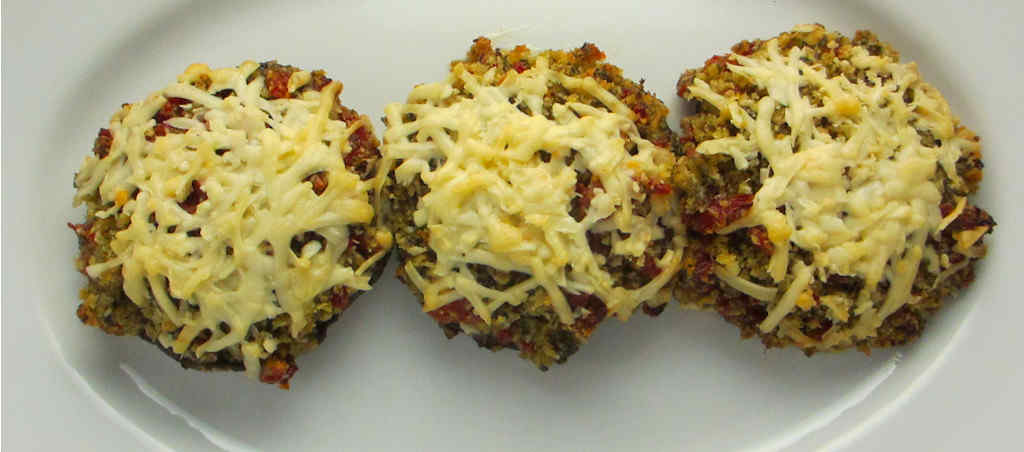
These Pesto Stuffed Mushrooms on the Char-Broil Big Easy were stuffed with what may be the perfect combination of ingredients. Herby pesto. Sweet acidic tomatoes. Crunchy Panko breadcrumbs. And cheese. Parmesan and Asiago. I made the mushrooms on my Char-Broil Big Easy, but you can do them in the oven (at 350 F) or on your gas or charcoal grill just as easily. I used medium-sized Portobello mushrooms, but if you want to serve these as appetizers you can use mini-bellos instead. They’ll disappear off the plate, that’s for sure!

Pesto Stuffed Mushrooms on the Char-Broil Big Easy

Improvise, If Needed

If you don’t have sun-dried tomatoes you can substitute diced roasted red bell peppers or pimentos. I really liked the nuttiness of Asiago cheese, but if you find it to be too strong, a nice shredded Mozzarella will work just fine instead.

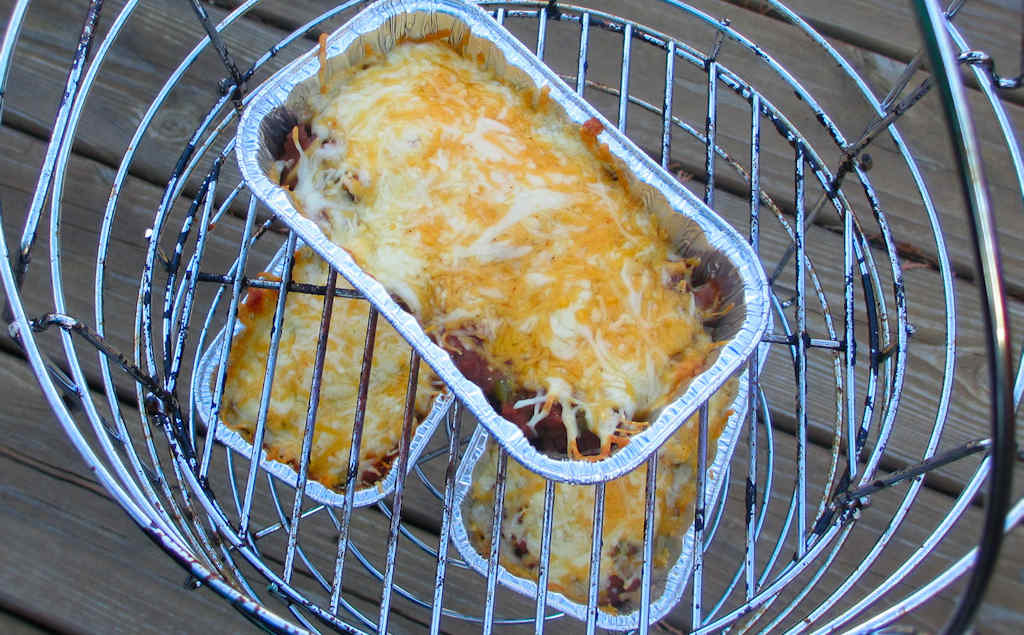
To make these pesto stuffed mushrooms on the Char-Broil Big Easy I used a bunk bed basket. It lets me double or even triple the amount of cooking space I have.

Also try my chili-stuffed mushrooms and my herb roasted mushrooms on the Big Easy.

It’s always a good idea to keep a few spare grease trays on hand for your Char-Broil Big Easy.

Love your Big Easy as much I love mine? Check out my Big Easy Add-Ons page and my free Big Easy eCookbook!

Pesto Stuffed Mushrooms on the Char-Broil Big Easy
Print Pin
4 from 1 vote

Pesto Stuffed Mushrooms on the Char-Broil Big Easy

These mushrooms were stuffed with what may be the perfect combination of ingredients. Herby pesto. Sweet acidic tomatoes. Crunchy Panko breadcrumbs. And cheese. 
Course Side
Cuisine American
Keyword Big Easy, Char-Broil, mushroom, stuffed
Prep Time 10 minutes
Cook Time 10 minutes
Total Time 20 minutes
Servings 4 servings
Calories 542kcal
Author Mike

Ingredients

Instructions

  • Fire up your Big Easy.
  • Wipe the mushrooms off and brush both sides with the oil.
  • Combine the pesto, Parmesan, sun-dried tomatoes and Panko in a bowl.
  • Season with salt and pepper.
  • Divide the pesto mixture between the mushrooms and top with the cheese.
  • Place into the Big Easy basket and cook for 10 minutes or until the cheese is melted.
  • Serve immediately.

Notes

You’ll need a Big Easy Bunk Bed Basket or Big Easy Cooking Rack to cook all the mushrooms or once, or divide the recipe in half and cook using a regular basket.

Nutrition

Calories: 542kcal | Carbohydrates: 22g | Protein: 21g | Fat: 42g | Saturated Fat: 13g | Trans Fat: 1g | Cholesterol: 47mg | Sodium: 1152mg | Potassium: 837mg | Fiber: 4g | Sugar: 10g | Vitamin A: 1800IU | Vitamin C: 5mg | Calcium: 557mg | Iron: 3mg

Nutritional values are approximate.

Grilled Zucchini Roll-Ups

I have to admit, zucchini isn’t something you often see around our kitchen. But now that I’ve discovered grilling and wrapping them around cheese, they are going to be seen and seen often.

These grilled zucchini roll-ups are stuffed with a wonderful mixture of feta, plain crumbled goat cheese, sun-dried tomatoes, chives and basil, and red pepper flakes. You can omit them, but the sun-dried tomatoes are what makes these bites really delicious.

Grilled Zucchini Roll-Ups

Great Flavors In A Single Bite

Don’t omit the red pepper flakes when you make these grilled zucchini roll-ups. They don’t make the roll-ups particularly spicy, but just add enough heat to complement the creamy sweet goat cheese.

I used a very sharp Wusthof knife to cut the zucchini into thin strips, but you could also use a mandolin (you might have to cut the zucchini into halves so they aren’t so long). Make sure you sharpen your knives regularly. Not only will they obviously work better, they’re safer when sharpened. I recently picked up an electric sharpener that I absolutely love. I found that my manual sharpening skills weren’t doing the job. This sharpener does an amazing job, and it works on 20 degree (European) and 15 degree (Asian) knives, so it handles everything in my knife block without a problem.

I recommend that you use a grill basket when making these roll-ups. It makes cooking easier and you don’t have to worry about anything falling through the grates. And cleanup is easier too!

Also check out my very popular cucumber roulades. They don’t require grilling, are easy to make, and taste fantastic. Ditto for my Greek salad bites.

Grilled Zucchini Roll-Ups
Print Pin
4 from 1 vote

Grilled Zucchini Roll-Ups

I have to admit, zucchini isn’t something you often see around our kitchen. But now that I’ve discovered grilling them and wrapping them around cheese, zucchini are going to be seen and seen often.
Course Appetizer
Cuisine American
Keyword grilled, zucchini
Prep Time 10 minutes
Cook Time 6 minutes
Total Time 16 minutes
Servings 30 rolls
Calories 44kcal

Equipment

Ingredients

  • 4 large zucchini cut lengthwise into 1/4″ strips
  • 2 ½ tablespoons sun-dried tomatoes chopped, plus 2 tablespoons of the oil from the jar
  • 4 ounces feta cheese crumbled
  • 6 ounces goat cheese crumbled
  • 1 tablespoon chives chopped (or 1 teaspoon dried)
  • 1 tablespoon basil chopped (or 1 teaspoon dried)
  • ½ tablespoon dried red pepper flake

Instructions

  • Fire up a grill for direct cooking.
  • Brush both sides of the zucchini strips with 1/2 tablespoon of the oil from the sun-dried tomatoes.
  • Place onto grill and grill until slightly tender and you get good grill marks.
  • Remove to a cooking rack and let cool completely.
  • Meanwhile, in a bowl, combine the sun-dried tomatoes, remaining oil, the cheeses, chives, basil, and red pepper flakes.
  • Spread 1 teaspoon (or maybe a bit more depending on how big your zucchini are) of the cheese mixture onto the zucchini strips.
  • Roll up and secure with toothpicks.

Notes

You can serve these immediately or refrigerate and serve later.

Nutrition

Calories: 44kcal | Carbohydrates: 2g | Protein: 2g | Fat: 3g | Saturated Fat: 2g | Cholesterol: 6mg | Sodium: 72mg | Potassium: 139mg | Fiber: 1g | Sugar: 1g | Vitamin A: 224IU | Vitamin C: 9mg | Calcium: 35mg | Iron: 1mg

Nutritional values are approximate.

Frozen Yogurt Dots

Sure, I’ve heard of Go-Gurt, but I’ve never had a reason to buy any. Then I came across this idea for frozen yogurt dots that uses Go-Gurt. I had to get some and try it. Just like those ice cream dots you can find at the mall, these little dots are packed with great flavor. They really make eating yogurt fun.

Frozen Yogurt Dots

We don’t have kids. So I have an excuse for not knowing you can also freeze Go-Gurt tubes for great yogurt-flavored popsicles. People should tell those of us without kids these awesome ideas! Heck, I’m lucky I knew about frozen yogurt dots!

Frozen Yogurt Dots on Sheet Pan

Lots And Lots Of Dots!

You can get a good number of dots out of a tube of Go-Gurt. It’s about a half of a full sheet pan’s worth. That’s a good bit for sure.

Also try my homemade red velvet klondike bars.

Frozen Yogurt Dots
Print Pin
No ratings yet

Frozen Yogurt Dots

Course Snack
Cuisine American
Prep Time 5 minutes
Cook Time 2 hours
Total Time 2 hours 5 minutes
Author Mike

Equipment

Ingredients

Instructions

  • Line a baking sheet with parchment or wax paper.
  • Cut just the very corner out of a tube of Go-Gurt. Don’t cut off much, just enough so you can squeeze the yogurt out through the opening.
  • Squeeze small dots of yogurt out onto the parchment paper.
  • Place in the freezer until completely frozen, about 2 hours.
  • Remove dots from parchment paper and enjoy!

Notes

I found that the easiest way to remove the frozen dots from the pan was to use the back of a regular old kitchen knife, scraping it along the paper.

Nutritional values are approximate.

Southern Fried Shrimp

These southern fried shrimp are darned good shrimp. I love shrimp, cooked any way you can imagine. Fried or boiled are my favorites. One of my favorite ways to devour shrimp is on a po boy sandwich. Tender with just a bit of coating and plenty of spicy flavor, I cannot stop devouring them shrimp after shrimp. I was already a borderline shrimp addict before these came along. These made it worse.

Southern Fried Shrimp

Spicy Crunchy Deliciousness

If you can’t find Tony Cachere’s fish fry in your grocery store you can use other fish fry mixes or just substitute all-purpose flour that has been seasoned with salt and pepper. You want the good stuff for these southern fried shrimp.

If I’m cooking for a crowd, I’ll break out my big deep fryer. But, if it’s just the two of us, I’ll fire up my Fry Daddy fryer. It’s the perfect size for both of us. It fries everything perfectly. And as an added bonus, it doesn’t use a lot of oil, which saves me money.

I get out my big deep fryer when it’s time to fry a large batch of food. It comes to temperature quickly and it maintains that temperature perfectly. It has a built-in oil filter and storage unit so I can re-use the oil several times.

Also try my copycat of Applebee’s Sriracha shrimp, Bayou fried shrimp, coconut fried shrimp and my copycat of Bonefish Grill’s Bang Bang shrimp. Did I mention how much I love fried shrimp?

Southern Fried Shrimp
Print Pin
5 from 1 vote

Southern Fried Shrimp

These southern fried shrimp are darned good shrimp. I love shrimp, cooked any way you can imagine.
Course Appetizer
Cuisine American
Keyword crispy, deep-fried, shrimp, southern
Prep Time 1 hour 15 minutes
Cook Time 15 minutes
Total Time 1 hour 30 minutes
Servings 3 pounds
Calories 563kcal
Author Mike

Ingredients

Instructions

  • Place shrimp into a resealable container or baggie.
  • In a large bowl whisk together the buttermilk and mustard.
  • Pour mixture in with the shrimp, seal, and shake gently to coat.
  • Refrigerate for 1 hour.
  • Whisk together the fish fry mix and cayenne.
  • Heat 3″ of oil in a Dutch oven to 325 F.
  • Working in batches, remove shrimp from container.
  • Shake off excess marinade then transfer to the fry mix.
  • Roll and coat. Shake off any excess coating and place in hot oil.
  • Fry shrimp 1 1/2 minutes per side then transfer to a wire rack or paper towel-lined plate to drain and cool.

Notes

Serve with your favorite dipping sauce or on a po boy.

Nutrition

Calories: 563kcal | Carbohydrates: 9g | Protein: 98g | Fat: 12g | Saturated Fat: 4g | Cholesterol: 1161mg | Sodium: 3750mg | Potassium: 613mg | Fiber: 1g | Sugar: 8g | Vitamin A: 822IU | Vitamin C: 20mg | Calcium: 847mg | Iron: 10mg

Nutritional values are approximate.

Palta Rellena

It seems like a hundred years since I lived in Lima, Peru. And although some of the memories of my years there have faded, my memories of the food have not. One of my favorites was (and is) palta rellena. Avocados stuffed with anything from ceviche to ham to tuna salad. I found this great variation on the classic over on Peru Delights, a wonderful site dedicated to all foods Peruvian. The avocado is smashed into a creamy guacamole, then topped with a mixture of shrimp, onion, tomato, and olives mixed with fresh lime juice. Drizzled with a fantastic sauce of aji amarillo, mayo and ketchup.

Palta Rellena

Aji Amarillo For That Authentic Flavor

Aji amarillo has a fantastic fruity, spicy flavor. Not too hot, but not totally tame either. If you can’t find it just add a few squirts of Sriracha hot sauce instead. But for authentic palta rellena it’s worth going out of your way to get aji amarillo.

Also try my tropical shrimp salad.

Palta Rellena
Print Pin
5 from 1 vote

Palta Rellena

Avocado is smashed into a creamy guacamole, then topped with a mixture of shrimp, onion, tomato, and olives mixed with fresh lime juice. Drizzled with a fantastic sauce of aji amarillo, mayo and ketchup.
Course Salad
Cuisine American
Keyword avocado, Peruvian
Prep Time 10 minutes
Total Time 10 minutes
Servings 2 servings
Calories 296kcal

Ingredients

For the guacamole

  • 1 avocado
  • Kosher salt freshly ground black pepper and lemon juice, to taste
  • 1 teaspoon garlic minced

For the salad

For the drizzle

For the garnish

  • parsley chopped

Instructions

For the guacamole

  • Mash together the avocado and salt, pepper and lemon juice.
  • Spoon mixture onto plates, or into a small metal ring (I used a large round cookie cutter) and mash down to the bottom.
  • Make a slight indentation into the middle for the salad.

For the salad

  • Combine the shrimp, tomato, onion and olives.
  • Season and add lemon juice to taste.
  • Spoon onto avocado mixture.

For the drizzle

  • Whisk together all ingredients and drizzle over the salads.
  • Serve garnished with fresh chopped parsley.

Notes

Serve immediately.

Nutrition

Calories: 296kcal | Carbohydrates: 13g | Protein: 16g | Fat: 22g | Saturated Fat: 3g | Trans Fat: 1g | Cholesterol: 164mg | Sodium: 636mg | Potassium: 653mg | Fiber: 7g | Sugar: 3g | Vitamin A: 444IU | Vitamin C: 37mg | Calcium: 116mg | Iron: 2mg

Nutritional values are approximate.

No-Boil Deviled Eggs

I’ve made my share of deviled eggs. Pretty pastel ones. Awesome Jell-O ones. And ya know, shelling all those eggs can be a job. So when I ran across a way of making no-boil deviled eggs, I immediately decided to give them a shot. What you end up with is that same great deviled egg flavor, but with a lot less trouble. This approach solves a whole lot of problems, especially if you’re setting out to make a big huge batch of eggs for a family get-together or picnic.

No-Boil Deviled Eggs

Great Results. And Easier.

The original recipe for no-boil deviled eggs called for cutting the cooked eggs into squares, which would’ve maximized the amount of finished eggs you would get. But, I thought that round ones would be more attractive. Plus, I’m not sure I’d be that great at cutting that many squares that would come out looking similar. I prefer a much easier way. Using a cooking cutter made it easy. And a bit fun, actually.

I almost always use Blue Plate mayonnaise in the dishes I make. I think it is the best around. If you can’t find it locally you can pick it up online for a fair price.

Also try my jalapeno popper and BBQ deviled eggs.

No-Boil Deviled Eggs
Print Pin
5 from 2 votes

No-Boil Deviled Eggs

When I ran across a way of making no-boil deviled eggs, I immediately decided to give them a shot. What you end up with is that same great deviled egg flavor, but with a lot less trouble.
Course Appetizer
Cuisine American
Keyword deviled, eggs
Prep Time 5 minutes
Cook Time 45 minutes
Total Time 50 minutes
Servings 3 dozen
Calories 458kcal

Ingredients

Instructions

  • Preheat your oven to 350 F.
  • Spray an 8″ x 8″ baking dish with non-stick spray.
  • Separate the egg whites and yokes into two bowls.
  • Whisk the whites until they just get foamy. Do not whisk until they foam completely. Less is more in this case.
  • Pour the egg whites into the dish and cover with foil.
  • Bake for 20 minutes or a few minutes more until the eggs have set.
  • Remove from the oven and let cool.
  • Whisk the yokes until smooth.
  • Spray a skillet with non-stick spray and add the yolks. Scramble until cooked.
  • Transfer the yolks to a food processor.
  • Add the mayonnaise, vinegar, mustard, and a pinch of salt and pepper and process until very smooth.
  • Transfer to a pastry bag with a round tip or dessert decorator.
  • Remove the cooked eggs whites from the baking dish and cut into squares, or use a small cookie cutter to cut into circles.
  • Pipe the egg yolk mixture onto each egg white.
  • Sprinkle with paprika and chives.

Notes

The number of deviled eggs you will get will of course depend on how you cut them. I used a large round cookie cutter so I only got about 2 dozen.

Nutrition

Calories: 458kcal | Carbohydrates: 2g | Protein: 26g | Fat: 38g | Saturated Fat: 9g | Trans Fat: 1g | Cholesterol: 754mg | Sodium: 480mg | Potassium: 286mg | Fiber: 1g | Sugar: 1g | Vitamin A: 1099IU | Vitamin C: 1mg | Calcium: 116mg | Iron: 4mg

Nutritional values are approximate.

Andean Popcorn

I love Andean popcorn. It’s somewhat similar to the popcorn we enjoy here in the states in that it has a fantastic flavor, even a hint of butter. The kernels, though, are different. They do not explode and puff up like popcorn has been grown to do here. Instead, they kinda… just go… pop. No big explosion. No fluffy white insides. The kernel is thin, and very crunchy. You just pop (no pun intended) the entire thing into your mouth and enjoy.

Andean Popcorn

A Peruvian Favorite

I recall street vendors up in the mountains of Peru, in the city of Huancayo, selling bags of Andean popcorn along the street on market day. I think a bag was 10 soles which then was less than a US nickel. Well worth the price! They were fried in screaming hot oil then salted. That’s it. You did (and do) have to be careful of the kernels when they first come out of the fryer, though. They are very, very hot. So let them cool a bit before diving in!

I popped the cancha in the same popper I use for ‘regular’ popcorn. It takes a bit longer as the heat needs to get really good and hot, but it’s well worth the wait. If you can’t find cancha in a South American market near you you can order it using the Amazon link at the bottom of this post. It’s great stuff!

Another favorite Peruvian-inspired appetizer of mine is aji amarillo chicken wings.

Andean Popcorn
Print Pin
5 from 1 vote

Andean Popcorn

I love Andean popcorn. It’s somewhat similar to the popcorn we enjoy here in the states in that it has a fantastic flavor, even a hint of a butter. 
Course Appetizer
Cuisine Peruvian
Keyword Peruvian, popcorn
Cook Time 10 minutes
Total Time 10 minutes
Servings 6 servings
Calories 163kcal
Author Mike

Ingredients

Instructions

  • Add the corn and oil to your popcorn popper and let pop until completely done.
  • Remove and immediately add salt. Do not be shy with the salt.
  • Let cool slightly before serving. The kernels will be very hot directly out of the popper.

Notes

This popcorn is best eaten right after you make it (after letting it cool slightly).

Nutrition

Calories: 163kcal | Carbohydrates: 20g | Protein: 3g | Fat: 8g | Saturated Fat: 6g | Sodium: 2mg | Potassium: 75mg | Fiber: 3g | Sugar: 1g | Calcium: 1mg | Iron: 1mg

Nutritional values are approximate.

Mini Classic Cheesecakes on the Char-Broil Big Easy

Note: This recipe was developed using the Char-Broil Big Easy Oil-Less Fryer. If you are cooking using the Char-Broil Smoker-Roaster Grill you should cook with the lid open and the temperature set to High. You might also need to adjust the cooking time.

I made mini pumpkin cheesecakes for Thanksgiving. They were a big hit. That got me jonesin’ for a more traditional cheesecake. So, that’s what I made! I love making mini classic cheesecakes on my Char-Broil Big Easy. It can’t get much easier.

Mini Classic Cheesecakes on the Char-Broil Big Easy

Don’t Overcook Them

The Big Easy does cook at a high temperature, so you do have to make sure you don’t overcook the cheesecakes, but it’s still easy. You’ll be rewarded with smooth creamy cheesecake with that light vanilla flavor. Perfect. And all in a single-serve size, so you’re not quite as tempted (maybe) to have more than one.

I am not a baker. Not even close. However, I found these mini classic cheesecakes on the Char-Broil Big Easy to be very easy to make. I did learn a few things along the way. You really need to make sure you don’t overcook them. Furthermore, do not let them go over 150 F. And, they may crack a bit no matter how hard you try. That’s ok, the cracks add character.

It’s always a good idea to keep a few spare grease trays on hand for your Char-Broil Big Easy.

Love your Big Easy as much I love mine? Check out my Big Easy Add-Ons page and my free Big Easy eCookbook!

Mini Classic Cheesecakes on the Char-Broil Big Easy
Print Pin
5 from 1 vote

Mini Classic Cheesecakes on the Char-Broil Big Easy

The Big Easy does cook at a high temperature, so you do have to make sure you don’t overcook the cheesecakes, but it’s still easy. You’ll be rewarded with smooth creamy cheesecake with that light vanilla flavor.
Course Dessert
Cuisine American
Keyword Big Easy, Char-Broil, cheesecake
Prep Time 15 minutes
Cook Time 45 minutes
Total Time 1 hour
Servings 18 pies
Calories 394kcal
Author Mike

Ingredients

Instructions

  • Place the cream cheese, sugar, and vanilla into a mixer and beat until blended.
  • With the mixer still running on low speed, add the eggs one-at-a-time until blended.
  • Divide mixture between the crusts. Depending on how full you fill them you might not need all 18 crusts.
  • Fire up your Big Easy.
  • Working in batches, add pies to the basket and bunk bed basket and lower into the Big Easy.
  • Cook for 10-15 minutes or until internal temperature reaches 145-150 F. Use an instant-read thermometer to test the temperature. Do not overcook. The cheesecakes will continue cooking just a bit after being removed from the Big Easy.
  • Remove and let cool.

Notes

You’ll need the Char-Broil Big Easy Bunk Bed basket to double the number of cheesecakes that you can cook at once.

Nutrition

Calories: 394kcal | Carbohydrates: 47g | Protein: 6g | Fat: 20g | Saturated Fat: 6g | Trans Fat: 1g | Cholesterol: 37mg | Sodium: 315mg | Potassium: 85mg | Fiber: 2g | Sugar: 11g | Vitamin A: 57IU | Calcium: 20mg | Iron: 2mg

Nutritional values are approximate.

No Bake Red Velvet Cheesecake

I cannot bake. I’m okay admitting it, too. So when my wife said the other day that she was jonesin’ for a red velvet cupcake, I came up with the next-best-thing: no bake red velvet cheesecake. I opted to make the cheesecake in miniature pre-baked (like I said, I don’t bake, and that includes baking pie crusts!). I like the little crusts because they have built-in portion control. You put a big ole cheesecake in front of me and I might have trouble keeping myself under control. Put a mini cheesecake in front of me and I can manage.

No Bake Red Velvet Cheesecake

So Easy. So Yummy.

You can’t get much easier than this no bake red velvet cheesecake. Just mix a few ingredients together and into the pre-made pie crusts it goes! Great vanilla and cocoa flavor with a perfect creamy texture. Very, very addicting little bites, that’s for sure.

Also try my black forest cheesecake.

No Bake Red Velvet Cheesecake
Print Pin
5 from 1 vote

No Bake Red Velvet Cheesecake

You put a big ole cheesecake in front of me and I might have trouble keeping myself under control. Put a mini cheesecake in front of me and I can manage.
Course Dessert
Cuisine American
Keyword cheesecake
Prep Time 15 minutes
Cook Time 4 hours
Total Time 4 hours 15 minutes
Servings 8
Calories 268kcal

Equipment

Ingredients

Instructions

  • Place the cream cheese into a mixer bowl and beat until smooth.
  • Add the sour cream, sugar, food coloring, cocoa powder and vanilla extract.
  • Beat until smooth.
  • Gently fold in the whipped topping. Do not over mix.
  • Pour, spoon or pipe the filling into the crust(s).
  • Refrigerate for 4 hours before serving.
  • Top with additional whipped cream if desired.

Notes

Store pies in the fridge until ready to use.

Nutrition

Calories: 268kcal | Carbohydrates: 21g | Protein: 3g | Fat: 19g | Saturated Fat: 12g | Cholesterol: 47mg | Sodium: 135mg | Potassium: 114mg | Fiber: 1g | Sugar: 21g | Vitamin A: 581IU | Vitamin C: 1mg | Calcium: 80mg | Iron: 1mg

Nutritional values are approximate.

Mexican Bean Dip on the Char-Broil Big Easy

Note: This recipe was developed using the Char-Broil Big Easy Oil-Less Fryer. If you are cooking using the Char-Broil Smoker-Roaster Grill you should cook with the lid open and the temperature set to High. You might also need to adjust the cooking time.

I love a spicy bean dip. Served up with a big ole bowl of warmed tortilla chips. Melted cheese, refried beans, spicy sausage, and lots of heat. I made this Mexican bean dip on the Char-Broil Big Easy in no time at all. You can make it in your oven too, just as easily. But making it outdoors is so much more fun!

This dip is not shy on heat. You can tone it back by using regular chorizo instead of hot (or substitute ground beef or sausage) and skipping the jalapenos.

Mexican Bean Dip on the Char-Broil Big Easy

Easy Clean-Up

Disposable mini meatloaf pans are great for cooking up dishes like this Mexican Bean Dip on the Char-Broil Big Easy. You can fit 4 of them on the cooker at once if you use the Big Easy Bunk Bed basket. That’s enough to feed a small crowd for sure.

It’s always a good idea to keep a few spare grease trays on hand for your Char-Broil Big Easy.

Love your Big Easy as much I love mine? Check out my Big Easy Add-Ons page and my free Big Easy eCookbook!

Mexican Bean Dip on the Char-Broil Big Easy
Print Pin
5 from 1 vote

Mexican Bean Dip on the Char-Broil Big Easy

I made this Mexican bean dip in no time at all. You can make it in your oven too, just as easily.
Course Appetizer
Cuisine American
Keyword Big Easy, Char-Broil, dip
Prep Time 10 minutes
Cook Time 30 minutes
Total Time 40 minutes
Servings 12
Calories 122kcal
Author Mike

Ingredients

Instructions

  • Crumble the sausage into a large skillet over medium-high heat.
  • Cook until almost done.
  • Add the onion and garlic and continue cooking until the meat is done.
  • Stir in the beans, cumin and oregano.
  • Remove from heat.
  • Fire up your Big Easy (or preheat your oven to 350 F if cooking in the oven).
  • Divide the meat mixture between the pans.
  • Divide the hot jalapenos and taco sauce between the pans.
  • Place into the Big Easy or oven and cook for 10 minutes.
  • Add cheese to the tops of the dips and cook for another 10-15 minutes or until hot and bubbly.
  • Top with olives and green onion and serve with warm tortilla chips.

Notes

If cooking in the oven use a 9″ x 9″ baking dish instead of the aluminum pans.

Nutrition

Calories: 122kcal | Carbohydrates: 1g | Protein: 8g | Fat: 9g | Saturated Fat: 6g | Cholesterol: 42mg | Sodium: 808mg | Potassium: 40mg | Fiber: 1g | Sugar: 1g | Vitamin A: 366IU | Vitamin C: 15mg | Calcium: 107mg | Iron: 1mg

Nutritional values are approximate.