Wow, I just had no idea how much we would both love this Mexican charred corn hot dog. It has such a wonderful combination of tastes, from the bite of the onion, to that great sweetness you get from roasted corn, fantastic citrus lime mayonnaise, all served over a grilled all-beef hot dog. Topped with crumbled Cotija cheese! These dogs were an absolute treat!

Different. And Delicious.
Mexican charred corn hot dogs are light and refreshing, the perfect dogs for a sunny day. If fresh corn-on-the-cob is no longer available in your area, you can use canned or frozen corn kernels. Drain them first and pat dry so that they roast well. Pour the kernels out onto a baking sheet and place under the broiler just long enough for them to start to char. It won’t take long, so don’t walk away and ignore them. Give them a stir or two as they roast to make sure they are charred evenly.
I almost always use Blue Plate mayonnaise in the dishes I make. I think it is the best around. If you can’t find it locally you can pick it up online for a fair price.

You’ll want to also try my loaded Mexican hot dogs.
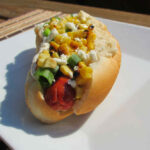
Mexican Charred Corn Hot Dog
Equipment
Ingredients
- 4 ears sweet corn husked
- 2 teaspoons vegetable oil
- 4 hot dogs
- 4 hot dog buns
- 2 green onions chopped
- 2 tablespoons mayonnaise
- 2 teaspoons lime juice
- kosher salt
- ground black pepper
- Cotija cheese crumbled
- Chili powder optional
Instructions
- Fire up your grill.
- Brush the corn with the oil and place over direct heat.
- Cook until charred on all sides, about 20 minutes.
- Remove from heat and let cool slightly.
- Meanwhile, cook the dogs and toast the buns as desired.
- Cut the kernels from the corn.
- Place in a bowl and stir in the green onions.
- Combine the mayonnaise and lime juice.
- Season with salt and pepper.
- Slather hot dog buns with the mayonnaise.
- Top with the dogs.
- Add the corn and green onion mixture.
- Sprinkle with Cotija cheese and chili powder, if using.
Notes
Nutrition
Nutritional values are approximate.