Jalapeno Popper Grilled Corn Salad

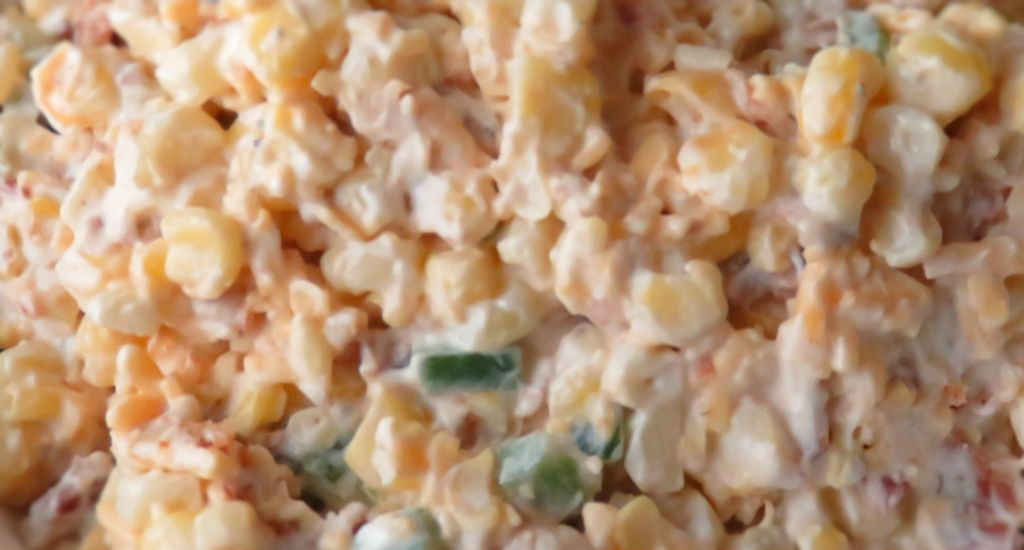
Corn is in season and that’s a happy time for me. And as much as I love grilled corn-on-the-cob, corn in salads is tied for my favorite way to get some good fresh corn into my belly. Like this jalapeno popper grilled corn salad. Creamy dressing. Crunchy bacon. Deliciously sweet corn. And a little heat. This is the perfect side dish for a grill-out or picnic. Make extra because everyone is going to want seconds. Even grandma. Well, if she likes a little spiciness that is. Now that I think about it, you might want to warn her first that this salad does contain jalapenos.

Jalapeño Popper Grilled Corn Salad

Fresh Is Best

I prefer to use fresh corn when I make jalapeno popper grilled corn salad. We’re getting our corn from the southern US now, but soon they’ll be harvesting corn here in Indiana. Almost time for my yearly ritual of putting up corn for the winter. I race on down to our local farmer’s market, Binford Farmer’s Market, and load up on corn as soon as it’s available. And I do mean load up. My favorite? My Dad’s Sweet Corn from Tipton, Indiana. Hand-picked and incredibly sweet, they always have great corn.

Also try my chili cheese Frito salad.

Jalapeño Popper Grilled Corn Salad
Print Pin
4 from 1 vote

Jalapeño Popper Grilled Corn Salad

And as much as I love grilled corn-on-the-cob, corn in salads is tied for my favorite way to get some good fresh corn into my belly. Like this jalapeno popper grilled corn salad.
Course Side
Cuisine American
Keyword corn, salad
Prep Time 15 minutes
Cook Time 1 hour 30 minutes
Total Time 1 hour 45 minutes
Servings 8 cups
Calories 439kcal

Ingredients

  • 8 ears fresh corn husks NOT removed
  • Olive oil
  • kosher salt
  • freshly ground black pepper
  • 2 jalapenos stems and seeds removed, minced
  • 1 cup bacon cooked, chopped
  • 2 ounces cream cheese softened
  • ¼ cup sour cream
  • 1 cup extra sharp cheddar cheese finely shredded

Instructions

  • Fire up your grill for medium heat grilling.
  • Peel back the husks from the corn but do not remove them. Remove all silks.
  • Lightly brush the corn with olive oil and season with salt and pepper.
  • Pull the husks back around the corn and tightly wrap in foil.
  • Place on the grill and cook 20 minutes, rotating often.
  • Open the foil and continue cooking until the corn is tender.
  • Remove the corn from the grill and let cool until you can cut the kernels from the ears.
  • Combine the corn with all remaining ingredients.
  • Refrigerate for at least 1 hour before serving.

Notes

Stir before serving.

Nutrition

Calories: 439kcal | Carbohydrates: 18g | Protein: 7g | Fat: 39g | Saturated Fat: 17g | Trans Fat: 1g | Cholesterol: 54mg | Sodium: 174mg | Potassium: 285mg | Fiber: 2g | Sugar: 6g | Vitamin A: 488IU | Vitamin C: 10mg | Calcium: 119mg | Iron: 1mg

Nutritional values are approximate.

BBQ Island Club Sandwich

I devoured my BBQ Island Club sandwich like I devoured the Margaritaville: The Cookbook. That’s where I found the recipe that inspired this sandwich. There’s nothing wrong with your standard good ole club sandwich. This is your standard good ole club sandwich… but with a twist. The dressing mix, as easy as it is, sets it apart from any other sandwich.

BBQ Island Club Sandwich

This Is One Great Club Sandwich

I made a big batch of the dressing and BBQ sauce mix and kept it on hand for burgers and sandwiches. It’s a nice change and is also absolutely fantastic on a Reuben or pastrami sandwich. Of course it’s also great on a BBQ Island club sandwich. If you love club sandwiches as much as I do, you also need to make my club with pesto mayonnaise!

If I’m reaching for a bottled BBQ sauce, I often go for Sweet Baby Ray’s.

Try my Cheeseburgers in Paradise. They’re just like the restaurant classic!

BBQ Island Club Sandwich
Print Pin
5 from 1 vote

BBQ Island Club Sandwich

There’s nothing wrong with your standard good ole club sandwich. This is your standard good ole club sandwich… but with a twist. The dressing mix, as easy as it is, sets it apart.
Course Main
Cuisine American
Keyword BBQ, sandwich
Prep Time 15 minutes
Total Time 15 minutes
Servings 1 sandwich
Calories 716kcal

Equipment

Ingredients

  • 2 tablespoons Thousand Island dressing
  • 1 tablespoon your favorite BBQ sauce
  • 3 slices white bread toasted
  • 2 slices turkey sandwich meat
  • 2 slices Swiss cheese
  • ½ cup iceberg lettuce shredded
  • 2 slices bacon cooked, halved
  • 2 slices tomato
  • 2 slices deli sandwich meat thin-sliced ham

Instructions

  • Combine the salad dressing and the BBQ sauce.
  • Slather one side of each slice of bread with the sauce mixture.
  • Top one slice of bread (with the sauce-side up) with the turkey, one slice of Swiss and half of the lettuce.
  • Add another slice of bread, sauce-side down.
  • Add the remaining Swiss and lettuce, the bacon, tomato and ham.
  • Add last slice of bread, sauce-side down.
  • Skewer and cut in half and serve.

Notes

I like to use a good smoky BBQ sauce on these sandwiches.

Nutrition

Calories: 716kcal | Carbohydrates: 55g | Protein: 37g | Fat: 38g | Saturated Fat: 14g | Trans Fat: 1g | Cholesterol: 95mg | Sodium: 2026mg | Potassium: 640mg | Fiber: 4g | Sugar: 17g | Vitamin A: 1026IU | Vitamin C: 9mg | Calcium: 495mg | Iron: 4mg

Nutritional values are approximate.

Creamy Dill Broccoli Slaw

This creamy dill broccoli slaw is a wonderful spin on my favorite salad, creamy cucumber salad. Loaded with dill and a hint of lime, it has a great summer flavor with plenty of crunch to it. I added a few sliced fresh chili peppers and chives from our garden for garnish. Cilantro would also make a great addition to this slaw.

Creamy Dill Broccoli Slaw

Crunchy. And Then Some.

You can substitute ‘normal’ shredded cabbage for the broccoli if you wish. Broccoli slaw tends to stay crunchier longer than cabbage, which can get soggy in no time. If you do make this creamy dill broccoli slaw with cabbage instead, sauce only the amount of slaw you plan on serving. That way the leftovers won’t get drenched in sauce and become soggy.

I almost always use Blue Plate mayonnaise in the dishes I make. I think it is the best around. If you can’t find it locally you can pick it up online for a fair price.

Also try my creamy cucumber salad.

Creamy Dill Broccoli Slaw
Print Pin
5 from 1 vote

Creamy Dill Broccoli Slaw

Loaded with dill and a hint of lime, this slaw has a great summer flavor with plenty of crunch to it.
Course Salad
Cuisine American
Keyword cole slaw, coleslaw, creamy, slaw
Prep Time 1 hour 10 minutes
Total Time 1 hour 10 minutes
Servings 6 servings
Calories 231kcal

Ingredients

  • 4 cups broccoli slaw a small bag
  • ¾ cup mayonnaise
  • 1 lime lime zested and juiced
  • 1 tablespoon olive oil
  • ¼ cup dill chopped
  • 2 tablespoons sugar
  • 1 teaspoon kosher salt
  • 1 teaspoon cumin I used slightly less
  • chile pepper sliced, for garnish (optional)
  • chives sliced, for garnish (optional)

Instructions

  • Place the slaw mix in a medium resealable container.
  • In a bowl, whisk together the remaining ingredients except for the garnish.
  • Add to the slaw.
  • Cover and shake gently to coat.
  • Refrigerate for at least 1 hour before serving.

Notes

Optionally, serve garnished with sliced pepper and chives.

Nutrition

Calories: 231kcal | Carbohydrates: 8g | Protein: 3g | Fat: 22g | Saturated Fat: 3g | Trans Fat: 1g | Cholesterol: 12mg | Sodium: 608mg | Potassium: 272mg | Fiber: 1g | Sugar: 5g | Vitamin A: 480IU | Vitamin C: 72mg | Calcium: 47mg | Iron: 1mg

Nutritional values are approximate.

Glazed Baked Mini-Donuts

Every few weeks my wife and I like to make something new and fun for her to take into work to share with her co-workers. This time we definitely tried something new for us, making glazed baked mini-donuts. They turned out to be incredibly easy to make. We glazed some with a vanilla glaze and some with a chocolate glaze. Some got covered in sprinkles. Some didn’t. They were great and everyone enjoyed them!

Glazed Baked Mini-Donuts

So Much Fun To Make! And Eat!

We actually ended up make three dozen glazed baked mini-donuts because making three is actually just as easy as making one. Both glazes are simple to make. You can’t mess around once you start glazing the donuts, though. As soon as the glaze is ready start dipping those donuts! If you wait too long the glaze will set up and you’ll get nothing but donut sadness.

I used the 12-cavity mini donut pan made by Wilton.

Also try my pineapple donuts.

Glazed Baked Mini-Donuts
Print Pin
5 from 1 vote

Glazed Baked Mini-Donuts

These glazed baked mini-donuts turned out to be incredibly easy to make. We glazed some with a vanilla glaze and some with a chocolate glaze. 
Course Dessert
Cuisine American
Keyword baked, donuts
Prep Time 15 minutes
Cook Time 20 minutes
Total Time 35 minutes
Servings 1 dozen
Calories 1870kcal

Ingredients

For the baked mini-donuts

For the vanilla glaze (makes enough for 12 mini-donuts)

For the chocolate glaze (makes enough for 12 mini-donuts)

Instructions

For the baked mini-donuts

  • Preheat oven to 425 F.
  • Spray the donut pan with non-stick spray.
  • In large bowl, whisk the flour, sugar, baking powder, salt and nutmeg.
  • Stir in the buttermilk, egg and butter until just combined. The dough will be slightly sticky and thick.
  • Place a slightly heaping tablespoon of dough into each donut cavity.
  • Spread it out evenly with your finger to fill the circle.
  • Bake 6-7 minutes or until donut tops are spongy.
  • Cool in pan for 3 minutes then transfer to cooling racks.
  • Apply glaze only after donuts have cooled completely.

For the vanilla glaze (makes enough for 12 mini-donuts)

  • Place all ingredients into a small shallow bowl and whisk until smooth.
  • Dip cooled donut bottoms (the smooth side) into the glaze and transfer to a cooling rack to set.

For the chocolate glaze (makes enough for 12 mini-donuts)

  • Place all ingredients into the top of a double-boiler over low heat with 1″ of water in the bottom pan.
  • Stir and melt completely. The mix should look shiny. If not, add a bit more corn syrup and stir.
  • Dip cooled donut bottoms (the smooth side) into the glaze and transfer to a cooling rack to set.

Notes

Store any leftovers in an airtight container.

Nutrition

Calories: 1870kcal | Carbohydrates: 289g | Protein: 30g | Fat: 67g | Saturated Fat: 38g | Trans Fat: 1g | Cholesterol: 241mg | Sodium: 1243mg | Potassium: 860mg | Fiber: 10g | Sugar: 182g | Vitamin A: 1166IU | Vitamin C: 1mg | Calcium: 472mg | Iron: 8mg

Nutritional values are approximate.

Kentucky Kernel ‘Fried’ Chicken using the Vortex

I make a habit of checking out the fried chicken coating mixes at the grocery store. Sure, I can make my own, but there are so many great commercial mixes out there that I just can’t pass them up. I prefer to ‘fry’ my chicken on my Weber charcoal grill using a Vortex insert. I get that perfectly juicy, crunchy skin, crazy good fried chicken flavor without all of the oil. Kentucky Kernel’s seasoned flour is a perfect mix of herbs and spices, making for some of the best tasting chicken I’ve ever had. Kentucky Kernel ‘Fried’ Chicken using the Vortex is amazing!

Kentucky Kernel 'Fried' Chicken using the Vortex

Bone-In For The Win

Any cut or cuts of chicken will do, but I think that ‘fried’ chicken on the Vortex is best when you use bone-in, skin-on pieces. For me that’s either split chicken breasts or thighs. No matter what you use, you’ll get very juicy tender meat and crispy skin and that’s what you’re here for. Make sure, though, that you don’t over-batter the chicken. You aren’t frying in oil. More is definitely not better when it comes to the batter. Just enough to coat the chicken is all you’ll need.

A Little Extra Crispy

I like to brush my chicken (very lightly) with just a bit of oil just before I pull it off the grill. It gives the skin that last little special crunch.

Also try my copycat of the crazy-good fried chicken from Church’s, also made using the Vortex!

Kentucky Kernel 'Fried' Chicken using the Vortex
Print Pin
5 from 1 vote

Kentucky Kernel ‘Fried’ Chicken using the Vortex

Perfectly juicy, crunchy skin, crazy good fried chicken flavor without all of the oil.
Course Main
Cuisine American
Keyword fried chicken, Vortex
Prep Time 15 minutes
Cook Time 1 hour
Total Time 1 hour 15 minutes
Servings 2 servings
Calories 4kcal
Author Mike

Ingredients

Instructions

  • Fire up your Kettle grill with the Vortex loaded with charcoal. Don’t start cooking until the coals are all lit and starting to ash over.
  • Rinse the chicken and pat dry.
  • Pour the seasoned flour mixture into a pie pan or shallow bowl.
  • Coat chicken completely in the mixture.
  • Transfer chicken to the grill along the edges, skin-side up.
  • Cover and cook for 40 minutes, turning the lid 90 degrees every 15 minutes.
  • Lightly brush the chicken with a little vegetable oil. Use caution as the grill will be hot.
  • Cover and cook another 5 minutes or until the chicken hits 160 F.
  • Remove and let rest and come to 165 F before serving.

Notes

I prefer chicken thighs for this recipe but you can use your favorite cuts.

Nutrition

Calories: 4kcal | Protein: 1g | Fat: 1g | Saturated Fat: 1g | Cholesterol: 2mg | Sodium: 1mg | Potassium: 4mg | Vitamin A: 3IU | Vitamin C: 1mg | Calcium: 1mg | Iron: 1mg

Nutritional values are approximate.

Garlic and Herb Marinated Chicken on the Char-Broil Big Easy

Note: This recipe was developed using the Char-Broil Big Easy Oil-Less Fryer. If you are cooking using the Char-Broil Smoker-Roaster Grill you should cook with the lid open and the temperature set to High. You might also need to adjust the cooking time.

Weber has a line of marinade mixes that you add juice to that are really, really good. And they’re perfect for flavoring chicken before cooking it on the Char-Broil Big Easy. I picked up a package of each and used them to marinate my favorite, split chicken breasts. The garlic and herb marinade is mixed with lemon juice to produce wonderfully seasoned chicken. A hint of garlic, a hint of lemon, and a mix of earthy herbs, this Garlic and Herb marinated chicken on the Char-Broil Big Easy is fantastic!

Garlic and Herb Marinaded Chicken on the Char-Broil Big Easy

Keep An Eye On Your Big Easy

Since the Big Easy cooks at a high temperature you do have to watch that your chicken doesn’t char. One way to help prevent that is to not use marinades containing substances that might burn, like sugar or honey. The other is to rinse the chicken before cooking. Now, you’re going to lose a bit of flavor doing that, but if like me you’re going to remove the skin before eating, it really doesn’t make that big of a difference. Garlic and Herb marinated chicken on the Char-Broil Big Easy is still going to be great.

Weber makes all sorts of great flavored Just Add Juice marinades. I’ve also made chicken marinated in their fantastic citrus herb and lemon pepper marinades.

Weber Marinades

It’s always a good idea to keep a few spare grease trays on hand for your Char-Broil Big Easy.

Love your Big Easy as much I love mine? Check out my Big Easy Add-Ons page and my free Big Easy eCookbook!

Garlic and Herb Marinaded Chicken on the Char-Broil Big Easy
Print Pin
5 from 1 vote

Garlic and Herb Marinated Chicken on the Char-Broil Big Easy

Delicious chicken ready in no time!
Course Main
Cuisine American
Keyword Big Easy, Char-Broil, chicken, marinade
Prep Time 4 hours
Cook Time 1 hour 20 minutes
Total Time 5 hours 20 minutes
Servings 4 servings
Calories 264kcal
Author Mike

Ingredients

Instructions

  • Place the chicken into a resealable bag or container.
  • Add marinade to taste. Toss to coat.
  • Seal and refrigerate for at least 4 hours, turning occasionally.
  • Fire up your Big Easy.
  • Transfer the chicken to the Big Easy basket.
  • Cook for approximately 20 minutes per pound or until it reaches 165 F as checked in several places.
  • Remove and let rest 10 minutes before serving.

Notes

I prefer to rinse the marinade off the outside of the chicken since it will tend to burn. The meat has already absorbed the flavors of the marinade.

Nutrition

Calories: 264kcal | Carbohydrates: 2g | Protein: 48g | Fat: 6g | Saturated Fat: 1g | Trans Fat: 1g | Cholesterol: 145mg | Sodium: 262mg | Potassium: 868mg | Fiber: 1g | Sugar: 1g | Vitamin A: 70IU | Vitamin C: 15mg | Calcium: 13mg | Iron: 1mg

Nutritional values are approximate.

Crispy Smoked Smashed Potatoes

I have a rule about firing up my Weber Smokey Mountain Smoker: never leave any empty space. The fire’s already going, might as well smoke as much as you can. I had a few corned beefs smoking, which meant I had some room left over, so I threw on a bag of red potatoes to make some crispy smoked smashed potatoes. After a few hours the potatoes were tender, ready for step 2: smashing. Later, when it was time for dinner, I placed the smashed potatoes onto a super hot griddle along with a little oil to crisp them up. Man, were they ever delicious! Crispy on the outside, tender on the inside, with a hint of smoke. A great side dish.

Crispy Smoked Smashed Potatoes

Load ‘Em Up!

I like my crispy smoked smashed potatoes topped like I’d top a baked potato: butter, sour cream, chopped crispy bacon and green onion. My wife, on the other hand, keeps hers simple by squirting them with a good dose of ketchup. No matter what you put on yours, you can’t go wrong. The smoke adds a nice different flavor that you just won’t get from the oven.

Also try my grilled Hasselback potatoes!

Crispy Smoked Smashed Potatoes
Print Pin
5 from 1 vote

Crispy Smoked Smashed Potatoes

Man, were these absolutely delicious! Crispy on the outside, tender on the inside, with a hint of smoke. A great side dish.
Course Side
Cuisine American
Keyword crispy, potatoes, smoked
Prep Time 10 minutes
Cook Time 2 hours 20 minutes
Total Time 2 hours 30 minutes
Servings 4
Calories 159kcal
Author Mike

Ingredients

Instructions

  • Fire up your smoker for smoking at 250 F. Use a lighter fruit food such as peach or apple.
  • Toss the potatoes with a bit of oil. Season well with salt and pepper.
  • Place potatoes on the smoker and smoke until tender, 1-2 hours depending on size.
  • Remove potatoes and let cool slightly.
  • Place potatoes onto a cutting board or solid flat surface. Take a large skillet (cast iron works great for this) and gently push down onto the potatoes, flattening them out.
  • To crisp the potatoes, add a little oil to the skillet you just used and place over high heat (I put the skillet on my grill).
  • Add the potatoes and crisp on one side, 5-10 minutes.
  • Flip and crisp the other side.
  • Serve hot.

Notes

Add your favorite baked potato toppings!

Nutrition

Calories: 159kcal | Carbohydrates: 36g | Protein: 4g | Fat: 1g | Saturated Fat: 1g | Sodium: 41mg | Potassium: 1032mg | Fiber: 4g | Sugar: 3g | Vitamin A: 16IU | Vitamin C: 20mg | Calcium: 23mg | Iron: 2mg

Nutritional values are approximate.

Copycat Applebee’s Classic Patty Melt

My wife requested that I make patty melts for dinner. So, I made patty melts for dinner. But not just my usual patty melts. No, it was time to bring out the big guns – a copycat of Applebee’s Classic Patty Melt. This is what a patty melt should be. Griddled patties, sautéed onions, a delicious sauce and of course, cheese. And thick bread. You have to have thick bread or you’ll end up with sandwich sadness. No one wants to have their patty melt fall apart when they take a bite. Man, how many times have I ordered a sandwich in a restaurant only to have it fall apart after a few bites? That’s when I had to adopt my ‘never put it down’ policy. I don’t need that policy with these!

Copycat Applebees Classic Patty Melt

The Sauce Sets This Sandwich Apart

The sauce for a copycat Applebee’s classic patty melt is best with a clove of roasted garlic mixed in. I roasted an entire head of garlic ahead of time. I squeezed out one clove for this recipe and saved the rest for something else. It really makes this Applebee’s Classic Patty Melt better than the rest, so don’t skip the effort.

Also check out my copycats of Steak’n Shakes Frisco Melt and Applebee’s Clubhouse grill.

Copycat Applebee's Classic Patty Melt
Print Pin
5 from 1 vote

Copycat Applebee’s Classic Patty Melt

This is what a patty melt should be. Griddled patties, sautéed onions, a delicious sauce and of course, cheese. And thick bread. You have to have thick bread or you’ll end up with sandwich sadness.
Course Main
Cuisine American
Keyword burgers, copycat
Prep Time 15 minutes
Cook Time 30 minutes
Total Time 45 minutes
Servings 2 servings
Calories 5722kcal

Equipment

Ingredients

Instructions

  • Fire up a grill or heat a skillet over medium-high heat.
  • Season the burger with salt, pepper and garlic powder and cook until done.
  • Meanwhile, melt 1 tablespoon of the butter in a medium skillet over medium-high heat and add the onion. Season with salt, pepper and garlic powder and sauté until softened.
  • Combine the mayo, garlic and mustard and slather on one side of each slice of bread.
  • Melt remaining 2 tablespoons of butter in a large skillet over medium-high heat.
  • Add the bread slices, mayonnaise mix side up, and swirl around to coat in the butter.
  • Add one slice of Swiss to two of the bread slices, and one slice of cheddar to the other.
  • Assemble sandwich by placing cooked patties on top of the two bread slices with Swiss, add the onions and then the top bread slices.

Notes

If you can’t find thick-cut Italian bread you can substitute Texas toast.

Nutrition

Calories: 5722kcal | Carbohydrates: 488g | Protein: 93g | Fat: 379g | Saturated Fat: 201g | Trans Fat: 3g | Cholesterol: 124mg | Sodium: 3860mg | Potassium: 2245mg | Fiber: 33g | Sugar: 289g | Vitamin A: 1169IU | Vitamin C: 8mg | Calcium: 559mg | Iron: 20mg

Nutritional values are approximate.

Pool Room Bologna Burgers

Back in my college years I spent (too much) time at a local pool hall. It was quite the dive and that’s putting it pretty nicely. But I loved it. It was smoky, greasy, and definitely not fru-fru. Beer, pool and a simple menu that fit the atmosphere perfectly. Now, the menu might not have included pool room bologna burgers, but it should have. These are the perfect no-frills sandwiches. Don’t be shy with the Pool Room sauce, either. It’s got a nice kick and it’s messy. Remember my motto: messy is tasty.

Pool Room Bologna Burgers

A Mighty Proper Burger

Make sure you have plenty of Pool Room sauce on hand. Slather up the bologna slices and buns real good. The biggest mistake would be to not achieve proper sauce dripping. It has to run down your chin, all over your hands, and down your arms. That’s why you don’t serve pool room bologna burgers with napkins – you’d need 40 of them. Grab a roll of paper towels instead.

I store my Pool Room sauce in cool squirt bottles. That way I can make awesome sauce designs on my burgers!

Also try my fried BBQ bologna sandwiches. Bologna on a burger or sandwich is a beautiful thing!

Pool Room Bologna Burgers
Print Pin
5 from 1 vote

Pool Room Bologna Burgers

These are the perfect no-frills sandwiches. Don’t be shy with the Pool Room sauce, either. It’s got a nice kick and it’s messy. Remember my motto: messy is tasty.
Course Main
Cuisine American
Keyword bologna, sandwich
Prep Time 5 minutes
Cook Time 10 minutes
Total Time 15 minutes
Servings 2 servings
Calories 306kcal
Author Mike

Equipment

Ingredients

  • 2 slices bologna nice and thick!
  • Ross’ Pool Room Hot Bologna sauce
  • 2 hamburger buns
  • 2 slices American cheese
  • 4 slices white onion
  • 4 slices tomato
  • ¼ cup iceberg lettuce leaves or shredded

Instructions

  • Heat a large skillet over medium high heat.
  • Add the bologna slices and sear on both sides.
  • Slather with the sauce and brown on both sides.
  • Toast buns if desired.
  • Slather buns with more sauce.
  • Add the bologna, cheese, onions, tomato and lettuce.

Notes

Serve with paper towels (or napkins, in a pinch).

Nutrition

Calories: 306kcal | Carbohydrates: 29g | Protein: 13g | Fat: 15g | Saturated Fat: 7g | Trans Fat: 1g | Cholesterol: 38mg | Sodium: 839mg | Potassium: 352mg | Fiber: 2g | Sugar: 7g | Vitamin A: 718IU | Vitamin C: 11mg | Calcium: 331mg | Iron: 2mg

Nutritional values are approximate.

Blue Cheese Vinaigrette

Wedge and Cobb salads are always my favorites. I can throw either one together in no time at all with a variety of ingredient. Whatever I have on hand. If I’m in a hurry I might grab a simple oil-and-vinegar dressing out of the pantry. But if I have a spare minute or two I like to make my own. Like this blue cheese vinaigrette. Easy to make using ingredients I almost always have on hand. It packs that nice blue cheese twang, along with a little hit of mustard. It was perfect on my simple wedge salad.

Blue Cheese Vinaigrette

Add A Little Smokiness

I like to use smoked pepper and salt when making this blue cheese vinaigrette. It adds a nice unexpected flavor. Subtle but definitely different than ‘normal’ salt and pepper.

I serve my dressings in squeeze bottles or sometimes dipping sauce bowls.

Also try my bacon buttermilk dressing or roasted red pepper vinaigrettes on a wedge salad. For something different, make my balsamic smoked honey vinaigrette.

Blue Cheese Vinaigrette
Print Pin
5 from 1 vote

Blue Cheese Vinaigrette

If I’m in a hurry I might grab a simple oil-and-vinegar dressing out of the pantry, but if I have a spare minute or two I like to make my own. Like this blue cheese vinaigrette. 
Course Dressing
Cuisine American
Keyword homemade salad dressing, vinaigrette
Prep Time 5 minutes
Total Time 5 minutes
Servings 8 servings
Calories 192kcal

Ingredients

Instructions

  • Whisk together the cheese, vinegar, and mustard.
  • While still whisking add the olive oil.
  • Season with salt and pepper.

Notes

Stir before serving.

Nutrition

Calories: 192kcal | Carbohydrates: 1g | Protein: 2g | Fat: 21g | Saturated Fat: 4g | Cholesterol: 6mg | Sodium: 140mg | Potassium: 28mg | Fiber: 1g | Sugar: 1g | Vitamin A: 66IU | Vitamin C: 1mg | Calcium: 46mg | Iron: 1mg

Nutritional values are approximate.