These roasted vegetable stuffed mushrooms may be one of my favorite summertime grilling ideas. It doesn’t really matter what vegetables you use, either. Just grab whatever vegetables are in season at the store, roast them on the grill, then spoon them into large mushroom caps. Add a bit of seasoning, a little cheese, place onto a cedar plank over a hot fire, and in no time at all you’ll have a great side dish.

That Great Cedar Aroma
Grilling (I usually use my Weber grill) on cedar planks can be a sensitive subject. Some folks really don’t care for it, others, like me, love it. I like the light flavor the planks can add. Specially to dishes like these roasted vegetable stuffed mushrooms. And it looks cool. And it makes the deck area smell great.
I have to admit that I’m cheap, so I re-use planks as much as I can. As long as you don’t burn them too much on one side, you can get a few uses from them. Don’t buy any el cheapo cedar planks for this or any other dish. Get the good stuff and you won’t ever look back. Cheap planks split, warm and have splinters. Good planks are thicker, stay flat and have smoother edges.

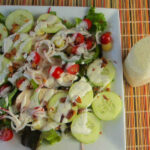
Also try my roasted beet and dill cucumber salad.
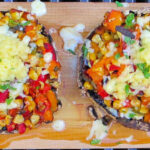
Roasted Vegetable Stuffed Mushrooms
Equipment
Ingredients
- ½ medium red bell pepper
- ½ medium orange bell pepper
- 1 ear sweet corn
- vegetable oil
- dried oregano crushed (optional)
- kosher salt to taste
- ground black pepper to taste
- 2 large portobello mushroom caps
- queso blanco shredded (or mozzarella)
- cilantro chopped, for garnish
Instructions
- Soak the cedar plank in water, if using.
- Fire up your grill for high-heat cooking.
- Lightly brush the peppers (I used whole peppers and saved the rest for later use) and corn with oil.
- Place over high heat and roast, turning often, until lightly charred and just tender.
- Remove from heat, let cool slightly, then chop the peppers and cut kernels from the ear of corn.
- Place vegetables into a bowl and season with oregano (if desired) and salt and pepper, to taste.
- Add the cedar plank and let it get hot and smoky, about 20 minutes.
- Reduce grill heat to medium.
- Using a spoon, gently scrape out the gills from the mushrooms.
- Lightly brush both sides of the mushrooms with oil.
- Place mushrooms on grill cap side up and grill 3 minutes. The mushrooms will start to sweat, but do not overcook them.
- Remove from heat and place onto the cedar plank.
- Spoon the vegetable mix into the mushrooms and place onto the grill.
- Grill for 20 minutes or until the mushroom is almost tender, watching to make sure the plank doesn’t catch on fire. If it does, spray it with water from a spray bottle.
- Add cheese and cook another 3-4 minutes until melted.
- Remove from heat, garnish with chopped cilantro, and serve.
Notes
Nutrition
Nutritional values are approximate.