Drunken Cajun Chicken Po Boy

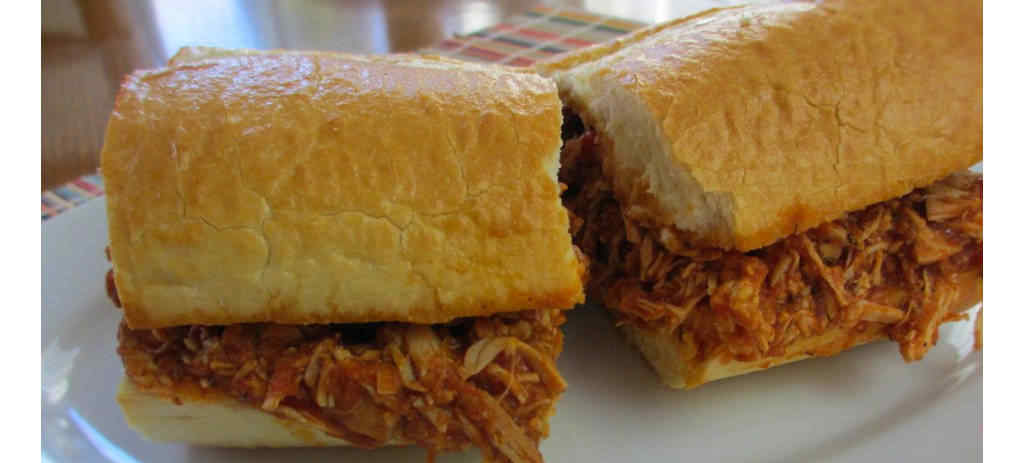
A place called Gumbo A Go-Go opened recently here in Indy (and sadly they’ve now closed!) . I’ve eaten there several times and have become totally addicted to their Datwich, a spicy shredded chicken sandwich. This is my first attempt at trying to match it. I’d say that this Drunken Cajun chicken po boy comes mighty darn close to the real thing. And I definitely ended up with a delicious sandwich!
Drunken Cajun Chicken Po Boy

Almost A Datwich

I will try again to duplicate the Datwich. I think I’m very close. Next time I’ll omit the tomatoes, add some broth, and more garlic! Until then I’m going to chow down on this spicy good Drunken Cajun chicken po boy sandwich! This is a mighty good sandwich on its own. It’s messy. Very messy. The chicken is very tender and some of the best flavored chicken I’ve had. It might not be a Datwich, but it’s great no matter what!

Also try my Creole beef debris po boy.
Drunken Cajun Chicken Po Boy
Print Pin
5 from 2 votes

Drunken Cajun Chicken Po’Boy

I’d say that this Drunken Cajun chicken po boy comes mighty darn close to the real thing. And I definitely ended up with a delicious sandwich!
Course Main
Cuisine Cajun
Keyword Cajun, chicken, sandwich
Prep Time 5 minutes
Cook Time 7 hours
Total Time 7 hours 5 minutes
Servings 4
Calories 328kcal

Ingredients

Instructions

  • Combine all of the seasons from the cayenne pepper to the basil to form a rub.
  • Rub mixture over the chicken.
  • Place chicken into a large Dutch oven over low heat.
  • Add remaining ingredients except the bread, plus any remaining rub.
  • Cover and cook 5-7 hours, stirring occasionally, until the chicken can be shredded with a fork.
  • Carefully remove the chicken and shred with a fork.
  • Use an immersion blender to blend the sauce left in the Dutch oven. Alternatively, pour the sauce into a counter top blender and puree, being careful not to burn yourself with the hot liquid.
  • Return shredded chicken to the pot.
  • Lightly toast the bread.
  • Cut in half lengthwise and top with the meat mixture.
  • Cut in halves and serve.

Notes

If using a blender, start out slowly as hot liquids will expand (or explode). Cover the top tightly. You can also let the liquid cool slightly before blending to help ensure it doesn’t explode.

Nutrition

Calories: 328kcal | Carbohydrates: 8g | Protein: 49g | Fat: 8g | Saturated Fat: 2g | Trans Fat: 1g | Cholesterol: 145mg | Sodium: 419mg | Potassium: 954mg | Fiber: 1g | Sugar: 1g | Vitamin A: 868IU | Vitamin C: 7mg | Calcium: 48mg | Iron: 2mg

Nutritional values are approximate.
Italian Pasta Salad

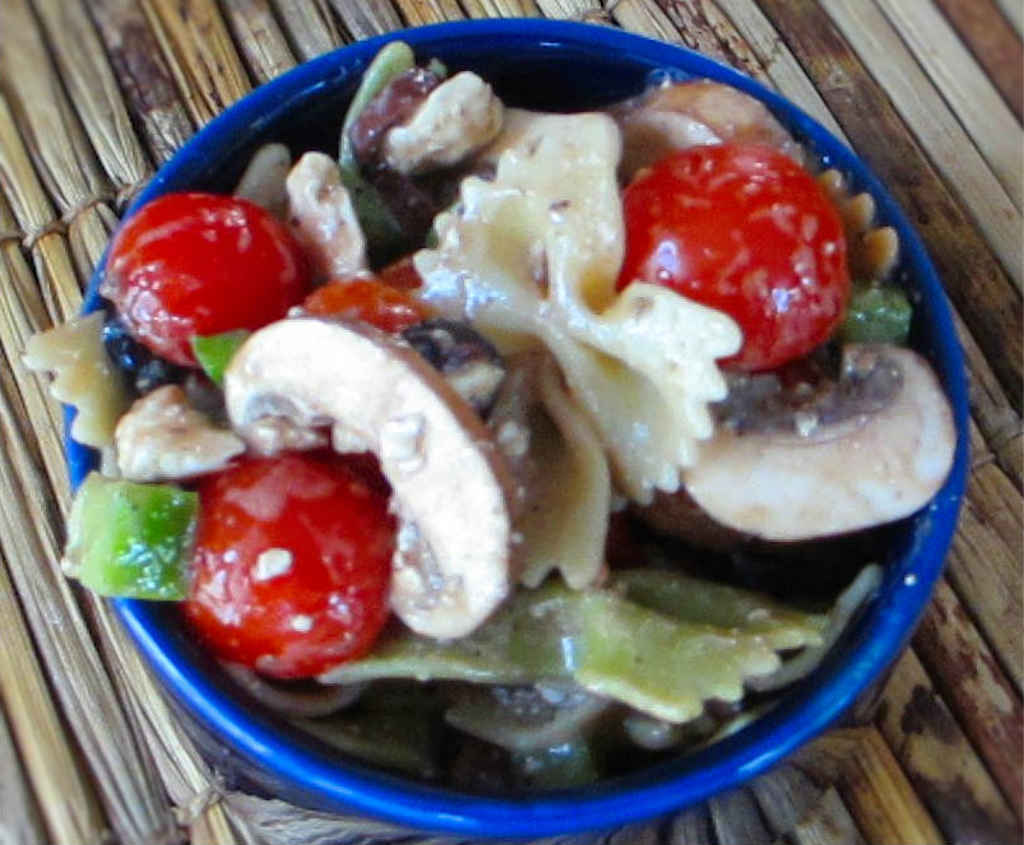
I’ve been on a pasta and potato salad kick lately. The beauty of salads is that I can make them in the morning when it is still cool out. Then, there’s no additional work at dinner time. Perfect! But that doesn’t mean I want something boring. This Italian pasta salad is nice and easy to make. And it’s definitely not boring!

Italian Pasta Salad

This Italian pasta salad has all sorts of yummy fresh things in it. Even with the pasta it still feels light. It’s a great salad to make in the evening and let it ‘get happy’ in the fridge overnight. Pack it into a cooler and you have the perfect side salad.

I almost always use Blue Plate mayonnaise in the dishes I make. I think it is the best around. If you can’t find it locally you can pick it up online for a fair price.

Also try my roasted red pepper pasta salad.

Italian Pasta Salad
Print Pin
4 from 1 vote

Italian Pasta Salad

The beauty of salads is that I can make them in the morning when it is still cool out. Then, there’s no additional work at dinner time. Perfect!
Course Side Dish
Cuisine American
Keyword Italian, pasta salad
Prep Time 10 minutes
Cook Time 15 minutes
Total Time 25 minutes
Servings 10
Calories 259kcal
Author Paula Deen

Ingredients

Instructions

  • Cook pasta per package instructions.
  • Drain well and let cool.
  • Transfer to a large bowl.
  • Add the tomatoes, mushrooms, olives and bell pepper to the pasta and fold to combine.
  • Whisk together the salad dressing, mayo, and sugar.
  • Add to the pasta mixture and fold to combine.
  • Season with salt and pepper. You may have to add a bit more dressing the next morning after the salad sits in the fridge.

Notes

You can use a sugar substitute in this salad.

Nutrition

Calories: 259kcal | Carbohydrates: 42g | Protein: 7g | Fat: 6g | Saturated Fat: 1g | Trans Fat: 1g | Cholesterol: 2mg | Sodium: 189mg | Potassium: 293mg | Fiber: 2g | Sugar: 8g | Vitamin A: 229IU | Vitamin C: 17mg | Calcium: 27mg | Iron: 1mg

Nutritional values are approximate.

Homemade Italian Vinaigrette

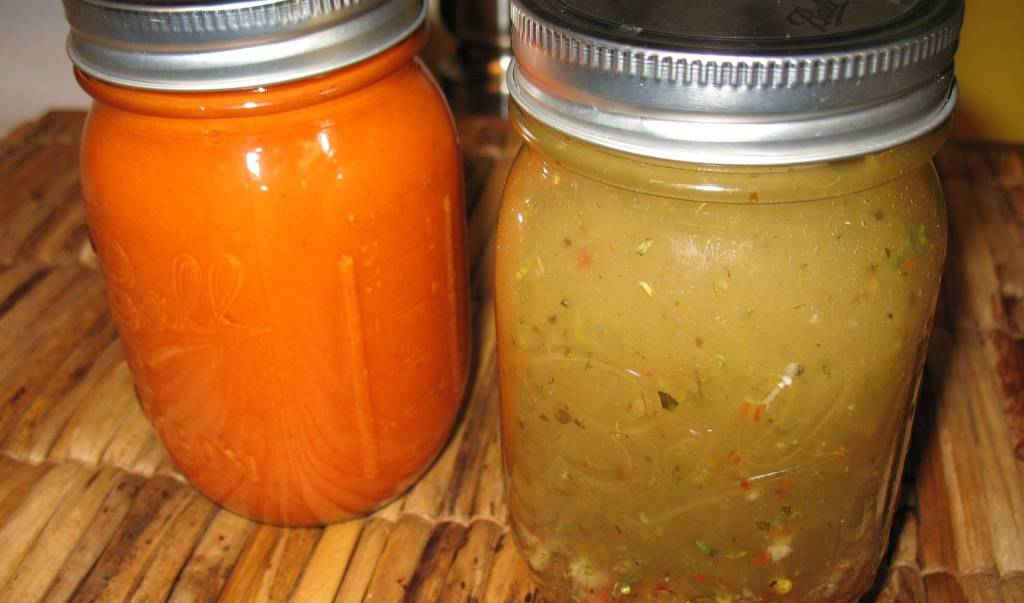
This homemade Italian vinaigrette (on the right in the photo) is my favorite salad dressing. It looks great and tastes great and it is so easy to make. I sometimes find that store-bought dressings can be a bit too vinegary. The beauty of making my own versions at home is that I can easily adjust the amount of vinegar. This has the right balance of vinegar and spices. I love it.

Homemade Catalina and Italian Salad Dressings

Better With Time

This homemade Italian vinaigrette gets better with time as the flavors ‘get happy’. I like to give the dried spices time to flavor the dressing. Make sure you give it a good, long shake before serving.

Shown on the left is my homemade Catalina dressing.

Check out my new site, Dress My Salad, for more great salad dressing ideas!

Homemade Catalina and Italian Salad Dressings
Print Pin
5 from 1 vote

Homemade Italian Vinaigrette

This homemade Italian vinaigrette (on the right in the photo) is my favorite salad dressing. It looks great and tastes great and it is so easy to make. I sometimes find that store-bought dressings can be a bit too vinegary.
Course Salad Dressing
Cuisine American
Keyword homemade salad dressing, Italian, vinaigrette
Prep Time 5 minutes
Cook Time 5 minutes
Total Time 10 minutes
Servings 2 cups
Calories 1499kcal

Ingredients

Instructions

  • Place all ingredients into a pint Mason jar and shake well.

Notes

Always stir again or shake before serving.

Nutrition

Calories: 1499kcal | Carbohydrates: 8g | Protein: 3g | Fat: 164g | Saturated Fat: 23g | Cholesterol: 3mg | Sodium: 109mg | Potassium: 182mg | Fiber: 2g | Sugar: 2g | Vitamin A: 666IU | Vitamin C: 22mg | Calcium: 120mg | Iron: 2mg

Nutritional values are approximate.
Pimento Olive Dip

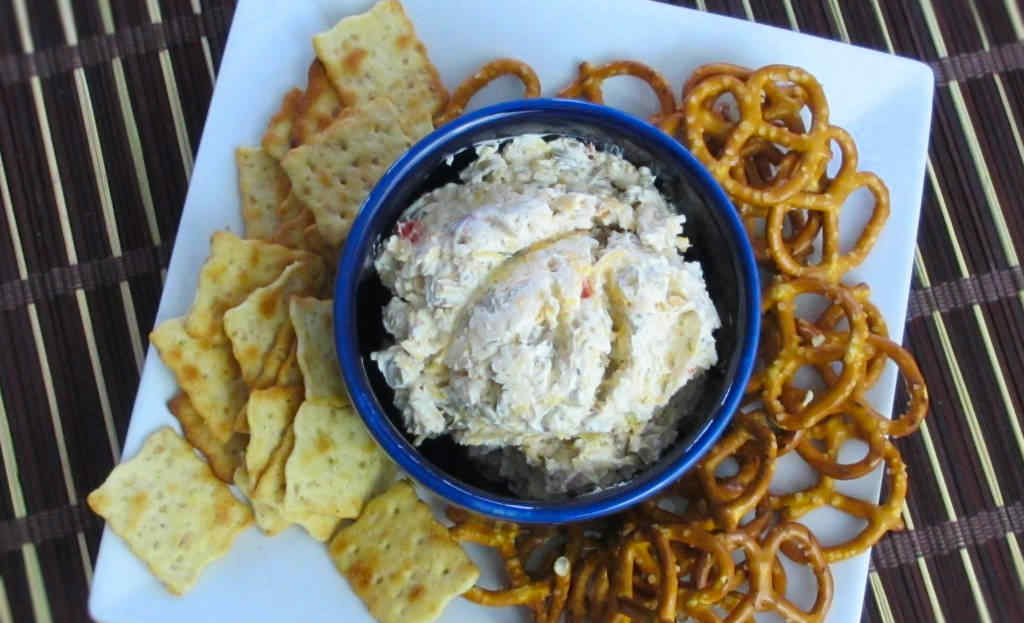
My wife loves olives, so when I ran across this pimento olive dip recipe I had to make it. Besides the great salty brininess of the olives, this dip has all sorts of great cheeses mixed in. An easy seasoning mix brings it all together. This dip is creamy, and a little on the thicker side.

Pimento Olive Dip

This pimento olive dip is fairly olivey (olive-ish?). It was great with something salty to dip into it, like pretzels or crackers. As creamy as this is, it’s still thick. So use something thick for dipping.

I highly recommend that you shred or grate your own cheese at home. Don’t buy the pre-shredded or pre-grated stuff. It has stuff added to it to keep it from sticking together. That ‘stuff’ affects how the cheese melts. Shred it yourself and use the good stuff.

Also try my creamy bacon cheese dip.

Pimento Olive Dip
Print Pin
4 from 1 vote

Pimento Olive Dip

If you love olives, this dip is for you!
Course Appetizer
Cuisine American
Keyword dip, olives, pimento, pimiento
Prep Time 5 minutes
Cook Time 15 minutes
Total Time 20 minutes
Servings 8
Calories 199kcal

Equipment

Ingredients

Instructions

  • Combine all ingredients and refrigerate.
  • Let set at room temperature for 15 minutes before serving.

Notes

Refrigerate any leftovers but let come to room temperature again before serving.

Nutrition

Calories: 199kcal | Carbohydrates: 1g | Protein: 7g | Fat: 18g | Saturated Fat: 8g | Trans Fat: 1g | Cholesterol: 38mg | Sodium: 351mg | Potassium: 59mg | Fiber: 1g | Sugar: 1g | Vitamin A: 413IU | Vitamin C: 1mg | Calcium: 231mg | Iron: 1mg

Nutritional values are approximate.

Pepperoni Pull-Apart Bread

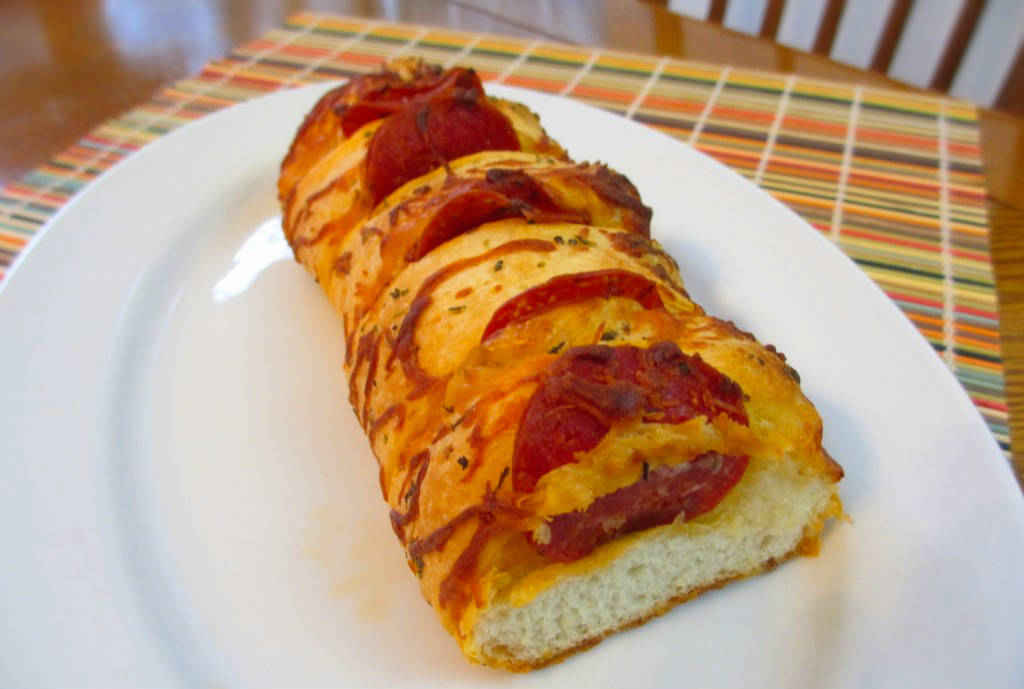
Oh my goodness this pepperoni pull-apart bread is yummy. Perfect as a side for a spaghetti dinner. Or any dish for that matter. It’s like garlic bread but on a whole new level. Nothing but delicious and crazy easy to make. The insides are nice and pillowy soft. The outside gets a bit of a crust to it. A nice crunch. Of course there’s cheese. Not a ton but you’ll notice it. And glorious pepperoni. Not enough to call this a pizza, but the flavor is there and that’s what we’re after.

Pepperoni Pull-Apart Bread

Great Hot Out Of The Oven

This bread is dangerously good. You’ve been warned! You won’t be able to stop eating it. It’s totally irresistible hot-out-of-the-oven.

If you like pull-apart bread, but want a little more kick than pepperoni, try our roasted jalapeno pull-apart bread. Or try our ham-and-cheese sandwich pull-apart. It’s a great way to make big sandwich in no time at all. For breakfast, make a pan of bacon biscuit pull-aparts.

Pepperoni Pull-Apart Bread
Print Pin
5 from 1 vote

Pepperoni Pull-Apart Bread

Oh my goodness this pepperoni pull-apart bread is yummy. Perfect as a side for a spaghetti dinner. Or any dish for that matter. It’s like garlic bread but on a whole new level. Nothing but delicious and crazy easy to make.
Course Bread
Cuisine American
Keyword bread, pepperoni
Prep Time 5 minutes
Cook Time 25 minutes
Total Time 30 minutes
Servings 6
Calories 37kcal

Equipment

Ingredients

  • 1 loaf French bread
  • pepperoni slices
  • 2 tablespoons butter melted
  • ½ teaspoon Italian seasoning
  • ¼ cup cheddar cheese shredded
  • ¼ cup Mozzarella cheese shredded

Instructions

  • Using a sharp knife, cut vertical incisions into the bread every 3/4".
  • Cut almost through the dough, but not all the way.
  • Stuff pepperoni slices, to taste, into the slits.
  • Combine the butter and Italian seasoning and brush over the top of the dough and into the slits.
  • Sprinkle cheese over top of dough and into the slits.
  • Heat in 350 F oven until the cheese has melted.

Notes

Also great with pepper jack or Swiss cheeses.

Nutrition

Calories: 37kcal | Carbohydrates: 1g | Protein: 2g | Fat: 3g | Saturated Fat: 2g | Cholesterol: 9mg | Sodium: 65mg | Potassium: 17mg | Fiber: 1g | Sugar: 1g | Vitamin A: 90IU | Vitamin C: 1mg | Calcium: 66mg | Iron: 1mg

Nutritional values are approximate.
Cowboy Caviar

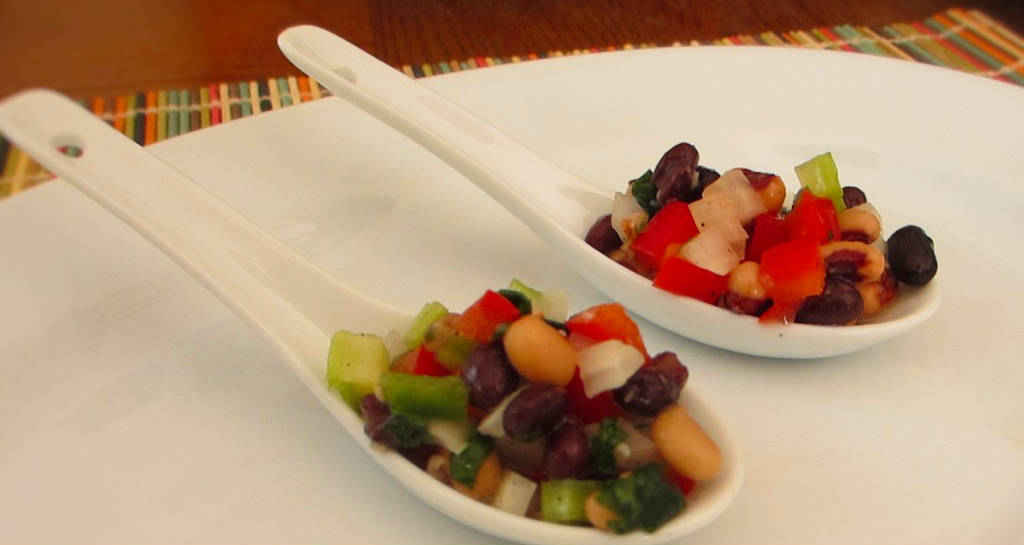
This marinated black-eyed pea salad (aka Cowboy Caviar) is absolutely fantastic. It is great as a side for grilled burgers or dogs… anything! The celery adds a really nice crunch. Take this along on your next pitch-in and everyone will love it. Like me, they will think that it’s the best kicked up pea salad ever.

Cowboy Caviar

A Great Fresh Bite

This recipe for Cowboy Caviar came from the July 2013 issue of Chile Pepper magazine (no longer in publication). The recipe was originally from Liberty’s Kitchen in New Orleans, which is committed to helping teach under-served youth in a culinary setting. So not only do they have a great mission, they also have a great black-eyed pea salad!

Also try my Buffalo Cowboy caviar and my Georgia caviar recipes.

Cowboy Caviar
Print Pin
4 from 1 vote

Cowboy Caviar

This marinated black-eyed pea salad (aka Cowboy Caviar) is absolutely fantastic. It is great as a side for grilled burgers or dogs… anything! 
Course Side
Cuisine American
Keyword bean salad
Prep Time 15 minutes
Cook Time 5 minutes
Total Time 20 minutes
Servings 10
Calories 280kcal

Equipment

Ingredients

For the cilantro lime vinaigrette

For the salad

  • 3 15 ounce black eyed peas rinsed and drained
  • 1 large sweet onion diced
  • 1 red bell pepper diced
  • 4 stalks celery diced
  • 2 tablespoons fresh cilantro chopped
  • Cilantro lime vinaigrette (from above)

Instructions

  • Prepare the vinaigrette by placing all ingredients into a bowl and whisking well. You can also puree them in a blender.
  • Make the salad by combining all ingredients and tossing to coat.

Notes

Give the salad another stir before serving.

Nutrition

Calories: 280kcal | Carbohydrates: 35g | Protein: 10g | Fat: 12g | Saturated Fat: 1g | Trans Fat: 1g | Sodium: 254mg | Potassium: 484mg | Fiber: 9g | Sugar: 10g | Vitamin A: 557IU | Vitamin C: 23mg | Calcium: 48mg | Iron: 3mg

Nutritional values are approximate.
Cheesy Garlic Bread

This is the easiest way to make a big ole loaf of yummy, cheesy garlic bread. Every slice is loaded with butter and cheese goodness. You can make these loaves ahead of time and bake them later. You can cut them thick, or you can cut them thin. If you end up cutting them real thin you might have to double or triple the ingredients for the ‘toppings’. Heck, you might want to double or triple them anyways because they’re great. And more cheese is more better!

Cheesy Garlic Bread

Kick It Up

You can kick up this cheesy garlic bread by substituting pepper jack cheese and adding a few pickled jalapeno slices. I sometimes make this using a baguette for smaller, almost crouton-sized slices of cheese bread.

Also try my gotta-have-it garlic bread and some gorgonzola garlic bread.

Cheesy Garlic Bread
Print Pin
5 from 1 vote

Cheesy Garlic Bread

This is the easiest way to make a big ole loaf of yummy, cheesy garlic bread. Every slice is loaded with butter and cheese goodness. You can make these loaves ahead of time and bake them later. 
Course Side
Cuisine American
Keyword cheesy, garlic bread
Prep Time 5 minutes
Cook Time 25 minutes
Total Time 30 minutes
Servings 4
Calories 385kcal

Ingredients

  • 1 loaf French bread
  • 4 ounces Mozzarella cheese sliced thin
  • 4 tablespoons butter
  • ½ teaspoon garlic powder or more, to taste
  • ½ teaspoon dried parsley

Instructions

  • Preheat oven to 350 F.
  • Make vertical cuts in the bread every inch or so, cutting to within 1/2″ of the bottom of the loaf but not all the way through.
  • Transfer bread to a large piece of aluminum foil.
  • Insert cheese slices into the cuts in the bread.
  • Melt the butter. Stir in the garlic powder and parsley. Brush over the bread and into the slits.
  • Wrap up the bread in the foil and transfer to the oven.
  • Bake 15 minutes.
  • Open foil and bake another 5 minutes until crispy.
  • Serve sliced or whole and let your guests pull it apart.

Notes

Pepper jack is great too!

Nutrition

Calories: 385kcal | Carbohydrates: 58g | Protein: 19g | Fat: 9g | Saturated Fat: 5g | Cholesterol: 24mg | Sodium: 707mg | Potassium: 175mg | Fiber: 2g | Sugar: 4g | Vitamin A: 217IU | Vitamin C: 1mg | Calcium: 205mg | Iron: 4mg

Nutritional values are approximate.

Spicy Roasted Baby Potatoes

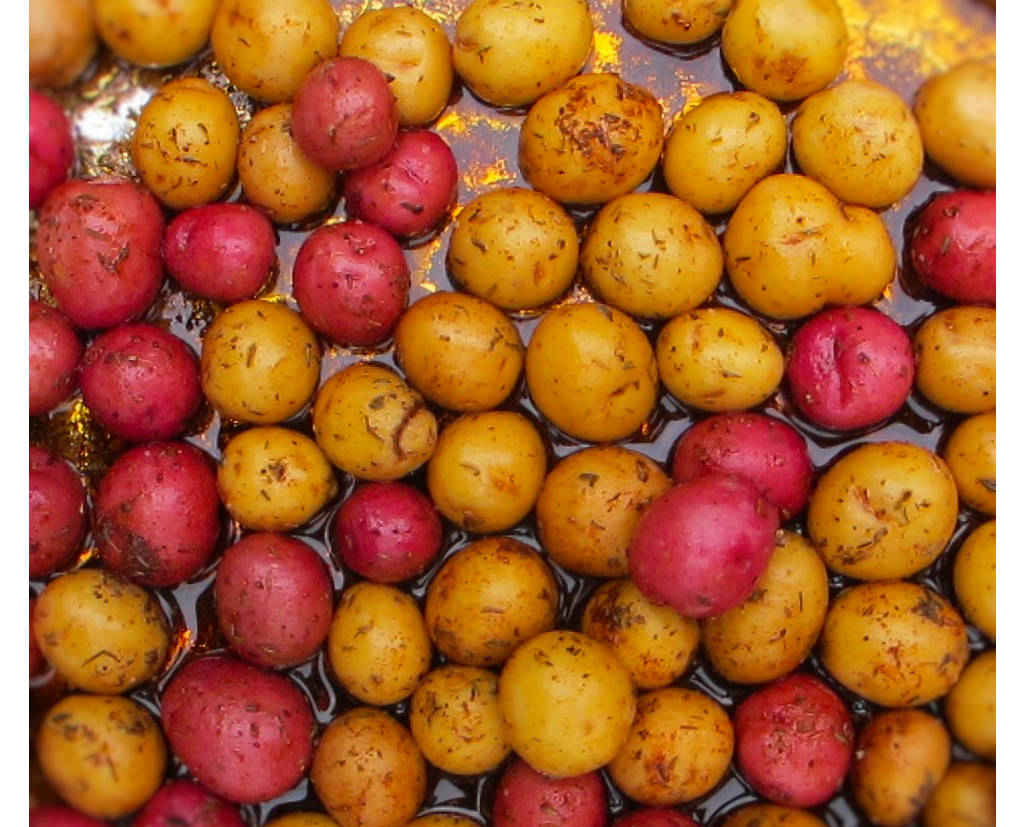
Baby potatoes have such tremendous potato flavor. And they cook very quickly, making them great to make on the grill, like these spicy roasted baby potatoes. These little bites-of-nothing-but-goodness pack some mighty nice kick. Just like I like it. And don’t fear the spicy, either. We’re not talking ‘oh my! my mouth is on fire’ spicy. There’s just enough to wake up your taste buds.

You can substitute fingerling potatoes too, just make sure they are all about the same size or they won’t cook evenly. You want tender, tasty baby potatoes. You don’t want to bite into a hard potato. Ever. The more they are the same size, the better they’ll be!

Spicy Roasted Baby Potatoes

Add A Little Smokiness

For a little smokiness in your spicy roasted baby potatoes, substitute chipotle powder for the chili powder. You’ll still get a nice kick. And you’ll get just the right hint of smoke. If you’re cooking these on a gas grill, people will think you used charcoal or wood!

Also try my grilled potato wedges.

Spicy Roasted Baby Potatoes
Print Pin
5 from 1 vote

Spicy Roasted Baby Potatoes

Baby potatoes have such tremendous potato flavor. And they cook very quickly, making them great to make on the grill, like these spicy roasted baby potatoes. These little bites-of-nothing-but-goodness pack some mighty nice kick. Just like I like it.
Course Side
Cuisine American
Keyword potatoes, roasted, spicy
Prep Time 5 minutes
Cook Time 25 minutes
Total Time 30 minutes
Servings 6
Calories 181kcal
Author Mike

Ingredients

Instructions

  • Set up your grill for indirect cooking.
  • Combine all ingredients in a large aluminum pan.
  • Cook over indirect heat until potatoes are tender, stirring occasionally, for about 25 minutes.

Notes

Left over potatoes can be stored in the fridge and reheated in the oven or on a grill.

Nutrition

Calories: 181kcal | Carbohydrates: 27g | Protein: 3g | Fat: 7g | Saturated Fat: 6g | Sodium: 31mg | Potassium: 665mg | Fiber: 4g | Sugar: 1g | Vitamin A: 411IU | Vitamin C: 30mg | Calcium: 29mg | Iron: 2mg

Nutritional values are approximate.
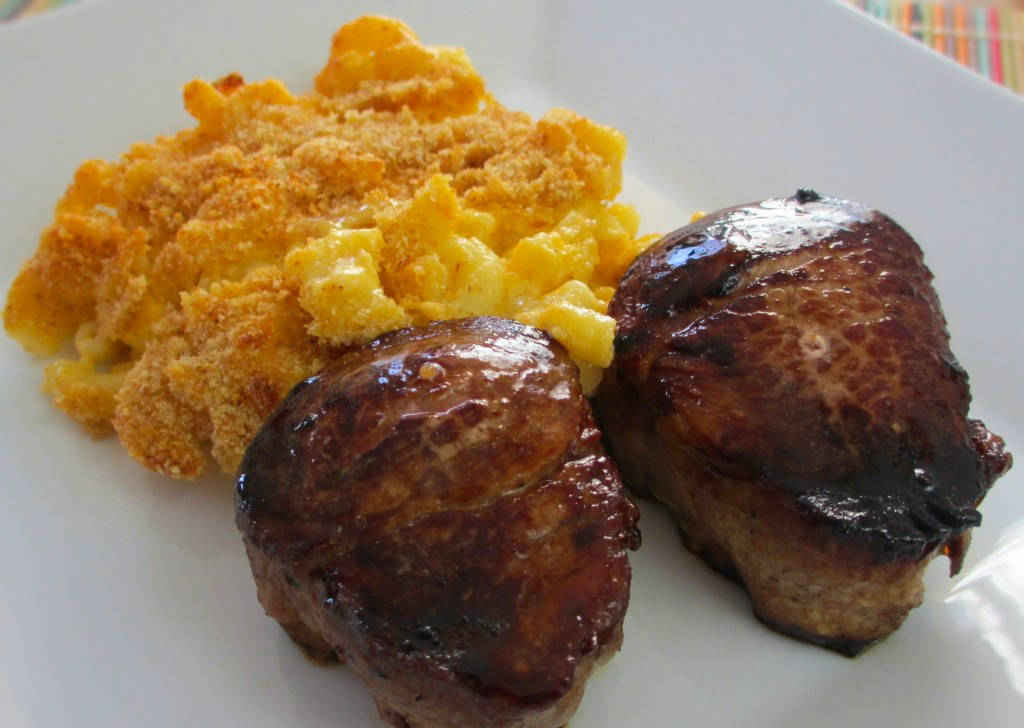
Balsamic Glazed Pork Medallions

I found this recipe for balsamic glazed pork medallions on a blog I follow, A Culinary Journey with Chef Dennis. I highly recommend you pay his blog a visit, and follow it. Chef Dennis’ original recipe was to use this great glaze on pork chops. We’re not big pork chop eaters, so instead I tried this on pork medallions. The end result was fantastic.

Balsamic Glazed Pork Medallions

A Wonderful Rich Flavor

Chef Dennis introduced me to Tamari sauce with this recipe for balsamic glazed pork medallions, and I’m glad he did. Tamari is fantastic. I now use it instead of soy sauce in any recipe I make that requires cooking. Tamari is a deeper brown and thicker than soy sauce. It has a richer, deeper flavor. If you are cooking, use Tamari. Keep soy sauce around on the table for drizzling over rice or Asian dishes.

Also try my delicious bacon wrapped pork medallions.

Balsamic Glazed Pork Medallions
Print Pin
5 from 1 vote

Balsamic Glazed Pork Medallions

The glaze on the pork is just amazing.
Course Main
Cuisine American
Keyword grilled, pork chops
Prep Time 4 hours
Cook Time 20 minutes
Total Time 4 hours 20 minutes
Servings 4
Calories 708kcal

Ingredients

Instructions

  • Combine all but the pork.
  • Place pork into a resealable baggie or container and add all but 2 tablespoons of the marinade. Let marinate for 2-4 hours.
  • Heat a large skillet over high heat. I prefer cast iron for this. Add in the pork (first shaking off any excess marinade) and sear on both sides.
  • Reduce heat and cook until pork reaches 145 F. If you let them cook above 155 F they will tend to get tough.
  • Remove pork and let rest.
  • Meanwhile, add reserved marinade to the skillet and stir, cooking for 1 minutes. Drizzle over pork and serve.

Notes

The marinade is also great for chicken.

Nutrition

Calories: 708kcal | Carbohydrates: 33g | Protein: 96g | Fat: 19g | Saturated Fat: 6g | Trans Fat: 1g | Cholesterol: 295mg | Sodium: 3061mg | Potassium: 1961mg | Fiber: 1g | Sugar: 27g | Vitamin A: 84IU | Vitamin C: 1mg | Calcium: 100mg | Iron: 5mg

Nutritional values are approximate.
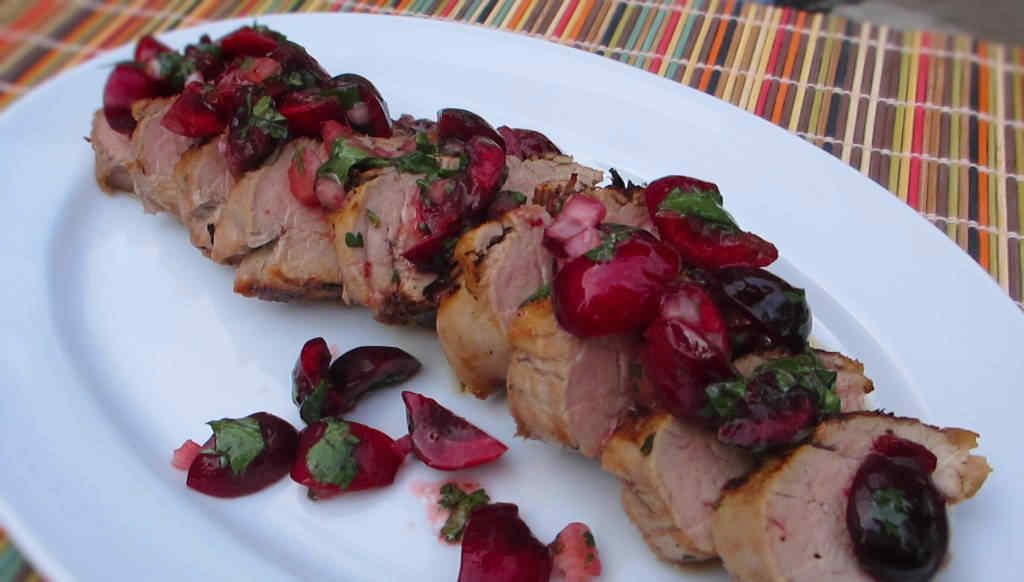
Grilled Pork Tenderloin with Cherry Salsa

I have to say that this grilled pork tenderloin with cherry salsa not only came out tasting fantastic, it was mighty pretty looking too! The cherry salsa on top really made this dish, and would also go well on grilled crostinis. The pork was crazy tender, tasty and juicy. All-in-all, this was a great, simple dish to make that far exceeded my expectations! I was striving to up my grilled pork game. And I was looking to improve my plating skills. Well, I think I got both down pretty darned good with this dish! And ya know, it wasn’t that hard to do, either!

Grilled Pork Tenderloin with Cherry Salsa

A Delicious Marinade

I’d use the marinade portion of this recipe for grilled pork tenderloin with cherry salsa on other meats. It’d be great on pork chops or chicken. This is a great reason to fire up my Weber grill (not that I needed an excuse!).

I know some folks (like my wife) aren’t used to pork having a slight pink color inside. That’s safe now. You don’t have to over-cook your pork like before to make sure it’s ok to eat. Well, ok but not good because in the old days you really had to overcook it. Not any more.

Also check out my grilled pork tenderloin with a cantaloupe salsa.

Grilled Pork Tenderloin with Cherry Salsa
Print Pin
5 from 1 vote

Grilled Pork Tenderloin with Cherry Salsa

I have to say that this grilled pork tenderloin with cherry salsa not only came out tasting fantastic, it was mighty pretty looking too! The cherry salsa on top really made this dish, and would also go well on grilled crostinis. 
Course Main
Cuisine American
Keyword grilled, pork, salsa
Prep Time 15 minutes
Cook Time 45 minutes
Total Time 1 hour
Servings 6
Calories 868kcal

Equipment

Ingredients

  • 1 cup cilantro chopped roughly, divided
  • ½ cup shallots minced, divided (use red onion if you don’t have shallots on hand)
  • 6 tablespoons lime juice about 3 limes, divided
  • ¼ cup vegetable oil
  • 2 pork tenderloins trimmed
  • ½ pound cherries stemmed, pitted, halved
  • 1 jalapeño minced
  • 1 tablespoon extra virgin olive oil
  • Kosher salt
  • ground black pepper

Instructions

  • Place 1/2 cup of the cilantro, 1/4 cup of the shallots, 4 tablespoons of the lime juice and the vegetable oil in a large resealable baggie.
  • Seal and shake to combine.
  • Add pork tenderloins to the baggie.
  • Reseal, and toss to coat.
  • Let marinate for 15-30 minutes at room temperature.
  • In a medium bowl, combine the remaining cilantro, shallots and lime juice.
  • Add the cherries, jalapeno and olive oil.
  • Mix and season with salt and pepper to taste.
  • Sear tenderloins over direct heat on the grill.
  • Then continue cooking over indirect heat until the internal temperatures reach 145-150 F.
  • Remove from heat and let rest 10 minutes.
  • Slice thin and serve topped with cherry salsa.

Notes

You can omit the jalapeno if you want but the salsa isn’t that spicy.

Nutrition

Calories: 868kcal | Carbohydrates: 11g | Protein: 126g | Fat: 33g | Saturated Fat: 15g | Trans Fat: 1g | Cholesterol: 393mg | Sodium: 318mg | Potassium: 2563mg | Fiber: 2g | Sugar: 7g | Vitamin A: 250IU | Vitamin C: 12mg | Calcium: 53mg | Iron: 6mg

Nutritional values are approximate.